博文目录
- 写在前面
- 正文
- 普通的二进制计数器
- 电路设计
- 行为仿真
- 普通的格雷码计数器
- 电路设计
- 行为仿真
- LFSR
- 电路设计
- 行为仿真
- 多功能计数器
- 电路设计
- 行为仿真
- 生成语句实现方式
- 电路设计
- 行为仿真
- 注意事项
- 参考资料
- 交个朋友
写在前面
相关博文
博客首页
注:学习交流使用!
正文
多功能计数器,英文名为:Versatile Counter;所谓多功能,这里包括二进制计数,格雷码计数以及线性反馈移位寄存器(LFSR)三种,本文通过从普通的计数器开始,也就是单个功能的计数器开始,一步一步过渡到多功能计数器。
作为对以下相关博文的延伸练习:
Verilog设计实例(1)线性反馈移位寄存器(LFSR)
FPGA设计心得(8)Verilog中的编译预处理语句
普通的二进制计数器
这个作为开头,不必多说,计数就完事了。
电路设计
设计文件:
`timescale 1ns/1ps
//
// Engineer: Reborn Lee
// Module Name: binary counter
// Additional Comments:
//
//
module binary_counter#(parameter N_BITS = 4)(
	input i_clk,
	input i_rst,
	output [N_BITS - 1 : 0] o_cnt,
	output o_cnt_done
	);

	reg [N_BITS - 1 : 0] bin_cnt = 0;
	always@(posedge i_clk) begin
		if(i_rst) begin
			bin_cnt <= 0;
		end
		else begin
			bin_cnt <= bin_cnt + 1;
		end
	end

	assign o_cnt_done = (bin_cnt == 0)? 1:0;
	assign o_cnt = bin_cnt;


endmodule
行为仿真
tb文件:
`timescale 1ns/1ps
module bin_cnt_tb;

	parameter N_BITS = 4;
	reg i_clk;
	reg i_rst;
	wire [N_BITS - 1 : 0] o_cnt;
	wire o_cnt_done;

	initial begin
		i_clk = 0;
		forever begin
			# 2 i_clk = ~ i_clk;
		end
	end

	initial begin
		i_rst = 1;

		# 8
		i_rst = 0;

	end

	binary_counter #(.N_BITS(N_BITS))
	inst_bin_cnt(
		.i_rst(i_rst),
		.i_clk(i_clk),
		.o_cnt(o_cnt),
		.o_cnt_done(o_cnt_done)
		);
endmodule
仿真图:

普通的格雷码计数器
任意位宽的格雷码计数器,实现的方式通常是设计一个普通的二进制计数器,同时将计数结果转化为格雷码。
二进制与格雷码的转换方式,详情见:格雷码和二进制转换。
为了方便给出原理图:

伪代码描述为:
assign gray_value = binary_value ^ (binary_value>>1);
或者:
assign gray_cnt = { bin_cnt[N_BITS - 1], bin_cnt[N_BITS - 1 : 1]^bin_cnt[N_BITS - 2 : 0]};
电路设计
一种简单的设计方式为:
`timescale 1ns / 1ps
//
// Engineer: Reborn Lee
// Create Date: 2020/06/02 13:46:10
// Module Name: gray_counter
// Additional Comments: common gray counter
//
//


module gray_counter #(parameter N_BITS = 4)(
	input i_clk,
	input i_rst,
	output [N_BITS - 1 : 0] o_cnt,
	output o_cnt_done
    );

	reg [N_BITS - 1 : 0] bin_cnt = 0;
	reg [N_BITS - 1 : 0] gray_cnt;
	always@(posedge i_clk) begin
		if(i_rst) begin
			bin_cnt <= 0;
			gray_cnt <= 0;
		end
		else begin
			bin_cnt <= bin_cnt + 1;
			// translate binary counter into  gray counter
			gray_cnt <= bin_cnt ^ bin_cnt >>> 1;

			//or
			// gray_cnt <= { bin_cnt[N_BITS - 1], bin_cnt[N_BITS - 1 : 1]^bin_cnt[N_BITS - 2 : 0]};

			//or

			// for(int i = 0; i < N_BITS - 1; i = i + 1) begin
			// 	gray_cnt[i] <= bin_cnt[i+1]^bin_cnt[i];
			// end
			// gray_cnt[N_BITS - 1] <= bin_cnt[N_BITS - 1];

		end

	end

	assign o_cnt = gray_cnt;
	// or
	assign o_cnt_done = (gray_cnt == 0) ? 1 : 0;


endmodule
注释部分解释:
 			for(int i = 0; i < N_BITS - 1; i = i + 1) begin
				gray_cnt[i] <= bin_cnt[i+1]^bin_cnt[i];
			end
			gray_cnt[N_BITS - 1] <= bin_cnt[N_BITS - 1];
以及:
gray_cnt <= { bin_cnt[N_BITS - 1], bin_cnt[N_BITS - 1 : 1]^bin_cnt[N_BITS - 2 : 0]};
均在always块内,因此使用非阻塞赋值。
又和二进制计数在一起always内,且紧邻分布,因此计数相较于二进制慢一拍,但毫无影响(不影响计数总数)。
注: 三种二进制转换为格雷码的实现原理一致,效果等价。
行为仿真
TestBench设计:
`timescale 1ns/1ps
module gray_cnt_tb;

	parameter N_BITS = 4;
	reg i_clk;
	reg i_rst;
	wire [N_BITS - 1 : 0] o_cnt;
	wire o_cnt_done;

	initial begin
		i_clk = 0;
		forever begin
			# 2 i_clk = ~ i_clk;
		end
	end

	initial begin
		i_rst = 1;

		# 8
		i_rst = 0;

	end

	gray_counter #(.N_BITS(N_BITS))
	inst_gray_cnt(
		.i_rst(i_rst),
		.i_clk(i_clk),
		.o_cnt(o_cnt),
		.o_cnt_done(o_cnt_done)
		);
endmodule
行为仿真波形:

局部放大:


LFSR
这个请参考上篇博文,单独做了一篇博客:
Verilog设计实例(1)线性反馈移位寄存器(LFSR)
为了方便不跳转另外一个链接,这里给出设计:
电路设计
`timescale 1ns / 1ps
//
// Company:
// Engineer: Reborn Lee
// Create Date: 2020/06/01 12:50:38
// Design Name:
// Module Name: lfsr
// Revision 0.01 - File Created
// Additional Comments:
//
//


module lfsr #(parameter NUM_BITS = 3)(
   input i_Clk,
   input i_Enable,

   // data valid
   input i_Seed_DV,

   // Optional Seed Value
   input [NUM_BITS-1:0] i_Seed_Data,

   output [NUM_BITS-1:0] o_LFSR_Data,
   output o_LFSR_Done

    );

  // internal variables
  reg [NUM_BITS:1] r_LFSR = 0;
  reg              r_XNOR;


  // Purpose: Load up LFSR with Seed if Data Valid (DV) pulse is detected.
  // Othewise just run LFSR when enabled.
    always @(posedge i_Clk)
    begin
      if (i_Enable == 1'b1)
      begin
          if (i_Seed_DV == 1'b1)
            r_LFSR <= i_Seed_Data;
          else
            r_LFSR <= {r_LFSR[NUM_BITS-1:1],r_XNOR}; //left right
      end
    end

// Create Feedback Polynomials.  Based on Application Note:
  // http://www.xilinx.com/support/documentation/application_notes/xapp052.pdf
    always @(*)
    begin
      case (NUM_BITS)
        3: begin
          r_XNOR = r_LFSR[3] ^~ r_LFSR[2];
        end
        4: begin
          r_XNOR = r_LFSR[4] ^~ r_LFSR[3];
        end
        5: begin
          r_XNOR = r_LFSR[5] ^~ r_LFSR[3];
        end
        6: begin
          r_XNOR = r_LFSR[6] ^~ r_LFSR[5];
        end
        7: begin
          r_XNOR = r_LFSR[7] ^~ r_LFSR[6];
        end
        8: begin
          r_XNOR = r_LFSR[8] ^~ r_LFSR[6] ^~ r_LFSR[5] ^~ r_LFSR[4];
        end
        9: begin
          r_XNOR = r_LFSR[9] ^~ r_LFSR[5];
        end
        10: begin
          r_XNOR = r_LFSR[10] ^~ r_LFSR[7];
        end
        11: begin
          r_XNOR = r_LFSR[11] ^~ r_LFSR[9];
        end
        12: begin
          r_XNOR = r_LFSR[12] ^~ r_LFSR[6] ^~ r_LFSR[4] ^~ r_LFSR[1];
        end
        13: begin
          r_XNOR = r_LFSR[13] ^~ r_LFSR[4] ^~ r_LFSR[3] ^~ r_LFSR[1];
        end
        14: begin
          r_XNOR = r_LFSR[14] ^~ r_LFSR[5] ^~ r_LFSR[3] ^~ r_LFSR[1];
        end
        15: begin
          r_XNOR = r_LFSR[15] ^~ r_LFSR[14];
        end
        16: begin
          r_XNOR = r_LFSR[16] ^~ r_LFSR[15] ^~ r_LFSR[13] ^~ r_LFSR[4];
          end
        17: begin
          r_XNOR = r_LFSR[17] ^~ r_LFSR[14];
        end
        18: begin
          r_XNOR = r_LFSR[18] ^~ r_LFSR[11];
        end
        19: begin
          r_XNOR = r_LFSR[19] ^~ r_LFSR[6] ^~ r_LFSR[2] ^~ r_LFSR[1];
        end
        20: begin
          r_XNOR = r_LFSR[20] ^~ r_LFSR[17];
        end
        21: begin
          r_XNOR = r_LFSR[21] ^~ r_LFSR[19];
        end
        22: begin
          r_XNOR = r_LFSR[22] ^~ r_LFSR[21];
        end
        23: begin
          r_XNOR = r_LFSR[23] ^~ r_LFSR[18];
        end
        24: begin
          r_XNOR = r_LFSR[24] ^~ r_LFSR[23] ^~ r_LFSR[22] ^~ r_LFSR[17];
        end
        25: begin
          r_XNOR = r_LFSR[25] ^~ r_LFSR[22];
        end
        26: begin
          r_XNOR = r_LFSR[26] ^~ r_LFSR[6] ^~ r_LFSR[2] ^~ r_LFSR[1];
        end
        27: begin
          r_XNOR = r_LFSR[27] ^~ r_LFSR[5] ^~ r_LFSR[2] ^~ r_LFSR[1];
        end
        28: begin
          r_XNOR = r_LFSR[28] ^~ r_LFSR[25];
        end
        29: begin
          r_XNOR = r_LFSR[29] ^~ r_LFSR[27];
        end
        30: begin
          r_XNOR = r_LFSR[30] ^~ r_LFSR[6] ^~ r_LFSR[4] ^~ r_LFSR[1];
        end
        31: begin
          r_XNOR = r_LFSR[31] ^~ r_LFSR[28];
        end
        32: begin
          r_XNOR = r_LFSR[32] ^~ r_LFSR[22] ^~ r_LFSR[2] ^~ r_LFSR[1];
        end

      endcase // case (NUM_BITS)
    end // always @ (*)

    assign o_LFSR_Data = r_LFSR[NUM_BITS:1];

 	// Conditional Assignment (?)
 	assign o_LFSR_Done = (r_LFSR[NUM_BITS:1] == i_Seed_Data) ? 1'b1 : 1'b0;


endmodule
行为仿真
`timescale 1ns / 1ps
module lfsr_tb ();

  parameter c_NUM_BITS = 4;

  reg r_Clk = 1'b0;

  wire [c_NUM_BITS-1:0] w_LFSR_Data;
  wire w_LFSR_Done;

  lfsr #(.NUM_BITS(c_NUM_BITS)) LFSR_inst
         (.i_Clk(r_Clk),
          .i_Enable(1'b1),
          .i_Seed_DV(1'b0),
          .i_Seed_Data({c_NUM_BITS{1'b0}}), // Replication
          .o_LFSR_Data(w_LFSR_Data),
          .o_LFSR_Done(w_LFSR_Done)
          );

  always @(*)
    #10 r_Clk <= ~r_Clk;

endmodule // LFSR_TB
仿真波形:

多功能计数器
有了上面三种计数器的单独设计,下面该考虑组合起来了,是用什么样的方式组合?
用户可以选择,可以通过定义条件编译的方式,定义了某个宏就执行某种计数器,计数位宽可选择,通过参数化的方式实现。
电路设计
本设计用到了上面的三个模块,例化到本模块使用;
`timescale 1ns / 1ps
//
// Company:
// Engineer:
//
// Create Date: 2020/06/02 16:22:52
// Design Name:
// Module Name: versatile_counter
// Project Name:
// Target Devices:
// Tool Versions:
// Description:
//
// Dependencies:
//
// Revision:
// Revision 0.01 - File Created
// Additional Comments:
//
//

// `define LFSR_MACRO
`define GRAY
// `define BIN
module versatile_counter #(parameter N_BITS = 4)(
	input i_clk,
	input i_rst,
	output [N_BITS - 1 : 0] o_out,
	output o_out_done

    );

	`ifdef LFSR_MACRO

	lfsr #(.NUM_BITS(N_BITS)) LFSR_inst
         (.i_Clk(i_clk),
          .i_Enable(1'b1),
          .i_Seed_DV(1'b0),
          .i_Seed_Data({N_BITS{1'b0}}), // Replication
          .o_LFSR_Data(o_out),
          .o_LFSR_Done(o_out_done)
          );


	`elsif GRAY

	gray_counter #(.N_BITS(N_BITS))
	inst_gray_cnt(
		.i_rst(i_rst),
		.i_clk(i_clk),
		.o_cnt(o_out),
		.o_cnt_done(o_out_done)
		);


	`else
	binary_counter #(.N_BITS(N_BITS))
	inst_bin_cnt(
		.i_rst(i_rst),
		.i_clk(i_clk),
		.o_cnt(o_out),
		.o_cnt_done(o_out_done)
		);

	`endif


endmodule
这里约定定义了宏GRAY,就是跑格雷码的代码,定义了宏BIN,就是跑二进制的代码,定义了LFSR_MACRO,就是跑LFSR的程序。
行为仿真
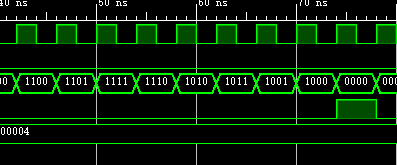
先假设定义了宏GRAY,仿真程序通用,如下:
`timescale 1ns/1ps
module sim_versatile_counter;

	parameter N_BITS = 4;
	reg i_clk;
	reg i_rst;
	wire [N_BITS - 1 : 0] o_out;
	wire o_out_done;

	initial begin
		i_clk = 0;
		forever begin
			# 2 i_clk = ~ i_clk;
		end
	end

	initial begin
		i_rst = 1;

		# 8
		i_rst = 0;

	end

	versatile_counter #(.N_BITS(N_BITS))
	inst_vc(
		.i_rst(i_rst),
		.i_clk(i_clk),
		.o_out(o_out),
		.o_out_done(o_out_done)
		);
endmodule
仿真波形 :

确实是格雷码计数器 ,放大:

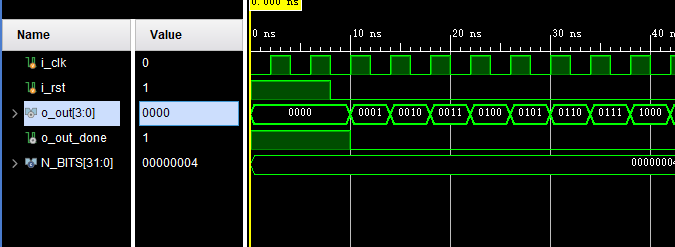
如果定义了宏BIN,
// `define LFSR_MACRO
// `define GRAY
`define BIN
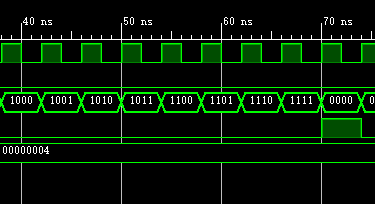
则仿真图如下:

放大观测:
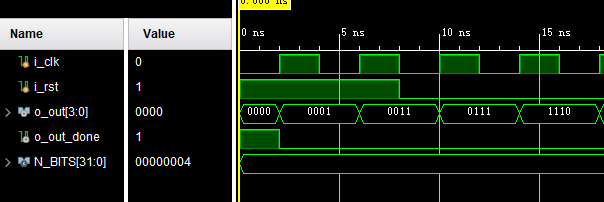
如果定义了宏LFSR_MACRO,则输出LFSR计数:
 `define LFSR_MACRO
// `define GRAY
//`define BIN


生成语句实现方式
这里使用生成语句,generate case来实现多功能计数器,我们需要定义一个参数SEL,当SEL为0的时候,输出为LFSR;当SEL为1时,输出为格雷码计数器;当SEL为2时候,输出为二进制计数器。
电路设计
`timescale 1ns / 1ps
//
// Create Date: 2020/06/02 16:22:52
// Design Name:
// Module Name: versatile_counter
// Revision 0.01 - File Created
// Additional Comments:
// Reborn Lee
//
module versatile_counter #(
	parameter N_BITS = 4,
	parameter SEL = 0

	)(
	input i_clk,
	input i_rst,
	output [N_BITS - 1 : 0] o_out,
	output o_out_done

    );


generate

	case(SEL)

		0: begin
			lfsr #(.NUM_BITS(N_BITS)) LFSR_inst
         (.i_Clk(i_clk),
          .i_Enable(1'b1),
          .i_Seed_DV(1'b0),
          .i_Seed_Data({N_BITS{1'b0}}), // Replication
          .o_LFSR_Data(o_out),
          .o_LFSR_Done(o_out_done)
          );
		end
		1: begin
			gray_counter #(.N_BITS(N_BITS))
		inst_gray_cnt(
		.i_rst(i_rst),
		.i_clk(i_clk),
		.o_cnt(o_out),
		.o_cnt_done(o_out_done)
		);
		end
		2: begin
			binary_counter #(.N_BITS(N_BITS))
		inst_bin_cnt(
		.i_rst(i_rst),
		.i_clk(i_clk),
		.o_cnt(o_out),
		.o_cnt_done(o_out_done)
		);

		end


	endcase

endgenerate


endmodule
行为仿真
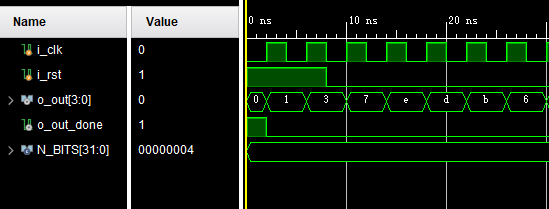
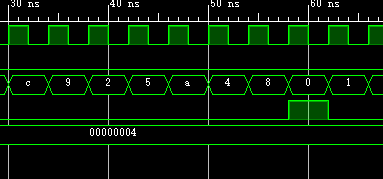
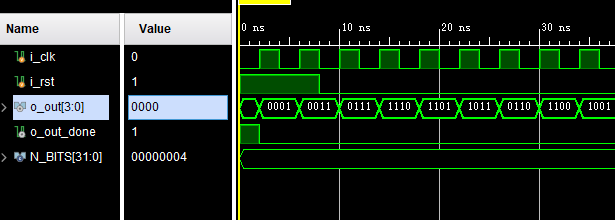
SEL为0,也即LFSR:
仿真文件例化改为:
	versatile_counter #(
		.N_BITS(N_BITS),
		.SEL(0)
		)
	inst_vc(
		.i_rst(i_rst),
		.i_clk(i_clk),
		.o_out(o_out),
		.o_out_done(o_out_done)
		);

放大:
SEL为1,也即格雷码计数器:
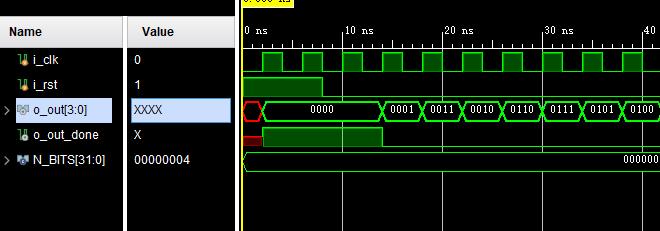
仿真文件例化改为:
	versatile_counter #(
		.N_BITS(N_BITS),
		.SEL(1)
		)
	inst_vc(
		.i_rst(i_rst),
		.i_clk(i_clk),
		.o_out(o_out),
		.o_out_done(o_out_done)
		);

放大:
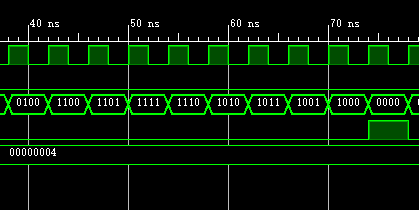
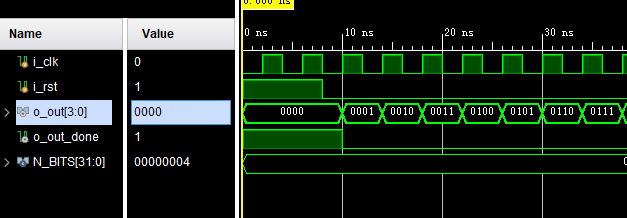
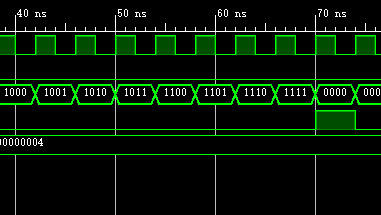
SEL为2,也即 二进制计数器:
仿真文件例化改为:
	versatile_counter #(
		.N_BITS(N_BITS),
		.SEL(2)
		)
	inst_vc(
		.i_rst(i_rst),
		.i_clk(i_clk),
		.o_out(o_out),
		.o_out_done(o_out_done)
		);

放大:
注意事项
关于多功能计数器的注意事项,这里不做多说,
在debug的过程中,可以先进行elaborated design,
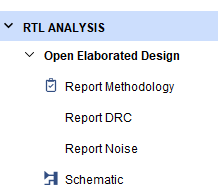
如果没有错误,在进行行为仿真;
其次需要注意,在宏定义过程中,别忘了`这个符号。
就这样吧,感觉如此实现也不是太难,我还记得使用OPENCORES里的那个设计实例,编译预处理指令一大堆,看得我头皮发麻,最关键的是我还没编译通过。
工程要不要分享了呢?暂时算了吧,反正代码已经贴出来了,实在需要的可以说一声。
工具 :vivado 2019.1
参考资料
参考资料1
参考资料2
参考资料3
交个朋友
FPGA/IC技术交流2020
最后
以上就是无心大门最近收集整理的关于Verilog设计实例(2)一步一步实现一个多功能通用计数器写在前面正文参考资料交个朋友的全部内容,更多相关Verilog设计实例(2)一步一步实现一个多功能通用计数器写在前面正文参考资料交个朋友内容请搜索靠谱客的其他文章。


发表评论 取消回复