身份证识别系统搭建
- 【阿里云高校计划】身份证识别系统搭建 day2 【抛砖引玉】
- 身份证识别系统搭建
- 一、项目简介
- 二、获取视觉智能开放平台提供的SDK
- 三、项目实现
- (一)前端index.html
- (二)控制层MainController
- (1)私有成员
- (2)MainController
- (3)saveFile
- (4)index
- (5)uploadFile
- (三)OcrService
- (四)配置文件application.properties
- (五)pom.xml
- 四、运行&获得AK&授权用户
- 运行
- 获得AK(AccessKey ID)
- 识别
- 五、总结
- 加入高校计划
【阿里云高校计划】身份证识别系统搭建 day2 【抛砖引玉】
身份证识别系统搭建
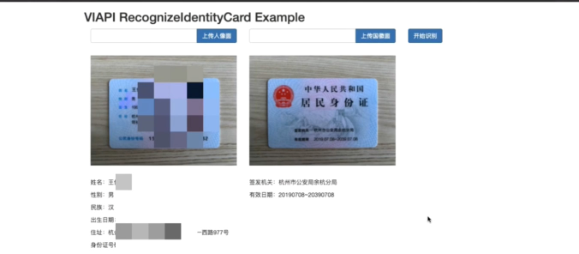
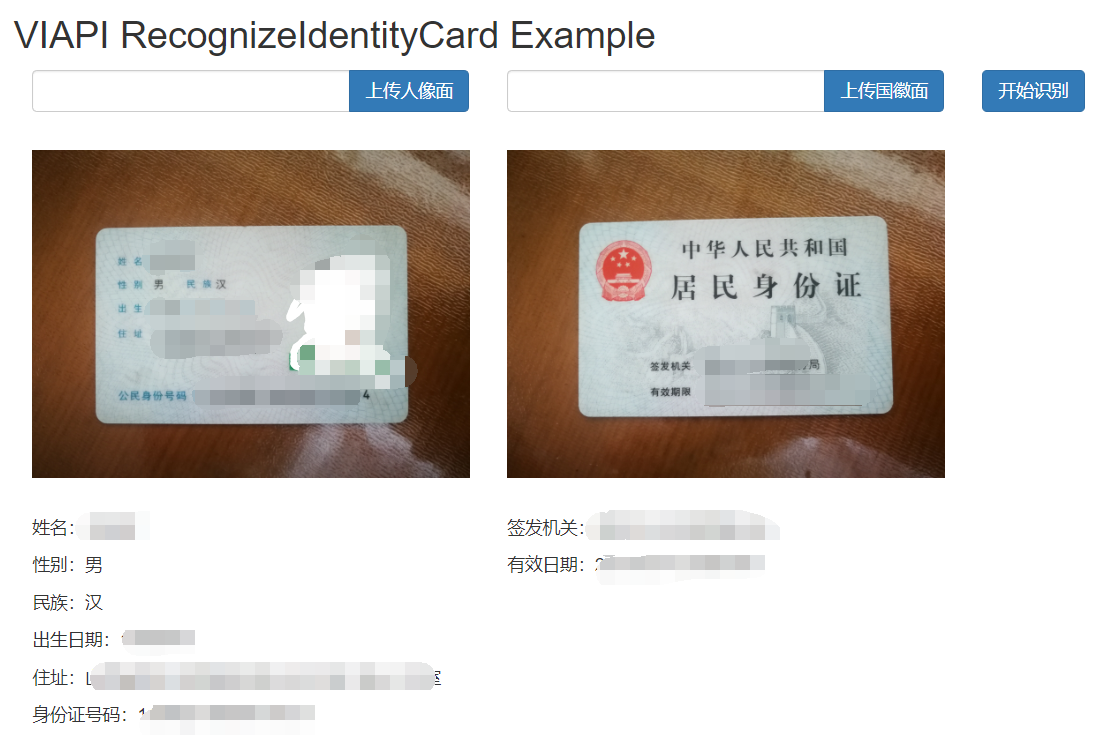
最终成果展示
用户在上传身份证人像面和国徽面之后,点击开始识别,就可以得到身份证正反面的文字内容
一、项目简介
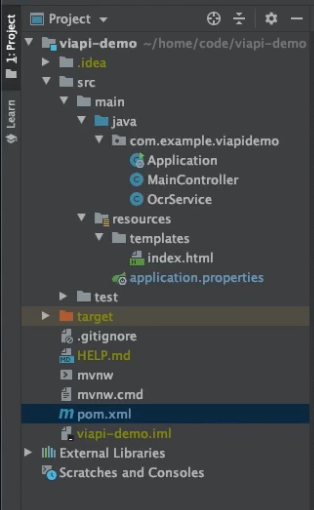
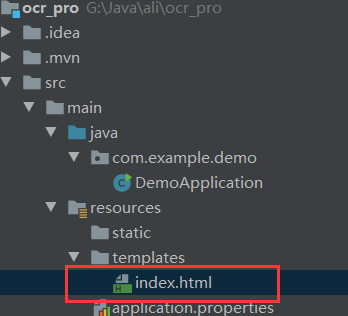
下图是该项目的文件结构,是一个spring boot项目
OCR:光学字符识别(Optical Character Recognition)
Maven 一个核心的特性就是依赖管理。
Maven 通过读取项目文件(pom.xml),找出它们项目之间的依赖关系。
- Application:Spring-Boot的一个启动类
- MainController:控制器层,负责模板的渲染、路由等功能
- OcrService:负责通过SDK调用视觉智能开放平台的OCR能力
- index.html:基于thymeleaf的前端模板
- application.properties:包含若干配置项的配置文件
- pom.xml:pom依赖
二、获取视觉智能开放平台提供的SDK
进入视觉智能开放平台的官网
找到帮助文档
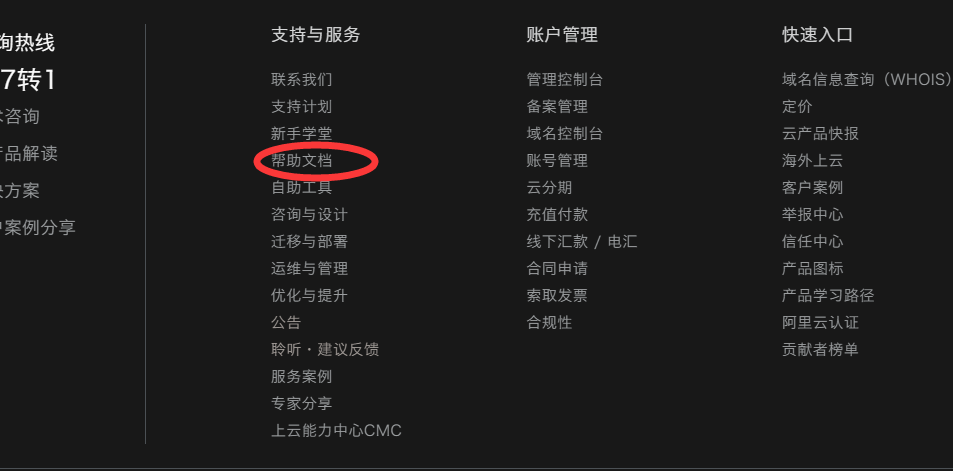
进入视觉智能开放平台目录
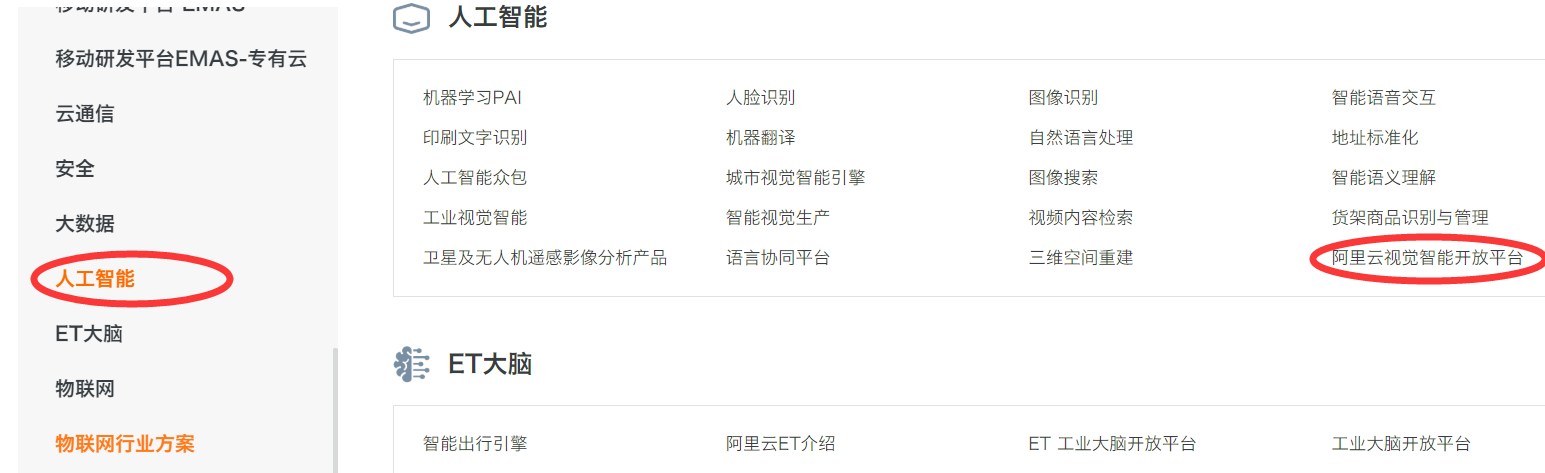
查看Java的SDK文档
https://help.aliyun.com/document_detail/151899.html
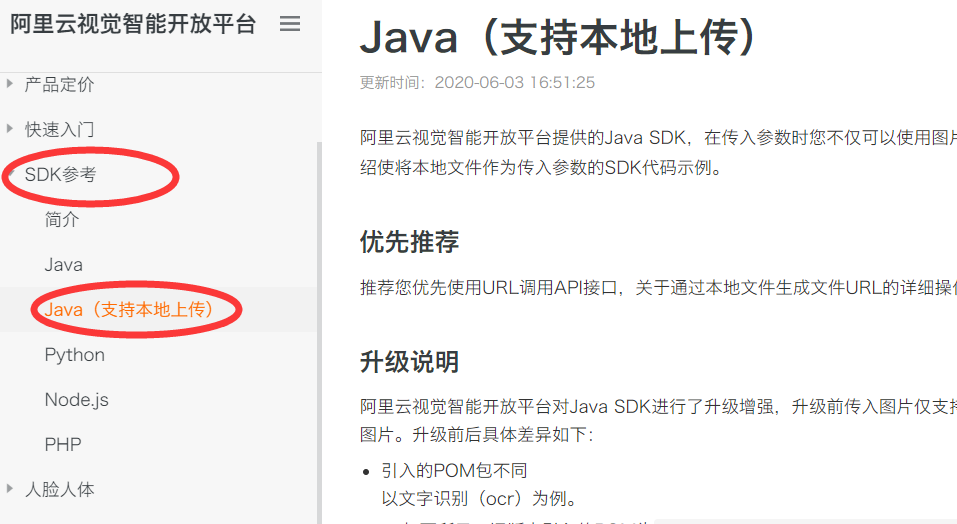
点击 Java(支持本地上传)进入相应的说明页,我们可以看出其中有很多 SDK,
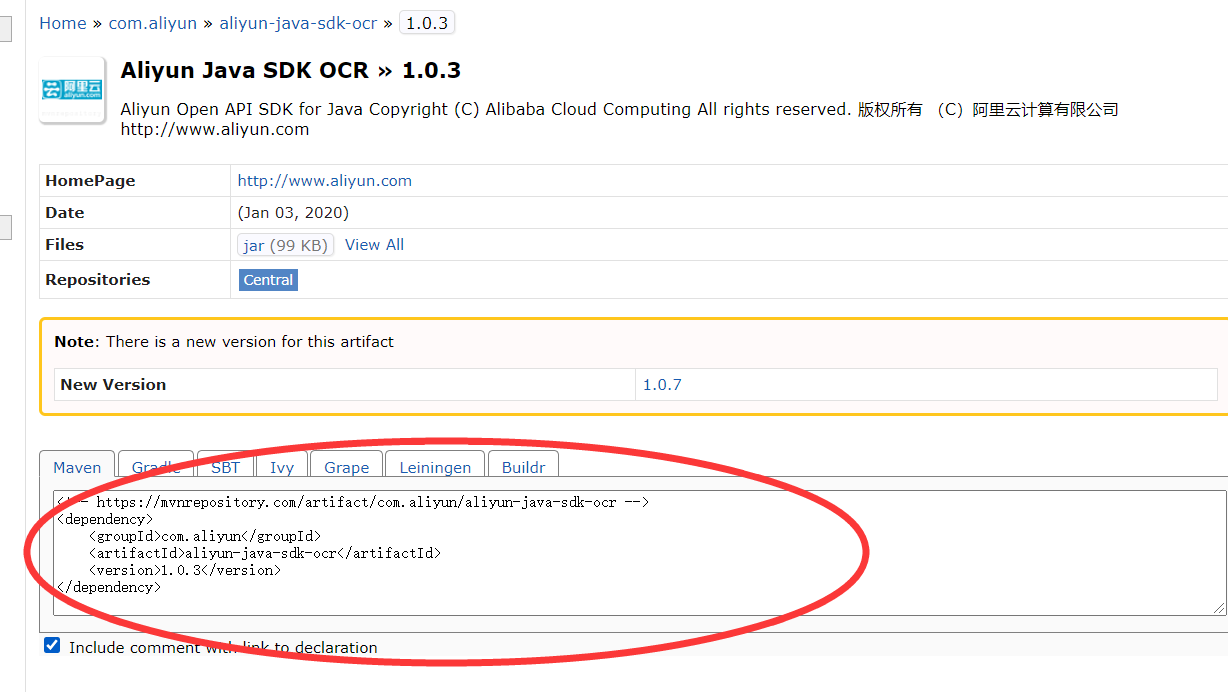
我们需要找到需要的 OCR SDK。如下图所示,我们可以通过下面的链接来找到我们所需要的相应版本的 SDK,然后获取我们需要的 Maven 坐标。
https://mvnrepository.com/artifact/com.aliyun/aliyun-java-sdk-ocr
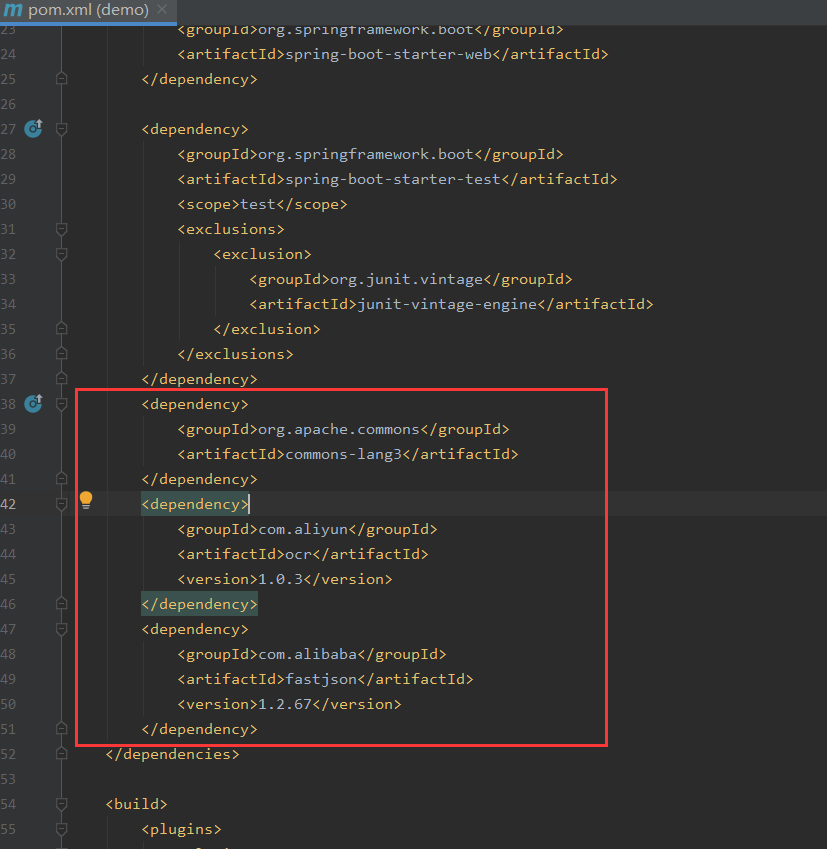
之后通过在pom.xml文件中添加Maven依赖安装java SDK,于是成功获得到了视觉智能开放平台提供的SDK
之后在我们的pom.xml里加入,如图所示
三、项目实现
(一)前端index.html
前端的实现是基于 thymeleaf 做的一个模版,其页面如下图所示,包括一个标
题、2 个表单、2 个上传文件的组件以及一个开始识别的按钮。

在src/main/resources/templates目录中新建index.html首页
写入代码,在浏览器打开页面,如图

这里我们用到了 bootstrap 和jquery 来进行页面的美化,我们用代理的方式来实现美化,相当于我们点击“上传人像面”的组件时候,会把表达上传到 input 组件中,再把 input 中的内容传给 form表单,“上传国徽面”也是如此。在 input 组件中,我们限制了可以上传图片的类型,最前面还设置了一个 alert,在用户上传的图片出现问题的时候会进行提示或者报错。
<!DOCTYPE html>
<html lang="en" xmlns:th="http://www.thymeleaf.org">
<head>
    <meta charset="UTF-8">
    <title>VIAPI</title>
    <link rel="stylesheet" href="https://cdn.bootcss.com/bootstrap/3.3.7/css/bootstrap.min.css">
    <script src="https://apps.bdimg.com/libs/jquery/2.1.4/jquery.min.js"></script>
</head>
<body>
<div class="container">
    <div class="row">
        <div class="col-md-12 mx-auto">
            <h2>VIAPI RecognizeIdentityCard Example</h2>
            <div class="col-sm-12">
                <p th:text="${message}" th:if="${message ne null}" class="alert alert-primary"></p>
            </div>
            <form method="post" th:action="@{/upload}" enctype="multipart/form-data">
                <div class="col-sm-4">
                    <div class="input-group">
                        <input id='location' class="form-control" onclick="$('#i-face').click();">
                        <label class="input-group-btn">
                            <input type="button" id="i-check" value="上传人像面" class="btn btn-primary" onclick="$('#i-face').click();">
                        </label>
                    </div>
                </div>
                <input type="file" name="face" id='i-face'  accept=".jpg, .png, .jpeg" onchange="$('#location').val($('#i-face').val());" style="display: none">
                <div class="col-sm-4">
                    <div class="input-group">
                        <input id='location1' class="form-control" onclick="$('#i-back').click();">
                        <label class="input-group-btn">
                            <input type="button" id="i-check-1" value="上传国徽面" class="btn btn-primary" onclick="$('#i-back').click();">
                        </label>
                    </div>
                </div>
                <input type="file" name="back" id='i-back'  accept=".jpg, .png, .jpeg" onchange="$('#location1').val($('#i-back').val());" style="display: none">
                <div class="col-sm-4">
                    <button type="submit" class="btn btn-primary">开始识别</button>
                </div>
            </form>

        </div>
    </div>

    <div class="row" style="margin-top: 30px;">
        <div class="col-md-12 mx-auto">
            <div class="col-sm-4">
                <img style="width: 100%;" th:src="${faceImage}" th:if="${faceImage ne null}" class="img-fluid" alt=""/>
            </div>
            <div class="col-sm-4">
                <img style="width: 100%;" th:src="${backImage}" th:if="${backImage ne null}" class="img-fluid" alt=""/>
            </div>
        </div>
    </div>
    <div class="row" style="margin-top: 30px;">
        <div class="col-md-12 mx-auto">
            <div class="col-sm-4">
                <p th:if="${faceResult ne null}"><span>姓名:</span><span th:text="${faceResult.name}"></span></p>
                <p th:if="${faceResult ne null}"><span>性别:</span><span th:text="${faceResult.gender}"></span></p>
                <p th:if="${faceResult ne null}"><span>民族:</span><span th:text="${faceResult.nationality}"></span></p>
                <p th:if="${faceResult ne null}"><span>出生日期:</span><span th:text="${faceResult.birthDate}"></span></p>
                <p th:if="${faceResult ne null}"><span>住址:</span><span th:text="${faceResult.address}"></span></p>
                <p th:if="${faceResult ne null}"><span>身份证号码:</span><span th:text="${faceResult.IDNumber}"></span></p>
            </div>
            <div class="col-sm-4">
                <p th:if="${backResult ne null}"><span>签发机关:</span><span th:text="${backResult.issue}"></span></p>
                <p th:if="${backResult ne null}"><span>有效日期:</span><span th:text="${backResult.startDate}"></span>~<span th:text="${backResult.endDate}"></span></p>
            </div>
        </div>
    </div>
</div>
</body>
</html>
(二)控制层MainController
控制层主要包括如下几部分:
- 定义的若干个私有成员
- MainCntroller
- saveFile
- index
- uploadFile
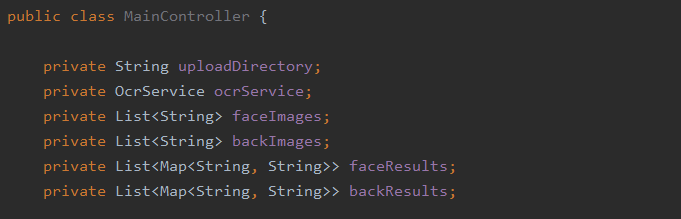
(1)私有成员
- 上传图片文件本地保存地址(uploadDirecto-ry)
- 调用视觉智能开放平台能力的封装(ocrService)
- 上传图片的缓存路径地址(faceImage、backImage)
- 识别结果的缓存(faceResults、backResults)
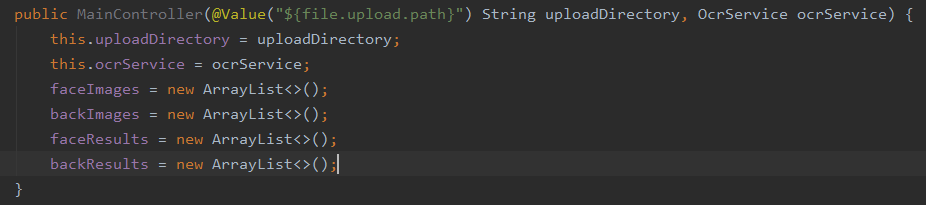
(2)MainController
MainController 构造方法的代码如下图所示,其中 file.upload.path 变量是在配
置文件中的,是本机的一个上传文件的目录地址,根据自己的情况进行设置。
这里有个小技巧,这里配置的目录地址其实是项目 target 目录下的一个子目录,这是因为 springboot 会默认取 target 下的 static 目录作为静态文件的地址,如果我们这么设置的话,上传和读取文件对应的是同一目录,可以更方便的进行文件的读取和存储操作。 (最后运行生成target)
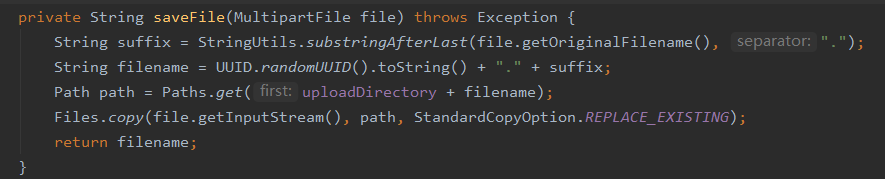
(3)saveFile
saveFile 是一个私有方法,用来保存文件,其代码如下图所示。
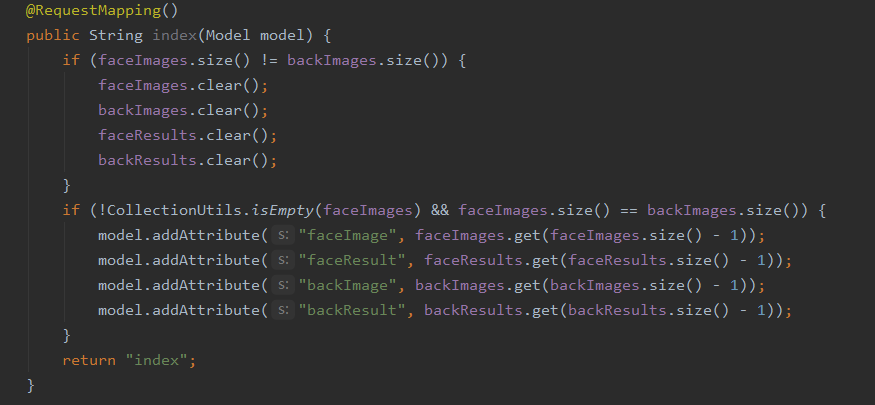
(4)index
index 是一个控制方法,是一开始进入页面时候用来加载模版的。首先是判断faceImage 和 backImage 缓存是否一样,如果不一样,就全部清除掉;其次就是将已经上传的结果进行展示,起到一个重新刷新页面也不会丢失识别结果的作用。
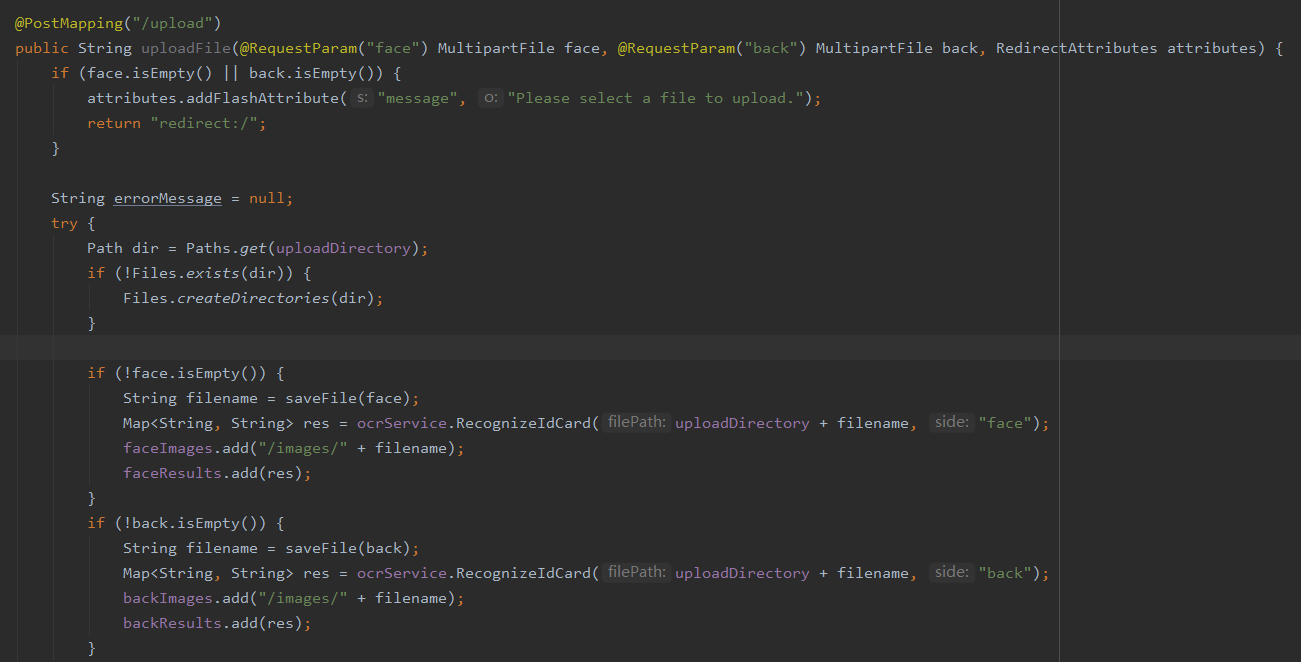
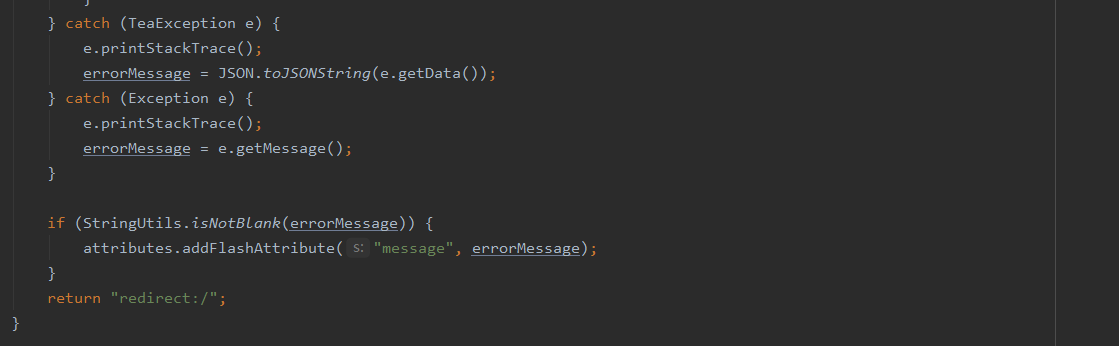
(5)uploadFile
uploadFile 也是一个控制方法,有三个参数,一个正面的人像面的文件,一个背
面的国徽面的文件,还有一个用来重定向的参数。首先,判断两张图片是否是空的,如果是空的,将会重定向到 index,相当于重新进入首页,并且会有一个 message来提示用户必须要上传一个文件,否则是无效的;接下来判断上传目录是否存在,如果不存在就递归的进行创建;然后如果人像面的文件不为空,将其保存到本地,紧接着调用视觉智能开放平台的能力去进行识别,在拿到结果之后将上传的图片和识别结果加入到缓存池中,国徽面的处理方式也类似;最后几行代码是异常的处理,并且会告知用户是哪种报错。
(三)OcrService
OcrService主要包括如下几部分:
- 四个私有变量
- ocrClient
- runtime
- accessKeyId(配置文件中配置)
- accessKeySecret(配置文件中配置)
- 初始化方法(初始化Client和runtime)
- 调用视觉智能开放平台身份证识别的方法
具体来说,在设置好 request 之后,我们将 request 和 runtime 作为参数传递给 ocrClient 来调用身份证识别的方法,之后我们得到相应的 response,也就是识别的结果,之后我们将结果处理成哈希 Map 返回给控制层。
package com.example.viapidemo;

import java.nio.file.Files;
import java.nio.file.Paths;
import java.util.Map;

import javax.annotation.PostConstruct;

import com.alibaba.fastjson.JSON;
import com.alibaba.fastjson.TypeReference;

import com.aliyun.ocr.Client;
import com.aliyun.ocr.models.Config;
import com.aliyun.ocr.models.RecognizeIdentityCardAdvanceRequest;
import com.aliyun.ocr.models.RecognizeIdentityCardResponse;
import com.aliyun.teautil.models.RuntimeOptions;
import org.springframework.beans.factory.annotation.Value;
import org.springframework.stereotype.Service;

/**
 * @author joffre
 * @date 2020/4/6
 */
@Service
public class OcrService {

    private Client ocrClient;
    private RuntimeOptions runtime;

    @Value("${viapi.accessKeyId}")
    private String accessKeyId;
    @Value("${viapi.accessKeySecret}")
    private String accessKeySecret;

    @PostConstruct
    private void init() throws Exception {
        Config config = new Config();
        config.type = "access_key";
        config.regionId = "cn-shanghai";
        config.accessKeyId = accessKeyId;
        config.accessKeySecret = accessKeySecret;
        config.endpoint = "ocr.cn-shanghai.aliyuncs.com";

        ocrClient = new Client(config);
        runtime = new RuntimeOptions();
    }

    public Map<String, String> RecognizeIdCard(String filePath, String side) throws Exception {

        RecognizeIdentityCardAdvanceRequest request = new RecognizeIdentityCardAdvanceRequest();
        request.imageURLObject = Files.newInputStream(Paths.get(filePath));
        request.side = side;
        RecognizeIdentityCardResponse response = ocrClient.recognizeIdentityCardAdvance(request, runtime);

        if ("face".equals(side)) {
            return JSON.parseObject(JSON.toJSONString(response.data.frontResult), new TypeReference<Map<String, String>>() {});
        } else {
            return JSON.parseObject(JSON.toJSONString(response.data.backResult), new TypeReference<Map<String, String>>() {});
        }
    }
}
控制层拿到返回的结果之后,结合前端的优化进行结果的展示,至此,我们便完
成了一个身份证识别系统的构建。
(四)配置文件application.properties
spring.servlet.multipart.max-file-size=100MB
#换成自己的static目录
file.upload.path=G:/Java/ali/ocr_pro/target/classes/static/images/#目录换成自己的static目录
#换成自己的AK,如果没有生成AK,请参考文章最后
viapi.accessKeyId=************
viapi.accessKeySecret=************
(五)pom.xml
<?xml version="1.0" encoding="UTF-8"?>
<project xmlns="http://maven.apache.org/POM/4.0.0" xmlns:xsi="http://www.w3.org/2001/XMLSchema-instance"
		 xsi:schemaLocation="http://maven.apache.org/POM/4.0.0 https://maven.apache.org/xsd/maven-4.0.0.xsd">
	<modelVersion>4.0.0</modelVersion>
	<parent>
		<groupId>org.springframework.boot</groupId>
		<artifactId>spring-boot-starter-parent</artifactId>
		<version>2.2.6.RELEASE</version>
		<relativePath/> <!-- lookup parent from repository -->
	</parent>
	<groupId>com.example</groupId>
	<artifactId>viapi-demo</artifactId>
	<version>0.0.1-SNAPSHOT</version>
	<name>viapi-demo</name>
	<description>Demo project for Spring Boot and viapi</description>

	<properties>
		<java.version>1.8</java.version>
	</properties>

	<dependencies>
		<dependency>
			<groupId>org.springframework.boot</groupId>
			<artifactId>spring-boot-starter-web</artifactId>
		</dependency>
		<dependency>
			<groupId>org.springframework.boot</groupId>
			<artifactId>spring-boot-starter-thymeleaf</artifactId>
		</dependency>
		<dependency>
			<groupId>org.springframework.boot</groupId>
			<artifactId>spring-boot-starter-test</artifactId>
			<scope>test</scope>
			<exclusions>
				<exclusion>
					<groupId>org.junit.vintage</groupId>
					<artifactId>junit-vintage-engine</artifactId>
				</exclusion>
			</exclusions>
		</dependency>
		<dependency>
			<groupId>org.apache.commons</groupId>
			<artifactId>commons-lang3</artifactId>
		</dependency>
		<dependency>
			<groupId>com.aliyun</groupId>
			<artifactId>ocr</artifactId>
			<version>1.0.3</version>
		</dependency>
		<dependency>
			<groupId>com.alibaba</groupId>
			<artifactId>fastjson</artifactId>
			<version>1.2.67</version>
		</dependency>
	</dependencies>

	<build>
		<plugins>
			<plugin>
				<groupId>org.springframework.boot</groupId>
				<artifactId>spring-boot-maven-plugin</artifactId>
			</plugin>
		</plugins>
	</build>

</project>
四、运行&获得AK&授权用户
运行
运行之后,项目中新建得到如下文件

获得AK(AccessKey ID)
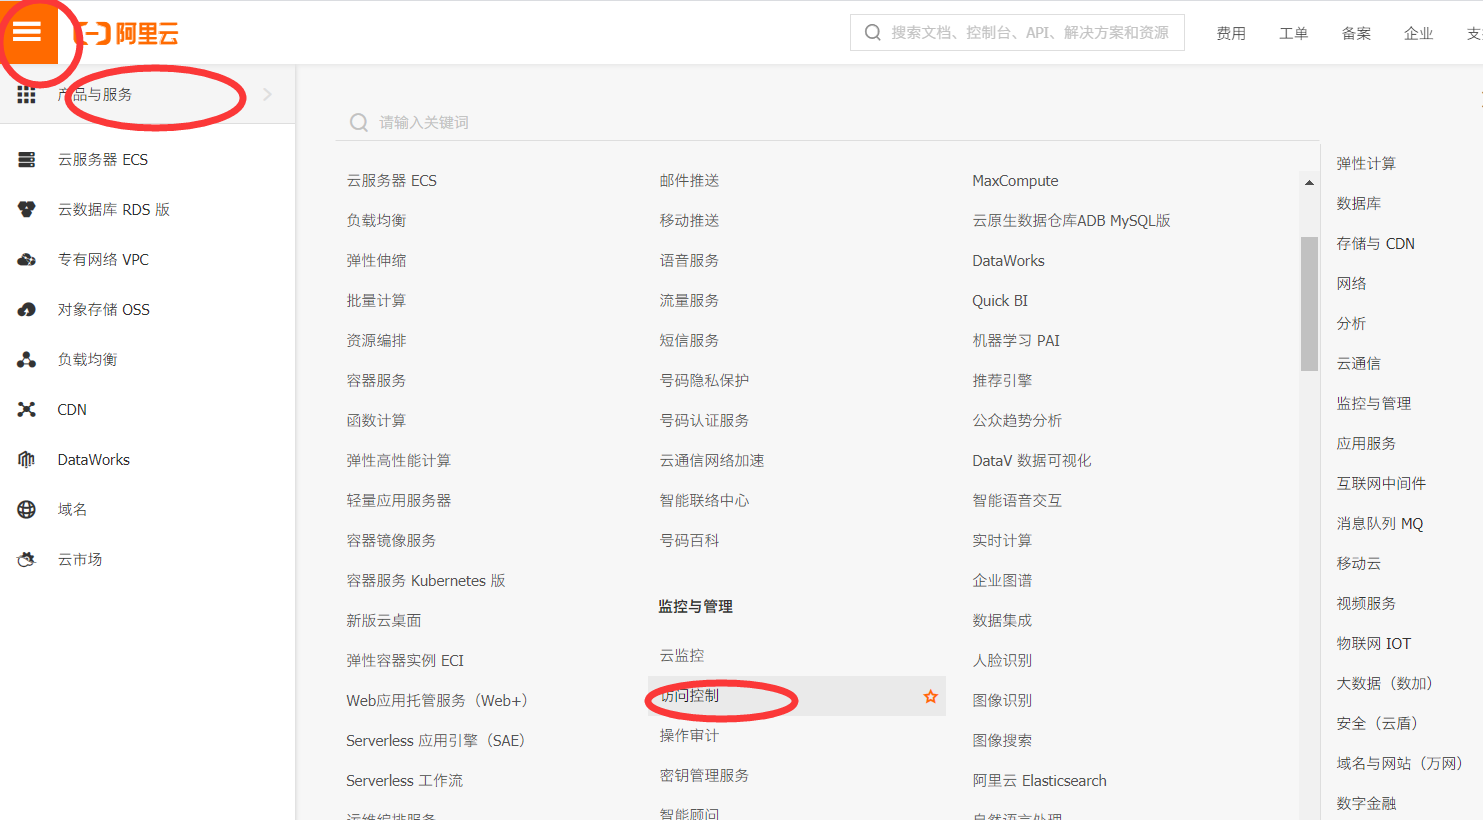
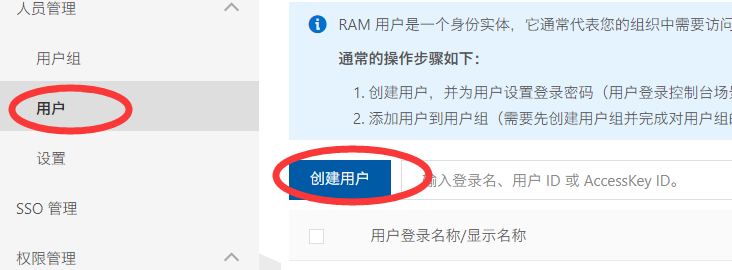
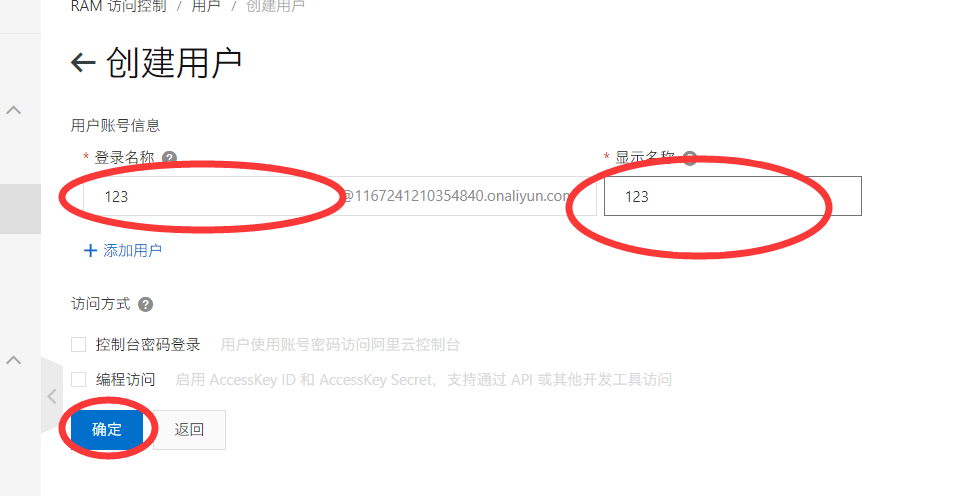
之后点击创建的用户,弹窗里点击创建Access Key
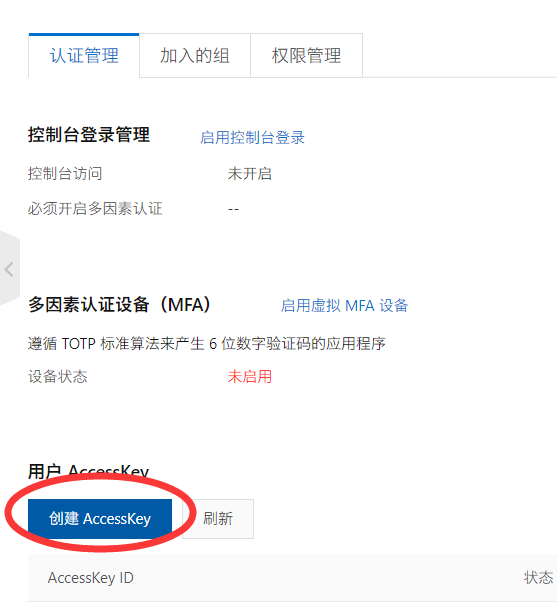
之后记住刚刚生成的AccessKey
新建用户组,再把刚刚新建的用户添加进去,并添加权限

之后进入到我们的Web应用中,http://localhost:8080/

识别
上传身份证人像面,上传国徽面,点击开始识别
识别成功!!!!
附阿里大佬的源码地址
https://github.com/aliyun/alibabacloud-viapi-demo/tree/master/identity-card-demo
五、总结
第一次尝试调用外部的API,并且自身也是一枚小辣鸡,拿着大佬的源码,都得搞半天才能实现。但是总归是实现了这个功能,之后有空可能会试着部署在自己的网站中。
加入高校计划
本人是参加的达摩院特别版-视觉AI训练营第二期
训练营里面的小哥哥小姐姐说话超级好听,我超喜欢这里!

最后
以上就是满意黑夜最近收集整理的关于【阿里云高校计划】身份证识别系统搭建 day2 【抛砖引玉】【阿里云高校计划】身份证识别系统搭建 day2 【抛砖引玉】的全部内容,更多相关【阿里云高校计划】身份证识别系统搭建内容请搜索靠谱客的其他文章。


发表评论 取消回复