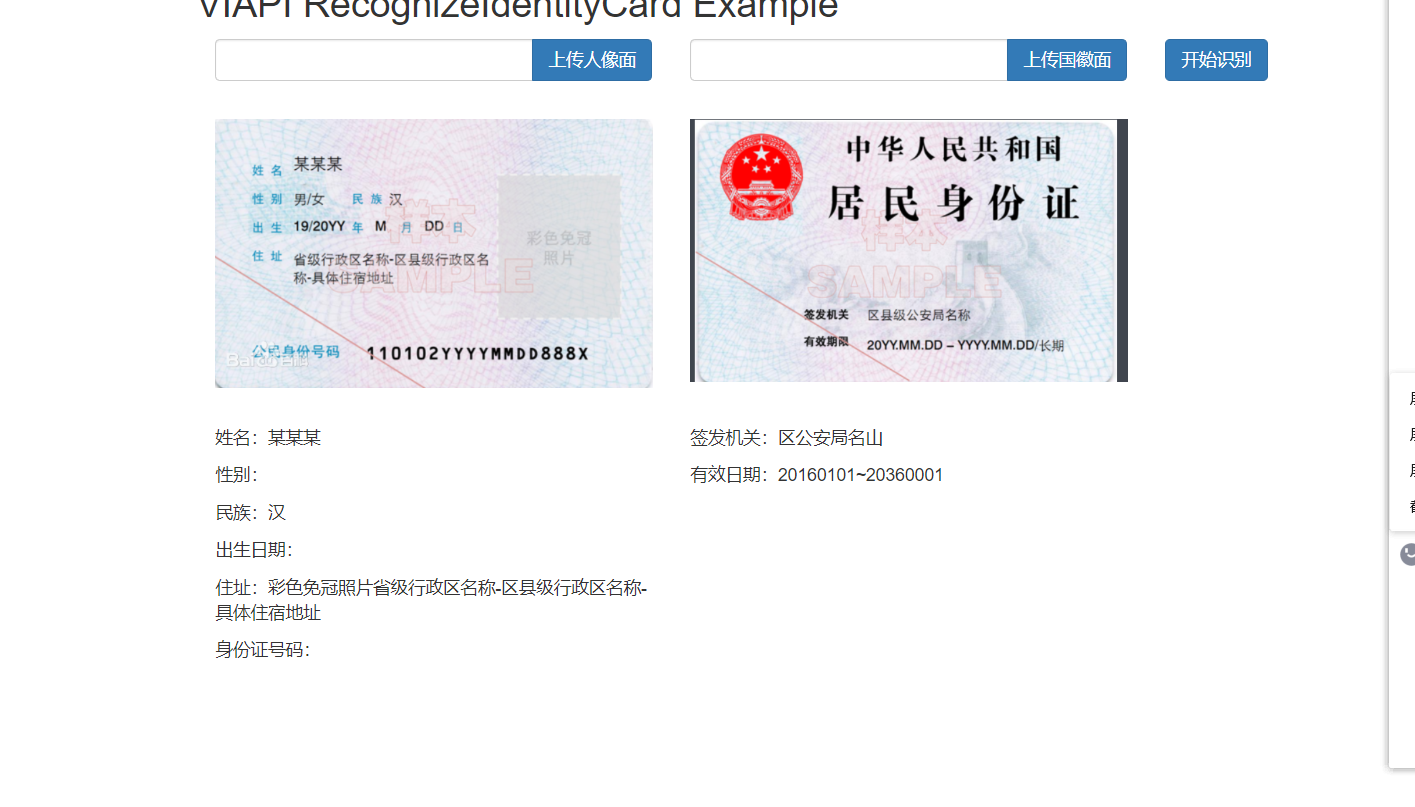
身份证识别的web页面
阿里云ai训练营,继续来记一波笔记,今天主要学的是调用阿里的ocr接口来实现一个简单的身份证文字信息识别。附上阿里的demo地址https://github.com/aliyun/alibabacloud-viapi-demo。阿里视觉开放平台地址:https://vision.aliyun.com/。
下边为识别结果图,(文字显示不全是因为选的身份证图片问题,)

下边是需要的pom依赖
<dependency>
            <groupId>org.apache.commons</groupId>
            <artifactId>commons-lang3</artifactId>
        </dependency>
        <dependency>
            <groupId>com.aliyun</groupId>
            <artifactId>ocr</artifactId>
            <version>1.0.3</version>
        </dependency>
        <dependency>
            <groupId>com.aliyun</groupId>
            <artifactId>aliyun-java-sdk-core</artifactId>
            <version>4.4.6</version>
        </dependency>
        <dependency>
            <groupId>com.alibaba</groupId>
            <artifactId>fastjson</artifactId>
            <version>1.2.68</version>
        </dependency>
下面是全局配置文件(注意:不改的话demo无法直接运行)
spring.servlet.multipart.max-file-size=100MB
file.upload.path=/Users/joffre/home/code/viapi-demo/target/classes/static/images/
//这里是上传图片的缓存地址,记得改成本机的位置。
viapi.accessKeyId=yourAccessKeyId	//在阿里云获取
viapi.accessKeySecret=yourAccessKeySecret
demo的前端界面用thymeleaf渲染的,用了bootstrap的部分样式。
<!DOCTYPE html>
<html lang="en" xmlns:th="http://www.thymeleaf.org">
<head>
    <title>VIAPI</title>
    <link rel="stylesheet" href="https://cdn.bootcss.com/bootstrap/3.3.7/css/bootstrap.min.css">
    <script src="https://apps.bdimg.com/libs/jquery/2.1.4/jquery.min.js"></script>
</head>
<body>
    <div class="container">
        <div class="row">
            <div class="col-md-12 mx-auto">
                <h2>VIAPI RecognizeIdentityCard Example</h2>
                <div class="col-sm-12">
                    <p th:text="${message}" th:if="${message ne null}" class="alert alert-primary"></p>
                </div>
                <form method="post" th:action="@{/upload}" enctype="multipart/form-data">
                    <div class="col-sm-4">
                        <div class="input-group">
                            <input id='location' class="form-control" onclick="$('#i-face').click();">
                            <label class="input-group-btn">
                                <input type="button" id="i-check" value="上传人像面" class="btn btn-primary" onclick="$('#i-face').click();">
                            </label>
                        </div>
                    </div>
                    <input type="file" name="face" id='i-face'  accept=".jpg, .png, .jpeg" onchange="$('#location').val($('#i-face').val());" style="display: none">
                    <div class="col-sm-4">
                        <div class="input-group">
                            <input id='location1' class="form-control" onclick="$('#i-back').click();">
                            <label class="input-group-btn">
                                <input type="button" id="i-check-1" value="上传国徽面" class="btn btn-primary" onclick="$('#i-back').click();">
                            </label>
                        </div>
                    </div>
                    <input type="file" name="back" id='i-back'  accept=".jpg, .png, .jpeg" onchange="$('#location1').val($('#i-back').val());" style="display: none">
                    <div class="col-sm-4">
                        <button type="submit" class="btn btn-primary">开始识别</button>
                    </div>
                </form>

            </div>
        </div>

        <div class="row" style="margin-top: 30px;">
            <div class="col-md-12 mx-auto">
                <div class="col-sm-4">
                    <img style="width: 100%;" th:src="${faceImage}" th:if="${faceImage ne null}" class="img-fluid" alt=""/>
                </div>
                <div class="col-sm-4">
                    <img style="width: 100%;" th:src="${backImage}" th:if="${backImage ne null}" class="img-fluid" alt=""/>
                </div>
            </div>
        </div>
        <div class="row" style="margin-top: 30px;">
            <div class="col-md-12 mx-auto">
                <div class="col-sm-4">
                    <p th:if="${faceResult ne null}"><span>姓名:</span><span th:text="${faceResult.name}"></span></p>
                    <p th:if="${faceResult ne null}"><span>性别:</span><span th:text="${faceResult.gender}"></span></p>
                    <p th:if="${faceResult ne null}"><span>民族:</span><span th:text="${faceResult.nationality}"></span></p>
                    <p th:if="${faceResult ne null}"><span>出生日期:</span><span th:text="${faceResult.birthDate}"></span></p>
                    <p th:if="${faceResult ne null}"><span>住址:</span><span th:text="${faceResult.address}"></span></p>
                    <p th:if="${faceResult ne null}"><span>身份证号码:</span><span th:text="${faceResult.IDNumber}"></span></p>
                </div>
                <div class="col-sm-4">
                    <p th:if="${backResult ne null}"><span>签发机关:</span><span th:text="${backResult.issue}"></span></p>
                    <p th:if="${backResult ne null}"><span>有效日期:</span><span th:text="${backResult.startDate}"></span>~<span th:text="${backResult.endDate}"></span></p>
                </div>
            </div>
        </div>
    </div>
</body>
</html>
后端主要用到的技术栈是springboot和阿里ocr,没用到数据库,上传的图片是存到缓存里边的。
 @RequestMapping()
    public String index(Model model) {
    //检查缓存的身份证正反面图片数量是否一样,不一样,则清空缓存
        if (faceImages.size() != backImages.size()) {
            faceImages.clear();
            backImages.clear();
            faceResults.clear();
            backResults.clear();
        }
        //刷新页面之前上传的图片不会丢失
        if (!CollectionUtils.isEmpty(faceImages) && faceImages.size() == backImages.size()) {
            model.addAttribute("faceImage", faceImages.get(faceImages.size() - 1));
            model.addAttribute("faceResult", faceResults.get(faceResults.size() - 1));
            model.addAttribute("backImage", backImages.get(backImages.size() - 1));
            model.addAttribute("backResult", backResults.get(backResults.size() - 1));
        }
        return "index";
    }
以下是上传文件的控制方法
 @PostMapping("/upload")
    public String uploadFile(@RequestParam("face") MultipartFile face, @RequestParam("back") MultipartFile back, RedirectAttributes attributes) {
        if (face.isEmpty() || back.isEmpty()) {
            attributes.addFlashAttribute("message", "Please select a file to upload.");
            return "redirect:/";
        }

        String errorMessage = null;
        try {
        //文件上传的目录是否为空,空则递归创建
            Path dir = Paths.get(uploadDirectory);
            if (!Files.exists(dir)) {
                Files.createDirectories(dir);
            }

            if (!face.isEmpty()) {
          //如果图像不为空则调用apache.commons的StringUtils保存到本地
                String filename = saveFile(face);
                Map<String, String> res = ocrService.RecognizeIdCard(uploadDirectory + filename, "face");
                faceImages.add("/images/" + filename);
                faceResults.add(res);
            }
            if (!back.isEmpty()) {
                String filename = saveFile(back);
                Map<String, String> res =
                ocrService.RecognizeIdCard(uploadDirectory + filename, "back");	//调阿里ocr的接口
                backImages.add("/images/" + filename);
                backResults.add(res);
            }
        } catch (TeaException e) {
            e.printStackTrace();
            errorMessage = JSON.toJSONString(e.getData());
        } catch (Exception e) {
            e.printStackTrace();
            errorMessage = e.getMessage();
        }

        if (StringUtils.isNotBlank(errorMessage)) {
        //存储错误信息
            attributes.addFlashAttribute("message", errorMessage);
        }
        return "redirect:/";
    }

       private String saveFile(MultipartFile file) throws Exception {
        String suffix = StringUtils.substringAfterLast(file.getOriginalFilename(), ".");
        String filename = UUID.randomUUID().toString() + "." + suffix;
        Path path = Paths.get(uploadDirectory + filename);
        Files.copy(file.getInputStream(), path, StandardCopyOption.REPLACE_EXISTING);
        return filename;
    }
欢迎参加阿里云高校“在家实践计划”,一起来拓宽眼界,增长见识。

最后
以上就是发嗲秋天最近收集整理的关于【阿里云高校计划】Day2身份识别系统搭建的全部内容,更多相关【阿里云高校计划】Day2身份识别系统搭建内容请搜索靠谱客的其他文章。
本图文内容来源于网友提供,作为学习参考使用,或来自网络收集整理,版权属于原作者所有。


发表评论 取消回复