1.vite项目搭建
可以按照vite官网操作:https://cn.vitejs.dev/guide/features.html#typescript
npm create vite@latest
自定义template模板
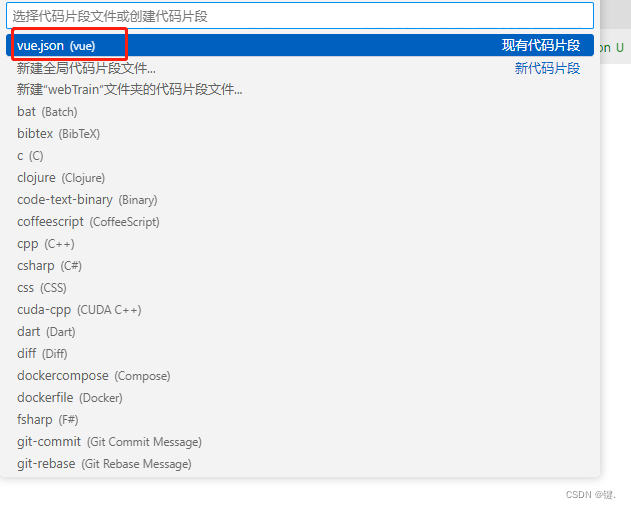
vscode-文件-首选项-配置用户代码片段-vue.json

添加如下代码即可快速创建vue模板
{
  "template": {
    "prefix": "vue",
    "body": [
      "<template></template>",
      "<script setup lang='ts'></script>",
      "<style scoped lang='less'></style>"
    ]
  }
}
element ui
element官网:https://element-plus.gitee.io/zh-CN/guide/design.html
npm install element-plus --save
// main.ts
import { createApp } from 'vue'
import ElementPlus from 'element-plus'
import 'element-plus/dist/index.css'
import App from './App.vue'

const app = createApp(App)

app.use(ElementPlus)
app.mount('#app')
Volar支持,请在 tsconfig.json 中通过 compilerOptions.type 指定全局组件类型。
// tsconfig.json
{
  "compilerOptions": {
    // ...
    "types": ["element-plus/global"]
  }
}
配置@别名
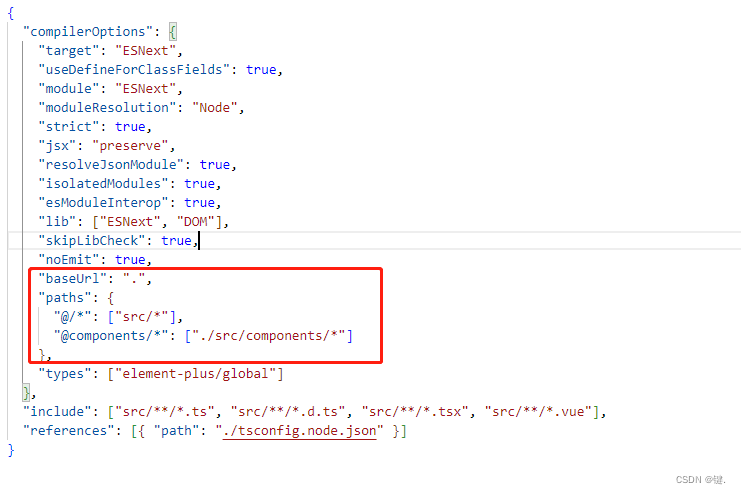
vite.config.ts compilerOptions 中配置如下
  "baseUrl": ".",
    "paths": {
      "@/*": ["src/*"],
      "@components/*": ["./src/components/*"]
    },

安装 path 和 @types/node
npm install path --save
npm install @types/node --save-dev
vite.config.ts 配置如下
import { defineConfig } from "vite";
import vue from "@vitejs/plugin-vue";
import path from "path";
// https://vitejs.dev/config/
export default defineConfig({
 resolve: {
   // 配置路径别名
   alias: {
     "@": path.resolve(__dirname, "./src"),
     "@components": path.resolve(__dirname, "./src/components"),
   },
 },
 plugins: [vue()],
});
配置路由
npm i vue-router@4
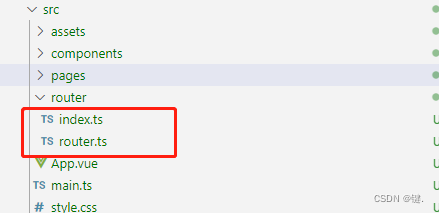
在src根目录创建router文件夹并新建两个ts文件,index.ts、router.ts

router.ts
const routes = [
  {
    name: "Home",
    path: "/",
    component: () => import("@/pages/Home.vue"),
  },
  {
    name: "About",
    path: "/about",
    component: () => import("@/pages/About.vue"),
  },
  {
    name: "Apple",
    path: "/apple",
    component: () => import("@/components/Apple/Apple.vue"),
  },
];
export default routes; //导出
index.ts
import { createRouter, createWebHistory } from "vue-router";
import routes from "./router";

const router = createRouter({
  history: createWebHistory(),
  routes,
});
export default router;
将vite自动创建的页面删除,并在app.vue增加router-view视图出口
app.vue
<script setup lang="ts">
// This starter template is using Vue 3 <script setup> SFCs
// Check out https://vuejs.org/api/sfc-script-setup.html#script-setup
</script>

<template>
  <router-view></router-view>
</template>

<style scoped>
</style>
在home首页配置一个跳转的函数
<template>
  <div>home首页</div>

  <el-button type="primary" @click="toApp" plain>跳转到apple</el-button>
  <A></A>
</template>
<script setup lang="ts">
import { useRouter } from "vue-router";
import A from "../components/Apple/A.vue";
const route = useRouter();
const toApp = () => {
  route.push({ name: "Apple" });
};
</script>
<style scoped lang="less"></style>
现在就可以看到配置的路由效果了:

★★★★★实用插件:
vue3自动引入插件
https://github.com/antfu/unplugin-auto-import
import { defineConfig } from 'vite'
import vue from '@vitejs/plugin-vue'
import VueJsx from '@vitejs/plugin-vue-jsx'
import AutoImport from 'unplugin-auto-import/vite'
// https://vitejs.dev/config/
export default defineConfig({
  plugins: [vue(),VueJsx(),AutoImport({
    imports:['vue'],
    dts:"src/auto-import.d.ts"
  })]
})
安装这个插件之后ref,watch等不用在vue文件中import就可以直接使用!!
less
npm i less-loader less --save-dev
直接安装就可以在vite中使用less了
2.实用功能
用vue3内置组件component实现tab选项卡
component官网简介
https://www.javascriptc.com/vue3js/api/built-in-components.html#component
<template>
  <div>apple页哦哦哦</div>
  <hr />
  <div style="display: flex">
    <div
      :class="[isActive == index ? 'active' : '']"
      class="tabs"
      v-for="(item, index) in data"
      :key="index"
      @click="switchTab(item, index)"
    >
      {{ item.name }}
    </div>
  </div>
  <component class="component" :is="curVal"></component>
</template>
<script setup lang="ts">
import { ref, markRaw, shallowRef } from "vue";
import A from "./A.vue";
import B from "./B.vue";
import C from "./C.vue";
const curVal = shallowRef(A);
const isActive = shallowRef(0);
const switchTab = (item: any, index: any) => {
  curVal.value = item.comV;
  isActive.value = index;
};
const data = shallowRef([
  {
    name: "A组件",
    comV: markRaw(A),
  },
  {
    name: "B组件",
    comV: markRaw(B),
  },
  {
    name: "C组件",
    comV: markRaw(C),
  },
]);
</script>
<style scoped>
.tabs {
  border: 1px solid rgb(221, 220, 220);
  box-sizing: border-box;
  padding: 10px 25px;
  margin: 0 10px;
}

.active {
  background: rgba(29, 192, 204, 0.788);
  color: #fff;
}
.component {
  border: 1px solid rgb(221, 220, 220);
  padding: 20px;
}
</style>
其中markRaw 、shallowRef两个属性是用于解决如下提示:

效果:

mitt实现兄弟组件传值
安装mitt
npm install --save mitt
src新建plugin文件夹,并创建Bus.ts文件
import mitt from "mitt";
const Bus = mitt();
export default Bus;
A.vue
<template>
  <div>
    <div>这是A页面哦</div>
    <el-button type="primary" @click="express">传值</el-button>
    <hr />
    <B></B>
  </div>
</template>
<script setup lang="ts">
import B from "./B.vue";
import Bus from "@/plugin/Bus";
import { ref } from "vue";
const aData = ref("a组件的数据");
const express = () => {
  Bus.emit("getData", aData);
};
</script>
<style scoped lang="less"></style>
B.vue
<template>
  <div>
    <div>这是B页面哦</div>
    <div>{{ data }}</div>
  </div>
</template>
<script setup lang="ts">
import Bus from "@/plugin/Bus";
import { onMounted, ref } from "vue";
const data = ref("123");
onMounted(() => {
  Bus.on("getData", (e: any) => {
    data.value = e;
  });
});
</script>
<style scoped lang="less"></style>
效果:

自义定指令操作盒子移动
<template>
  <div v-move class="box">
    <div class="head"></div>
    <div class="content"></div>
  </div>
</template>
<script setup lang="ts">
import { Directive, DirectiveBinding } from "vue";

const vMove: Directive<any, void> = (el: HTMLElement, binding: DirectiveBinding) => {
  let moveEle: HTMLDivElement = el.firstElementChild as HTMLDivElement;
  const mouseDown = (e: MouseEvent) => {
    let X = e.clientX - el.offsetLeft;
    let Y = e.clientY - el.offsetTop;
    const move = (e: MouseEvent) => {
      el.style.left = e.clientX - X + "px";
      el.style.top = e.clientY - Y + "px";
      //不让盒子移动到视图之外
      //右下
      if (el.offsetLeft >= document.body.clientWidth - el.clientWidth) {
        el.style.left = document.body.clientWidth - el.clientWidth + "px";
      }
      if (el.offsetTop >= document.body.clientHeight - el.clientHeight) {
        el.style.top = document.body.clientHeight - el.clientHeight + "px";
      }

      //左上
      if (el.offsetLeft <= 0) {
        el.style.left = 0 + "px";
      }
      if (el.offsetTop <= 0) {
        el.style.top = 0 + "px";
      }
    };
    document.addEventListener("mousemove", move);
    document.addEventListener("mouseup", () => {
      document.removeEventListener("mousemove", move);
    });
  };
  moveEle.addEventListener("mousedown", mouseDown);
};
</script>
<style scoped lang="less">
.box {
  position: fixed;
  width: 200px;
  height: 400px;
  border: 1px solid rgb(230, 230, 230);
  .head {
    height: 50px;
    background: red;
    cursor: move;
  }
}
</style>
效果:

★vue3自义定loading插件
在component目录建一个plugin目录并创建loading.vue和index.ts两个文件
loading.vue
<template>
  <div v-if="isShow" class="wrap">
    <div class="show"></div>
  </div>
</template>
<script setup lang="ts">
import { ref } from "vue";
const isShow = ref(false);
const show = () => {
  isShow.value = true;
};
const hide = () => {
  isShow.value = false;
};

//暴露当前组件的函数和变量
defineExpose({
  isShow,
  show,
  hide,
});
</script>
<style scoped lang="less">
.wrap {
  position: absolute;
  left: 0;
  top: 0;
  display: flex;
  justify-content: center;
  align-items: center;
  background: rgba(240, 238, 238, 0.002);
  backdrop-filter: blur(5px);
  width: 100vw;
  height: 100vh;
}

.show {
  width: 35px;
  height: 35px;
  display: inline-block;
  border: 5px solid rgba(189, 189, 189, 0.25);
  border-left-color: rgb(229, 93, 3);
  border-top-color: rgb(229, 48, 3);
  border-radius: 50%;
  animation: rotate 600ms infinite linear;
}
@keyframes rotate {
  to {
    transform: rotate(1turn);
  }
}
</style>
index.ts
import { App, createVNode, render, VNode } from "vue";
import Loading from "./Loading.vue";

export default {
  install(app: App) {
    //给组件创建一个虚拟dom
    const vnode: VNode = createVNode(Loading);
    //通过render把虚拟dom生成真是dom并挂在在body
    render(vnode, document.body);
    //自义定vue的全局配置
    app.config.globalProperties._loading = {
      show: () => vnode.component?.exposed?.show(),
      hide: () => vnode.component?.exposed?.hide(),
    };
  },
};
通过上面的操作我们自义定的loading插件就已经写好了,现在需要在main.ts中注册这个插件并在需要使用的地方使用就可以了!
main.ts
import { createApp } from "vue";
import "./style.css";
import App from "./App.vue";
import router from "./router";
import ElementPlus from "element-plus";
import "element-plus/dist/index.css";
//引入自义定的插件并注册
import Loading from "@/components/plugin/loading/index";

createApp(App).use(Loading).use(router).use(ElementPlus).mount("#app");

type Lodinfo = {
  show: () => void;
  hide: () => void;
};
//编写ts loading 声明文件放置报错 和 智能提示
declare module "@vue/runtime-core" {
  export interface ComponentCustomProperties {
    _loading: Lodinfo;
  }
}
使用插件
<template>
  <div class="box">
    <el-button type="primary" @click="showload" plain>显示loading插件</el-button>
  </div>
</template>
<script setup lang="ts">
import { getCurrentInstance } from "vue";
const instance = getCurrentInstance();
const showload = () => {
  instance?.proxy?._loading.show();
  setTimeout(() => {
    instance?.proxy?._loading.hide();
  }, 3000);
};
</script>
<style scoped lang="less">
.box {
  display: flex;
  flex-direction: column;
  button {
    margin: 5px 0;
  }
}
</style>
效果:

最后
以上就是完美冬天最近收集整理的关于Vite+Vue3+TS项目创建及基本环境搭建1.vite项目搭建2.实用功能的全部内容,更多相关Vite+Vue3+TS项目创建及基本环境搭建1内容请搜索靠谱客的其他文章。


发表评论 取消回复