Android自定义控件——音量控制器
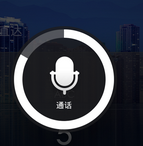
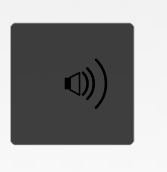
一直有写博客分享技术的打算,但是由于时间关系一直没能开始。今天终于有点空闲时间,所以写了一篇关于自定义控件的应用来练练手。好了,废话不多说,直接进入主题。我看到小米手机上的音量控制是下面第一张图这个造型的,网上也有很多案例,我自己也尝试实现过。不过今天我们要实现的音量控制类型并不是这样,而是经典的小喇叭样式——第二幅图的样式。(做的很丑,将就看看O(∩_∩)O~)


音量增加时,圆弧的数量会增多;同样,音量减少的时候,圆弧的数量会减少。我们可以使用自定义控件来实现这个效果。实现原理很简单,好了,废话不多说,直接上代码。
首先这是一个自定义的控件 所以我们要自定义一个类继承View。
public class VolumeView extends View{

    //当前音量大小
    private int currentVolume=2;
    //最大音量大小
    private int maxVolume =4;

    //喇叭图案
    private Bitmap loudspeaker;
    //画笔
    private Paint mPaint;
    //音量线的宽度
    private float strokeWidth=5;
    public VolumeView(Context context) {
        this(context,null);
        // TODO Auto-generated constructor stub
    }
    public VolumeView(Context context, AttributeSet attrs) {
        this(context, attrs,0);
        // TODO Auto-generated constructor stub
    }
    public VolumeView(Context context, AttributeSet attrs, int defStyleAttr) {
        super(context, attrs, defStyleAttr);
        // TODO Auto-generated constructor stub
        initView();
    }
initView方法是对图像和画笔的一些初始化。
private void initView() {
    //绘制喇叭图案
    loudspeaker = BitmapFactory.decodeResource(getResources(), R.drawable.loudspeakers);
    mPaint = new Paint();
    mPaint.setAntiAlias(true);
    mPaint.setStrokeWidth(strokeWidth); // 设置音量线的宽度
    mPaint.setStrokeCap(Paint.Cap.ROUND); // 设置音量线两端为圆头
    mPaint.setStyle(Paint.Style.STROKE); // 设置样式为空心圆
    mPaint.setColor(Color.BLACK);

}
接下来,就是最主要的一步——onDraw方法来绘制图形了。
protected void onDraw(Canvas canvas) {
    // TODO Auto-generated method stub
    canvas.drawBitmap(loudspeaker, getWidth()/2-loudspeaker.getWidth()/2, getHeight()/2-loudspeaker.getHeight()/2, mPaint);
    float centre = getWidth()/2; //圆心的坐标
    float radius =30f; //半径的长度
    RectF rect ;
    for(int i=0;i<currentVolume;i++){
        radius = radius+i*12;
        rect=new RectF(centre-radius, centre-radius,centre+radius, centre+radius);
        canvas.drawArc(rect, -45, 90, false, mPaint);

    }
}
我们首先将小喇叭的图案绘制到组件的中间位置,因为要画弧线,所以先定义弧线的圆心和半径。然后根据当前的音量大小来循环设置弧线的大小。初始的音量默认为2,所以一开始会绘制2条弧线。
最后,我们可以添加触控事件,比如手指上滑代表增加音量,下滑代表降低音量。
/**
 * 减少当先音量
 */
public void decreaseVolume()
{
    currentVolume++;
currentVolume=currentVolume>maxVolume?maxVolume:currentVolume;
    currentVolume=currentVolume>0?currentVolume:0;
    postInvalidate();
}

/**
 * 增加当先音量
 */
public void increaseVolume()
{
    currentVolume--;
    currentVolume=currentVolume>maxVolume?maxVolume:currentVolume;
    currentVolume=currentVolume>0?currentVolume:0;
    postInvalidate();
}
private int xDown, xUp;
@Override
public boolean onTouchEvent(MotionEvent event)
{
    switch (event.getAction())
    {
    case MotionEvent.ACTION_DOWN:
        xDown = (int) event.getY();
        break;
    case MotionEvent.ACTION_UP:
        xUp = (int) event.getY();
        if (xUp > xDown)// 下滑  表示减小音量
        {
            increaseVolume();
        } else// 上滑  表示增加音量
        {
            decreaseVolume();
        }
        break;
    }
    return true;
}
这里有一个细节要注意。就是要判断当前音量是不是在有效范围内。当前音量应该大于0小于最大音量。下面这两句就是用来控制当前音量的:
currentVolume=currentVolume>maxVolume?maxVolume:currentVolume;
currentVolume=currentVolume>0?currentVolume:0;
好了,最后一步就是在布局文件中使用了!
<RelativeLayout xmlns:android="http://schemas.android.com/apk/res/android"
    xmlns:tools="http://schemas.android.com/tools"
    android:layout_width="match_parent"
    android:layout_height="match_parent"
    tools:context="com.example.volumview.MainActivity" >
    <com.example.volumview.VolumeView
        android:background="@drawable/load_bg"
        android:layout_width="250dp"
        android:layout_height="250dp"
        android:layout_centerInParent="true"
        />
</RelativeLayout>
大功告成!由于时间仓促,所以代码还有许多可以修改与完善的地方。比如当前音量、最大音量还有一些其他属性都应该写成自定义属性。如果大家有兴趣,可以将源码下载下来自行修改!
好了,今天的就到这了!下次会给大家带来第一张图中小米手机音量控制器的实现!本人新手菜鸟一枚!各位喜欢的话,可以留个言 顶一下!
**
源码下载
**
最后
以上就是鳗鱼过客最近收集整理的关于Android自定义控件——音量控制器Android自定义控件——音量控制器的全部内容,更多相关Android自定义控件——音量控制器Android自定义控件——音量控制器内容请搜索靠谱客的其他文章。


发表评论 取消回复