目录
- 研究概述
- 自注意力(self-attention)
- NLP
- CV
- 软注意力(soft-attention)
- 通道注意力
- Non-Local(Self-Attention的应用)
- 位置注意力(position-wise attention)
- 混合域模型(融合空间域和通道域注意力)
- 参考文献
研究概述
计算机视觉(computer vision)中的注意力机制(attention)的核心思想就是基于原有的数据找到其之间的关联性,然后突出其某些重要特征,有通道注意力,像素注意力,多阶注意力等,也有把NLP中的自注意力引入,从而能够忽略无关噪声信息而关注重点信息。
自注意力(self-attention)
NLP
论文链接:Attention Is All You Need(2017 NIPS)
代码来源:The Annotated Transformer


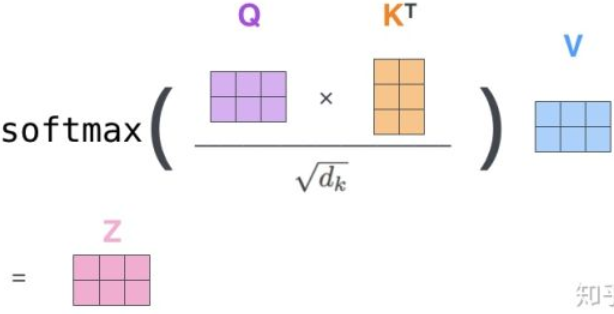
Q,K的维度为key_size即dk,V的维度为head_size即dv,当head的个数h=8时,dk=dv=dmodel/h=64。
Note:每一个head学习一组参数,其实具体实现时,只需要一开始进行 linear transform然后进行reshape拆分出多个头,等价于每一个头学习了一组参数。(很多人存在理解误差,可结合代码和运算过程理解)
- input = [nbatches, L, 512] #batch_size,L序列长度,d_model=512每一个单词的特征维度
- query,key,value = linear_1(input), linear_2(input), linear_3(input) #query,key,value = [nbatches, L, 512],那么linear的参数 W=[512, 512] 可见等维度的映射
- query,key,value = query.view(nbatches, L, 8, 64),key.view(nbatches, L, 8, 64),value.view(nbatches, L, 8, 64) #可见multi-head是将512维度拆分成了8个头,即8 x 64 = 512,一开始 W = [512, 512]的线性映射,也就等价于说每个头都有一个W’ = [512/8, 512/8]的一组参数,但其实只需要学习三组线性层的参数W_1 = [512, 512],W_2 = [512, 512],W_3 = [512, 512]即可,不必强调多少个头学习多少组参数。
self.linears = clones(nn.Linear(d_model, d_model), 4) #d_model=512,等维的线性映射
query, key, value = [l(x).view(nbatches, -1, self.h, self.d_k).transpose(1, 2)
                           for l, x in zip(self.linears, (query, key, value))] #先等维线性映射,后reshape拆分多头
- query 和 key.transpose(-2,-1) 相乘,两者分别对应的 shape 为 [nbatches, 8, L 64] 和 [nbatches, 8, 64, L]。这样相乘得到的结果 scores 的 shape为[nbatches, 8, L, L]。[L, L] 表示每一个单词和每一个单词之间的相似权重关系。## 防止dk增大时,QKT点积值过大,利用sqrt(dk)对其进行缩放,保持数值的稳定性。
- 对 scores 进行 softmax行归一化,所以 p_attn 的 shape 为 [nbatches, 8, L, L]。values的 shape 为 [nbatches, 8, L, 64]。所以最后 p_attn 与 values 相乘输出的 result 的 shape 为 [nbatches, 8, L, 64]。##8个 heads 都进行了不同的矩阵乘法,这样就得到了不同的 “representation subspace”。这就是 multi-head attention 的意义。
- result.transpose(1,2) 得到 [ nbatches,L, 8,64 ]。然后使用 view 进行 reshape 得到 [ nbatches, L, 512 ]。可以理解为8个heads结果的 concatenate 。 最后使用 last linear layer 进行转换。shape仍为 [ nbatches, L, 512 ]。与input时的shape是完全一致的。
x = x.transpose(1, 2).contiguous().view(nbatches, -1, self.h * self.d_k)
return self.linears[-1](x)
下面是整个Transformer中self-attention的代码实现,上面的两个代码分块就是里面的一部分,代码来源 Harvard NLP
#self-attention
class MultiHeadedAttention(nn.Module):
    def __init__(self, h, d_model, dropout=0.1):
        #Take in model size and number of heads.
        super(MultiHeadedAttention, self).__init__()
        assert d_model % h == 0

        self.d_k = d_model // h
        self.h = h
        self.linears = clones(nn.Linear(d_model, d_model), 4)
        self.attn = None
        self.dropout = nn.Dropout(p=dropout)

    def forward(self, query, key, value):
        #batch_size
        nbatches = query.size(0)

        # 1) Do all the linear projections in batch from d_model => h x d_k
        query, key, value = [l(x).view(nbatches, -1, self.h, self.d_k).transpose(1, 2)
                                    for l, x in zip(self.linears, (query, key, value))]

        # query, key, value = [x.view(nbatches, -1, self.h, self.d_k).transpose(1, 2)
        #                     for x in (query, key, value)]

        # 2) Apply attention on all the projected vectors in batch.
        #input=(n,h,l,d_model//h)
        x, self.attn = attention(query, key, value, dropout=self.dropout)

        # 3) "Concat" using a view and apply a final linear.
        #output=(n,l,d_model)
        x = x.transpose(1, 2).contiguous().view(nbatches, -1, self.h * self.d_k)
        return self.linears[-1](x)
        # return x

def attention(query, key, value, dropout=None):
    #"Compute 'Scaled Dot Product Attention'"
    d_k = query.size(-1)
    scores = torch.matmul(query, key.transpose(-2, -1)) / math.sqrt(d_k)
    p_attn = F.softmax(scores, dim = -1)
    if dropout is not None:
        p_attn = dropout(p_attn)
    return torch.matmul(p_attn, value), p_attn
CV
对于NLP而言,建立的是序列中每一个word之间的自相关性,对于计算机视觉中image而言,很显然应该建立的是每一个pixel之间的自相关性。
图片来源:Self-Attention Generative Adversarial Networks(2019 ICML)
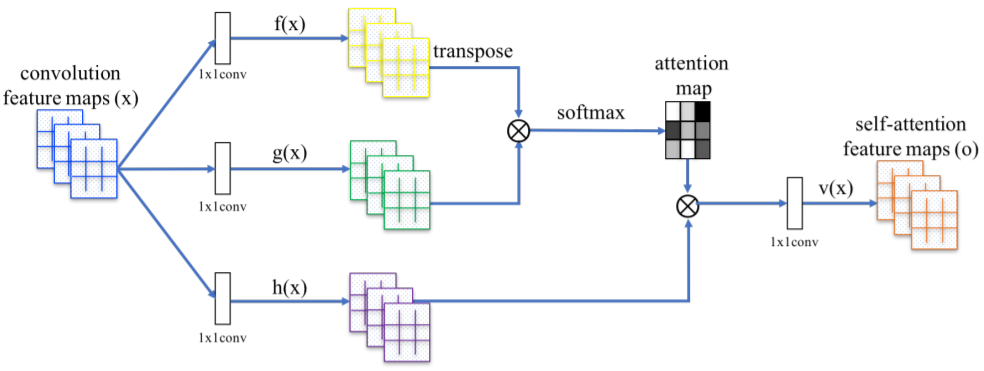
假设feature maps的大小Batch_size×Channels×Width×Height
在初始化函数中,定义了三个1×1卷积,分别是query_conv , key_conv 和 value_conv:
- 在query_conv卷积中,输入为B×C×W×H,输出为B×C/8×W×H;
- 在key_conv卷积中,输入为B×C×W×H,输出为B×C/8×W×H;## query和key的通道维度相等即可,不一定要和value通道数相同,在NLP中也是一样的,因为query x key = [L, L]不会出现特征维
- 在value_conv卷积中,输入为B×C×W×H,输出为B×C×W×H。
步骤一:
proj_query = self.query_conv(x).view(m_batchsize,-1,width*height).permute(0,2,1)
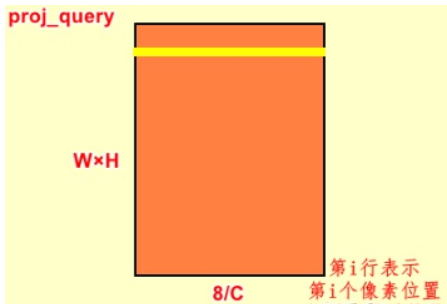
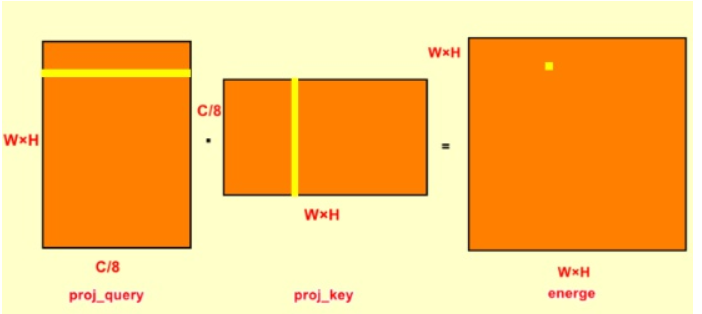
proj_query中首先是对输入的feature map进行query_conv卷积,输出为B×C/8×W×H;view函数改变输出的维度,就单张feature map而言,就是将W×H大小拉直,变为1×(W×H)大小;就batchsize大小而言,输出就是B×C/8×(W×H);permute函数则对第二维和第三维进行倒置,输出为B×(W×H)×C/8。proj_query中的第i行表示第i个像素位置上所有通道的值。
##(WxH)也就是像素的个数,类似于NLP的Sequence Length,对于CV中的特征维是通道维即C/8,NLP中是d_model。
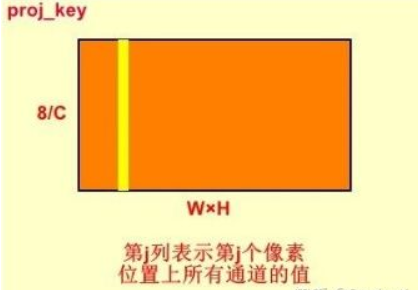
proj_key = self.key_conv(x).view(m_batchsize,-1,width*height)
proj_key与proj_query相似,只是没有最后一步倒置,输出为B×C/8×(W×H)。proj_key中的第j行表示第j个像素位置上所有通道的值。
步骤二:
energy = torch.bmm(proj_query,proj_key)
这一步是将batch_size中的每一对proj_query和proj_key分别进行矩阵相乘,输出为B×(W×H)×(W×H)。Energy中的第(i,j)是将proj_query中的第i行与proj_key中的第j行点乘得到。这个步骤的意义是energy中第(i,j)位置的元素是指输入特征图第j个元素对第i个元素的影响,从而实现全局上下文任意两个元素的依赖关系。
步骤三:
attention = self.softmax(energy)
这一步是将energe进行softmax归一化,是对行的归一化。归一化后每行的之和为1,对于(i,j)位置即可理解为第j位置对i位置的权重,所有的j对i位置的权重之和为1,此时得到attention_map。
proj_value = self.value_conv(x).view(m_batchsize,-1,width*height)
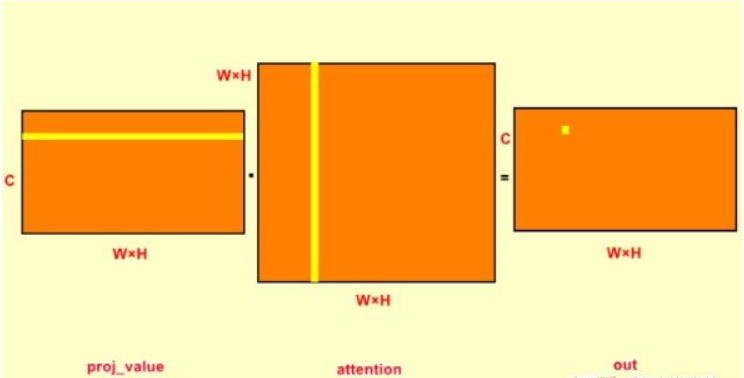
proj_value和proj_query与proj_key一样,只是输入为B×C×W×H,输出为B×C×(W×H)。从self-attention结构图中可以知道proj_value是与attention_map进行矩阵相乘,即下面两行代码。
out = torch.bmm(proj_value,attention.permute(0,2,1) )
out = out.view(m_batchsize,C,width,height)
在对proj_value与attention_map点乘之前,先对attention进行转置。这是由于attention中每一行的权重之和为1,是原特征图第j个位置对第i个位置的权重,将其转置之后,每一列之和为1;proj_value的每一行与attention中的每一列点乘,将权重施加于proj_value上,输出为B×C×(W×H)。
out = self.gamma*out + x
这一步是对attention之后的out进行加权,x是原始的特征图,将其叠加在原始特征图上。Gamma是经过学习得到的,初始gamma为0,输出即原始特征图,随着学习的深入,在原始特征图上增加了加权的attention,得到特征图中任意两个位置的全局依赖关系。
#self-attention
class PSA_Module(Module):
    """ Position attention module"""
    #Ref from SAGAN
    def __init__(self, in_dim):
        super(PSA_Module, self).__init__()
        self.chanel_in = in_dim

        self.query_conv = Conv2d(in_channels=in_dim, out_channels=in_dim//8, kernel_size=1)
        self.key_conv = Conv2d(in_channels=in_dim, out_channels=in_dim//8, kernel_size=1)
        self.value_conv = Conv2d(in_channels=in_dim, out_channels=in_dim, kernel_size=1)
        self.gamma = Parameter(torch.zeros(1))

        self.softmax = Softmax(dim=-1)
    def forward(self, x):
        """
            inputs :
                x : input feature maps( B X C X H X W)
            returns :
                out : attention value + input feature
                attention: B X (HxW) X (HxW)
        """
        m_batchsize, C, height, width = x.size()
        proj_query = self.query_conv(x).view(m_batchsize, -1, width*height).permute(0, 2, 1)
        proj_key = self.key_conv(x).view(m_batchsize, -1, width*height)
        energy = torch.bmm(proj_query, proj_key)
        attention = self.softmax(energy)
        proj_value = self.value_conv(x).view(m_batchsize, -1, width*height)

        out = torch.bmm(proj_value, attention.permute(0, 2, 1))
        out = out.view(m_batchsize, C, height, width)

        out = self.gamma*out + x
        return out
软注意力(soft-attention)
通道注意力
(1) 论文链接:Squeeze-and-Excitation Networks(2018 CVPR)
代码链接:https://github.com/moskomule/senet.pytorch

通道注意力可以理解为让神经网络在看什么,典型的代表是SENet。卷积网络的每一层都有好多卷积核,每个卷积核对应一个特征通道,相对于空间注意力机制(Spatial Attention),通道注意力在于分配各个卷积通道之间的资源,分配粒度上比前者大了一个级别。
整体思想:通道维属于CV里面的特征维,普通的卷积层的输出并没有考虑对各通道的依赖,SE-Block的目的在于通过网络选择性的增强信息量最大的特征,使得后期处理充分利用这些特征并抑制无用的特征,减少噪声。
- Squeeze操作:将各通道的全局空间特征作为该通道的表示,使用全局平均池化生成各通道的统计量
- Excitation操作:学习各通道的依赖程度,并根据依赖程度对不同的特征图进行调整,得到最后的输出,需要考察各通道的依赖程度
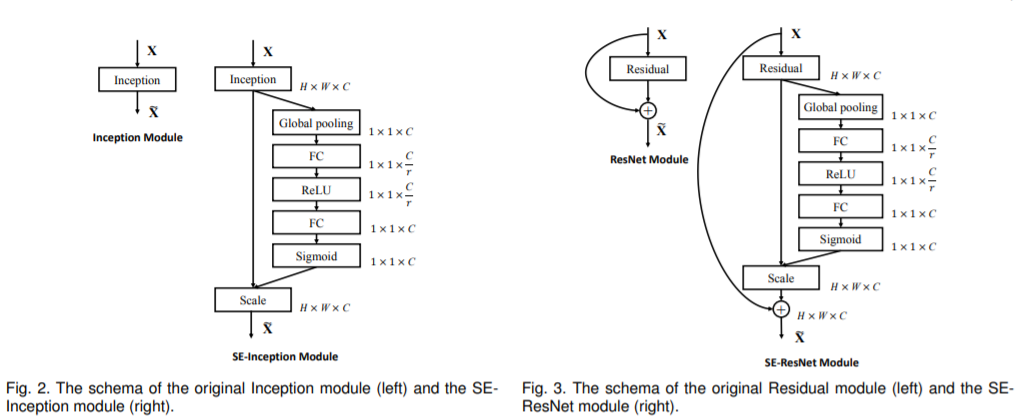
实现步骤: - 将输入特征进行 Global avgpooling,得到1×1×Channel;
- 然后bottleneck特征交互一下,先压缩channel数,再重构回channel数;
- 最后接个sigmoid,生成channel间0~1的attention weights,最后scale乘回原输入特征。(Note:之所以使用 sigmoid 而不使用 softmax 是因为各个Channel的特征不一定要互斥,这样允许有更大的灵活性(例如可以允许多个通道同时得到比较大的权值))
对图2的SE-ResNet Module和ResNet Module分别代码实现
#ResNet Module
class BasicBlock(nn.Module):
    def __init__(self, inplanes, planes, stride=1):
        super(BasicBlock, self).__init__()
        self.conv1 = conv3x3(inplanes, planes, stride)
        self.bn1 = nn.BatchNorm2d(planes)
        self.relu = nn.ReLU(inplace=True)
        self.conv2 = conv3x3(planes, planes)
        self.bn2 = nn.BatchNorm2d(planes)
        if inplanes != planes:
            self.downsample = nn.Sequential(nn.Conv2d(inplanes, planes, kernel_size=1, stride=stride, bias=False),
                                            nn.BatchNorm2d(planes))
        else:
            self.downsample = lambda x: x
        self.stride = stride

    def forward(self, x):
        residual = self.downsample(x)
        out = self.conv1(x)
        out = self.bn1(out)
        out = self.relu(out)

        out = self.conv2(out)
        out = self.bn2(out)

        out += residual
        out = self.relu(out)

        return out

#SE-ResNet Module
class SEBasicBlock(nn.Module):
    expansion = 1

    def __init__(self, inplanes, planes, stride=1, downsample=None, groups=1,
                 base_width=64, dilation=1, norm_layer=None,
                 *, reduction=16):
        super(SEBasicBlock, self).__init__()
        self.conv1 = conv3x3(inplanes, planes, stride)
        self.bn1 = nn.BatchNorm2d(planes)
        self.relu = nn.ReLU(inplace=True)
        self.conv2 = conv3x3(planes, planes, 1)
        self.bn2 = nn.BatchNorm2d(planes)
        self.se = SELayer(planes, reduction)
        self.downsample = downsample
        self.stride = stride

    def forward(self, x):
        residual = x
        out = self.conv1(x)
        out = self.bn1(out)
        out = self.relu(out)

        out = self.conv2(out)
        out = self.bn2(out)
        out = self.se(out)

        if self.downsample is not None:
            residual = self.downsample(x)

        out += residual
        out = self.relu(out)

        return out

class SELayer(nn.Module):
    def __init__(self, channel, reduction=16):
        super(SELayer, self).__init__()
        self.avg_pool = nn.AdaptiveAvgPool2d(1)
        self.fc = nn.Sequential(
            nn.Linear(channel, channel // reduction, bias=False),
            nn.ReLU(inplace=True),
            nn.Linear(channel // reduction, channel, bias=False),
            nn.Sigmoid()
        )

    def forward(self, x):
        b, c, _, _ = x.size()
        y = self.avg_pool(x).view(b, c)
        y = self.fc(y).view(b, c, 1, 1)
        return x * y.expand_as(x)
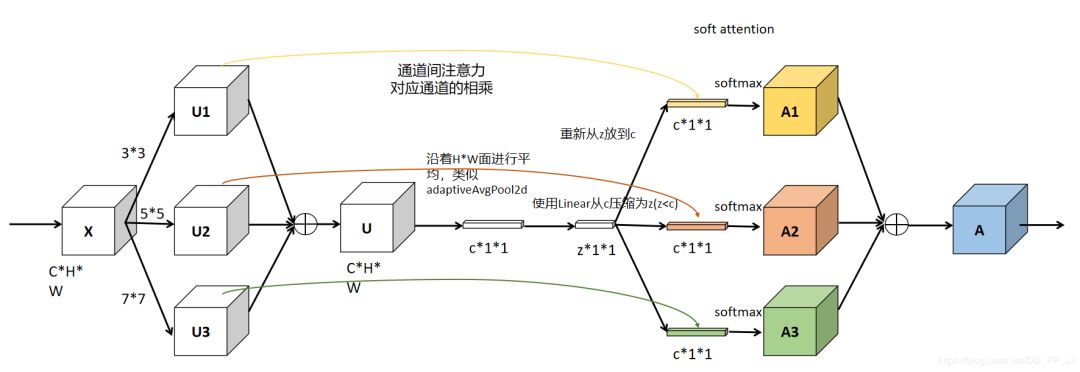
(2) 论文链接:Selective Kernel Networks(2019 CVPR)(SENet的孪生兄弟)
代码链接:https://github.com/pppLang/SKNet

Motivation
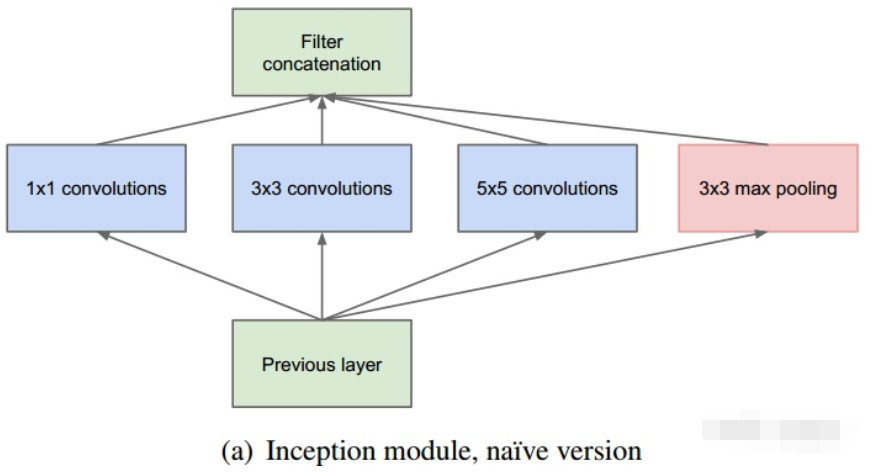
- 基本的Inception结构,用多个不同Kernal size的卷积核进行卷积加上max polling操作得到输出的各个特征图,然后各个特征图Concate起来组合成输出的特征图。不同Kernal size的特征图上的像素点具有不同大小的感受野,所表达的信息在空间上大小不同,这样就丰富了所提取的特征,加强了信息的丰富程度和特征的表达能力,进而提升了网络的性能。
- 但是,这样的直接Concate还是过于粗暴,利用类似于SENet的显示学习的方法,根据特征图的内容,去学习一套更精细的组合规则(系数)。
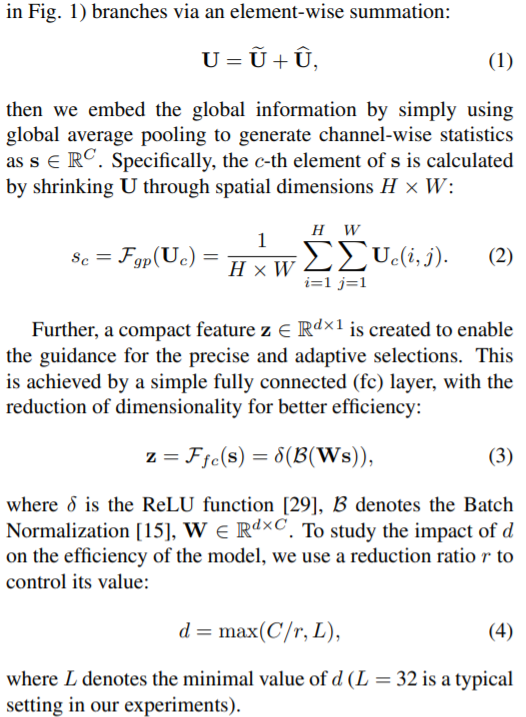
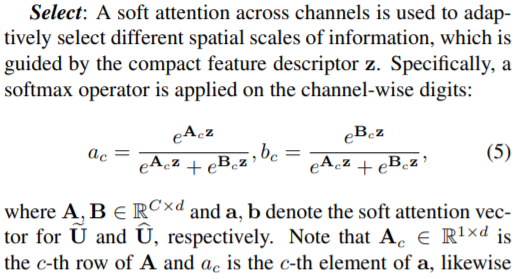
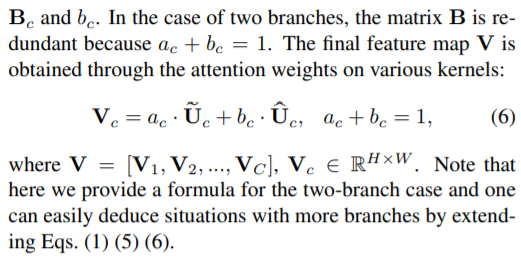
实现步骤(感觉公式有问题):
Non-Local(Self-Attention的应用)
论文链接:Non-local Neural Networks(2018 CVPR)
代码链接:https://github.com/AlexHex7/Non-local_pytorch
Motivation
- Local这个词主要是针对感受野(receptive field)来说的。以单一的卷积操作为例,它的感受野大小就是卷积核大小,而我们一般都选用33,55之类的卷积核,它们只考虑局部区域,因此都是local的运算。同理,池化(Pooling)也是。
- 相反的,non-local指的就是感受野可以很大,而不是一个局部领域。全连接就是non-local的,而且是global的。但是全连接带来了大量的参数,给优化带来困难。卷积层的堆叠可以增大感受野,但是如果看特定层的卷积核在原图上的感受野,它毕竟是有限的。这是local运算不能避免的。
- 然而有些任务,它们可能需要原图上更多的信息,比如attention。如果在某些层能够引入全局的信息,就能很好地解决local操作无法看清全局的情况,为后面的层带去更丰富的信息。
总结上述可得,卷积网络在统计全局信息时出现的三个问题:
1、捕获长范围特征依赖需要累积很多层的网络,导致学习效率太低;
2、由于网络需要累计很深,需要小心的设计模块和梯度;
3、当需要在比较远位置之间来回传递消息时,卷积或者时序局部操作很困难。
Non-local的通用公式表示:

实现步骤:
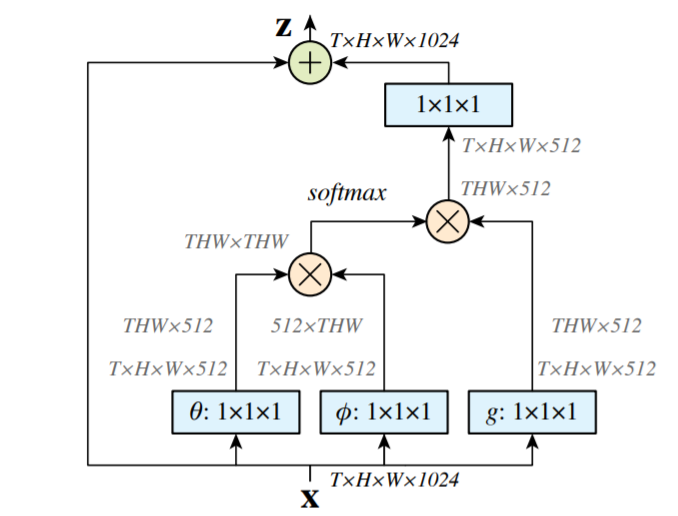
- 首先对输入的 feature map X 进行线性映射(即 111 卷积,来压缩通道数),然后得到 θ,φ,g 特征;
- 通过reshape操作,强行合并上述的三个特征除通道数外的维度,然后对θ和φ进行矩阵点乘操作,计算出特征中的自相关性,即得到每帧中每个像素对其它所有帧所有像素的关系;
- 然后对自相关特征进行 Softmax 归一化操作,得到0~1的weights,即需要的 Self-attention 系数;
- 最后将 attention系数,对应乘回特征矩阵 g 中,然后再上扩展channel数(111卷积),与原输入 feature map X 做残差运算,获得non-local block的输出。
存在的问题和不足:
- 计算量偏大,从图中可以看出如果特征图较大,那么两个(batch,hxw,512)矩阵乘是非常耗内存和计算量的,也就是说当输入特征图很大存在效率底下问题。解决:只在高阶语义层引入non local layer, 也可以在具体实现的过程中添加pooling层来进一步减少计算量,但是这样会损失信息,不是最佳处理办法。
- 只涉及到了位置注意力模块,而没有涉及常用的通道注意力机制
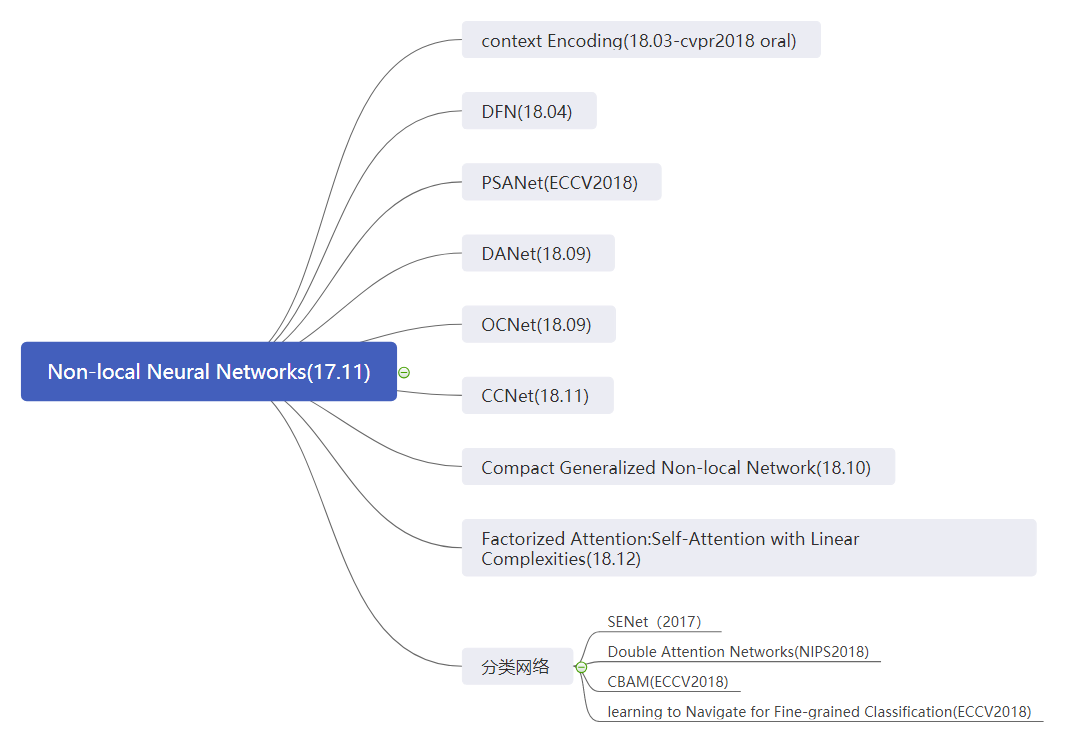
改进思路:
import torch
from torch import nn
from torch.nn import functional as F

class _NonLocalBlockND(nn.Module):
    """
    调用过程
    NONLocalBlock2D(in_channels=32),
    super(NONLocalBlock2D, self).__init__(in_channels,
            inter_channels=inter_channels,
            dimension=2, sub_sample=sub_sample,
            bn_layer=bn_layer)
    """
    def __init__(self,
                 in_channels,
                 inter_channels=None,
                 dimension=3,
                 sub_sample=True,
                 bn_layer=True):
        super(_NonLocalBlockND, self).__init__()

        assert dimension in [1, 2, 3]

        self.dimension = dimension
        self.sub_sample = sub_sample

        self.in_channels = in_channels
        self.inter_channels = inter_channels

        if self.inter_channels is None:
            self.inter_channels = in_channels // 2
            # 进行压缩得到channel个数
            if self.inter_channels == 0:
                self.inter_channels = 1

        if dimension == 3:
            conv_nd = nn.Conv3d
            max_pool_layer = nn.MaxPool3d(kernel_size=(1, 2, 2))
            bn = nn.BatchNorm3d
        elif dimension == 2:
            conv_nd = nn.Conv2d
            max_pool_layer = nn.MaxPool2d(kernel_size=(2, 2))
            bn = nn.BatchNorm2d
        else:
            conv_nd = nn.Conv1d
            max_pool_layer = nn.MaxPool1d(kernel_size=(2))
            bn = nn.BatchNorm1d

        self.g = conv_nd(in_channels=self.in_channels,
                         out_channels=self.inter_channels,
                         kernel_size=1,
                         stride=1,
                         padding=0)

        if bn_layer:
            self.W = nn.Sequential(
                conv_nd(in_channels=self.inter_channels,
                        out_channels=self.in_channels,
                        kernel_size=1,
                        stride=1,
                        padding=0), bn(self.in_channels))
            nn.init.constant_(self.W[1].weight, 0)
            nn.init.constant_(self.W[1].bias, 0)
        else:
            self.W = conv_nd(in_channels=self.inter_channels,
                             out_channels=self.in_channels,
                             kernel_size=1,
                             stride=1,
                             padding=0)
            nn.init.constant_(self.W.weight, 0)
            nn.init.constant_(self.W.bias, 0)

        self.theta = conv_nd(in_channels=self.in_channels,
                             out_channels=self.inter_channels,
                             kernel_size=1,
                             stride=1,
                             padding=0)
        self.phi = conv_nd(in_channels=self.in_channels,
                           out_channels=self.inter_channels,
                           kernel_size=1,
                           stride=1,
                           padding=0)

        if sub_sample:
            self.g = nn.Sequential(self.g, max_pool_layer)
            self.phi = nn.Sequential(self.phi, max_pool_layer)

    def forward(self, x):
        '''
        :param x: (b, c,  h, w)
        :return:
        '''

        batch_size = x.size(0)

        g_x = self.g(x).view(batch_size, self.inter_channels, -1)#[bs, c, w*h]
        g_x = g_x.permute(0, 2, 1)

        theta_x = self.theta(x).view(batch_size, self.inter_channels, -1)
        theta_x = theta_x.permute(0, 2, 1)

        phi_x = self.phi(x).view(batch_size, self.inter_channels, -1)

        f = torch.matmul(theta_x, phi_x)

        print(f.shape)

        f_div_C = F.softmax(f, dim=-1)

        y = torch.matmul(f_div_C, g_x)
        y = y.permute(0, 2, 1).contiguous()
        y = y.view(batch_size, self.inter_channels, *x.size()[2:])
        W_y = self.W(y)
        z = W_y + x
        return z
位置注意力(position-wise attention)
论文链接:CCNet: Criss-Cross Attention for Semantic Segmentation(2019 ICCV)
代码链接:https://github.com/speedinghzl/CCNet
Contribution
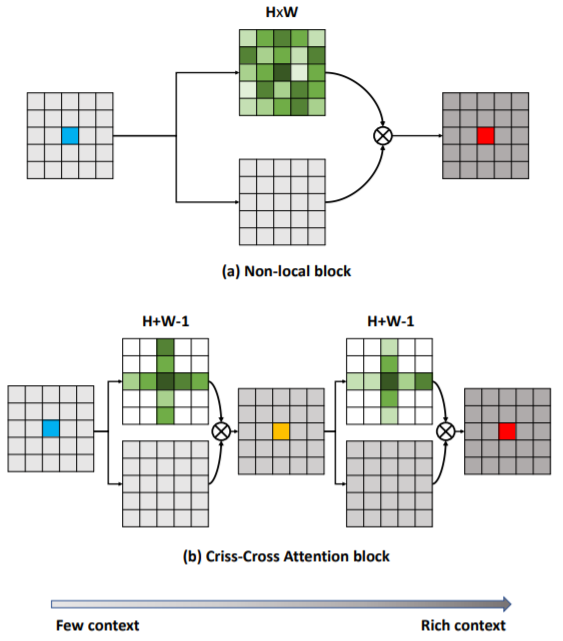
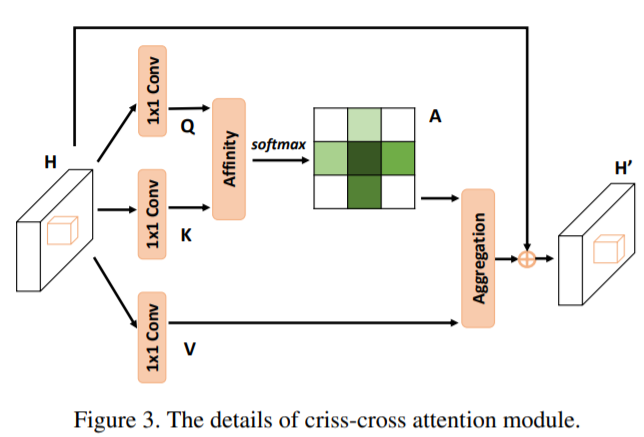
在上面的DANet中,attention map计算的是所有像素与所有像素之间的相似性,空间复杂度为(H x W) x (H x W),而本文采用了criss-cross思想,只计算每个像素与其同行同列即十字上的像素的相似性,通过进行循环(两次相同操作即二阶注意力,能够从所有像素中获取全图像的上下文信息,以生成具有密集且丰富的上下文信息的新特征图),间接计算到每个像素与每个像素的相似性,将空间复杂度降为(H x W) x (H + W - 1),极大的降低了计算量。

def _check_contiguous(*args):
    if not all([mod is None or mod.is_contiguous() for mod in args]):
        raise ValueError("Non-contiguous input")


class CA_Weight(autograd.Function):
    @staticmethod
    def forward(ctx, t, f):
        # Save context
        n, c, h, w = t.size()
        size = (n, h+w-1, h, w)
        weight = torch.zeros(size, dtype=t.dtype, layout=t.layout, device=t.device)

        _ext.ca_forward_cuda(t, f, weight)

        # Output
        ctx.save_for_backward(t, f)

        return weight

    @staticmethod
    @once_differentiable
    def backward(ctx, dw):
        t, f = ctx.saved_tensors

        dt = torch.zeros_like(t)
        df = torch.zeros_like(f)

        _ext.ca_backward_cuda(dw.contiguous(), t, f, dt, df)

        _check_contiguous(dt, df)

        return dt, df

class CA_Map(autograd.Function):
    @staticmethod
    def forward(ctx, weight, g):
        # Save context
        out = torch.zeros_like(g)
        _ext.ca_map_forward_cuda(weight, g, out)

        # Output
        ctx.save_for_backward(weight, g)

        return out

    @staticmethod
    @once_differentiable
    def backward(ctx, dout):
        weight, g = ctx.saved_tensors

        dw = torch.zeros_like(weight)
        dg = torch.zeros_like(g)

        _ext.ca_map_backward_cuda(dout.contiguous(), weight, g, dw, dg)

        _check_contiguous(dw, dg)

        return dw, dg

ca_weight = CA_Weight.apply
ca_map = CA_Map.apply


class CrissCrossAttention(nn.Module):
    """ Criss-Cross Attention Module"""
    def __init__(self,in_dim):
        super(CrissCrossAttention,self).__init__()
        self.chanel_in = in_dim

        self.query_conv = nn.Conv2d(in_channels = in_dim , out_channels = in_dim//8 , kernel_size= 1)
        self.key_conv = nn.Conv2d(in_channels = in_dim , out_channels = in_dim//8 , kernel_size= 1)
        self.value_conv = nn.Conv2d(in_channels = in_dim , out_channels = in_dim , kernel_size= 1)
        self.gamma = nn.Parameter(torch.zeros(1))

    def forward(self,x):
        proj_query = self.query_conv(x)
        proj_key = self.key_conv(x)
        proj_value = self.value_conv(x)

        energy = ca_weight(proj_query, proj_key)
        attention = F.softmax(energy, 1)
        out = ca_map(attention, proj_value)
        out = self.gamma*out + x

        return out

__all__ = ["CrissCrossAttention", "ca_weight", "ca_map"]
混合域模型(融合空间域和通道域注意力)
(1) Residual Attention Network for image classification(2017 CVPR)
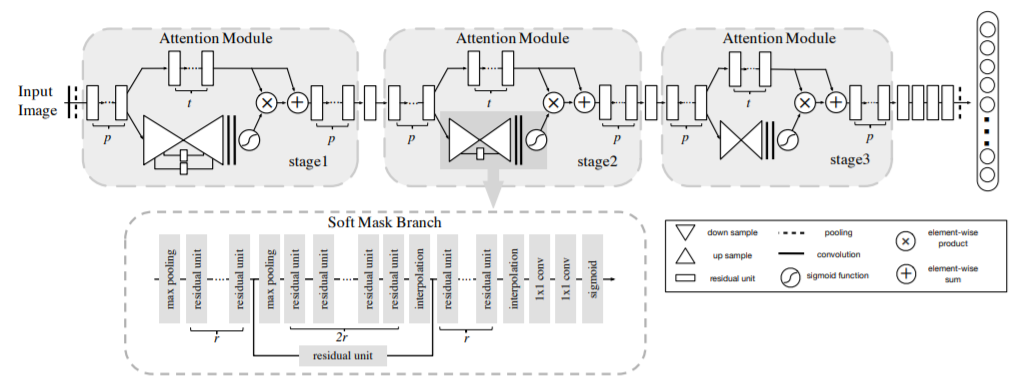
该文章的注意力机制的创新点在于提出了残差注意力学习(residual attention learning),不只根据当前网络层的信息加上mask,还把上一层的信息传递下来,这样就防止mask之后的信息量过少引起的网络层数不能堆叠很深的问题,从而可以得到的特征更为丰富,从而能够更好的注意关键特征。同时采用三阶注意力模块来构成整个的注意力。(其实对于其它的注意力的处理也都引入了残差连接,原因差不多相同)
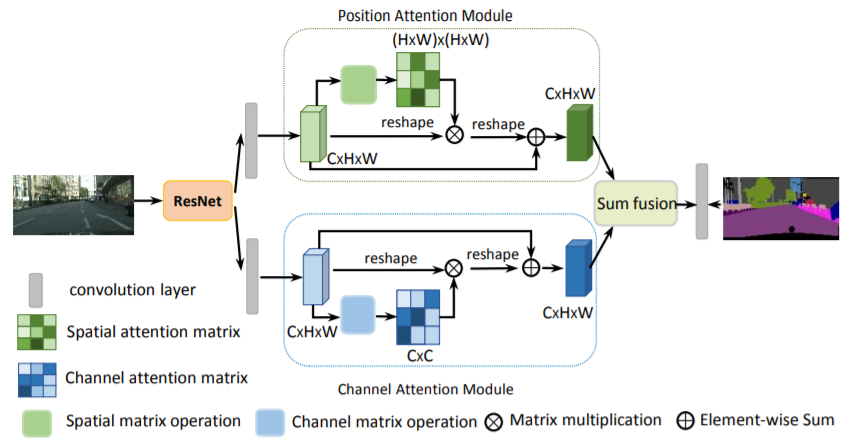
(2) Dual Attention Network for Scene Segmentation(2019 CVPR) ##将通道注意力和空间注意力机制并行使用,得到的特征进行融合
""" Position attention module"""
class PSA_Module(Module):

    #Ref from SAGAN
    def __init__(self, in_dim):
        super(PSA_Module, self).__init__()
        self.chanel_in = in_dim

        self.query_conv = Conv2d(in_channels=in_dim, out_channels=in_dim//8, kernel_size=1)
        self.key_conv = Conv2d(in_channels=in_dim, out_channels=in_dim//8, kernel_size=1)
        self.value_conv = Conv2d(in_channels=in_dim, out_channels=in_dim, kernel_size=1)
        self.gamma = Parameter(torch.zeros(1))

        self.softmax = Softmax(dim=-1)
    def forward(self, x):
        """
            inputs :
                x : input feature maps( B X C X H X W)
            returns :
                out : attention value + input feature
                attention: B X (HxW) X (HxW)
        """
        m_batchsize, C, height, width = x.size()
        proj_query = self.query_conv(x).view(m_batchsize, -1, width*height).permute(0, 2, 1)
        proj_key = self.key_conv(x).view(m_batchsize, -1, width*height)
        energy = torch.bmm(proj_query, proj_key)
        attention = self.softmax(energy)
        proj_value = self.value_conv(x).view(m_batchsize, -1, width*height)

        out = torch.bmm(proj_value, attention.permute(0, 2, 1))
        out = out.view(m_batchsize, C, height, width)

        out = self.gamma*out + x
        return out

""" Channel attention module"""
class CSA_Module(Module):
    def __init__(self, in_dim):
        super(CSA_Module, self).__init__()
        self.chanel_in = in_dim

        self.gamma = Parameter(torch.zeros(1))
        self.softmax  = Softmax(dim=-1)
    def forward(self,x):
        """
            inputs :
                x : input feature maps( B X C X H X W)
            returns :
                out : attention value + input feature
                attention: B X C X C
        """
        m_batchsize, C, height, width = x.size()
        proj_query = x.view(m_batchsize, C, -1)
        proj_key = x.view(m_batchsize, C, -1).permute(0, 2, 1)
        energy = torch.bmm(proj_query, proj_key)

        energy_new = torch.max(energy, -1, keepdim=True)[0].expand_as(energy)-energy

        attention = self.softmax(energy_new)
        proj_value = x.view(m_batchsize, C, -1)

        out = torch.bmm(attention, proj_value)
        out = out.view(m_batchsize, C, height, width)

        out = self.gamma*out + x
        return out
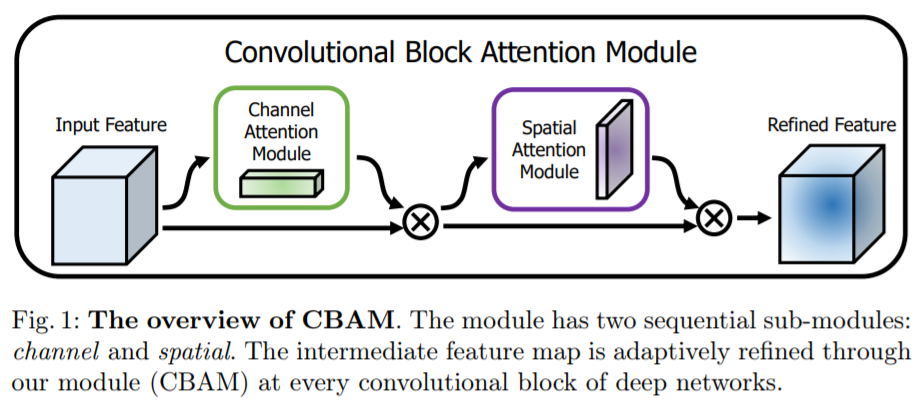
(3) CBAM: Convolutional Block Attention Module(2018 ECCV)
代码链接:https://github.com/Jongchan/attention-module
整体架构
子模块的具体实现
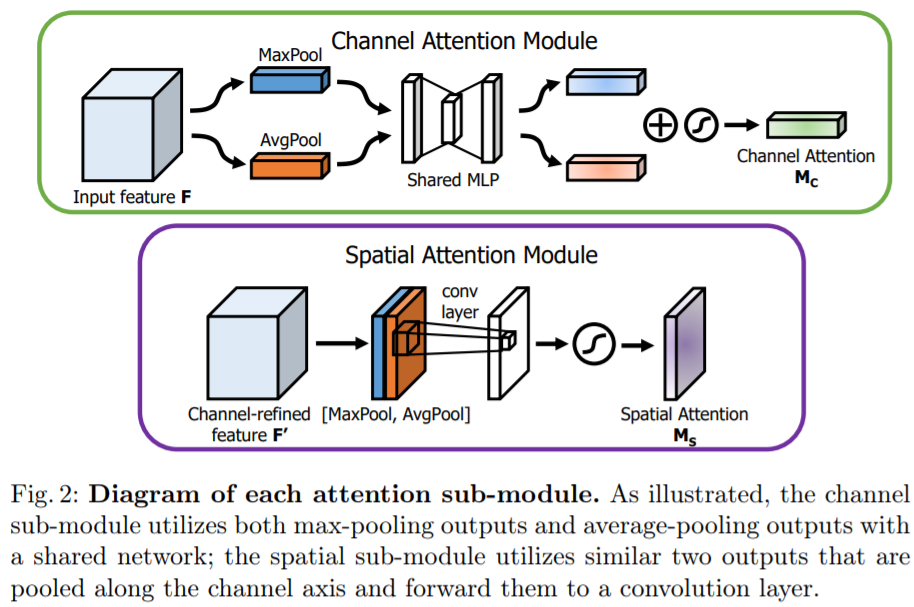


在ResNet结构应用CBAM
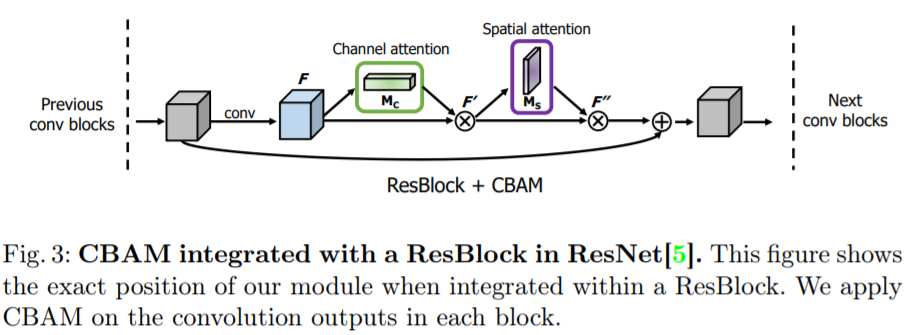
#ChannelAttention
class ChannelAttention(nn.Module):
    def __init__(self, in_planes, rotio=16):
        super(ChannelAttention, self).__init__()
        self.avg_pool = nn.AdaptiveAvgPool2d(1)
        self.max_pool = nn.AdaptiveMaxPool2d(1)

        self.sharedMLP = nn.Sequential(
            nn.Conv2d(in_planes, in_planes // ratio, 1, bias=False), nn.ReLU(),
            nn.Conv2d(in_planes // rotio, in_planes, 1, bias=False))
        self.sigmoid = nn.Sigmoid()

    def forward(self, x):
        avgout = self.sharedMLP(self.avg_pool(x))
        maxout = self.sharedMLP(self.max_pool(x))
        return self.sigmoid(avgout + maxout)

#SpatialAttention
class SpatialAttention(nn.Module):
    def __init__(self, kernel_size=7):
        super(SpatialAttention, self).__init__()
        assert kernel_size in (3,7), "kernel size must be 3 or 7"
        padding = 3 if kernel_size == 7 else 1

        self.conv = nn.Conv2d(2,1,kernel_size, padding=padding, bias=False)
        self.sigmoid = nn.Sigmoid()

    def forward(self, x):
        avgout = torch.mean(x, dim=1, keepdim=True)
        maxout, _ = torch.max(x, dim=1, keepdim=True)
        x = torch.cat([avgout, maxout], dim=1)
        x = self.conv(x)
        return self.sigmoid(x)
#cbam
class cbam(nn.Module):
 	def __init__(self, planes):
        self.ca = ChannelAttention(planes)# planes是feature map的通道个数
        self.sa = SpatialAttention()
     def forward(self, x):
        x = self.ca(out) * x  # 广播机制
        x = self.sa(out) * x  # 广播机制
将cbam模块引入Resnet中
class BasicBlock(nn.Module):
    expansion = 1
    def __init__(self, inplanes, planes, stride=1, downsample=None):
        super(BasicBlock, self).__init__()
        self.conv1 = conv3x3(inplanes, planes, stride)
        self.bn1 = nn.BatchNorm2d(planes)
        self.relu = nn.ReLU(inplace=True)
        self.conv2 = conv3x3(planes, planes)
        self.bn2 = nn.BatchNorm2d(planes)
        self.ca = ChannelAttention(planes)
        self.sa = SpatialAttention()
        self.downsample = downsample
        self.stride = stride
    def forward(self, x):
        residual = x
        out = self.conv1(x)
        out = self.bn1(out)
        out = self.relu(out)
        out = self.conv2(out)
        out = self.bn2(out)
        out = self.ca(out) * out  # 广播机制
        out = self.sa(out) * out  # 广播机制
        if self.downsample is not None:
            residual = self.downsample(x)
        out += residual
        out = self.relu(out)
        return out
参考文献
- 计算机视觉中的注意力机制
- Non-local模块与Self-attention的之间的关系与区别
- 视觉应用中的Self Attention
- Non-local neural networks
- 双注意力网络,是丰富了还是牵强了attention
- 深入理解Transformer原理及实现
- SENet的孪生兄弟SKNet
- 简单而有效的CBAM模块
最后
以上就是强健老师最近收集整理的关于注意力机制(Attention Mechanism)的全部内容,更多相关注意力机制(Attention内容请搜索靠谱客的其他文章。


发表评论 取消回复