相对布局(RelativeLayout)的使用
- 背景
- 接着上一篇提到的线性布局,如果说线性布局是遵循一种顺序排放,一处存在一个组件就不会存在另一个。那么相对布局则是位置上的相对关系(对于其他组件),不指定相对位置则会堆在一起重叠起来。
- 什么是相对布局
- 相对布局指的是有参照的布局方式,就是以某个兄弟组件,或者父容器来决定组件自己位置的。(兄弟组件是在同一个布局里面的组件,id参照其他布局里的组件会出问题)
- 常见属性
- android:gravity
- 设置容器内各个子组件的对齐方式。
- android:ignoreGravity
- 这是子组件的属性,设置了的话那么该子组件不受上面的gravity影响。
- 尝试设置一个布局文件,如下。
-
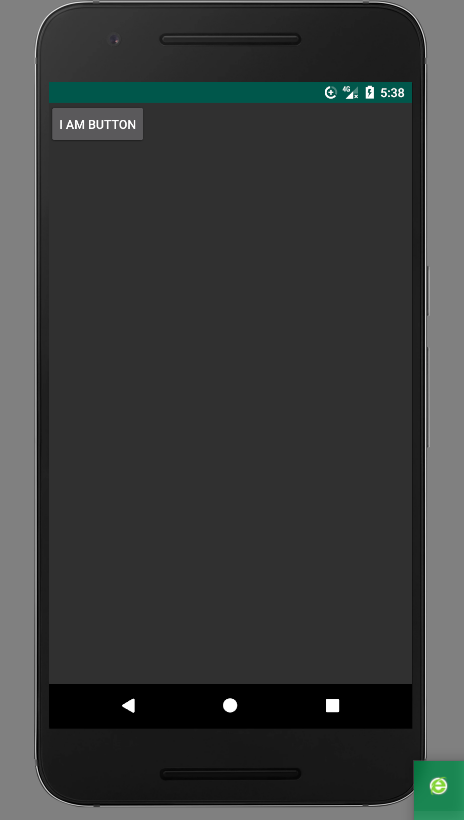
  	<?xml version="1.0" encoding="utf-8"?>
  	<RelativeLayout xmlns:android="http://schemas.android.com/apk/res/android"
  	    xmlns:app="http://schemas.android.com/apk/res-auto"
  	    xmlns:tools="http://schemas.android.com/tools"
  	    android:layout_width="match_parent"
  	    android:layout_height="match_parent"
  	    tools:context="com.zc.helloworld.MainActivity"
  	    >

  	    <Button
  	        android:id="@+id/btn_01"
  	        android:layout_width="wrap_content"
  	        android:layout_height="wrap_content"
  	        android:text="I am Button"/>
  	    <Button
  	        android:id="@+id/btn_02"
  	        android:layout_width="wrap_content"
  	        android:layout_height="wrap_content"
  	        android:text="I am Button"/>
  	    <Button
  	        android:id="@+id/btn_03"
  	        android:layout_width="wrap_content"
  	        android:layout_height="wrap_content"
  	        android:text="I am Button"/>
  	</RelativeLayout>
-
- 效果如下。惊讶发现三个按钮只出现了一个,这就是相对布局,没有指定相对位置,那么就会叠放在一个位置。
- 设置权重,但是这只会改变组件对于布局的排列,而不能设置组件自身之间的关系,因此依然重叠。
- android:gravity
- 子组件的属性
- 根据父容器确定位置
- 向左对齐:android:layout_alighParentLeft
- 向右对齐:android:layout_alighParentRight
- 顶端对齐:android:layout_alighParentTop
- 底部对齐:android:layout_alighParentBottom
- 水平居中:android:layout_centerHorizontal
- 垂直居中:android:layout_centerVertical
- 中央位置:android:layout_centerInParent(两个方向)
- 属性值为布尔值。
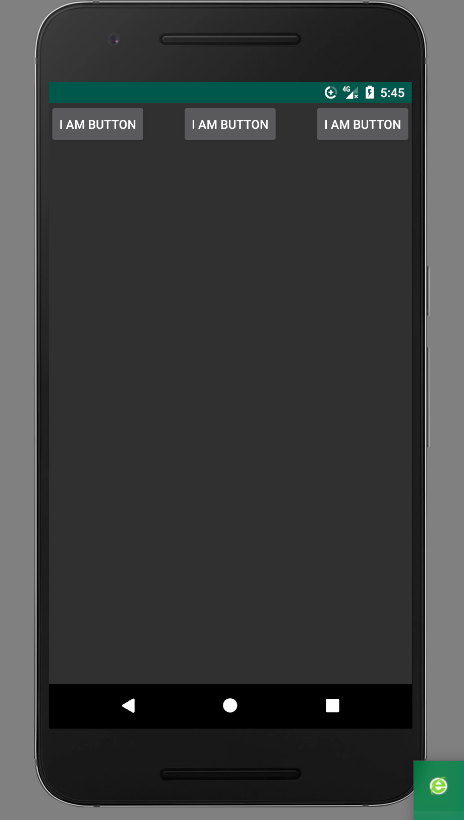
- 进行设置如下。(取消权重设置,显然不同于LinearLayout的必须给出排列方向,Relativelayout自定义性更强)
-
<?xml version="1.0" encoding="utf-8"?> <RelativeLayout xmlns:android="http://schemas.android.com/apk/res/android" xmlns:app="http://schemas.android.com/apk/res-auto" xmlns:tools="http://schemas.android.com/tools" android:layout_width="match_parent" android:layout_height="match_parent" tools:context="com.zc.helloworld.MainActivity" > <Button android:id="@+id/btn_01" android:layout_width="wrap_content" android:layout_height="wrap_content" android:layout_alignParentLeft="true" android:text="I am Button"/> <Button android:id="@+id/btn_02" android:layout_width="wrap_content" android:layout_height="wrap_content" android:layout_centerInParent="true" android:layout_alignParentTop="true" android:text="I am Button"/> <Button android:id="@+id/btn_03" android:layout_width="wrap_content" android:layout_height="wrap_content" android:layout_alignParentRight="true" android:text="I am Button"/> </RelativeLayout> - 效果如下
-
- 根据兄弟组件确定位置
- 左边:android:layout_toLeftOf
- 右边:android:layout_toRightOf
- 上方:android:layout_above
- 下方:android:layout_below
- 对齐上边界:android:layout_alignTop
- 对齐下边界:android:layout_alignBottom
- 对齐左边界:android:layout_alignLeft
- 对齐右边界:android:layout_alignRight
- 属性值均为兄弟组件id。
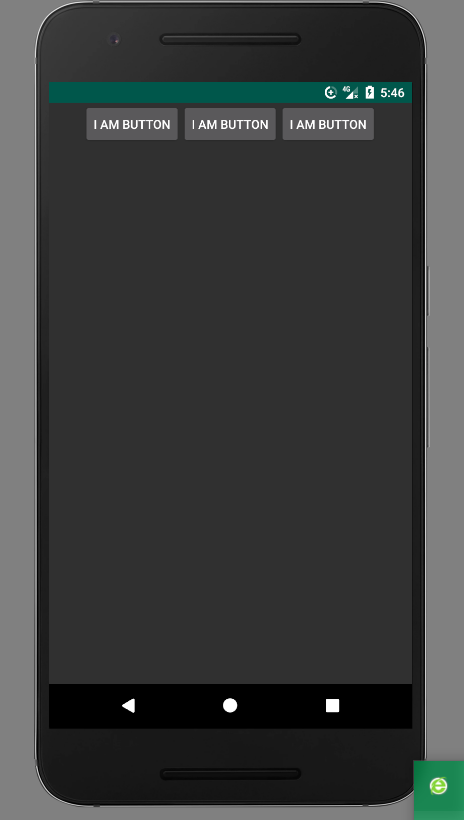
- 如下设置。
-
<?xml version="1.0" encoding="utf-8"?> <RelativeLayout xmlns:android="http://schemas.android.com/apk/res/android" xmlns:app="http://schemas.android.com/apk/res-auto" xmlns:tools="http://schemas.android.com/tools" android:layout_width="match_parent" android:layout_height="match_parent" tools:context="com.zc.helloworld.MainActivity" > <Button android:id="@+id/btn_01" android:layout_toLeftOf="@+id/btn_02" android:layout_width="wrap_content" android:layout_height="wrap_content" android:text="I am Button"/> <Button android:id="@+id/btn_02" android:layout_width="wrap_content" android:layout_height="wrap_content" android:layout_centerInParent="true" android:layout_alignParentTop="true" android:text="I am Button"/> <Button android:id="@+id/btn_03" android:layout_toRightOf="@id/btn_02" android:layout_width="wrap_content" android:layout_height="wrap_content" android:text="I am Button"/> </RelativeLayout> - 效果如下。
-
- 自身设置与父容器边距确定位置
- android:layout_margin: 组件的四周外部留出一定的边距
- android:layout_marginLeft: 组件的左边外部留出一定的边距
- android:layout_marginTop: 组件的上边外部留出一定的边距
- android:layout_marginRight: 组件的右边外部留出一定的边距
- android:layout_marginBottom: 组件的下边外部留出一定的边距
- 属性值为像素值(px或者dp)
- 自身设置内部元素边距
- android:padding :组件的四周内部留出一定的边距
- android:paddingLeft: 组件的左边内部留出一定的边距
- android:paddingTop: 组件的上边内部留出一定的边距
- android:paddingRight: 组件的右边内部留出一定的边距
- android:paddingBottom: 组件的下边内部留出一定的边距
- 属性值同上。
- 根据父容器确定位置
最后
以上就是秀丽鸡最近收集整理的关于安卓入门系列-05常见布局之RelaiveLayout(相对布局)相对布局(RelativeLayout)的使用的全部内容,更多相关安卓入门系列-05常见布局之RelaiveLayout(相对布局)相对布局(RelativeLayout)内容请搜索靠谱客的其他文章。
本图文内容来源于网友提供,作为学习参考使用,或来自网络收集整理,版权属于原作者所有。


发表评论 取消回复