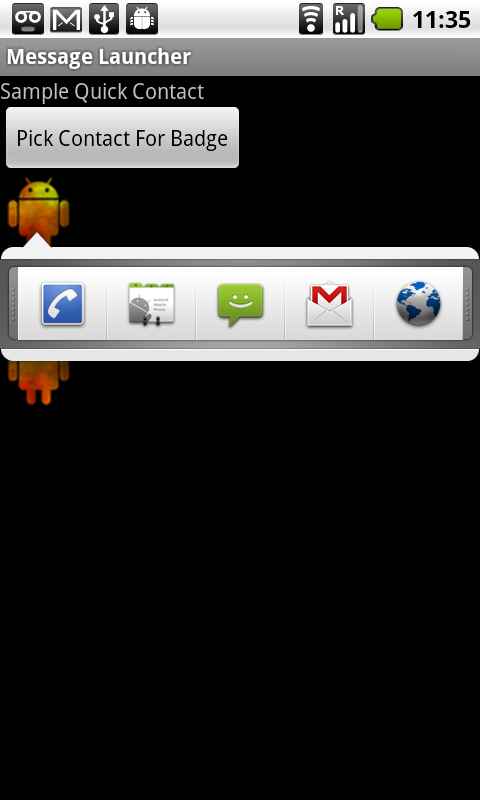
If you’ve spent any time on an Android device, you may have noticed how you can click on little Contact images to launch a toolbar with lots of different actions, such as call, text or email that person. In this Quick Tip, you learn how to build this great functionality—called the Quick Contact Badge—into your own applications.
In order to have easy access to contacts, we’ll start with our existing open source code here. We enhance this project, which initially allowed the user to simply choose a contact from a list, and create several different quick contact badges for that contact to illustrate how they work.
Note: This tutorial requires Android 2.0 or higher.
Step 1: Adding an Activity
Start with a new Activity called QuickContactBadgeActivity. Inside the onCreate() method, add a setContentView() method call for a new layout called badge (e.g. R.id.badge).
- public class QuickContactBadgeActivity extends Activity {
- @Override
- protected void onCreate(Bundle savedInstanceState) {
- super.onCreate(savedInstanceState);
- setContentView(R.layout.badge);
- }
- }
public class QuickContactBadgeActivity extends Activity {

    @Override
    protected void onCreate(Bundle savedInstanceState) {
        super.onCreate(savedInstanceState);

        setContentView(R.layout.badge);
    }
}
Step 2: Creating the Layout
Now you need to create a layout using QuickContactBadge controls. The QuickContactBadge control was introduced in Android 2.0 (API Level 5). The following layout creates two QuickContactBadge controls and provides a holder for a third (a FrameLayout control). The QuickContactBadge control is derived from an ImageView control. Thus, you can set the image displayed by the QuickContactBadge control just as you would an ImageView, using the src attribute.
Here’s the final layout we’re using:
- <?xml version="1.0" encoding="utf-8"?>
- <LinearLayout
- xmlns:android="http://schemas.android.com/apk/res/android"
- android:layout_width="wrap_content"
- android:layout_height="wrap_content"
- android:orientation="vertical">
- <TextView
- android:text="Sample Quick Contact Badges"
- android:id="@+id/TextView01"
- android:layout_width="match_parent"
- android:layout_height="wrap_content"></TextView>
- <Button
- android:layout_width="wrap_content"
- android:layout_height="wrap_content"
- android:id="@+id/pick_contact"
- android:onClick="onPickContact"
- android:text="@string/pick_contact_for_badge"></Button>
- <QuickContactBadge
- android:id="@+id/badge_small"
- android:layout_width="wrap_content"
- android:layout_height="wrap_content"
- android:src="@drawable/droid_small"></QuickContactBadge>
- <QuickContactBadge
- android:id="@+id/badge_medium"
- android:layout_width="wrap_content"
- android:layout_height="wrap_content"></QuickContactBadge>
- <FrameLayout
- android:id="@+id/badge_holder_large"
- android:layout_width="wrap_content"
- android:layout_height="wrap_content"></FrameLayout>
- </LinearLayout>
<?xml version="1.0" encoding="utf-8"?>
<LinearLayout
    xmlns:android="http://schemas.android.com/apk/res/android"
    android:layout_width="wrap_content"
    android:layout_height="wrap_content"
    android:orientation="vertical">
    <TextView
        android:text="Sample Quick Contact Badges"
        android:id="@+id/TextView01"
        android:layout_width="match_parent"
        android:layout_height="wrap_content"></TextView>
    <Button
        android:layout_width="wrap_content"
        android:layout_height="wrap_content"
        android:id="@+id/pick_contact"
        android:onClick="onPickContact"
        android:text="@string/pick_contact_for_badge"></Button>
    <QuickContactBadge
        android:id="@+id/badge_small"
        android:layout_width="wrap_content"
        android:layout_height="wrap_content"
        android:src="@drawable/droid_small"></QuickContactBadge>
    <QuickContactBadge
        android:id="@+id/badge_medium"
        android:layout_width="wrap_content"
        android:layout_height="wrap_content"></QuickContactBadge>
    <FrameLayout
        android:id="@+id/badge_holder_large"
        android:layout_width="wrap_content"
        android:layout_height="wrap_content"></FrameLayout>
</LinearLayout>
QuickContactBadge controls can launch the contact action bar (as we’re calling it) in three different sizes: small, medium (default), and large. The small action bar contains only the action buttons and minimal details. The medium action bar contains the action buttons and some additional contact info. The large action bar contains lots of actions, contact info and graphics.
Note: The current ADT plug-in for Eclipse allows you to set the window size of the contact action bar in XML. An error is shown when you try to set a value, though. Unfortunately, this means you can’t actually set this attribute in the XML layout file. Instead, you must set the window size programmatically using the setMode() method of the QuickContactBadge class. You will see how in the next step.
Step 2: Configuring the Badges
Within the onCreate() method of the Activity, add the following code, replacing the email address with one in your contacts (add it ahead of time if you need to).
- QuickContactBadge badgeSmall = (QuickContactBadge) findViewById(R.id.badge_small);
- badgeSmall.assignContactFromEmail("any@gmail.com", true);
- badgeSmall.setMode(ContactsContract.QuickContact.MODE_SMALL);
QuickContactBadge badgeSmall = (QuickContactBadge) findViewById(R.id.badge_small);
badgeSmall.assignContactFromEmail("any@gmail.com", true);
badgeSmall.setMode(ContactsContract.QuickContact.MODE_SMALL);
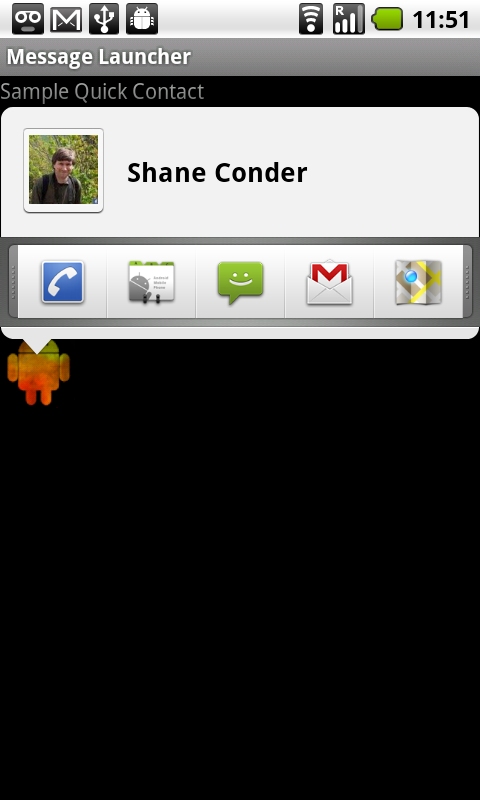
The more information that is associated with the contact tied to the badge, the more action items will be available for use in the contact action bar. For instance, here’s one using my own email address:

And here’s another with a contact that has a web address assigned:

You can use the setExcludeMimeTypes() method of the QuickContactBadge class to remove any actions or information you don’t want to display.
Step 3: Working with Unknown Contacts
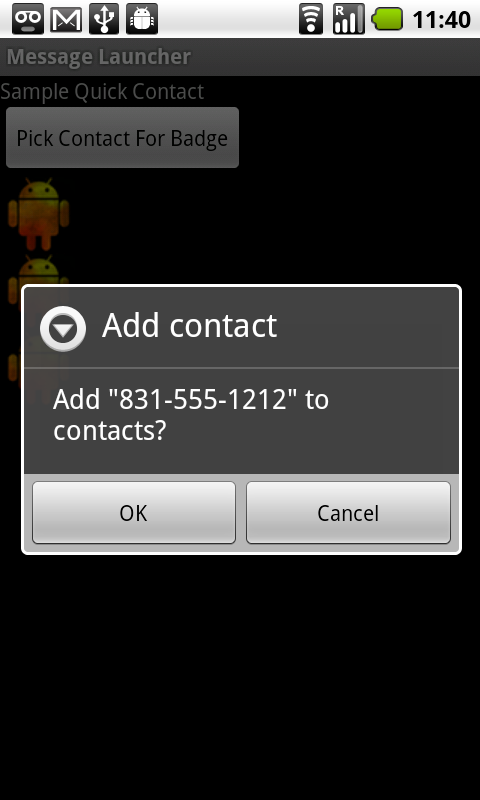
The previous example worked well because you already knew your own address or added a contact you knew to exist. What if the contact doesn’t yet exist within your Contacts database? Try it!
Add the following code, this time to look up a phone number that you probably don’t have in your address book:
- QuickContactBadge badgeMedium = (QuickContactBadge) findViewById(R.id.badge_medium);
- badgeMedium.assignContactFromPhone("831-555-1212", true);
- badgeMedium.setImageResource(R.drawable.droid_small);
QuickContactBadge badgeMedium = (QuickContactBadge) findViewById(R.id.badge_medium);
badgeMedium.assignContactFromPhone("831-555-1212", true);
badgeMedium.setImageResource(R.drawable.droid_small);
Note also that this time we are using a medium sized QuickContactBadge. When clicking on the QuickContactBadge for an unknown entry, something interesting happens. The user is asked if they want to add the contact. If they choose yes, they’ll get the option to add the email or phone number to an existing contact or create a new contact. Then, on subsequent presses of this QuickContactBadge, the contact will exist and be found. This can be quite handy.

Step 4: Creating a QuickContactBadge From an Existing Contact
Generally speaking, you don’t know what contacts are on someone’s device. You do, however, have access to the Contacts content provider and can retrieve URIs for each contact as needed. You learned how to launch the contact picker in this previous tutorial.
Here’s an example of how we can use a contact URI to supply the contact information for a QuickContactBadge:
- public void onPickContact(View view) {
- Intent contactPickerIntent = new Intent(Intent.ACTION_PICK,
- Contacts.CONTENT_URI);
- startActivityForResult(contactPickerIntent, CONTACT_PICKER_RESULT);
- }
- @Override
- protected void onActivityResult(int requestCode, int resultCode, Intent data) {
- if (resultCode == RESULT_OK) {
- switch (requestCode) {
- case CONTACT_PICKER_RESULT:
- Uri contactUri = data.getData();
- FrameLayout badgeLargeHolder = (FrameLayout) findViewById(R.id.badge_holder_large);
- QuickContactBadge badgeLarge = new QuickContactBadge(this);
- badgeLarge.assignContactUri(contactUri);
- badgeLarge.setMode(ContactsContract.QuickContact.MODE_LARGE);
- badgeLarge.setImageResource(R.drawable.droid_small);
- badgeLargeHolder.addView(badgeLarge);
- break;
- }
- }
- }
public void onPickContact(View view) {
    Intent contactPickerIntent = new Intent(Intent.ACTION_PICK,
            Contacts.CONTENT_URI);
    startActivityForResult(contactPickerIntent, CONTACT_PICKER_RESULT);
}

@Override
protected void onActivityResult(int requestCode, int resultCode, Intent data) {
    if (resultCode == RESULT_OK) {
        switch (requestCode) {
        case CONTACT_PICKER_RESULT:
            Uri contactUri = data.getData();
            FrameLayout badgeLargeHolder = (FrameLayout) findViewById(R.id.badge_holder_large);

            QuickContactBadge badgeLarge = new QuickContactBadge(this);
            badgeLarge.assignContactUri(contactUri);
            badgeLarge.setMode(ContactsContract.QuickContact.MODE_LARGE);
            badgeLarge.setImageResource(R.drawable.droid_small);
            badgeLargeHolder.addView(badgeLarge);
            break;
        }
    }
}
Here you use the Contact Uri chosen by the user to configure a QuickContactBadge that the user can click on. In addition, this shows the final, and largest, contact action bar mode.

Using the QuickContactBadge
When might you want to use the QuickContactBadge? Use the QuickContactBadge anywhere that displays friends or lists of contacts, enabling the user to interact with these individuals in other ways. You could also add your email and phone number to the Contacts and provide a QuickContactBadge within your application to give users a quick way to email, call, or message you (or your support team).
Conclusion
In this Quick Tip, you learned how to use the QuickContactBadge control to quickly bring up the contact action bar (available in various sizes) and enable various actions to be taken. The QuickContactBadge is a standard view control available in Android 2.0 and higher, so users should be familiar with its purpose, and therefore appreciate it when developers take advantage of its powerful features. The QuickContactBadge can also save you, the developer, valuable time in creating all of the possible Intent actions that this control provides with ease.
About the Authors
Mobile developers Lauren Darcey and Shane Conder have coauthored several books on Android development: an in-depth programming book entitled Android Wireless Application Development and Sams TeachYourself Android Application Development in 24 Hours. When not writing, they spend their time developing mobile software at their company and providing consulting services. They can be reached at via email to androidwirelessdev+mt@gmail.com, via their blog at androidbook.blogspot.com, and on Twitter @androidwireless.
转载于:https://www.cnblogs.com/stay/articles/1961098.html
最后
以上就是漂亮小蜜蜂最近收集整理的关于Android Quick Tip: Using the Quick Contact Badge 【转】的全部内容,更多相关Android内容请搜索靠谱客的其他文章。


![[官网]Using PuTTYChapter 3: Using PuTTY](https://file2.kaopuke.com:8081/files_image/reation/bcimg12.png)

发表评论 取消回复