- 安装svgo svg-sprite-loader
cnpm install svgo --save
cnpm install svg-sprite-loader --save-dev
- 新建vue.config.js
const path = require('path')
function resolve(dir) {
    return path.join(__dirname, dir)
}
module.exports = {
    publicPath: process.env.NODE_ENV === "production" ? "./" : "/", // 部署生产环境和开发环境下的URL
    outputDir: process.env.NODE_ENV === 'test' ? 'test' : 'dist',//配置这个地方, // 构建输出目录(npm run build 或 yarn build 时 ,生成文件的目录名称)
    assetsDir: 'assets', // 用于放置生成的静态资源(js、css、img、fonts)的;(项目打包之后,静态资源会放在这个文件夹下)
    lintOnSave: true, // 是否开启eslint保存检测,有效值:ture | false | 'error'
    runtimeCompiler: false, // 是否使用包含运行时编译器的Vue核心的构建
    transpileDependencies: [], // 默认情况下 babel-loader 忽略其中的所有文件 node_modules,这里可增加例外的依赖包名
    productionSourceMap: false, // 是否在构建生产包时生成 sourceMap 文件,false将提高构建速度
    filenameHashing: false, //默认情况下,生成的静态资源在它们的文件名中包含了 hash 以便更好的控制缓存。你可以通过将这个选项设为 false 来关闭文件名哈希。(false的时候就是让原来的文件名不改变)
    // https://cli.vuejs.org/guide/webpack.html#simple-configuration
    configureWebpack: (config) => {
        //webpack-bundle-analyzer 插件
        const BundleAnalyzerPlugin = require('webpack-bundle-analyzer').BundleAnalyzerPlugin
        if (process.env.NODE_ENV === 'production') {
            return {
                plugins: [
                    new BundleAnalyzerPlugin()
                ]
            }
        }
    },

    // webpack 链接 API,用于生成和修改 webapck 配置
    // https://github.com/mozilla-neutrino/webpack-chain
    chainWebpack: config => {
        config.module
            .rule('svg')
            .exclude.add(resolve('src/icons'))
            .end()
        config.module
            .rule('icons')
            .test(/.svg$/)
            .include.add(resolve('src/icons'))
            .end()
            .use('svg-sprite-loader')
            .loader('svg-sprite-loader')
            .options({
                symbolId: 'icon-[name]'
            })
            .end()
    },

    // 支持webPack-dev-server的所有选项
    devServer: {
        open: true, // 是否自动启动浏览器
        host: '192.168.0.245',
        port: 3000, // 端口号
        https: false,
        hotOnly: false,
        proxy: null,
        // proxy: { // 配置多个代理
        //     '/api': {
        //         target: '<url>',
        //         ws: true,
        //         changOrigin: true
        //     },
        //     "/foo": {
        //         target: "<other_url>"
        //     }
        // },
        before: app => { }
    },
    parallel: require('os').cpus().length > 1, // 构建时开启多进程处理 babel 编译
    pwa: { // https://github.com/vuejs/vue-cli/tree/dev/packages/%40vue/cli-plugin-pwa

    },
    pluginOptions: {} // 第三方插件配置
};
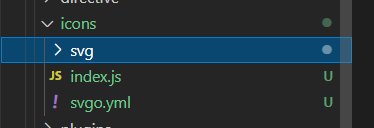
- src目录下创建icons文件夹

svg下面放svg文件
index.js内容如下
const requireAll = requireContext => requireContext.keys().map(requireContext)
const req = require.context('./svg', false, /.svg$/)
requireAll(req)
svgo.yml内容如下
# replace default config

# multipass: true
# full: true

plugins:

  # - name
  #
  # or:
  # - name: false
  # - name: true
  #
  # or:
  # - name:
  #     param1: 1
  #     param2: 2

- removeAttrs:
    attrs:
      - 'fill'
      - 'fill-rule'
- components文件夹下创建文件夹SvgIcon 后创建index.vue文件
<template>
  <div v-if="isExternal" :style="styleExternalIcon" class="svg-external-icon svg-icon" v-on="$listeners" />
  <svg v-else :class="svgClass" aria-hidden="true" v-on="$listeners">
    <use :xlink:href="iconName" />
  </svg>
</template>

<script>
// doc: https://panjiachen.github.io/vue-element-admin-site/feature/component/svg-icon.html#usage
import { isExternal } from '@/utils/validate'

export default {
  name: 'SvgIcon',
  props: {
    iconClass: {
      type: String,
      required: true
    },
    className: {
      type: String,
      default: ''
    }
  },
  computed: {
    isExternal() {
      return isExternal(this.iconClass)
    },
    iconName() {
      return `#icon-${this.iconClass}`
    },
    svgClass() {
      if (this.className) {
        return 'svg-icon ' + this.className
      } else {
        return 'svg-icon'
      }
    },
    styleExternalIcon() {
      return {
        mask: `url(${this.iconClass}) no-repeat 50% 50%`,
        '-webkit-mask': `url(${this.iconClass}) no-repeat 50% 50%`
      }
    }
  }
}
</script>

<style scoped>
.svg-icon {
  width: 1em;
  height: 1em;
  vertical-align: -0.15em;
  fill: currentColor;
  overflow: hidden;
}

.svg-external-icon {
  background-color: currentColor;
  mask-size: cover!important;
  display: inline-block;
}
</style>
- main.js全局引用
import { createApp } from 'vue'
import App from './App.vue'
import router from './router'
import store from './store'
import '@/icons' // icon
import installElementPlus from './plugins/element'
import SvgIcon from '@/components/SvgIcon'
import './assets/css/icon.css'
const app = createApp(App)

installElementPlus(app)
app
    .use(store)
    .use(router)
    .component('svg-icon', SvgIcon)
    .mount('#app')
- 页面中使用示例如下
<svg-icon icon-class="svg文件名" class-name="css样式名称"></svg-icon>
最后
以上就是虚拟月饼最近收集整理的关于vue3.0项目中如何优雅使用svg的全部内容,更多相关vue3内容请搜索靠谱客的其他文章。
本图文内容来源于网友提供,作为学习参考使用,或来自网络收集整理,版权属于原作者所有。


发表评论 取消回复