欢迎来到爱学习小可爱的“数字图像处理”入门编程小天地~
高斯&拉普拉斯金字塔&图像重建
编程目的
通过编写高斯金字塔函数以及拉普拉斯金字塔函数,对图像进行模糊处理以及改变分辨率大小,最终展现高斯金字塔、拉普拉斯金字塔、以及重建的图像。
ps:
没感动天,没感动地,只感动我自己,第二篇热腾腾的博客出炉啦~
编程核心代码基于算法,没有调用成品函数~ 如果感兴趣的话,就继续往下看吧~ 欢迎各位和我一起交流!如有引用,请标明来源哦!
https://blog.csdn.net/qq_43836026/article/details/105565359
编程原理
1.高斯金字塔
高斯金字塔是对一张图像重复进行高斯滤波和下采样得到的不同尺度的图像集合。最底层图像为原始图像G_[0],通过重复高斯滤波除去高频信号分量和下采样减小分辨率,可得到G_[1]…G_[n-1].G_[n]图像,随着层数的增加,图像分辨率逐渐减少,也更加模糊。该过程可以用公式(1.1)表示。

其中,G_[n+1]是高斯金字塔中第n+1层图像,G_[n] 是高斯金字塔中第n层图像,F是高斯滤波函数,S(scale1,scale2)是双线性插值函数,scale1、scale2分别是图像在高、长方向上分辨率变换的倍数,在本实验中,下采样的时候倍数都是0.5。
2.拉普拉斯金字塔
在高斯金字塔运算过程中,图像经过高斯滤波和下采样后会丢失部分高频信息,拉普拉斯金字塔则用来描述高斯金字塔每层操作后丢失的高频信息。拉普拉斯金字塔是用高斯金字塔每一层图像减去上一层图像经过上采样及滤波后的预测图像的图像集合。随着层数增加,分辨率逐渐增大。该过程可以用公式(1.2)表示。

其中L_[n]是拉普拉斯金字塔第n层图像,G_[n]、G¬_[n+1]分别是高斯金字塔第n层、n+1层图像,S(scale1,scale2)是双线性插值函数,上采样中,scale1、scale2由高斯金字塔中第n层和n+1层图像实际尺寸比得到,F是高斯滤波器。
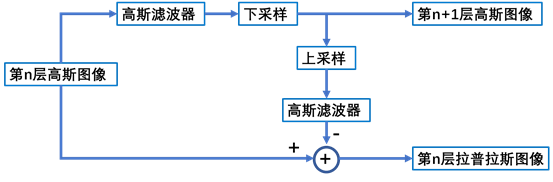
由图1.2,我们可知,一个图像若有n层高斯金字塔,则有n-1层拉普拉斯金字塔。
3 重建高斯金字塔
由图1.2,我们可以知道高斯金字塔图像与拉普拉斯金字塔图像关系,从而根绝拉普拉斯金字塔图像和预测图像重建高斯金字塔图像,一层层递推,最终得到原始图像。
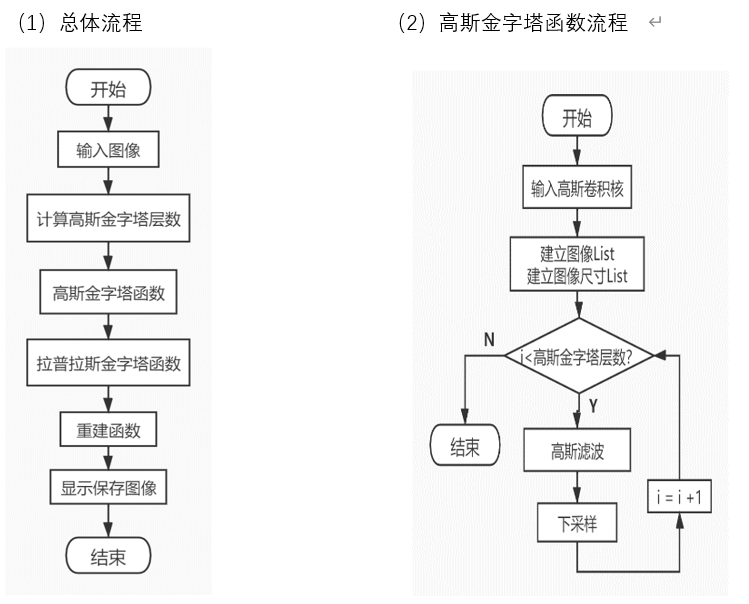
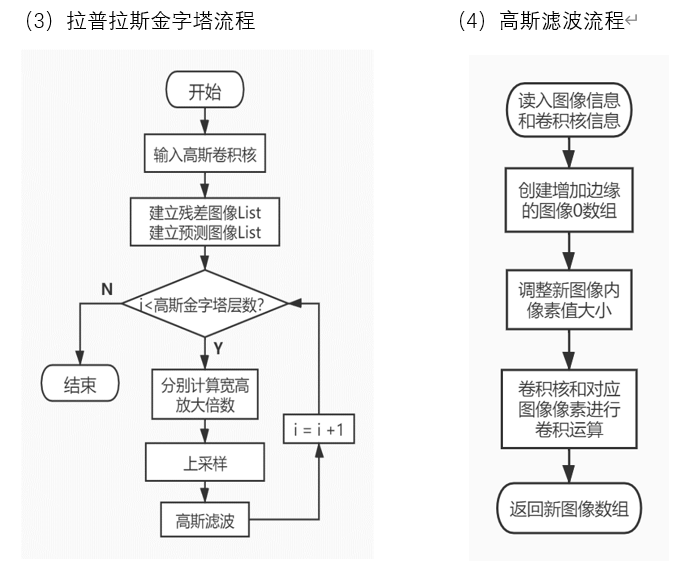
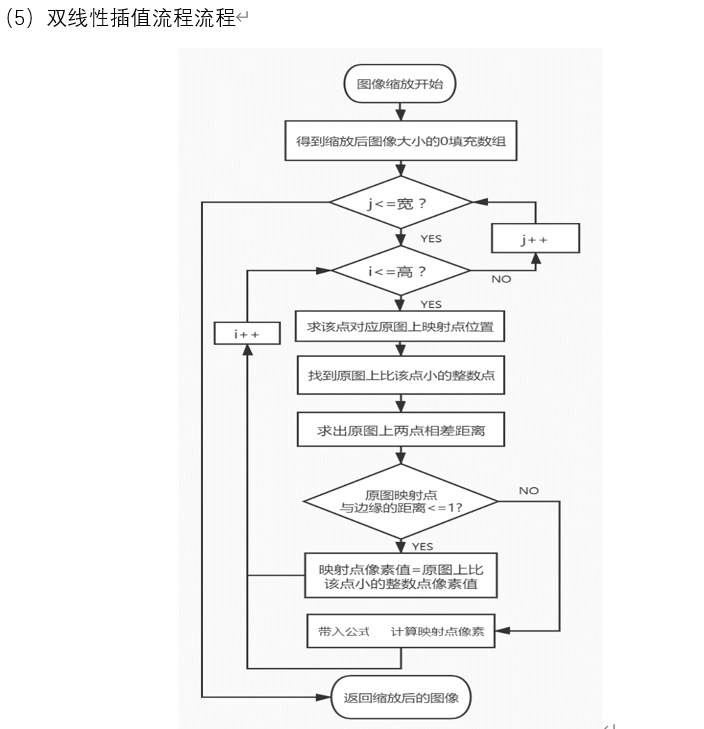
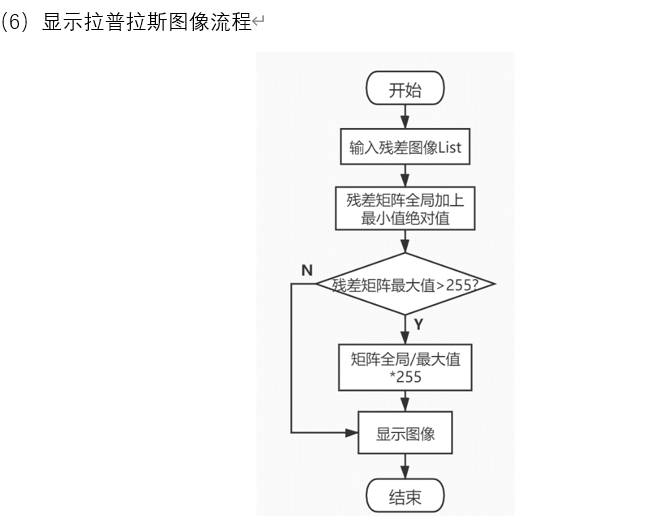
编程流程
编程代码
没心没肺必有我主函数
if __name__ =='__main__':
    img = mpimg.imread(file_in)
    #----高斯、拉普拉斯金字塔-----#
    W = img.shape[0]
    L = img.shape[1]
    N = min(L,W)
    n = math.log2(N)
    n = int(n+1)
    print(n)
    Gaussian_Pyramid_Img_List,Gaussian_Lens_List = Gaussian_Pyramid(img,n)
    Laplacian_Pyramid_Img_List,New_Img_List = Laplacian_Pyramid(Gaussian_Pyramid_Img_List,n,Gaussian_Lens_List)
    huanyuan(Laplacian_Pyramid_Img_List,New_Img_List)
    #-----保存显示图片-----------#
    save(Gaussian_Pyramid_Img_List,Laplacian_Pyramid_Img_List)
高斯函数
def Gaussian_Pyramid(Img,count):
    #------高斯卷积核------#
    Gaussian_Kernel=np.array([[1/16,2/16, 1/16], [2/16, 4/16, 2/16], [1/16, 2/16, 1/16]])
    fw, fh,= Gaussian_Kernel.shape
    w = Img.shape[0]
    h = Img.shape[1]
    s1 = (w,h)
    #----高斯图像List-----#
    Gaussian_Img_List = [Img]
    #----高斯图像尺寸List--#
    Gaussian_Lens_List = [s1]
    SCALE_w1 = SCALE_h1=0.5
    print('高斯金字塔第0层', Img.shape)
    for l in range (count-1):
        iw = Gaussian_Img_List[l].shape[0]
        ih = Gaussian_Img_List[l].shape[1]
        #-------高斯滤波--------#
        New_I = Convolve(Gaussian_Img_List[l],Gaussian_Kernel,iw,ih,fw,fh)
        #-------下采样----------#
        New_Img = imresize(New_I,SCALE_w1,SCALE_h1)
        print('高斯金字塔第{}层'.format(l+1),New_Img.shape)
        Gaussian_Img_List.append(New_Img)
        a = New_Img.shape[0]
        b = New_Img.shape[1]
        s = (a,b)
        Gaussian_Lens_List.append(s)
    return Gaussian_Img_List,Gaussian_Lens_List
高斯滤波函数
本次编程最遗憾的地方!!滤波填充的时候只填了0就卷积运算了,导致左下边缘有黑边,莫得办法咯,我试了对称填充,可是老是报错,索引超出范围,哭泣。
#----------滤波-----------#
def Convolve(Img,Gaussian_Kernel,iw,ih,fw,fh):
    # ---------创建新全0数组-------#
    c = Img.shape[2]
    New_I = np.zeros((iw + fw - 1, ih + fh - 1,c)).astype(np.float32)
    # --------原图像像素值对应到新图像中----#
    for i in range(iw):
        for j in range(ih):
            for k in range(c):
                New_I[i, j + fh - 1,k] = Img[i, j,k]
    #--ps:若把对称部分注释,程序正常,只是左下边缘有点失真#
    # --------进行卷积运算----------#
    New_Img = np.zeros((iw, ih,3)).astype(np.float32)
    for i in range(iw):
        for j in range(ih):
            #------超级重要!!!—----#
            for k in range (c):
                Img_F = New_I[i:i + fw, j:j + fh,k]
                temp = np.multiply(Img_F, Gaussian_Kernel)
                value = temp.sum()
                New_Img[i, j,k] = value if value > 0 else 0
                New_Img[i, j,k] = value if value < 255 else 255
    return New_Img
双线性插值函数(上下采样)
#-------双线性插值---------#
def imresize(New_Img,SCALE_w,SCALE_h):
    Out_shape = (round(SCALE_w * New_Img.shape[0]), round(SCALE_h * New_Img.shape[1]))
    Out_img = np.zeros((Out_shape[0], Out_shape[1], 3)).astype(np.float32)  # 得到输出图像大小的0数组
    Out_w = Out_shape[0]  # 图像的宽
    Out_h = Out_shape[1]  # 图像的长

    for j in range(Out_w):  # j为行数,i为列数
        for i in range(Out_h):
            # -------在原图像上的映射点--------#
            In_x = float((j + 0.5) / SCALE_w - 0.5)
            In_y = float((i + 0.5) / SCALE_h - 0.5)
            # --原图像上映射点周围最近的整数点--#
            Int_In_x = math.floor(In_x)
            Int_In_y = math.floor(In_y)
            # ------计算一部分距离权重值-------#
            a = In_x - Int_In_x
            b = In_y - Int_In_y
            # --映射点距离图像边缘不大于1的情况--#
            if Int_In_x + 1 == New_Img.shape[0] or Int_In_y + 1 == New_Img.shape[1]:
                Out_img[j, i, :] = New_Img[Int_In_x, Int_In_y, :]
                continue
            # --正常情况下带公式计算映射点的像素值--#
            Out_img[j, i,:] = (1.0 - a) * (1.0 - b) * New_Img[Int_In_x, Int_In_y,:] +
                               a * (1.0 - b) * New_Img[Int_In_x + 1, Int_In_y,:] +
                               (1.0 - a) * b * New_Img[Int_In_x, Int_In_y,:] +
                               a * b * New_Img[Int_In_x + 1, Int_In_y + 1,:]

    Out_img = Out_img.astype(np.uint8)

    return Out_img
拉普拉斯函数
#-----拉普拉斯金字塔------#
def Laplacian_Pyramid(Gaussian_Pyramid_Img_List,n,Gaussian_Lens_List):
    Gaussian_Kernel = np.array([[1 / 16, 2 / 16, 1 / 16], [2 / 16, 4 / 16, 2 / 16], [1 / 16, 2 / 16, 1 / 16]])
    fw, fh, = Gaussian_Kernel.shape
    Laplacian_Img_List = []
    New_Img_List = []
    for l in range (n-1,0,-1):
        #------上采样--------#
        m = Gaussian_Lens_List[l]
        q = Gaussian_Lens_List[l-1]
        SCALE_w2 = q[0]*1.0/m[0]
        SCALE_h2 = q[1]*1.0/m[1]
        # print(SCALE_w2)
        # print(SCALE_h2)
        New_I = imresize(Gaussian_Pyramid_Img_List[l], SCALE_w2,SCALE_h2)
        iw = New_I.shape[0]
        ih = New_I.shape[1]
        #------高斯滤波------#
        New_Img = Convolve(New_I,Gaussian_Kernel,iw,ih,fw,fh)

        difference = Gaussian_Pyramid_Img_List[l - 1] - New_Img
        print('拉普拉斯金字塔第{}层'.format(n-1-l), difference.shape)
        Laplacian_Img_List.append(difference)
        New_Img_List.append(New_Img)
    return  Laplacian_Img_List,New_Img_List
重建图像函数
#--------重建图像--------#
def huanyuan(Laplacian_Pyramid_Img_List,New_Img_List):
    plt.figure(figsize=(30, 30))
    for i in range(len(Laplacian_Pyramid_Img_List)):
        huanyuan = Laplacian_Pyramid_Img_List[i]+New_Img_List[i]
        huanyuan = huanyuan.astype(np.uint8)
        #plt.figure(figsize=(30,5))
        plt.title('H_{}'.format(i))
        plt.xlabel(huanyuan.shape)
        plt.subplot(3,math.ceil(len(Laplacian_Pyramid_Img_List)/3.0),i+1)
        plt.axis('on')
        plt.imshow(huanyuan)
    #plt.show()
        # cv.imwrite(file_out + 'H_{}.jpg'.format(i), huanyuan)
        # cv.imshow('H_{}'.format(i), huanyuan)
        # cv.waitKey(0)
        # #cv.destroyAllWindows()
    print('-----重建成功!------')
显示图片
def save(Gaussian_Pyramid_Img_List,Laplacian_Pyramid_Img_List):
    plt.figure(figsize=(30, 30))
    for i in range(len(Gaussian_Pyramid_Img_List)):
        plt.title('G_{}'.format(i))
        plt.xlabel(Gaussian_Pyramid_Img_List[i].shape)
        plt.subplot(3, math.ceil(len(Gaussian_Pyramid_Img_List)/3.0), i + 1)
        plt.axis('on')
        plt.imshow(Gaussian_Pyramid_Img_List[i])
    plt.show()

    plt.figure(figsize=(30, 30))
    for i in range(len(Laplacian_Pyramid_Img_List)):
        convert1 = Laplacian_Pyramid_Img_List[i] + np.abs(Laplacian_Pyramid_Img_List[i].min())
        if convert1.max() > 255:
            convert1 = convert1 / convert1.max() * 255
        out_img = convert1.astype(np.uint8)
        plt.title('L_{} '.format(i))
        plt.xlabel(Laplacian_Pyramid_Img_List[i].shape)
        plt.subplot(3, math.ceil(len(Laplacian_Pyramid_Img_List)/3.0), i + 1)
        plt.axis('on')
        plt.imshow(out_img)
    plt.show()
        # cv.imwrite(file_out + 'L_{}.jpg'.format(i),out_img)
        # cv.imshow('L_{}'.format(i), out_img)
        # cv.waitKey(0)
        #cv.destroyAllWindows()
编程结果
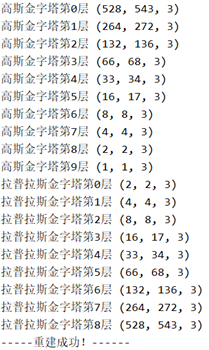
1.高斯金字塔和拉普拉斯金字塔各层图片分辨率
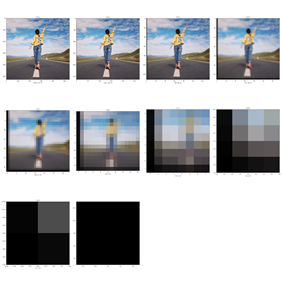
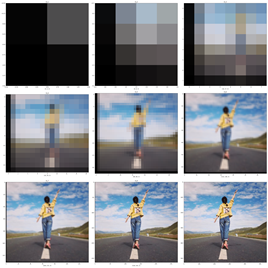
2.高斯金字塔图
3 拉普拉斯金字塔图像
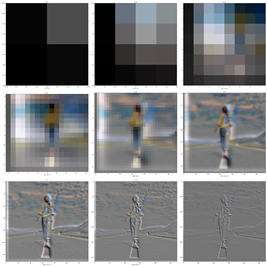
4图像重建
结果分析
本次实验程序可将任意分辨率大小的图像形成高斯金字塔及拉普拉斯金字塔,并通过拉普拉斯金字塔进行高斯图像及原始图像的重建。
(1) 高斯金字塔的层数确实比拉普拉斯金字塔多一层,且两金字塔对应的图像分辨率相同。
(2)高斯金字塔图像随着层数的增加,分辨率逐渐变小为原来的一半,且越来越模糊,很好地模拟了人眼观察图像随距离变换而改变的效果。
(3)拉普拉斯金字塔图像随着层数的减少,分辨率逐渐变大,得到了每层对应的残差,可知通过将第n+1层高斯图像进行上采样和滤波得到的预测图象与实际第n层高斯图像有差异。
(4)通过重建,可以得到对应的高斯图像以及原始图像。
最后
以上就是寒冷手链最近收集整理的关于数字图像处理Python实战--高斯&拉普拉斯金字塔&图像重建的全部内容,更多相关数字图像处理Python实战--高斯&拉普拉斯金字塔&图像重建内容请搜索靠谱客的其他文章。


发表评论 取消回复