V831
文章目录
- V831
- 前言
- 一、AprilTag 标记追踪测距
- 二、 AprilTag 获取角度信息以及三维坐标的显示
- 三、AprilTag多个三维坐标的显示
- 总结
前言
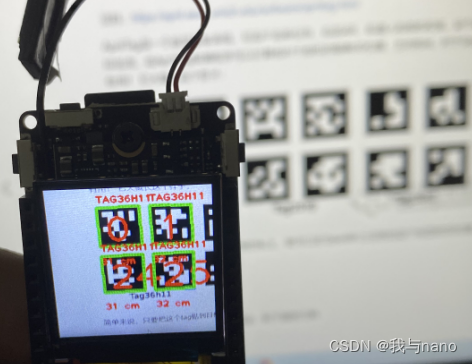
AprilTag 标记追踪是视觉很常用的一个标签,V831也具备这个功能。
一、AprilTag 标记追踪测距
先看代码
#!/usr/bin/python3
from maix import display, camera

f_x = (6 / 5.76) * 240 # 镜头的焦距是6MM,感光cmos的长是5.76mm,240像素是屏幕的长
f_y = (6 / 3.24) * 240 # 镜头的焦距是6MM,感光cmos的宽是3.24mm,240像素是屏幕的宽

c_x = 240 * 0.5  # 屏幕分辨率的一半
c_y = 240 * 0.5  # 屏幕分辨率的一半

while True:
    t = camera.capture()
    mks = t.find_apriltags(families = 16,fx = f_x,fy = f_y,cx = c_x,cy = c_y)
    for mk in mks:
      x_tran = mk['x_translation']
      y_tran = mk['y_translation']
      z_tran = mk['z_translation']
      #家族信息
      fam = mk['family']
      #外框数据
      x, y, w, h, id  =  mk['x'], mk['y'], mk['w'], mk['h'], mk['id']
      #内框数据
      x1,y1 = mk['corners'][0]   #访问字典的列表
      x2,y2 = mk['corners'][1]
      x3,y3 = mk['corners'][2]
      x4,y4 = mk['corners'][3]
      z1,z2 = mk['centroid']
      #虚拟距离
      length = (x_tran*x_tran + y_tran*y_tran + z_tran*z_tran)**0.5

      #画外框
      t.draw_rectangle(x, y, x + w, y + h, color=(0, 0, 255), thickness = 2)
      #打印ID
      t.draw_string(int(x + w*0.15) , int(y + h*0.15) , str(id), scale = 4.0, color = (255, 0, 0), thickness = 3)
      #画内框
      t.draw_line(x1, y1, x2, y2, color = (0, 255, 0), thickness = 3)
      t.draw_line(x2, y2, x3, y3, color = (0, 255, 0), thickness = 3)
      t.draw_line(x3, y3, x4, y4, color = (0, 255, 0), thickness = 3)
      t.draw_line(x4, y4, x1, y1, color = (0, 255, 0), thickness = 3)

      if(fam == 16):
        t.draw_string(x, y-20, "TAG36H11", scale = 1.0, color = (255, 0, 0), thickness = 2)

      t.draw_string(x, y+h+15, str(int(length * 3.0649 - 2))+" cm", scale = 1.0, color = (255, 0, 0), thickness = 2)

    display.show(t)

如果想要获取标签四个点的坐标只需要获取字典中键值为 corners 的列表中的值即可,而想获得外框(蓝色框)的坐标只需要获取字典中键值为 x , y , w , h 的的值,最后像代码中所操作的一样即可。
字典的键值如下所示: ‘x’ , ‘y’ , ‘w’ , ‘h’ , ‘id’ , ‘family’ , ‘centroid’ , ‘corners’ , ‘x_translation’ , ‘y_translation’ , ‘z_translation’ , ‘decision_margin’ , ‘hamming’ , ‘goodness’ , ‘x_rotation’ , ‘y_rotation’ , ‘z_rotation’。
介绍简单几个键值的含义。‘x’ , ‘y’ , ‘w’ , ‘h’ 键值返回的值分别是外框左上角 x 坐标和 y 坐标以及外框的长和宽。特别注意的是键值 ‘corners’ 返回的是一个列表,列表中的值代表着内框的四个顶点的坐标。
在这个代码里测距使用的原理同样类似于小孔成像,具体怎么用的可以去看之前的测距博客,我认识这个值并不是很准确(可能是追踪测距的缘故),后面我会将这个测距算法进行优化。
二、 AprilTag 获取角度信息以及三维坐标的显示
同样先看代码
#!/usr/bin/python3
from maix import display, camera
import math

f_x = (6 / 5.76) * 240 # 镜头的焦距是6MM,感光cmos的长是5.76mm,240像素是屏幕的长
f_y = (6 / 3.24) * 240 # 镜头的焦距是6MM,感光cmos的宽是3.24mm,240像素是屏幕的宽

c_x = 240 * 0.5 # 屏幕分辨率的一半
c_y = 240 * 0.5 # 屏幕分辨率的一半

while True:
    t = camera.capture()
    mks = t.find_apriltags(families = 16,fx = f_x,fy = f_y,cx = c_x,cy = c_y)
    for mk in mks:

      #内框数据
      x1,y1 = mk['corners'][0]   #访问字典的列表
      x2,y2 = mk['corners'][1]
      x3,y3 = mk['corners'][2]
      x4,y4 = mk['corners'][3]

      #获取角度信息
      x_rol = mk['x_rotation']
      y_rol = mk['y_rotation']
      z_rol = mk['z_rotation']
      #画内框
      t.draw_line(x1, y1, x2, y2, color = (0, 255, 0), thickness = 3)
      t.draw_line(x2, y2, x3, y3, color = (0, 255, 0), thickness = 3)
      t.draw_line(x3, y3, x4, y4, color = (0, 255, 0), thickness = 3)
      t.draw_line(x4, y4, x1, y1, color = (0, 255, 0), thickness = 3)

      #显示当前角度
      t.draw_string(2, 2, "X rotation is: "+str(int(180*x_rol/3.14))+" Angle", scale = 1.0, color = (0, 0, 255), thickness = 1)    #90° ~ 270°  正对着是180°。上下
      t.draw_string(2, 15, "Y rotation is: "+str(int(180*y_rol/3.14))+" Angle", scale = 1.0, color = (0, 0, 255), thickness = 1)   #0° ~ 90°,270° ~ 360°   正对着是0°。 左右
      t.draw_string(2, 30, "Z rotation is: "+str(int(180*z_rol/3.14))+" Angle", scale = 1.0, color = (0, 0, 255), thickness = 1)   #0° ~ 360°   正对着是0°。 顺时针旋转增加

      #右下角画框
      t.draw_string(140, 120, "Space", scale = 1.0, color = (125, 0, 0), thickness = 2)
      t.draw_rectangle(140, 140, 235, 235, color=(128, 128, 128), thickness=2)

      #画出三维坐标系
      t.draw_line(180, 200, int(180 - 40 * math.sin(z_rol)), int(240 - 40 * math.cos(z_rol) + 40 * math.cos(x_rol)), color = (255, 0, 0), thickness = 3)
      t.draw_line(180, 200, int(140 + 40 * math.cos(z_rol) + 40 * math.cos(y_rol)), int(200 - 40 * math.sin(z_rol)), color = (0, 255, 0), thickness = 3)
      t.draw_line(180, 200, int(180 + 40 * math.sin(y_rol)),int(200 - 40 * math.sin(x_rol)), color = (0, 0, 255), thickness = 3)

    display.show(t)

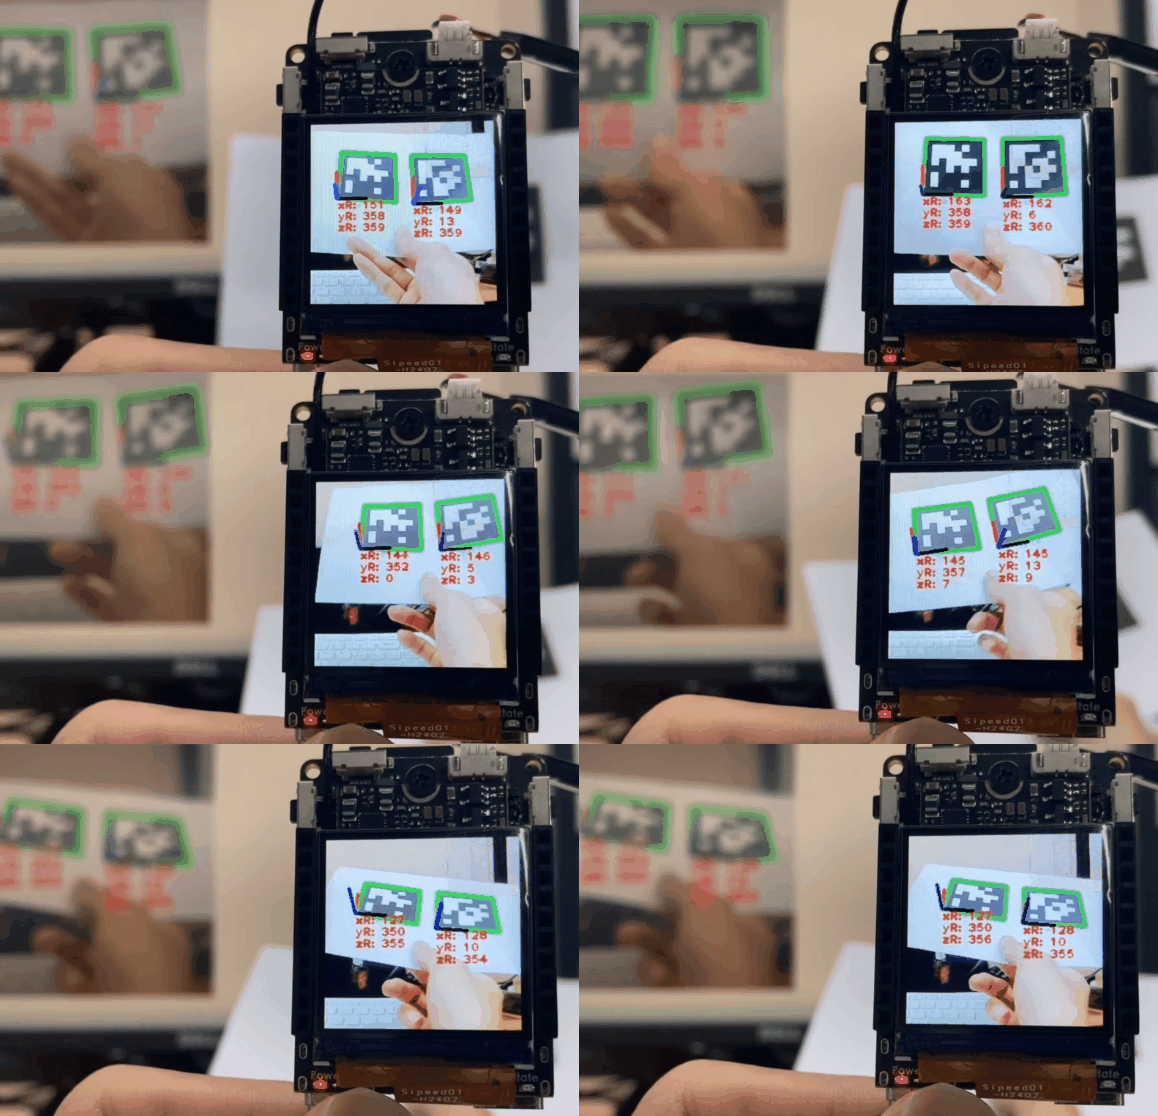
如果想要获取标签的角度信息只需要获取字典中键值分别是 x_rotation,y_rotation,z_rotation 的的值即可,需要指出的是获取的值是弧度,需要转换成角度的话需要使用弧度转角度公式。将获取的弧度其乘上 180 再除以 3.14 即可(3.14选取了圆周率小数点后两位)。
x_rotation 转为角度后取值范围是 [90°,270°] 正对着标签时显示为 180° ,在标签前后移动时变化。 y_rotation 转为角度后取值范围是 [0°,90°]U[270°,360°] 正对着标签时显示为 0° ,在标签左右移动时变化。z_rotation 转为角度后取值范围是 [0°,360°] 正对着标签时显示为 0° ,在标签旋转时变化。
三、AprilTag多个三维坐标的显示
from maix import display, camera
import math

f_x = (6 / 5.76) * 240
f_y = (6 / 3.24) * 240

c_x = 240 * 0.5
c_y = 240 * 0.5

while True:
    t = camera.capture()
    mks = t.find_apriltags(families = 16,fx = f_x,fy = f_y,cx = c_x,cy = c_y)
    for mk in mks:

      #内框数据
      x1,y1 = mk['corners'][0]   #访问字典的列表
      x2,y2 = mk['corners'][1]
      x3,y3 = mk['corners'][2]
      x4,y4 = mk['corners'][3]

      x_rol = mk['x_rotation']
      y_rol = mk['y_rotation']
      z_rol = mk['z_rotation']
      #画内框
      t.draw_line(x1, y1, x2, y2, color = (0, 255, 0), thickness = 3)
      t.draw_line(x2, y2, x3, y3, color = (0, 255, 0), thickness = 3)
      t.draw_line(x3, y3, x4, y4, color = (0, 255, 0), thickness = 3)
      t.draw_line(x4, y4, x1, y1, color = (0, 255, 0), thickness = 3)


      t.draw_string(x4, y4, "xR: "+str(int(180*x_rol/3.14)), scale = 1.0, color = (255, 0, 0), thickness = 2)    #90° ~ 270°  正对着是180°。上下
      t.draw_string(x4, y4 + 15, "yR: "+str(int(180*y_rol/3.14)), scale = 1.0, color = (255, 0, 0), thickness = 2)   #0° ~ 90°,270° ~ 360°   正对着是0°。 左右
      t.draw_string(x4, y4 + 30, "zR: "+str(int(180*z_rol/3.14)), scale = 1.0, color = (255, 0, 0), thickness = 2)   #0° ~ 360°   正对着是0°。 顺时针旋转增加

      t.draw_line(x4, y4, int(x4 - 40 * math.sin(z_rol)), int(y4 + 40 - 40 * math.cos(z_rol) + 40 * math.cos(x_rol)), color = (255, 0, 0), thickness = 3)
      t.draw_line(x4, y4, int(x4 - 40 + 40 * math.cos(z_rol) + 40 * math.cos(y_rol)), int(y4 - 40 * math.sin(z_rol)), color = (0, 0, 0), thickness = 3)
      t.draw_line(x4, y4, int(x4  + 40 * math.sin(y_rol)),int(y4 - 40 * math.sin(x_rol)), color = (0, 0, 255), thickness = 3)
    display.show(t)

总结
感觉加上一个jy-901陀螺仪,V831可以无限发挥他的功能。
最后
以上就是敏感冬天最近收集整理的关于V831——AprilTag标签识别V831前言一、AprilTag 标记追踪测距二、 AprilTag 获取角度信息以及三维坐标的显示三、AprilTag多个三维坐标的显示总结的全部内容,更多相关V831——AprilTag标签识别V831前言一、AprilTag内容请搜索靠谱客的其他文章。


发表评论 取消回复