第六节:Pytorch实现全连接神经网络
前面的五节中,我们讲解了使用PyTorch搭建一个神经网络中需要的需要各种技巧,包括:网络的搭建、选择不同的实践技巧(优化器选择、学习率下降等等)以及可视化训练过程
接下来的几章,我们将使用Pytorch搭建各种神经网络
本章我们将使用PyTorch从头到尾完整的搭建一个全连接神经网络
我们使用垃圾邮件分类和加利福尼亚房价数据两个数据集来进行训练,分别对应机器学习中有监督学习的分类和回归任务
分类任务:垃圾邮件分类
垃圾邮件分类的数据集可以在加利福尼亚大学尔湾分校的网站上下载
数据集一共包含三个文件,data文件是数据文件,其中的每一行都代表一个邮件,一共有4061个邮件,其中有1813个非垃圾邮件,2788个垃圾邮件
我们的目标是训练一个全连接神经网络来实现对垃圾邮件的预测
数据集一共有58列,其中前48列是某个关键词在全文的频率×100,例如you、make等词语,每一个词语以word_freq_xxx作为列索引,例如free的全文频率以word_freq_free作为列索引;
49~54列是一些符号在全文所有符号中出现的评论×100,例如;,#,$等,同样,这些列以char_freq_x的形式作为列名,例如;的列索引名称为char_freq_;
55列是全文中所有连续的大写单词的平均长度,56列是大写单词的最长长度,57列是邮件中大写字母的数量,58列是文件是否是垃圾邮件
names文件中包含所有的特征名称
DOCUMENTATION中包含数据集的描述信息
准备工作
我们首先导入需要使用的库
import numpy as np
import pandas as pd
from sklearn.preprocessing import StandardScaler,MinMaxScaler
from sklearn.model_selection import train_test_split
from sklearn.metrics import accuracy_score,confusion_matrix,classification_report
from sklearn.manifold import TSNE
import torch
import torch.nn as nn
from torch.optim import SGD,Adam
import torch.utils.data as Data
import matplotlib.pyplot as plt
import seaborn as sns
import hiddenlayer as hl
from torchviz import make_dot
其中sklearn.preprocessing是用于对数据进行标准化预处理的模块,帮助我们将所有的值映射到0~1之间,便于模型学习到数据的分布
由于我们是从csv文件中读取的数据,因此我们还要使用sklearn.model_selection来帮助我们分割训练集与测试集
我们使用sklearn.metrics来评估模型的预测效果
最后为了对数据集进行直观的理解,我们使用sklearn.manifold来对输入的数据(具有57个特征的邮件)进行降维,将57个特征按照重要性组合为2个特征从而能够在平面上显示,我们将使用这个模块来降维以及可视化
数据清洗
我们首先对数据进行读取、清洗、分割等预处理
在一个完整的机器学习的流程中,我们对给定数据集首先进行清洗、分割等预操作之后,还要根据对数据集进行了解,以确定我们会使用的机器学习算法,这里我们已经确定使用的是全连接神经网络,但是为了体现一个完整的机器学习流程,我们还是会对数据集特征进行可视化与了解
data=pd.read_csv(filepath_or_buffer='./data/spambase/spambase.data',sep=',',header=None)
index=pd.read_csv(filepath_or_buffer='./data/spambase/spambase.names',sep='t',header=None)
print(data.shape)
print(data.head(2))
print('')
print(index.shape)
print(index.tail(20))
>>>
(4601, 58)
     0     1     2    3     4     5     6     7    8     9   ...   48     49
0  0.00  0.64  0.64  0.0  0.32  0.00  0.00  0.00  0.0  0.00  ...  0.0  0.000
1  0.21  0.28  0.50  0.0  0.14  0.28  0.21  0.07  0.0  0.94  ...  0.0  0.132

    50     51    52     53     54   55    56  57
0  0.0  0.778  0.00  0.000  3.756   61   278   1
1  0.0  0.372  0.18  0.048  5.114  101  1028   1

[2 rows x 58 columns]

(87, 1)
                                          0
67      word_freq_parts:        continuous.
68      word_freq_pm:           continuous.
69      word_freq_direct:       continuous.
70      word_freq_cs:           continuous.
71      word_freq_meeting:      continuous.
72      word_freq_original:     continuous.
73      word_freq_project:      continuous.
74      word_freq_re:           continuous.
75      word_freq_edu:          continuous.
76      word_freq_table:        continuous.
77      word_freq_conference:   continuous.
78      char_freq_;:            continuous.
79      char_freq_(:            continuous.
80      char_freq_[:            continuous.
81      char_freq_!:            continuous.
82      char_freq_$:            continuous.
83      char_freq_#:            continuous.
84  capital_run_length_average: continuous.
85  capital_run_length_longest: continuous.
86  capital_run_length_total:   continuous.
由于我们读取的names文件夹中除了特征名以外,还有其他的内容,因此我们首先对names读取出的特征内容进行清洗
首先通过抽样确定特征开始的行
print(index.iloc[25:33])
>>>
                                                    0
25            | i.e. unsolicited commercial e-mail.
26                                                  |
27  | For more information, see file 'spambase.DOC...
28  | UCI Machine Learning Repository: http://www....
29                  1, 0.    | spam, non-spam classes
30                word_freq_make:         continuous.
31                word_freq_address:      continuous.
32                word_freq_all:          continuous.
得知特征的名称从30行开始,考虑到带分割特征中每一行:前都是我们需要提取的数据,因此我们使用字符串的split方法
index=index.loc[30:].copy()
print(index.head())
for i,word in enumerate(index.values):
    index.iloc[i]=index.iloc[i].values[0].split(':')[0]
print(index.head())
>>>
                                      0
30  word_freq_make:         continuous.
31  word_freq_address:      continuous.
32  word_freq_all:          continuous.
33  word_freq_3d:           continuous.
34  word_freq_our:          continuous.
                    0
30     word_freq_make
31  word_freq_address
32      word_freq_all
33       word_freq_3d
34      word_freq_our
接下来我们为添加上文件特征这一行之后,将其转化为Index对象作为data对象的行名
index.loc[87]='label'
newIndex=pd.Index(index.values.reshape(len(index.values)))
data.columns=newIndex
print(data.iloc[0:2,0:3])
>>>
   word_freq_make  word_freq_address  word_freq_all
0            0.00               0.64           0.64
1            0.21               0.28           0.50
数据预处理
下面我们对数据进行预处理,以达到可以用于训练的程度
首先划分数据集,我们主要调用scikit-learn中的train_test_split来划分数据集,我们指定测试集的大小以及随机抽取的混乱度
X=data.iloc[:,0:57].values
y=data['label'].values
X_train,X_test,y_train,y_test=train_test_split(X,y,test_size=0.25,random_state=123)
print(y.shape)
print(X_test.shape)
print(X_train.shape)
print(y_test.shape)
print(y_train.shape)
>>>
(4601,)
(1151, 57)
(3450, 57)
(1151,)
(3450,)
接下来标准化输入的数据,使得输入数据的范围在0~1内,我们使用scikit-learn中的MinMaxScaler方法
最后我们为了检验标准化的结果,我们指定求出测试和训练集中的每个特征的最大值,判断是否为1,最小值是否为0
由于计算机的浮点数精度问题,实际上我们无法得到精确的1,只能得到一个和1相差为10-14~1017的数字,在计算机的角度来说我们就认为其为1
scaler=MinMaxScaler(feature_range=(0,1))
X_train=scaler.fit_transform(X_train)
X_train=scaler.fit_transform(X_test)
print((X_train.max(axis=0)>(1-1e-7)).sum(),(X_train.min(axis=0)==0).sum())
>>>
57 57
数据特征可视化
在训练前我们对训练数据集所有数据的某一个特征进行可视化
我们使用箱须图来进行可视化,箱须图中的箱体的三条线分别表示25%,50%,75%位置的值,而须线的上边缘和下边缘分别是75%值+1.5(75%的值-25%的值)和25%的值-(75%的值-25%的值)
colname=data.columns.values[:-1]
plt.figure(figsize=(20,14))
for ii in range(len(colname)):
    plt.subplot(7,9,ii+1)
    sns.boxplot(x=y_train,y=X_train[:,ii])
    plt.title(colname[ii])
plt.subplots_adjust(hspace=0.4)
plt.show()
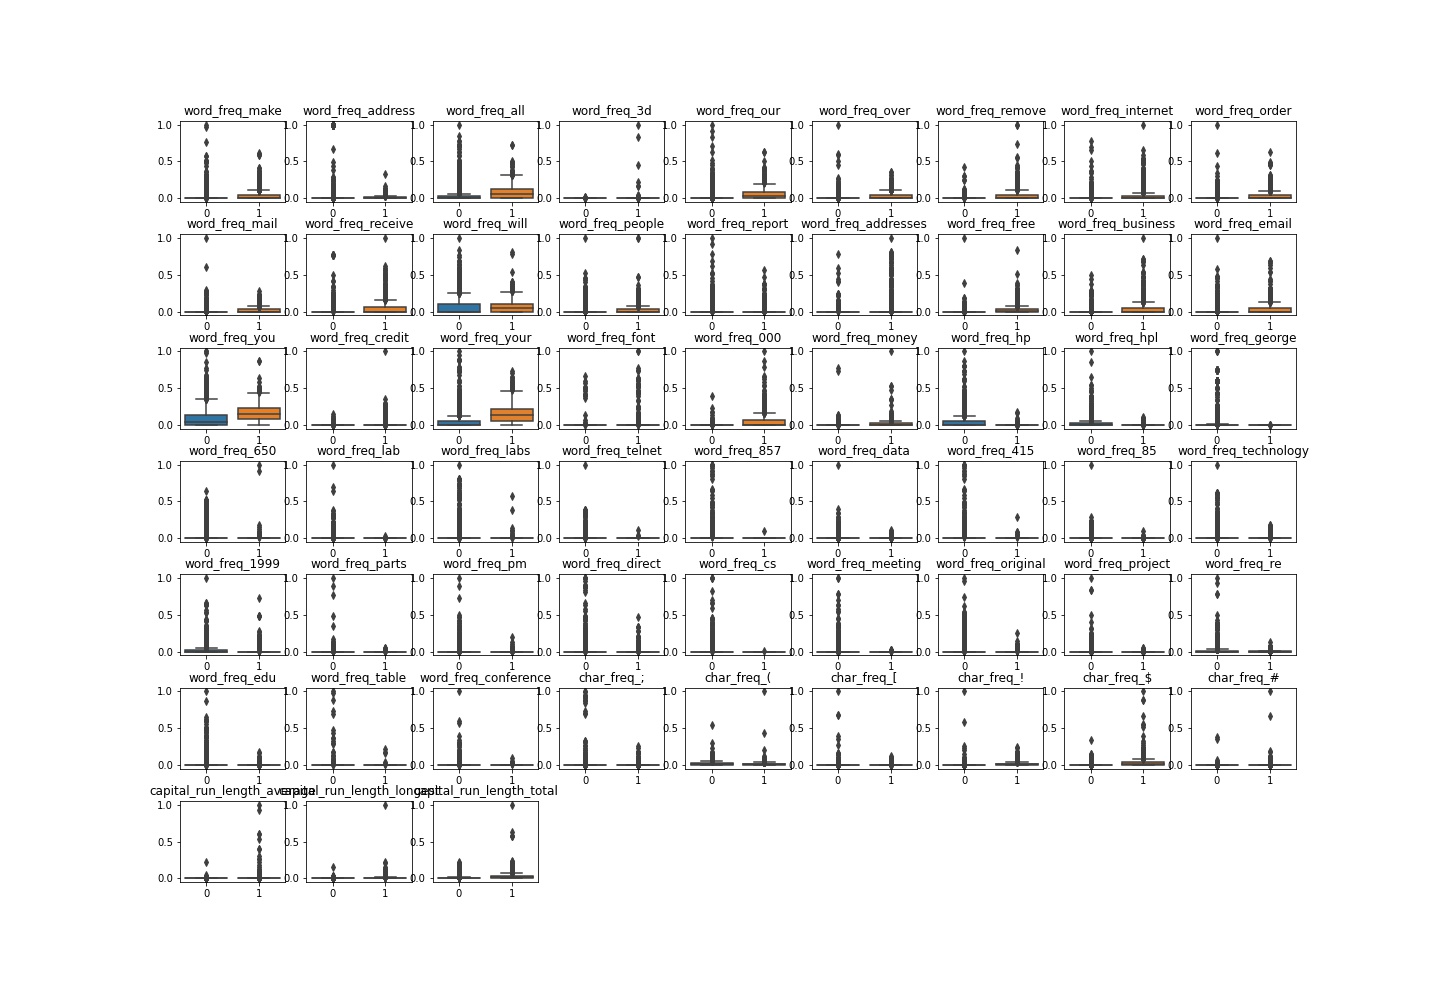
搭建网络并可视化网络结构
接下来我们将搭建出网络并可视化网络结构
class FullyConnectedNuralNetwork(nn.Module):
    def __init__(self):
        super(FullyConnectedNuralNetwork,self)
        self.hidden1=nn.Sequential(
                nn.Linear(in_features=57,out_features=30,bias=True),
                nn.ReLU())
        self.hidden2=nn.Sequential(
                nn.Linear(in_features=30,out_features=10,bias=True),
                nn.ReLU())
        self.hidden3=nn.Sequential(
                nn.Linear(in_features=10,out_features=2,bias=True),
                nn.Sigmoid())
    def forward(self,x):
        fc1=self.hidden1(x)
        fc2=self.hidden2(fc1)
        output=self.hidden3(fc2)
        return fc1,fc2,output
接下来用前面讲过的torchviz库的make_dot函数来可视化网络结构
FCNN1=FullyConnectedNuralNetwork()
x=torch.randn(size=(1,57)).requires_grad_(True)
y=FCNN1(x)
FCArchitecture=make_dot(y,params=dict(list(FCNN1.named_parameters())+[('x',x)]))
FCArchitecture.format='png'
FCArchitecture.directory='../图片/'
FCArchitecture.view()
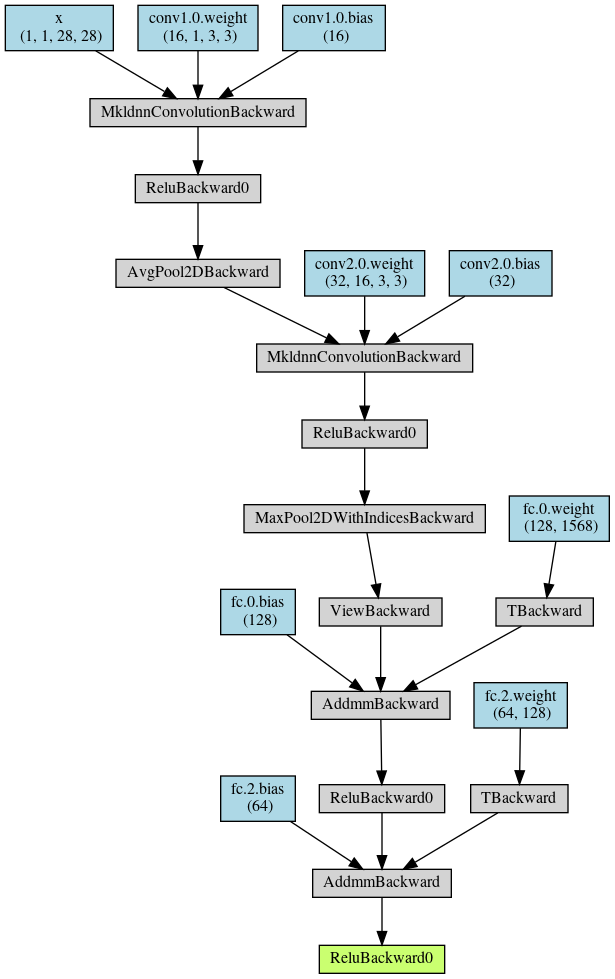
训练网络
接下来我们将训练我们的网络,并使用前面讲解的方法来检测训练
首先需要使用将数据直接处理为可用于训练的tensor,并且使用dataloader分批
X_train=torch.from_numpy(X_train.astype(np.float32))
y_train=torch.from_numpy(y_train.astype(np.float32))
X_test=torch.from_numpy(X_test.astype(np.float32))
y_test=torch.from_numpy(y_test.astype(np.float32))

train_data=Data.TensorDataset(X_train,y_train)
train_loader=Data.DataLoader(dataset=train_data,batch_size=64,shuffle=True,num_workers=1)
for step,(batch_x,batch_y) in enumerate(train_loader):
    if step>0:
        break
print(step,batch_x.shape,batch_y.shape)
>>>
1 torch.Size([64, 57]) torch.Size([64])
然后定义需要使用的优化器和损失函数
optomizerAdam=torch.optim.Adam(FCNN1.parameters(),lr=0.01)
lossFunc=nn.CrossEntropyLoss()
由于我们是一个轻量级的网络,因此使用HiddenLayer来进行可视化,注意我们如果把绘图函数放在训练过程内,那么就会得到动态的绘图效果
history1=hl.History()
canvas1=hl.Canvas()
logStep=25
for epoch in range(15):
    for step,(batch_x,batch_y) in enumerate(train_loader):
        _,_,output=FCNN1(batch_x)
        train_loss=lossFunc(output,batch_y)
        optomizerAdam.zero_grad()
        train_loss.backward()
        optomizerAdam.step()

        niter=epoch*len(train_loader)+step+1
        if niter % logStep ==0:
            _,_,output=FCNN1(X_test)
            _,pre_lab=torch.max(output,1)
            test_accuracy=accuracy_score(y_test,pre_lab)
            history1.log(niter,train_loss=train_loss,test_accuracy=test_accuracy)
            with canvas1:
                canvas1.draw_plot(history1['train_loss'])
                canvas1.draw_plot(history1['test_accuracy'])
最后的效果如下
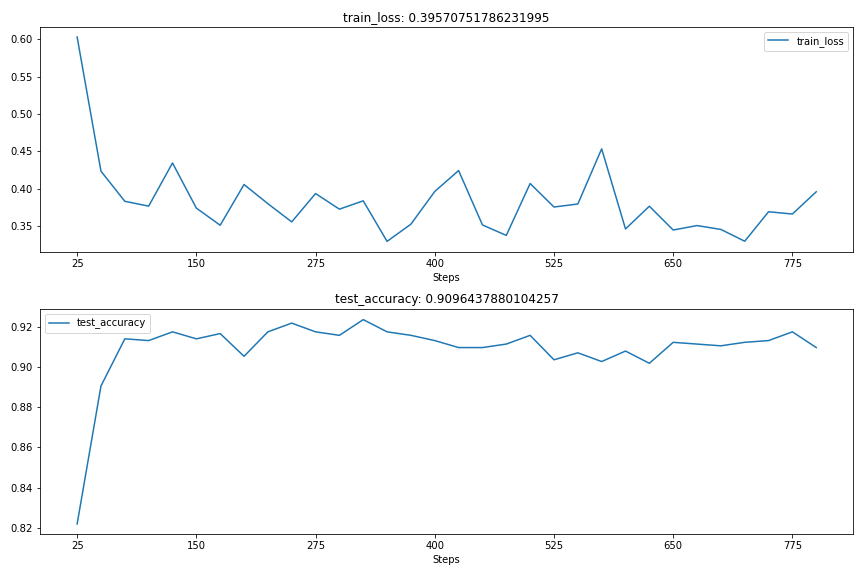
最后,尽管我们训练的准确度不稳定,但是我们的准确度却依旧维持在了较高的水平
对于没有得到稳定的准确度,一个可能的原因是训练后期我们当前使用lr过大,导致一直在最优点之前震荡而无法下降到最优点
理解网络
我们上面训练的网络本质上是个黑箱模型,我们无法了解其中发生了什么事,下面我们对网络中间进行可视化,来了解输入数据在网络中计算的时候发生了什么
落实到代码上就是我们要得到中间层的输出
得到中间层输出有两种方法,第一种就是直接利用我们前向传播时候返回的中间值,第二种就是使用钩子技术
钩子技术可以理解为在不影响原业务的基础上获得我们希望的中间值
我们下面将使用钩子技术来获取中间值,钩子技术的实现主要靠闭包
activations={}
activations['origin']=X_test
def getActivation(name):
    def hook(model,inputData,outputData):
        activations[name]=outputData.detach()
    return hook
这里activations字典主要用于存储中间层的输出,hook需要定义的输入实际上是Pytorch中以及规定好的,需要我们预留的,因此必须这样写
Pytorch中的每个层为我们预留了register_forward_hook函数,即预留了一个接口,我们如果调用这个接口,那么就会将隐藏在底层的输入和输出显化
接下来Pytorch会将model填充为我们自定义的模型,input是指定层的输入,output是指定层的输出,这里由于我们只需要指定层的输出,因此只需要将获取的输出保存在全局上的字典即可
接下来我们在获取中间值的时候再进行一次正常的计算就能够获取中间值,获取的原理就是上面说的,X_test的正向传播时候隐藏在底层的hidden1的输入和输出显化,并且按照我们设定的字典的模式保存
FCNN1.hidden1.register_forward_hook(getActivation('hidden1'))
FCNN1.hidden2.register_forward_hook(getActivation('hidden2'))
FCNN1.hidden3.register_forward_hook(getActivation('hidden3'))
_,_,_=FCNN1(X_test)
我们查看下保存的效果
print(len(activations))
for item in activations:
    print(type(activations[item]))
    print(activations[item].shape)
>>>
4
<class 'torch.Tensor'>
torch.Size([1151, 57])
<class 'torch.Tensor'>
torch.Size([1151, 30])
<class 'torch.Tensor'>
torch.Size([1151, 10])
<class 'torch.Tensor'>
torch.Size([1151, 2])
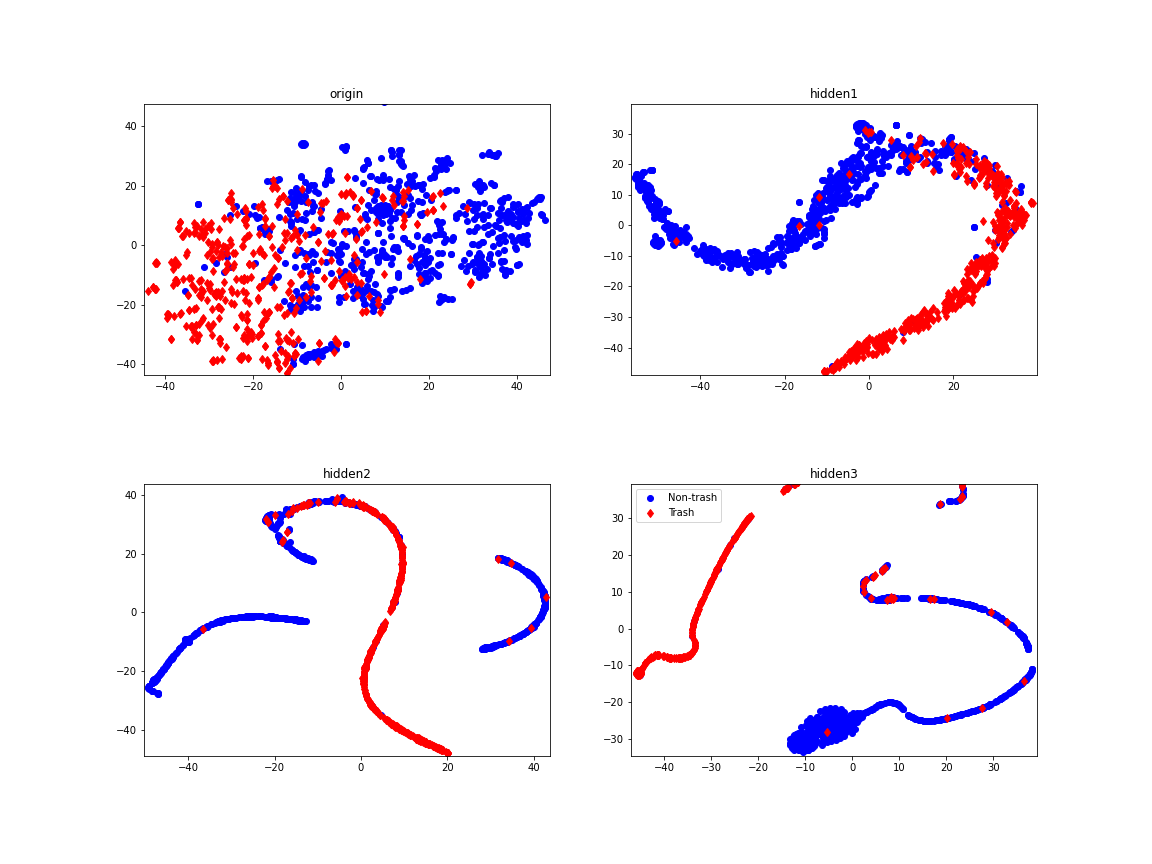
最后我们将每层得到的输出,包括原始输入使用TSNE方法进行降维,降维到二维以便于在图像上显示
plt.figure(figsize=(16,12))
for i,item in enumerate(activations):
    plt.subplot(2,2,i+1)
    value=TSNE(n_components=2).fit_transform(activations[item].data.numpy())
    plt.xlim([min(value[:,0]-1),max(value[:,0]+1)])
    plt.ylim([min(value[:,1]-1),max(value[:,0]+1)])
    plt.plot(value[y_test==0,0],value[y_test==0,1],'bo',label='Non-trash')
    plt.plot(value[y_test==1,0],value[y_test==1,1],'rd',label='Trash')
    plt.title(item)
plt.legend()
plt.subplots_adjust(hspace=0.4)
plt.show()
我们能够看到,原始输入的邮件具有57个特征,使用TSNE函数,即先使用PCA将57个特征根据重要程度压缩为2个特征,然后可视化,我们发现这个时候垃圾邮件和非垃圾邮件是杂乱的掺杂的
但是经过第一个隐藏层之后,得到了有效的划分,接下来再经过第二个隐藏层之后进一步得到到了划分,一直直到最后一层
至此,第一个例子已经讲解完毕
回归任务:房价预测
下面我们将使用scikit-learning库中的加利福尼亚州的房价数据来训练我们的网络,来完成对房价的预测
CA房价数据集来源于1990美国人口普查,这次人口普查将整个CA划分为多个人口普查区域,每个普查区域通常有600~3000的人口
该数据集中的每一行都是一个普查区,一共包含20640个普查区,每个普查区有10个特征,例如:该区域收入平均数、房屋年龄、平均房间数等等
最后我们将搭建一个全连接神经网络,来预测房屋的价格
具体的步骤和上面进行垃圾邮件分类的任务大体相似,只不过由于我们使用的是scikit-learn中现成的库,因此免去了我们进行数据清洗的过程
准备工作
首先是导入库
import numpy as np
import pandas as pd
from sklearn.preprocessing import StandardScaler
from sklearn.model_selection import train_test_split
from sklearn.metrics import mean_squared_error,mean_absolute_error
from sklearn.datasets import fetch_california_housing
import torch
import torch.nn as nn
import torch.nn.functional as F
from torch.optim import Adam
import matplotlib.pyplot as plt
import seaborn as sns
数据预处理
我们直接使用fetch_california_housing来获取需要处理的数据
但是由于使用这个函数将会访问外网来下载数据集,经常会由于url无法打开而报错,因此这里直接读取已经下载好的csv文件即可
具体的资源csdn上搜索加利福尼亚房屋价格即可
houseData=pd.read_csv('./data/housing.csv',sep=',')
print(houseData.shape)
print(houseData.head())
>>>
(20640, 10)
   longitude  latitude  housing_median_age  total_rooms  total_bedrooms
0    -122.23     37.88                  41          880           129.0
1    -122.22     37.86                  21         7099          1106.0
2    -122.24     37.85                  52         1467           190.0
3    -122.25     37.85                  52         1274           235.0
4    -122.25     37.85                  52         1627           280.0

   population  households  median_income  median_house_value ocean_proximity
0         322         126         8.3252              452600        NEAR BAY
1        2401        1138         8.3014              358500        NEAR BAY
2         496         177         7.2574              352100        NEAR BAY
3         558         219         5.6431              341300        NEAR BAY
4         565         259         3.8462              342200        NEAR BAY
这里median_house_value就是我们要预测的房屋价格
由于ocean_proximity这一列是字符,我们需要将其转化为数值才能够参与到后面的运算
我们首先查询下一共有那些数值
types=[]
for i in houseData['ocean_proximity'].values:
    if i not in types:
        types.append(i)
print(types)
>>>
['NEAR BAY', '<1H OCEAN', 'INLAND', 'NEAR OCEAN', 'ISLAND']
我们根据顺序,分别给分0,1,2,3,来进行转化
houseData['ocean_proximity_value']=np.zeros_like(houseData['households'])
for mark,location in enumerate(types):
    houseData.ocean_proximity_value[houseData.ocean_proximity==location]=mark
newtype=[]
for i in houseData['ocean_proximity_value']:
    if i not in newtype:
        newtype.append(i)
print(newtype)
>>>
[0, 1, 2, 3, 4]
我们首先添加了ocean_proximity_value这一列来储存转化的数值,初值全为0
enumerate函数的功能是将列表的值与索引绑定起来,形成一个元组,在这里是type最初为[‘NEAR BAY’, ‘<1H OCEAN’, ‘INLAND’, ‘NEAR OCEAN’, ‘ISLAND’]
我们使用enumerate绑定之后返回的结果就是[(0,‘NEAR BAY’), (1,’<1H OCEAN’), (2,‘INLAND’), (3,‘NEAR OCEAN’), (4,‘ISLAND’)]
然后我们使用元组赋值的方法来在每次迭代的时候同时赋值
每次迭代内部,我们对houseData的ocean_proximity_value这一列进行修改,需要注意的是,我们使用的属性查值,而非索引查值,这样避免了链式索引带来的问题
接下来对数据进行分割
houseLabel=houseData['median_house_value'].copy()
houseData.drop(['median_house_value','ocean_proximity'],axis=1,inplace=True)
X_train,X_test,y_train,y_test=train_test_split(houseData.values,houseLabel.values,test_size=0.3,random_state=42)
scaler=StandardScaler()
X_train=scaler.fit_transform(X_train)
X_test=scaler.fit_transform(X_test)
print(X_train.shape)
print(X_test.shape)
>>>
(14448, 9)
(6192, 9)
数据特征可视化
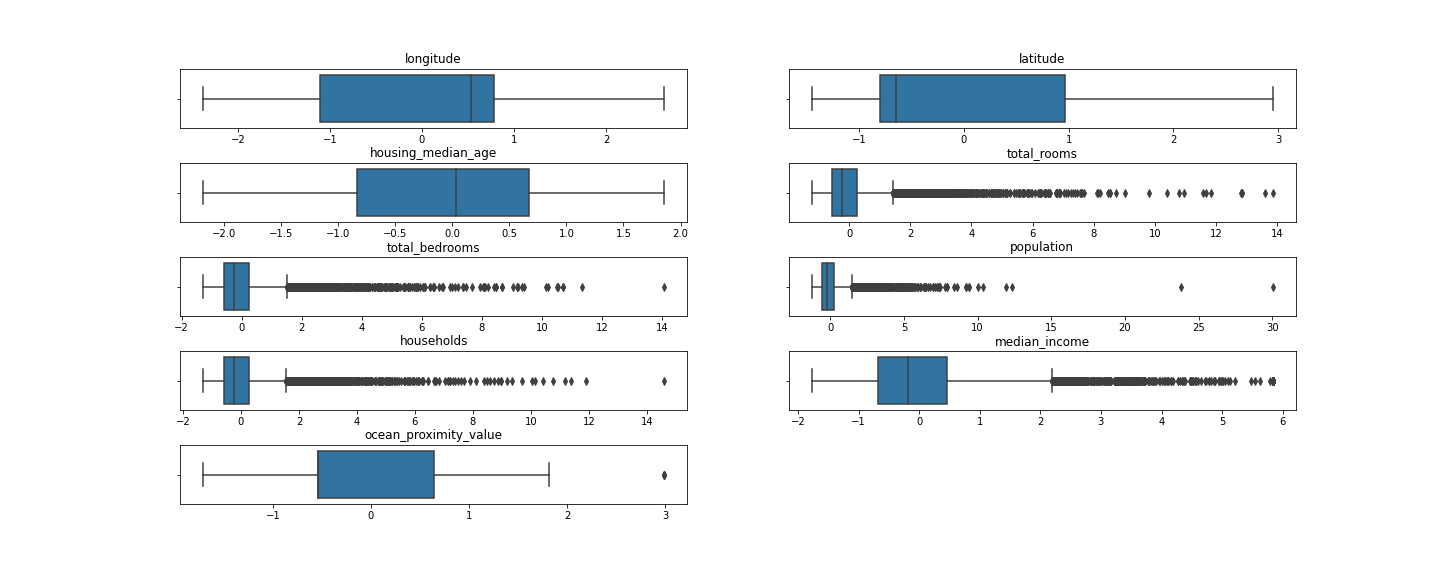
接下来我们训练数据集的九个特征进行可视化
首先是箱须图,来了解训练数据集的9个特征的分布
colnames=houseData.columns.values
print(colnames)
plt.figure(figsize=(20,8))
for ii,name in enumerate(colnames):
    plt.subplot(5,2,ii+1)
    sns.boxplot(x=X_train[:,ii])
    plt.title(name)
plt.subplots_adjust(hspace=0.6)
plt.show()
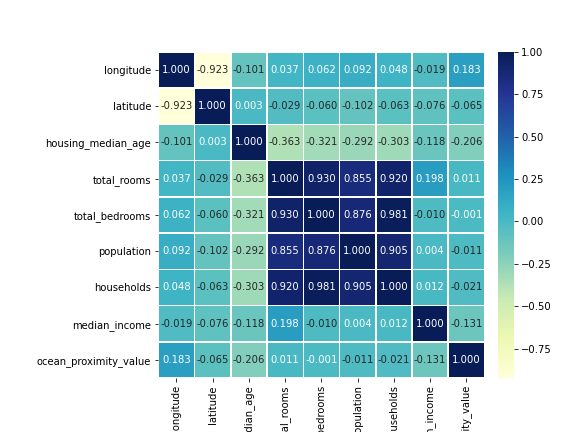
接下来我们绘制所有特征之间的相关系数热力图
dataCor=np.corrcoef(X_train,rowvar=0)
dataCor=pd.DataFrame(dataCor,columns=colnames,index=colnames)
plt.figure(figsize=(8,6))
sns.heatmap(dataCor,square=True,annot=True,fmt='.3f',linewidths=.5,cmap='YlGnBu',
           cbar_kws={'fraction':0.046,'pad':0.03})
plt.show()
最后,我们将数据转换为Tensor,便于下面的网络计算
X_train=torch.from_numpy(X_train.astype(np.float32))
y_train=torch.from_numpy(y_train.astype(np.float32))
X_test=torch.from_numpy(X_test.astype(np.float32))
y_test=torch.from_numpy(y_test.astype(np.float32))

train_data=Data.TensorDataset(X_train,y_train)
test_data=Data.TensorDataset(X_test,y_test)
train_loader=Data.DataLoader(dataset=train_data,batch_size=64,shuffle=True,num_workers=1)
搭建网络并可视化结构
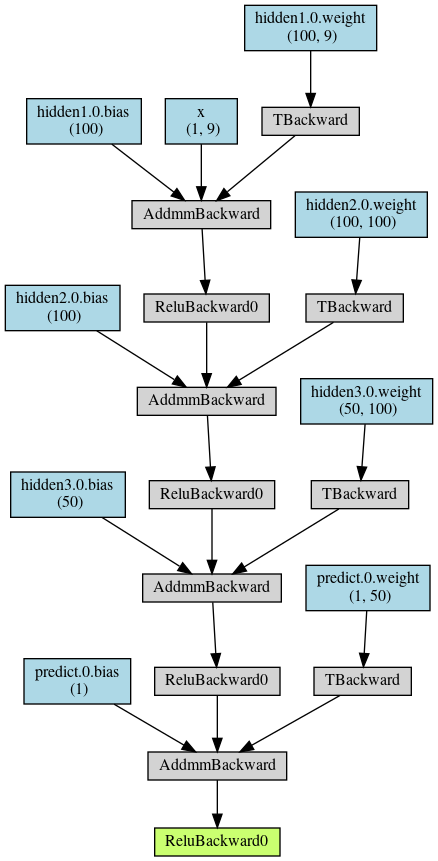
我们首先搭建如下的网络
class FullyConnectedNuralNetwork(nn.Module):
    def __init__(self):
        super(FullyConnectedNuralNetwork,self).__init__()
        self.hidden1=nn.Sequential(
                nn.Linear(in_features=9,out_features=100,bias=True),
                nn.ReLU())
        self.hidden2=nn.Sequential(
                nn.Linear(in_features=100,out_features=100,bias=True),
                nn.ReLu())
        self.hidden3=nn.Sequential(
                nn.Linear(in_features=100,out_features=50,bias=True),
                nn.ReLU())
        self.predict=nn.Sequential(
                nn.Linear(in_features=50,out_features=1,bias=True),
                nn.ReLU())
    def forward(self,x):
        x=self.hidden1(x)
        x=self.hidden2(x)
        x=self.hidden3(x)
        x=self.predict(x)
        return x
接下来使用torchviz中的make_dot来进行可视化
from torchviz import make_dot
fcNet=FullyConnectedNuralNetwork()
x=torch.randn(size=(1,9)).requires_grad_(True)
y=fcNet(x)
fcNetArchitecture=make_dot(y,params=dict(list(fcNet.named_parameters())+[('x',x)]))
fcNetArchitecture.directory='/home/jack/图片/houseNet.png'
fcNetArchitecture.view()
训练网络
老生长谈,上代码
from sklearn.metrics import accuracy_score
logStep=25
train_loss_all=[]
for epoch in range(30):
    train_loss=0
    train_num=0
    for step,(batch_x,batch_y) in enumerate(train_loader):
        output=fcNet(batch_x)
        loss=lossFunc(output,batch_y)
        optimizerAdam.zero_grad()
        loss.backward()
        optimizerAdam.step()

        train_loss_=loss.item()*batch_x.size(0)
        train_num+=batch_x.size(0)
    train_loss_all.append(train_loss/train_num)
由于是回归问题,最后的输出是一个值,因此直接记录每次的损失即可
(未完待续)
最近大二刚开学,作业有点多,诸位看官见谅,最后一个训练的代码得到的训练结果有问题,还没debug,过几天有时间了再写
本教程会一直持续到使用Pytorch实现各种网络
最后
以上就是强健老鼠最近收集整理的关于第六节:Pytorch实现全连接神经网络第六节:Pytorch实现全连接神经网络分类任务:垃圾邮件分类回归任务:房价预测的全部内容,更多相关第六节内容请搜索靠谱客的其他文章。


发表评论 取消回复