之所以要先讲spi机制是因为sentinel后面的一些扩展都需要基于这个机制,所以在这里先大概说下spi的使用与其具体的实现
SPI
SPI 全称Service Provider Interface,
原生Java SPI
JAVA中的SPI机制_清朝程序猿的博客-CSDN博客_java spi
其他细节这里就不说了
Sentinel SPI
Sentinel SPI是对原生的spi进行的一种扩展,提供了缓存功能和排序功能默认实现等,不过相对于dubbo spi还是要差一点,这点以后有机会写dubbo的时候再说一下,不过对于sentinel来说它自己实现的spi也够用了,下面就来稍微看下使用方式与源码的基本解析
使用
定义接口
public interface Dog {

    void eat();
}


以下是实现类


/**
 * 设置为默认值
 */
@Spi(isDefault = true)
public class RedDog implements  Dog {
    @Override
    public void eat() {
        System.out.println("红狗吃饭");
    }
}


/**
 * 设置别名
 */
@Spi(value = "white", order = -1)
public class WhiteDog implements Dog {
    @Override
    public void eat() {
        System.out.println("白狗吃饭");
    }
}
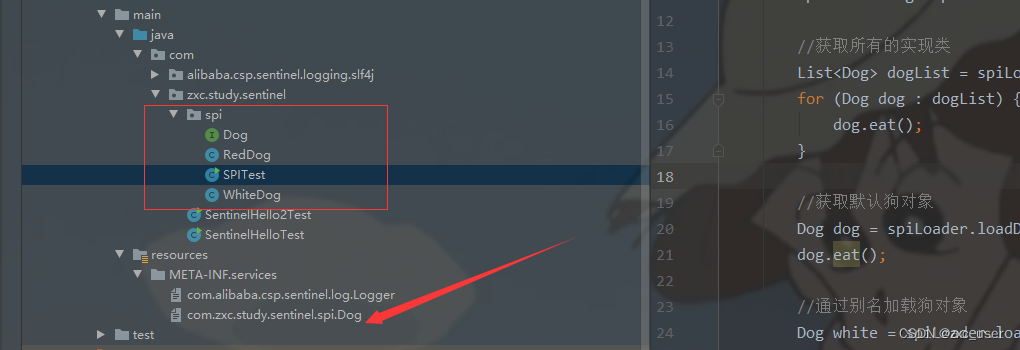
配置文件
sentinel spi机制的配置文件地址是固定,前缀为 com.alibaba.csp.sentinel.spi.SpiLoader#SPI_FILE_PREFIX定义的值,也就是
META-INF/services/,而文件名为接口的全类名,不包含后缀,文件内容以换行分割,为实现类的全类名,如下
文件名为


com.zxc.study.sentinel.spi.Dog


文件内容为


com.zxc.study.sentinel.spi.RedDog
com.zxc.study.sentinel.spi.WhiteDog
spi使用
利用Sentinel提供的SpiLoader进行操作即可,以下为一些测试
public class SPITest {
    public static void main(String[] args) {

        //加载SpiLoader对象
        SpiLoader<Dog> spiLoader = SpiLoader.of(Dog.class);

        //获取所有的实现类
        List<Dog> dogList = spiLoader.loadInstanceList();
        for (Dog dog : dogList) {
            dog.eat();
        }

        //获取默认狗对象
        Dog dog = spiLoader.loadDefaultInstance();
        dog.eat();

        //通过别名加载狗对象
        Dog white = spiLoader.loadInstance("white");
        white.eat();

        //加载第一个实例进行调用,配置文件哪个先放进去就拿拿个
        spiLoader.loadFirstInstance().eat();

        //可以通过 @spi注解的order进行设置,默认都是0,值越少排的越前面,最优化和最底级别的
        spiLoader.loadHighestPriorityInstance().eat();
        spiLoader.loadLowestPriorityInstance().eat();

        //获取排序后的列表
        spiLoader.loadInstanceListSorted();

        //其他几个api也都比较简单,这个功能比原生的java spi机制已经要强大很多了,帮我们做了很多事
    }
}
最后再看下具体的结构图,其实也是比较简单的

总结:sentinel的spi机制使用还是比较简单的,扩展性也比较强,到时候看到源码你就会看到spi机制的作用了,这种spi机制在dubbo也是用到了,而且是dubbo的核心扩展机制,后面会再说到这个问题,接下来就是要看下实现了,也不是很复杂,目前的话都是以代码来描述的,以后再尝试去画图,理解起来可能更好点
源码分析
spiLoader构建
创建入口: com.alibaba.csp.sentinel.spi.SpiLoader#of


public static <T> SpiLoader<T> of(Class<T> service) {
        //基本校验,一看就懂!
        AssertUtil.notNull(service, "SPI class cannot be null");
        AssertUtil.isTrue(service.isInterface() || Modifier.isAbstract(service.getModifiers()),
                "SPI class[" + service.getName() + "] must be interface or abstract class");

        //获取全类名
        String className = service.getName();

        //从获取中获取SpiLoader对象,就是一个全局Map维护的
        SpiLoader<T> spiLoader = SPI_LOADER_MAP.get(className);

        //没有的话要进行创建,使用双重检索机制处理并发问题,这也是阿里惯用手法!
        if (spiLoader == null) {
            synchronized (SpiLoader.class) {
                spiLoader = SPI_LOADER_MAP.get(className);
                if (spiLoader == null) {
                    //创建并方到缓存中,直接new对象然后放到缓存中
                    SPI_LOADER_MAP.putIfAbsent(className, new SpiLoader<>(service));
                    spiLoader = SPI_LOADER_MAP.get(className);
                }
            }
        }

        //如果缓存有直接返回,没有则创建
        return spiLoader;
    }


这段逻辑还是比较简单的,除了双重检锁机制可能稍微复杂点,其他的没有啥,加锁是为了并发问题处理
spiLoader的具体操作
spiLoader对象获取实例的操作,也不是很复杂,除了获取对象的那部分代码,其他的逻辑还是比较简单的
首先先看下load方法,这也是核心加载方法,这个看完了,其他的是比较简单的


        //使用juc包下原子类控制只加载一次
        if (!loaded.compareAndSet(false, true)) {
            return;
        }

        //拼接文件全类名, META-INF/services/com.zxc.study.sentinel.spi.Dog
        String fullFileName = SPI_FILE_PREFIX + service.getName();

        //获取类加载器逻辑...
        ClassLoader classLoader;
        if (SentinelConfig.shouldUseContextClassloader()) {
            classLoader = Thread.currentThread().getContextClassLoader();
        } else {
            classLoader = service.getClassLoader();
        }
        if (classLoader == null) {
            classLoader = ClassLoader.getSystemClassLoader();
        }

        //加载资源
        Enumeration<URL> urls = null;
        try {
            urls = classLoader.getResources(fullFileName);
        } catch (IOException e) {
            fail("Error locating SPI configuration file, filename=" + fullFileName + ", classloader=" + classLoader, e);
        }

        if (urls == null || !urls.hasMoreElements()) {
            RecordLog.warn("No SPI configuration file, filename=" + fullFileName + ", classloader=" + classLoader);
            return;
        }

        //循环处理文件,可能有多个,这里也是体现扩展的地方
        //你可能引用的是sentinel的jar包,他里面会有这个文件,然后你也可以在自己项目对应的文件下配置该文件
        while (urls.hasMoreElements()) {
            URL url = urls.nextElement();

            InputStream in = null;
            BufferedReader br = null;
            try {
                in = url.openStream();
                br = new BufferedReader(new InputStreamReader(in, StandardCharsets.UTF_8));
                String line;
                while ((line = br.readLine()) != null) {
                    if (StringUtil.isBlank(line)) {
                        // Skip blank line
                        continue;
                    }

                    line = line.trim();
                    int commentIndex = line.indexOf("#");
                    if (commentIndex == 0) {
                        // Skip comment line
                        continue;
                    }

                    if (commentIndex > 0) {
                        line = line.substring(0, commentIndex);
                    }
                    line = line.trim();

                    Class<S> clazz = null;
                    try {
                        clazz = (Class<S>) Class.forName(line, false, classLoader);
                    } catch (ClassNotFoundException e) {
                        fail("class " + line + " not found", e);
                    }

                    if (!service.isAssignableFrom(clazz)) {
                        fail("class " + clazz.getName() + "is not subtype of " + service.getName() + ",SPI configuration file=" + fullFileName);
                    }

                    //上面是解析一行行的数据,然后反射加载类...
                    classList.add(clazz);

                    //获取spi注解,这个是标记在实现类上的
                    Spi spi = clazz.getAnnotation(Spi.class);

                    //获取别名
                    String aliasName = spi == null || "".equals(spi.value()) ? clazz.getName() : spi.value();
                    if (classMap.containsKey(aliasName)) {
                        Class<? extends S> existClass = classMap.get(aliasName);
                        fail("Found repeat alias name for " + clazz.getName() + " and "
                                + existClass.getName() + ",SPI configuration file=" + fullFileName);
                    }
                    classMap.put(aliasName, clazz);

                    //是否有别名,有的话则进行设置
                    if (spi != null && spi.isDefault()) {
                        //别名只能有一个,多个时则报错
                        if (defaultClass != null) {
                            fail("Found more than one default Provider, SPI configuration file=" + fullFileName);
                        }
                        defaultClass = clazz;
                    }

                    RecordLog.info("[SpiLoader] Found SPI implementation for SPI {}, provider={}, aliasName={}"
                            + ", isSingleton={}, isDefault={}, order={}",
                        service.getName(), line, aliasName
                            , spi == null ? true : spi.isSingleton()
                            , spi == null ? false : spi.isDefault()
                            , spi == null ? 0 : spi.order());
                }
            } catch (IOException e) {
                fail("error reading SPI configuration file", e);
            } finally {
                closeResources(in, br);
            }
        }

        sortedClassList.addAll(classList);

        //进行排序,默认顺序为0,值越小排的越前
        Collections.sort(sortedClassList, new Comparator<Class<? extends S>>() {
            @Override
            public int compare(Class<? extends S> o1, Class<? extends S> o2) {
                Spi spi1 = o1.getAnnotation(Spi.class);
                int order1 = spi1 == null ? 0 : spi1.order();

                Spi spi2 = o2.getAnnotation(Spi.class);
                int order2 = spi2 == null ? 0 : spi2.order();

                return Integer.compare(order1, order2);
            }
        });
    }


再看看其他的方法


1. 加载全部实例的方法   com.alibaba.csp.sentinel.spi.SpiLoader#loadInstanceList


    public List<S> loadInstanceList() {

        //加载对象,如果加载过则不会再加载了
        load();

        //根据文件配置顺序实现化对象出来
        return createInstanceList(classList);
    }


再到里面去看


    private List<S> createInstanceList(List<Class<? extends S>> clazzList) {

        //为空则返回
        if (clazzList == null || clazzList.size() == 0) {
            return Collections.emptyList();
        }

        List<S> instances = new ArrayList<>(clazzList.size());
        //循环创建实例
        for (Class<? extends S> clazz : clazzList) {
            //创建实例
            S instance = createInstance(clazz);
            instances.add(instance);
        }
        return instances;
    }


    private S createInstance(Class<? extends S> clazz) {
        //获取注解
        Spi spi = clazz.getAnnotation(Spi.class);

        //标记是否为单例,默认是单例的
        boolean singleton = true;
        if (spi != null) {
            singleton = spi.isSingleton();
        }
        //创建实例
        return createInstance(clazz, singleton);
    }


    private S createInstance(Class<? extends S> clazz, boolean singleton) {
        S instance = null;
        try {
            //如果是单例的话仍然使用双重检锁机制解决并发问题
            if (singleton) {
                instance = singletonMap.get(clazz.getName());
                if (instance == null) {
                    synchronized (this) {
                        instance = singletonMap.get(clazz.getName());
                        if (instance == null) {
                            //实例化对象并放到缓存中
                            instance = service.cast(clazz.newInstance());
                            singletonMap.put(clazz.getName(), instance);
                        }
                    }
                }
            } else {
                //非单例直接实例化对象
                instance = service.cast(clazz.newInstance());
            }
        } catch (Throwable e) {
            fail(clazz.getName() + " could not be instantiated");
        }
        return instance;
    }


代码看着有点多,但其实很容易理解


2. 加载默认对象 :  com.alibaba.csp.sentinel.spi.SpiLoader#loadDefaultInstance


    public S loadDefaultInstance() {

        //仍然是要加载,如果有就不再次加载了
        load();

        //没有默认class直接返回空
        if (defaultClass == null) {
            return null;
        }

        //有的化使用通用方法加载对象,又走到上面的逻辑了
        return createInstance(defaultClass);
    }


3. 根据别名获取对象: com.alibaba.csp.sentinel.spi.SpiLoader#loadInstance(aliasName)


    public S loadInstance(String aliasName) {


        AssertUtil.notEmpty(aliasName, "aliasName cannot be empty");

        load();

        //之前load的时候已经把别名和对象放在对应的map里面了
        Class<? extends S> clazz = classMap.get(aliasName);
        if (clazz == null) {
            fail("no Provider class's aliasName is " + aliasName);
        }

        //创建对象,,这里idea有个显示bug,其实上面fail()方法里面已经抛异常了,但是这里感知不到,所以会提示说clazz不能为null
        return createInstance(clazz);
    }


4. 获取第一个实例,根据你配置文件的进行拿取


  public S loadFirstInstance() {

        //加载
        load();

        if (classList.size() == 0) {
            return null;
        }

        //获取第一个并返回,你配置文件怎么配的就拿哪个
        Class<? extends S> serviceClass = classList.get(0);
        S instance = createInstance(serviceClass);
        return instance;
    }


5.  获取优先级最高的 com.alibaba.csp.sentinel.spi.SpiLoader#loadHighestPriorityInstance


        //加载
        load();


        if (sortedClassList.size() == 0) {
            return null;
        }

        //从排好序的获取最考前的,排序是@Spi注解的order属性定义的,越小越考前
        Class<? extends S> highestClass = sortedClassList.get(0);
        return createInstance(highestClass);
    }


6. 获取优先级最低的,跟上面反着来...


   public S loadLowestPriorityInstance() {
        load();

        if (sortedClassList.size() == 0) {
            return null;
        }

        Class<? extends S> lowestClass = sortedClassList.get(sortedClassList.size() - 1);
        return createInstance(lowestClass);
    }


7. 获取排序的实例列表


   public List<S> loadInstanceListSorted() {

        //加载
        load();

        //把维护好排好序的放进去创建实例...
        return createInstanceList(sortedClassList);
    }


其他的就不说了,有兴趣可以自己看看
主要逻辑都在load()方法里面,其他的方法实现其实很简单,就是在对一个List进行操作,拿第一个,最后一个,等等,估计你一看就懂了.....
好了,这篇就说到这里,这个spi机制在后面会有使用,而且我们对sentinel的扩展有一部分就是基于这个机制进行扩展的..
最后
以上就是想人陪饼干最近收集整理的关于第二篇:Sentinel之SPI机制使用与源码分析SPISentinel SPI的全部内容,更多相关第二篇:Sentinel之SPI机制使用与源码分析SPISentinel内容请搜索靠谱客的其他文章。


发表评论 取消回复