NodeMCU 通过MQTT 连接阿里云物联网
前言:
  这是第一个帖子,希望以后所有的东西都能记录在CSDN吧!
  自己在调试过程中也借鉴了很多人的帖子,这里总结出来,方便以后查阅,也方便他人!
1.NodeMCU固件的选择及生产Bin文件
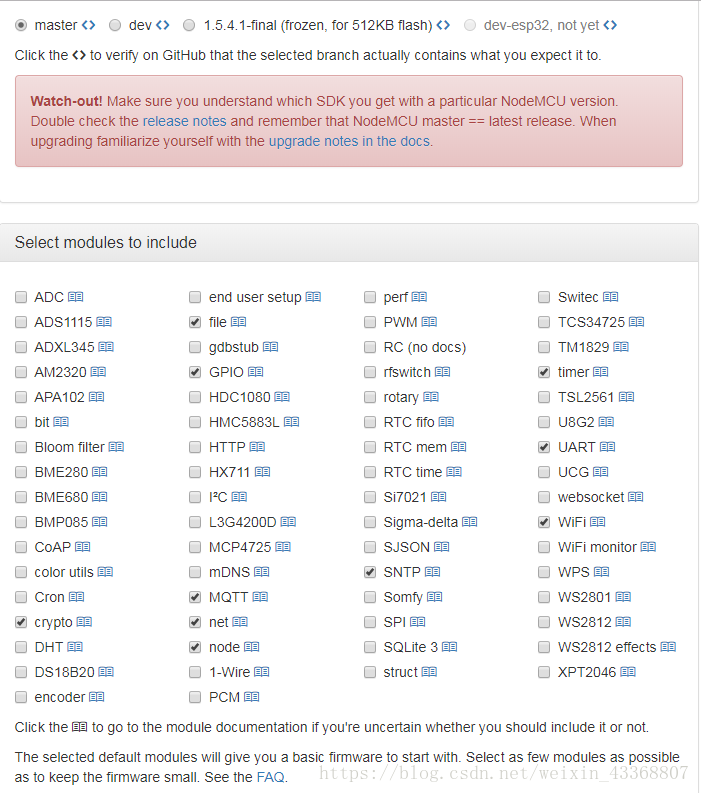
首先在下列网址选择自己需要的固件,并且生成bin文件,烧录到ESP8266里面。
固件生成网址 https://nodemcu-build.com/index.php
- 在Select branch里面选择master版本。(稳定版)
- 在modules里面选择勾选下列:
		crypto----加密模块(hamc加密)
		sntp--获取时间戳模块
		file,gpio,net,node,timer,uart,wifi,mqtt为默认模块
最后输入你的邮箱,就会把编译好的bin文件发送到你的邮箱,会提供2个版
本(整形,浮点型)根据实际需求选择
2.刷入新的固件
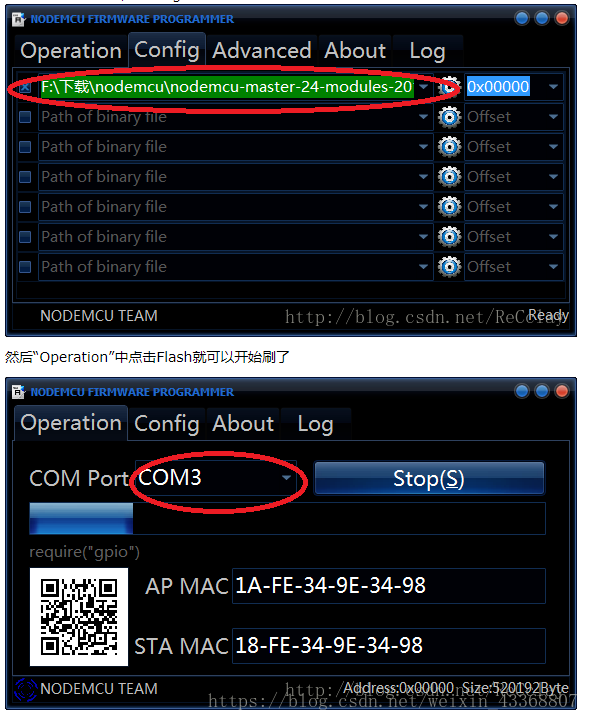
刷固件的软件这里取: https://github.com/nodemcu/nodemcu-flasher
打开软件,选择刚才生产的bin文件,选好对应的COM口,直接点击start就可以了(其他配置默认)
3.创建阿里云IOT设备
这里借鉴的(https://blog.csdn.net/yannanxiu/article/details/81334230)
3.1 开通平台
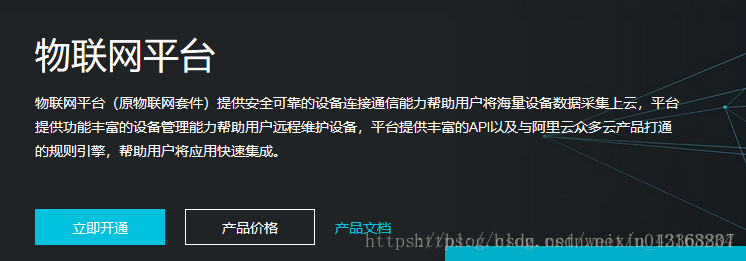
首先,需要进入阿里云IoT hub控制台进行操作,如果没有开通直接开通即可,免费。
控制台链接:https://www.aliyun.com/product/iot
3.2 创建产品
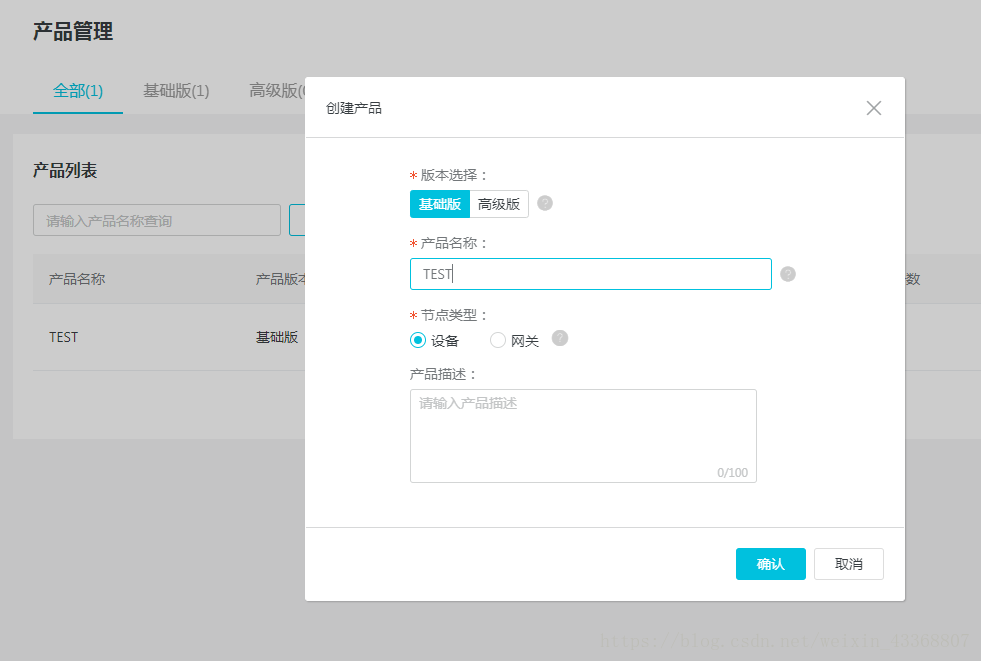
开通后我们首先需要创建产品,产品名称随便输入即可,其他默认。
3.3 创建设备
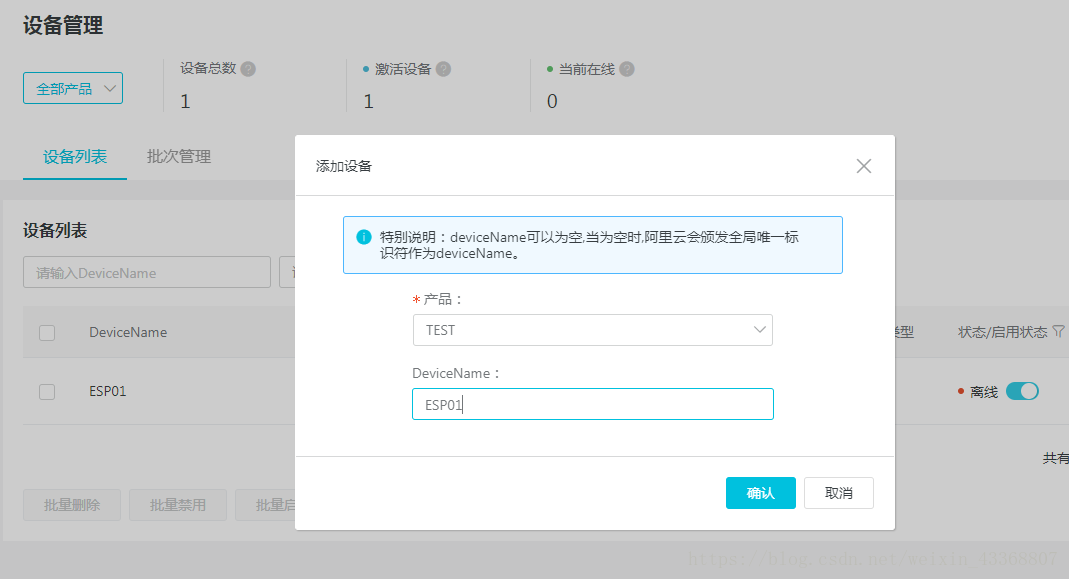
然后是创建设备,随便输入一个DeviceName即可。
3.4 创建一个新的Topic
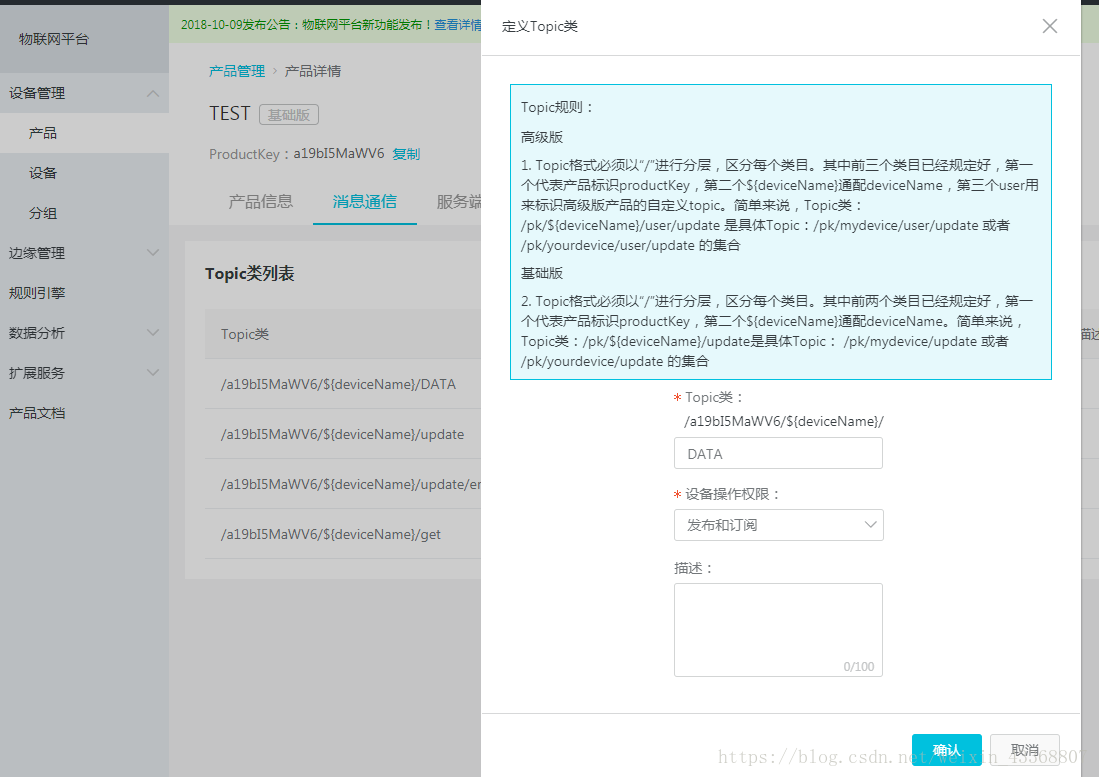
	在产品管理栏里面,他已经帮我们定义了自动3个topic,其中发送权限是:设备上传数据到broken。订阅权限是:设备接收从broken发来的数据。
	这里我们定义一个具有发送和订阅权限的topic:DATA.
3.5:获取认证三元组
最后就得到了设备认证三元组:ProductKey、DeviceName和DeviceSecret。并且定义了一个新的tpoic:DATA.
其中mqtt的Connect报文参数:
		mqttClientId:clientId+"|securemode=3,signmethod=hmacsha1,timestamp=132323232|"
		mqttUsername: deviceName+"&"+productKey
		mqttPassword: sign_hmac(deviceSecret,content)

具体替代如下:
        clientid 一般使用MAC地址,也可以自定义。
	    timestamp的值可以是最新的internet时间戳,也可以随便定义。
		deviceName 使用 我们在3.3中创建的device的名字替代:ESP01.
		productkey 使用产品的ProductKey替代
       mqttPassword,需要使用hmacsha1加密: 秘钥deviceSecret: 使用自己的DeviceSecret。 content格式如下示例:
       如果clientId = 12345,deviceName = device, productKey = pk, timestamp = 789,则 content =clientId12345deviceNamedeviceproductKeypktimestamp789
具体可以参考阿里的help文档https://help.aliyun.com/document_detail/73742.html?spm=a2c4g.11186623.6.638.56bb5f6cWj1v13
4.Lua脚本的编写
编译环境下载:https://esp8266.ru/esplorer/
wifi的配置
cfg={}
cfg.ssid="leon"
cfg.pwd="123456"
----[wifi connect]---------------
wifi.setmode(wifi.STATION)  --设置为STA模式
wifi.sta.config(cfg)        --配置
wifi.sta.connect()          --连接wifi
-----[注册wifi事件]----
wifi.eventmon.register(wifi.eventmon.STA_GOT_IP, function(T)
     print("Connected, IP is "..wifi.sta.getip())
end)

wifi.eventmon.register(wifi.eventmon.STA_DISCONNECTED, function(T)
     print("wifi disconnect")
end)
MQTT设备的配置
[Aili MQTT 配置]
----[阿里3元认证组]------
ProductKey ="a19bI5MaWV6"   --换成自己的
DeviceName ="ESP01"  -- 换成自己的
DeviceSecret="yourselfDeviceSecret"   --换成自己的设备秘钥

RegionId="cn-shanghai"     --华东2,regionid根据你的服务器选择
topic0="/a19bI5MaWV6/ESP01/DATA"   --这就是我们之前定义的一个topic
myMQTTport=1883    --port
myMQTT=nil		--client
myMQTTtimes='6666'     --随便定义即可
[转换成MQTT的host,clientid,username,password]
myMQTThost=ProductKey..".iot-as-mqtt."..RegionId..".aliyuncs.com"   --host
myMQTTClientId=ClientId.."|securemode=3,signmethod=hmacsha1,timestamp="..myMQTTtimes.."|" --设备ID
myMQTTusername=DeviceName.."&"..ProductKey          --username
[hmacsha1 加密得到password]
hmacdata="clientId"..ClientId.."deviceName"..DeviceName.."productKey"..ProductKey.."timestamp"..myMQTTtimes  --hmac 校验的数据
myMQTTpassword=crypto.toHex(crypto.hmac("sha1",hmacdata,DeviceSecret))    --hmacdata加上设备的秘钥 ,使用hmacsha1 加密得到password
[创建MQTT客户端]
myMQTT=mqtt.Client(myMQTTClientId, 120,myMQTTusername,myMQTTpassword)
[MQTT客户端发起连接请求]
MQTTconnectFlag=0
tmr.alarm(0,1000,1,function()
    if myMQTT~=nil then
	    print("Attempting client connect...")
	    myMQTT:connect(myMQTThost, myMQTTport,0,MQTTSuccess,MQTTFailed)
    end
end)
[连接成功,连接失败事件]
function MQTTSuccess(client)
	print("MQTT connected")
	client:subscribe(topic0,0, function(conn)     --注册topic0
        print("subscribe success")
    end)
	myMQTT=client
	MQTTconnectFlag=1
	tmr.stop(0)        --关闭定时连接
end

---[连接失败]---
function MQTTFailed(client,reson)
	print("Fail reson:"..reson)
	MQTTconnectFlag=0
	tmr.start(0)     --重新启动连接
end
–[设备发送和接收数据及下线事件]-----
--[注册 设备接收到订阅的topic 事件]-----
myMQTT:on("message", function(client, topic, data)
    print(topic ..":")
    if data ~= nil then
        print(data)
    end
end)

--[topic 定时上传数据]
tmr.alarm(1, 5000, 1, function()    --等待连接上
    if MQTTconnectFlag==1 and myMQTT~=nil then
        myMQTT:publish(topic0,"this is data upload",0,0,function(client)
                        print("send ok" )
        end)
    end
end)
--[设备offline 事件]-----
myMQTT:on("offline", function(client)
    print ("offline")
    tmr.start(0)
end)
5.调试结果
烧录好代码之后运行,控制台会显示device在线,并且由于device订阅了Data topic,并且每隔5S发布向改topic上传数据。设备会接收到自己的数据并且打印出来。
6.全部代码参考如下,三元组换成自己的就好。
-----[wifi config]-------------
---------------------------
cfg={}
cfg.ssid="leon"
cfg.pwd="hyl123456"

-----[Aili MQTT 配置]---------
----------------------------
ProductKey ="a19bI5MaWV6"   --换成自己的
ClientId =wifi.sta.getmac()  -- 自定义clientId,这里使用mac地址
DeviceName ="ESP01"  -- 换成自己的
DeviceSecret="a1wLtTqCn6EzZ"
RegionId="cn-shanghai"     --华东2

myMQTTport=1883    --port
myMQTT=nil		--client

myMQTThost=ProductKey..".iot-as-mqtt."..RegionId..".aliyuncs.com"   --host
myMQTTusername=DeviceName.."&"..ProductKey          --username

topic0="/a19bI5MaWV6/ESP01/DATA"   --device 的topic

----[wifi connect]---------------
wifi.setmode(wifi.STATION)  --设置为STA模式
wifi.sta.config(cfg)        --配置
wifi.sta.connect()          --连接wifi

-----[注册wifi事件]----
wifi.eventmon.register(wifi.eventmon.STA_GOT_IP, function(T)
     print("Connected, IP is "..wifi.sta.getip())
end)

wifi.eventmon.register(wifi.eventmon.STA_DISCONNECTED, function(T)
     print("wifi disconnect")
end)


--------[获取时间戳]--------------------
function GetNetTime()
    sntp.sync({"0.nodemcu.pool.ntp.org","1.nodemcu.pool.ntp.org","2.nodemcu.pool.ntp.org","3.nodemcu.pool.ntp.org","www.beijing-time.org"},
         function(sec, usec, server, info)
                 print('sync', sec, usec, server)
         end,
         function()
            print("get time error")
         end)
    return 0
end

--------MQTT------------------
myMQTTtimes='6666'
hmacdata="clientId"..ClientId.."deviceName"..DeviceName.."productKey"..ProductKey.."timestamp"..myMQTTtimes  --hmac 校验的数据
myMQTTpassword=crypto.toHex(crypto.hmac("sha1",hmacdata,DeviceSecret))    --hmacdata加上设备的秘钥 ,使用hmacsha1 加密得到password
myMQTTClientId=ClientId.."|securemode=3,signmethod=hmacsha1,timestamp="..myMQTTtimes.."|"   --设备ID
----[创建MQTT客户端]
myMQTT=mqtt.Client(myMQTTClientId, 120,myMQTTusername,myMQTTpassword)


----[启动定时连接]
MQTTconnectFlag=0
tmr.alarm(0,1000,1,function()
    if myMQTT~=nil then
	    print("Attempting client connect...")
	    myMQTT:connect(myMQTThost, myMQTTport,0,MQTTSuccess,MQTTFailed)
    end
end)

---[连接成功]---
function MQTTSuccess(client)
	print("MQTT connected")
	client:subscribe(topic0,0, function(conn)     --注册topic0
        print("subscribe success")
    end)
	myMQTT=client
	MQTTconnectFlag=1
	tmr.stop(0)        --关闭定时连接
end

---[连接失败]---
function MQTTFailed(client,reson)
	print("Fail reson:"..reson)
	MQTTconnectFlag=0
	tmr.start(0)     --重新启动连接
end

--[设备offline 事件]-----
myMQTT:on("offline", function(client)
    print ("offline")
    tmr.start(0)
end)

--[注册 设备接收到订阅的topic 事件]-----
myMQTT:on("message", function(client, topic, data)
    print(topic ..":")
    if data ~= nil then
        print(data)
    end
end)

--[topic 定时上传数据]
tmr.alarm(1, 5000, 1, function()    --等待连接上
    if MQTTconnectFlag==1 and myMQTT~=nil then
        myMQTT:publish(topic0,"this is data upload",0,0,function(client)
                        print("send ok" )
        end)
    end
end)
最后
以上就是暴躁长颈鹿最近收集整理的关于NodeMCU 通过MQTT 连接阿里云物联网NodeMCU 通过MQTT 连接阿里云物联网的全部内容,更多相关NodeMCU内容请搜索靠谱客的其他文章。
本图文内容来源于网友提供,作为学习参考使用,或来自网络收集整理,版权属于原作者所有。


发表评论 取消回复