gayhub上的zxing可用于生成二维码,识别二维码
gayhub地址:https://github.com/zxing/zxing
此文只是简易教程,文末附有完整代码和demo下载地址,进入正题:
(1)下载并导入zxing.jar包
下载:
zxing.jar下载地址,只需要1积分,方便大家学习下载。
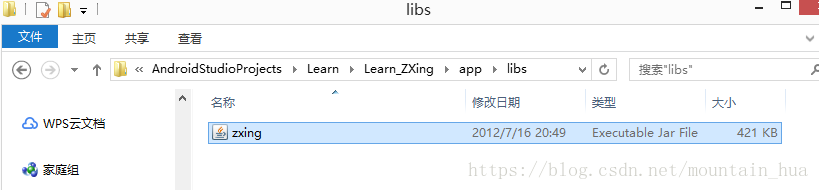
把下载好的zxing.jar放在app的libs文件夹内,如图
导入:
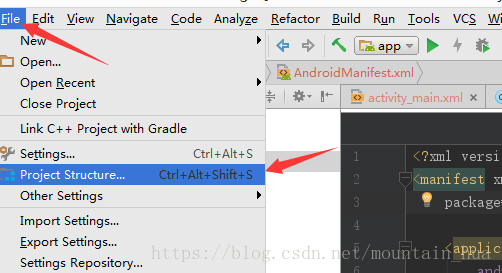
进入project structure.如图
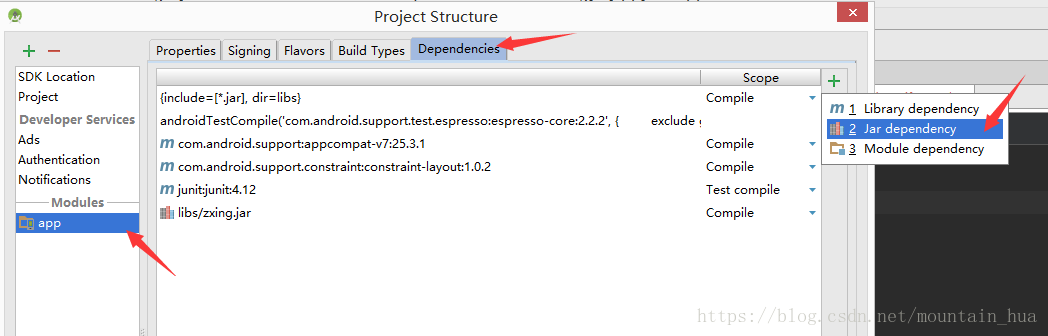
点进去之后,依次进入app——Dependencies——jar dependency:
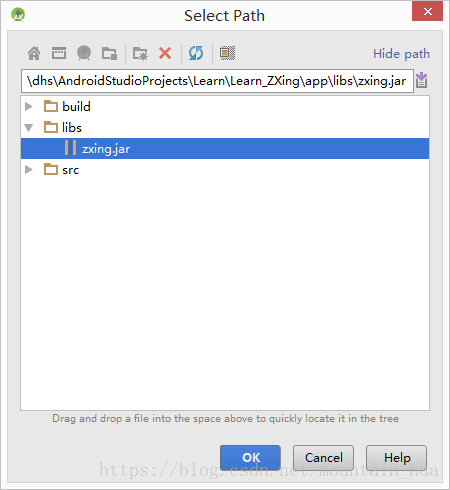
选择zxing.jar,导入
(2)生成二维码:
生成二维码的函数:
public void createQRcodeImage(String url)
    {
        im1=(ImageView)findViewById(R.id.imageView);
        w=im1.getWidth();
        h=im1.getHeight();
        try
        {
            //判断URL合法性
            if (url == null || "".equals(url) || url.length() < 1)
            {
                return;
            }
            Hashtable<EncodeHintType, String> hints = new Hashtable<EncodeHintType, String>();
            hints.put(EncodeHintType.CHARACTER_SET, "utf-8");
            //图像数据转换,使用了矩阵转换
            BitMatrix bitMatrix = new QRCodeWriter().encode(url, BarcodeFormat.QR_CODE, w, h, hints);
            int[] pixels = new int[w * h];
            //下面这里按照二维码的算法,逐个生成二维码的图片,
            //两个for循环是图片横列扫描的结果
            for (int y = 0; y < h; y++)
            {
                for (int x = 0; x < w; x++)
                {
                    if (bitMatrix.get(x, y))
                    {
                        pixels[y * w + x] = 0xff000000;
                    }
                    else
                    {
                        pixels[y * w + x] = 0xffffffff;
                    }
                }
            }
            //生成二维码图片的格式,使用ARGB_8888
            Bitmap bitmap = Bitmap.createBitmap(w, h, Bitmap.Config.ARGB_8888);
            bitmap.setPixels(pixels, 0, w, 0, 0, w, h);
            //显示到我们的ImageView上面
            im1.setImageBitmap(bitmap);
        }
        catch (WriterException e)
        {
            e.printStackTrace();
        }
    }
设置两种转换方式,默认转换/自定义转换:
Button bt=(Button)findViewById(R.id.button);
bt.setOnClickListener(new View.OnClickListener() {
@Override
public void onClick(View v) {
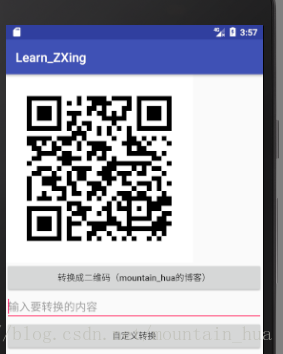
createQRcodeImage("https://blog.csdn.net/mountain_hua");//url为我的csdn博客地址
}
});
Button bt2=(Button)findViewById(R.id.button2);
bt2.setOnClickListener(new View.OnClickListener() {
@Override
public void onClick(View v) {
EditText editText=(EditText)findViewById(R.id.editText);
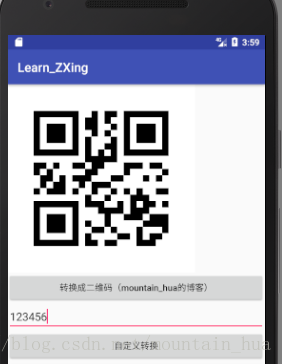
createQRcodeImage(editText.getText().toString());//自定义转换内容
}
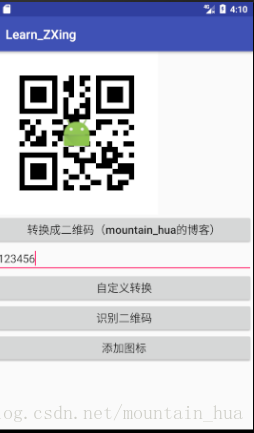
});默认转换为我的博客: 自定义转换:
二维码转换出来了,可以拿手机扫一扫试一试。
(3)识别二维码
识别二维码需要一个RGBLuminanceSource类:
//识别图片所需要的RGBLuminanceSource类
    public class RGBLuminanceSource extends LuminanceSource {

        private byte bitmapPixels[];

        protected RGBLuminanceSource(Bitmap bitmap) {
            super(bitmap.getWidth(), bitmap.getHeight());

            // 首先,要取得该图片的像素数组内容
            int[] data = new int[bitmap.getWidth() * bitmap.getHeight()];
            this.bitmapPixels = new byte[bitmap.getWidth() * bitmap.getHeight()];
            bitmap.getPixels(data, 0, getWidth(), 0, 0, getWidth(), getHeight());

            // 将int数组转换为byte数组,也就是取像素值中蓝色值部分作为辨析内容
            for (int i = 0; i < data.length; i++) {
                this.bitmapPixels[i] = (byte) data[i];
            }
        }

        @Override
        public byte[] getMatrix() {
            // 返回我们生成好的像素数据
            return bitmapPixels;
        }

        @Override
        public byte[] getRow(int y, byte[] row) {
            // 这里要得到指定行的像素数据
            System.arraycopy(bitmapPixels, y * getWidth(), row, 0, getWidth());
            return row;
        }
    }
识别二维码的函数:
//识别二维码的函数
public void recogQRcode(ImageView imageView){
Bitmap QRbmp = ((BitmapDrawable) (imageView).getDrawable()).getBitmap(); //将图片bitmap化
int width = QRbmp.getWidth();
int height = QRbmp.getHeight();
int[] data = new int[width * height];
QRbmp.getPixels(data, 0, width, 0, 0, width, height); //得到像素
RGBLuminanceSource source = new RGBLuminanceSource(QRbmp); //RGBLuminanceSource对象
BinaryBitmap bitmap1 = new BinaryBitmap(new HybridBinarizer(source));
QRCodeReader reader = new QRCodeReader();
Result re = null;
try {
//得到结果
re = reader.decode(bitmap1);
} catch (NotFoundException e) {
e.printStackTrace();
} catch (ChecksumException e) {
e.printStackTrace();
} catch (FormatException e) {
e.printStackTrace();
}
//Toast出内容
Toast.makeText(MainActivity.this,re.getText(),Toast.LENGTH_SHORT).show();
//利用正则表达式判断内容是否是URL,是的话则打开网页
String regex = "(((https|http)?://)?([a-z0-9]+[.])|(www.))"
+ "\w+[.|\/]([a-z0-9]{0,})?[[.]([a-z0-9]{0,})]+((/[\S&&[^,;u4E00-u9FA5]]+)+)?([.][a-z0-9]{0,}+|/?)";//设置正则表达式
Pattern pat = Pattern.compile(regex.trim());//比对
Matcher mat = pat.matcher(re.getText().trim());
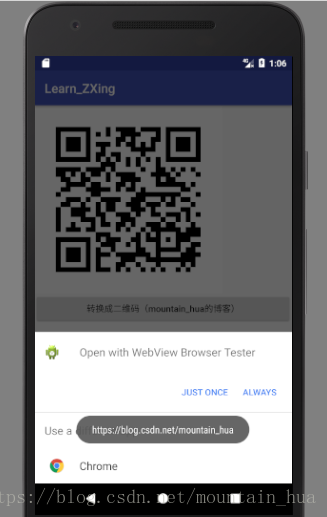
if (mat.matches()){
Uri uri = Uri.parse(re.getText());
Intent intent = new Intent(Intent.ACTION_VIEW, uri);//打开浏览器
startActivity(intent);
}
}下面看识别效果:
这是识别URL的结果: 这是识别一般文字的结果:

(4)完整代码:
Mainactivity:
package mountain_hua.learn_zxing;

import android.content.Intent;
import android.graphics.Bitmap;
import android.graphics.drawable.BitmapDrawable;
import android.net.Uri;
import android.support.v7.app.AppCompatActivity;
import android.os.Bundle;
import android.view.View;
import android.widget.Button;
import android.widget.EditText;
import android.widget.ImageView;
import android.widget.Toast;

import com.google.zxing.BarcodeFormat;
import com.google.zxing.BinaryBitmap;
import com.google.zxing.ChecksumException;
import com.google.zxing.EncodeHintType;
import com.google.zxing.FormatException;
import com.google.zxing.LuminanceSource;
import com.google.zxing.NotFoundException;
import com.google.zxing.Result;
import com.google.zxing.WriterException;
import com.google.zxing.common.BitMatrix;
import com.google.zxing.common.HybridBinarizer;
import com.google.zxing.qrcode.QRCodeReader;
import com.google.zxing.qrcode.QRCodeWriter;

import java.util.Hashtable;
import java.util.regex.Matcher;
import java.util.regex.Pattern;

public class MainActivity extends AppCompatActivity {

    private ImageView im1;  //imageview图片
    private int w,h;        //图片宽度w,高度h
    @Override
    protected void onCreate(Bundle savedInstanceState) {
        super.onCreate(savedInstanceState);
        setContentView(R.layout.activity_main);

        Button bt=(Button)findViewById(R.id.button);
        bt.setOnClickListener(new View.OnClickListener() {
            @Override
            public void onClick(View v) {
                createQRcodeImage("https://blog.csdn.net/mountain_hua");//url为我的csdn博客地址
            }
        });

        Button bt2=(Button)findViewById(R.id.button2);
        bt2.setOnClickListener(new View.OnClickListener() {
            @Override
            public void onClick(View v) {
                EditText editText=(EditText)findViewById(R.id.editText);
                createQRcodeImage(editText.getText().toString());//自定义转换内容
            }
        });

        Button bt3=(Button)findViewById(R.id.button3);
        bt3.setOnClickListener(new View.OnClickListener() {
            @Override
            public void onClick(View v) {
                im1=(ImageView)findViewById(R.id.imageView);
                recogQRcode(im1);
            }
        });

    }

    //转换成二维码QRcode的函数。参数为一个字符串
    public void createQRcodeImage(String url)
    {
        im1=(ImageView)findViewById(R.id.imageView);
        w=im1.getWidth();
        h=im1.getHeight();
        try
        {
            //判断URL合法性
            if (url == null || "".equals(url) || url.length() < 1)
            {
                return;
            }
            Hashtable<EncodeHintType, String> hints = new Hashtable<EncodeHintType, String>();
            hints.put(EncodeHintType.CHARACTER_SET, "utf-8");
            //图像数据转换,使用了矩阵转换
            BitMatrix bitMatrix = new QRCodeWriter().encode(url, BarcodeFormat.QR_CODE, w, h, hints);
            int[] pixels = new int[w * h];
            //下面这里按照二维码的算法,逐个生成二维码的图片,
            //两个for循环是图片横列扫描的结果
            for (int y = 0; y < h; y++)
            {
                for (int x = 0; x < w; x++)
                {
                    if (bitMatrix.get(x, y))
                    {
                        pixels[y * w + x] = 0xff000000;
                    }
                    else
                    {
                        pixels[y * w + x] = 0xffffffff;
                    }
                }
            }
            //生成二维码图片的格式,使用ARGB_8888
            Bitmap bitmap = Bitmap.createBitmap(w, h, Bitmap.Config.ARGB_8888);
            bitmap.setPixels(pixels, 0, w, 0, 0, w, h);
            //显示到我们的ImageView上面
            im1.setImageBitmap(bitmap);
        }
        catch (WriterException e)
        {
            e.printStackTrace();
        }
    }

    //识别二维码的函数
    public void recogQRcode(ImageView imageView){
        Bitmap QRbmp = ((BitmapDrawable) (imageView).getDrawable()).getBitmap();   //将图片bitmap化
        int width = QRbmp.getWidth();
        int height = QRbmp.getHeight();
        int[] data = new int[width * height];
        QRbmp.getPixels(data, 0, width, 0, 0, width, height);    //得到像素
        RGBLuminanceSource source = new RGBLuminanceSource(QRbmp);   //RGBLuminanceSource对象
        BinaryBitmap bitmap1 = new BinaryBitmap(new HybridBinarizer(source));
        QRCodeReader reader = new QRCodeReader();
        Result re = null;
        try {
            //得到结果
            re = reader.decode(bitmap1);
        } catch (NotFoundException e) {
            e.printStackTrace();
        } catch (ChecksumException e) {
            e.printStackTrace();
        } catch (FormatException e) {
            e.printStackTrace();
        }
        //Toast出内容
        Toast.makeText(MainActivity.this,re.getText(),Toast.LENGTH_SHORT).show();

        //利用正则表达式判断内容是否是URL,是的话则打开网页
        String regex = "(((https|http)?://)?([a-z0-9]+[.])|(www.))"
                + "\w+[.|\/]([a-z0-9]{0,})?[[.]([a-z0-9]{0,})]+((/[\S&&[^,;u4E00-u9FA5]]+)+)?([.][a-z0-9]{0,}+|/?)";//设置正则表达式

        Pattern pat = Pattern.compile(regex.trim());//比对
        Matcher mat = pat.matcher(re.getText().trim());
        if (mat.matches()){
            Uri uri = Uri.parse(re.getText());
            Intent intent = new Intent(Intent.ACTION_VIEW, uri);//打开浏览器
            startActivity(intent);
        }

    }

    //识别图片所需要的RGBLuminanceSource类
    public class RGBLuminanceSource extends LuminanceSource {

        private byte bitmapPixels[];

        protected RGBLuminanceSource(Bitmap bitmap) {
            super(bitmap.getWidth(), bitmap.getHeight());

            // 首先,要取得该图片的像素数组内容
            int[] data = new int[bitmap.getWidth() * bitmap.getHeight()];
            this.bitmapPixels = new byte[bitmap.getWidth() * bitmap.getHeight()];
            bitmap.getPixels(data, 0, getWidth(), 0, 0, getWidth(), getHeight());

            // 将int数组转换为byte数组,也就是取像素值中蓝色值部分作为辨析内容
            for (int i = 0; i < data.length; i++) {
                this.bitmapPixels[i] = (byte) data[i];
            }
        }

        @Override
        public byte[] getMatrix() {
            // 返回我们生成好的像素数据
            return bitmapPixels;
        }

        @Override
        public byte[] getRow(int y, byte[] row) {
            // 这里要得到指定行的像素数据
            System.arraycopy(bitmapPixels, y * getWidth(), row, 0, getWidth());
            return row;
        }
    }

}
布局文件activity_main:
<?xml version="1.0" encoding="utf-8"?>
<LinearLayout xmlns:android="http://schemas.android.com/apk/res/android"
    xmlns:app="http://schemas.android.com/apk/res-auto"
    android:orientation="vertical" android:layout_width="match_parent"
    android:layout_height="match_parent">

    <ImageView
        android:id="@+id/imageView"
        android:layout_width="300dp"
        android:layout_height="300dp"
        app:srcCompat="@android:color/background_light" />

    <Button
        android:id="@+id/button"
        android:layout_width="match_parent"
        android:layout_height="wrap_content"
        android:textAllCaps="false"
        android:text="转换成二维码(mountain_hua的博客)" />

    <EditText
        android:id="@+id/editText"
        android:layout_width="match_parent"
        android:layout_height="wrap_content"
        android:ems="10"
        android:hint="输入要转换的内容"
        android:inputType="textPersonName" />

    <Button
        android:id="@+id/button2"
        android:layout_width="match_parent"
        android:layout_height="wrap_content"
        android:text="自定义转换" />

    <Button
        android:id="@+id/button3"
        android:layout_width="match_parent"
        android:layout_height="wrap_content"
        android:text="识别二维码" />
</LinearLayout>
demo下载地址:https://download.csdn.net/download/mountain_hua/10471127
本文参考:
https://www.jianshu.com/p/20db116b6279
https://blog.csdn.net/qq_29634351/article/details/78688315
http://www.cnblogs.com/mythou/p/3280023.html
https://www.2cto.com/kf/201603/495847.html
续:在二维码中间填充图片logo
首先说明,二维码是有一定的纠错功能的,二维条码因穿孔、污损等引起局部损坏时,照样可以正确得到识读,损毁面积达30%仍可恢复信息。但三个角上的“回”字及周围的底色不要改变,这是用于二维码定位的,最好是填充图片在中间,越小越好。
下面进入正题:
填充图片函数:
    //给二维码添加图片
    //第一个参数为原二维码,第二个参数为添加的logo
    private static Bitmap addLogo(Bitmap src, Bitmap logo) {
        //如果原二维码为空,返回空
        if (src ==null ) {
            return null;
        }
        //如果logo为空,返回原二维码
        if (src ==null ||logo ==null) {
            return src;
        }

        //这里得到原二维码bitmap的数据
        int srcWidth = src.getWidth();
        int srcHeight = src.getHeight();
        //logo的Width和Height
        int logoWidth = logo.getWidth();
        int logoHeight = logo.getHeight();

        //同样如果为空,返回空
        if (srcWidth == 0 || srcHeight == 0) {
            return null;
        }
        //同样logo大小为0,返回原二维码
        if (logoWidth == 0 || logoHeight == 0) {
            return src;
        }

        //logo大小为二维码整体大小的1/5,也可以自定义多大,越小越好
        //二维码有一定的纠错功能,中间图片越小,越容易纠错
        float scaleFactor = srcWidth * 1.0f / 5 / logoWidth;
        Bitmap bitmap = Bitmap.createBitmap(srcWidth, srcHeight, Bitmap.Config.ARGB_8888);
        try {
            Canvas canvas = new Canvas(bitmap);
            canvas.drawBitmap(src, 0, 0, null);
            canvas.scale(scaleFactor, scaleFactor, srcWidth / 2, srcHeight / 2);
            canvas.drawBitmap(logo, (srcWidth - logoWidth) / 2, (srcHeight - logoHeight) / 2,null );

            canvas.save(Canvas.ALL_SAVE_FLAG);
            canvas.restore();
        } catch (Exception e) {
            bitmap = null;
            e.getStackTrace();
        }

        return bitmap;
    }
然后在button中设置监听:
Button bt4=(Button)findViewById(R.id.button4);
bt4.setOnClickListener(new View.OnClickListener() {
@Override
public void onClick(View v) {
im1=(ImageView)findViewById(R.id.imageView);
Bitmap QRbmp = ((BitmapDrawable) (im1).getDrawable()).getBitmap(); //将图片bitmap化
//将drawable里面的图片bitmap化
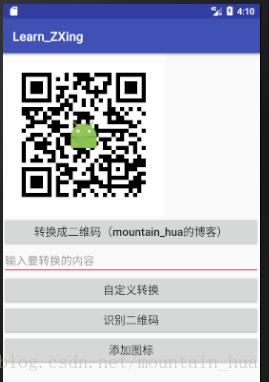
Bitmap logo = BitmapFactory.decodeResource(getResources(), R.drawable.ic_launcher);
im1.setImageBitmap(addLogo(QRbmp,logo));
}
});效果如下:
附完整版demo(带填充图片):https://download.csdn.net/download/mountain_hua/10473011
最后
以上就是朴素豌豆最近收集整理的关于Android利用zxing生成二维码,识别二维码,中间填充图片超详细、超简易教程(1)下载并导入zxing.jar包(2)生成二维码:(3)识别二维码(4)完整代码:续:在二维码中间填充图片logo的全部内容,更多相关Android利用zxing生成二维码,识别二维码,中间填充图片超详细、超简易教程(1)下载并导入zxing内容请搜索靠谱客的其他文章。


发表评论 取消回复