我是靠谱客的博主 时尚小笼包,这篇文章主要介绍STM32MP157 | 使用输入(input)子系统上报按键事件一、概念二、输入子系统用来实现驱动的设备三 、输入子系统在内核中的框架四、输入子系统中设备驱动层的编程步骤四、测试驱动模块,现在分享给大家,希望可以做个参考。
一、概念
输入子系统用于实现Linux输入设备驱动的一种框架。Linux内核将其中固定的部分放入内核中,驱动开发只需要实现其中不固定的部分。
输入子系统对应的设备文件是固定名称/devlinputlevent0…1…2.….
/dev/event0…1…2…
输入子系统对应的设备文件(驱动)的主设备号是13
二、输入子系统用来实现驱动的设备
键盘鼠标按键触摸屏游戏手柄游戏摇杆.……
三 、输入子系统在内核中的框架
1.输入子系统框架图

- input事件处理层
事件处理层就为我们用户空间的应用程序提供了统一访问设备的接口以及对驱动层提交来的事件进行处理。 - input核心层
input核心层对下提供了设备驱动层的编程接口,对上又提供了事件处理层的编程接口。 - input设备驱动层
input设备驱动层提供对硬件各寄存器的读写访问和将底层硬件的状态变化转换为标准的输入事件再通过核心层提交给事件处理层。
2. input输入子系统相关结构体
(1)input事件处理层
struct input_handler {

	void *private;

	void (*event)(struct input_handle *handle, unsigned int type, unsigned int code, int value); //上报数据
	void (*events)(struct input_handle *handle,
		       const struct input_value *vals, unsigned int count);
	bool (*filter)(struct input_handle *handle, unsigned int type, unsigned int code, int value);
	bool (*match)(struct input_handler *handler, struct input_dev *dev);//完成匹配的
	int (*connect)(struct input_handler *handler, struct input_dev *dev, const struct input_device_id *id);//驱动层和事件层连接
	void (*disconnect)(struct input_handle *handle);//驱动层和事件层断开
	void (*start)(struct input_handle *handle);

	bool legacy_minors;
	int minor;
	const char *name;

	const struct input_device_id *id_table;

	struct list_head	h_list;
	struct list_head	node;
};
(2)input设备驱动层(主要)
struct input_dev {
	const char *name;
	const char *phys;
	const char *uniq;
	struct input_id id;

	unsigned long propbit[BITS_TO_LONGS(INPUT_PROP_CNT)];

	unsigned long evbit[BITS_TO_LONGS(EV_CNT)]; //上报的事件类型
	unsigned long keybit[BITS_TO_LONGS(KEY_CNT)];//上报的按键事件的键值
	unsigned long relbit[BITS_TO_LONGS(REL_CNT)];//上报的相对事件
	unsigned long absbit[BITS_TO_LONGS(ABS_CNT)];//上报的绝对坐标事件中包含哪些坐标类型
	unsigned long mscbit[BITS_TO_LONGS(MSC_CNT)];
	unsigned long ledbit[BITS_TO_LONGS(LED_CNT)];
	unsigned long sndbit[BITS_TO_LONGS(SND_CNT)];
	unsigned long ffbit[BITS_TO_LONGS(FF_CNT)];
	unsigned long swbit[BITS_TO_LONGS(SW_CNT)];
	struct device dev;

	struct list_head	h_list;
	struct list_head	node;
};
(3)input核心层
struct input_handle {

	void *private;

	int open;
	const char *name;

	struct input_dev *dev;
	struct input_handler *handler;

	struct list_head	d_node;
	struct list_head	h_node;
};
四、输入子系统中设备驱动层的编程步骤
需要包含的头文件:
#include <linux/input.h>
(1)分配input_dev结构
//分配
struct input_dev *input_allocate_device(void);
//释放
void input_free_device(struct input_dev *dev);
(2)初始化input_dev
1)指定会触发哪些事件类型
.evbit =
	#define Ev_SYN            0x00//同步事件
	#define Ev_KEY            0x01//按键事件
	#define EV_REL            0x02//相对坐标事件
	#define Ev_ABS            0x03//绝对坐标事件
2)指定事件中的数据类型
.keybit =
	上报的按键事件包含哪些键值
.absbit =
	上报的绝对坐标事件中包含哪些坐标类型
注:可以使用位原子操作set_bit函数对以上某些成员的某些位置1
void set_bit(int nr, unsigned long *addr);1/将addr地址上的nr位置1
(3)注册input dev到内核
//注册
int input_register_device(struct input_dev *dev) ;
//注销
void input_unregister_device(struct input_dev *dev) ;
(4) 上报事件 (input_event函数)
当输入设备需要上报数据时,调用输入子系统提供的接口通知接口层发生了事件,并且传递相关的数据
void input_event(struct input_dev *dev,unsigned int type, unsigned int code, int value);
参数:
	dev - input_dev结构
	type -上报的事件类型
	code - 键值/坐标类型/ ...
	value -按键状态/坐标值/ ...
或者
//上报EV_KEY按键事件
void input_report_key(struct input_dev *dev, unsigned int code, int value)
{
	input_event(dev, EV_KEY, code, !!value);
}
//上报EV_REL相对坐标事件
void input_report_rel(struct input_dev *dev, unsigned int code, int value)
{
	input_event(dev, EV_REL, code, value);
}
//上报EV_ABS绝对使事件
void input_report_abs(struct input_dev *dev, unsigned int code, int value)
{
	input_event(dev, EV_ABS, code, value);
}
//上报EV_SYN同步事件,每次上报事件,都要进行同步,清空buf
void input_sync(struct input_dev *dev)
{
	input_event(dev, EV_SYN, SYN_REPORT, 0);
}
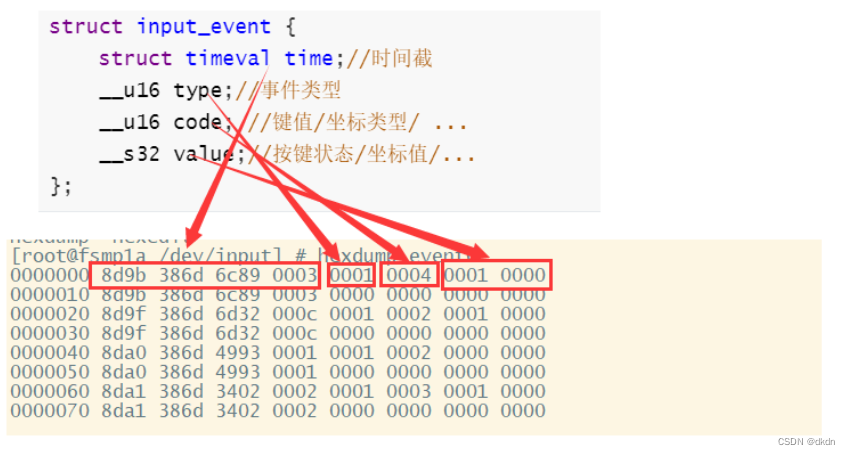
(5)在用户空间获取的数据时struct input_event类型
struct input_event {
    struct timeval time;//时间截
    __u16 type;//事件类型
    __u16 code; //键值/坐标类型/ ...
    __s32 value;//按键状态/坐标值/...
};
注:input_dev注册成功后,会在ldevlinput目录下新增一个event*的设备文件。
五、添加设备树
//在stm32mp175a-fsmp1a.dts中添加如下节点:
myirqs{
    interrupt-parent = <&gpiof>;
    interrupts = <9 0>,<7 0>,<8 0>;
    keys = <&gpiof 9 0>,<&gpiof 7 0>,<&gpiof 8 0>;   //gpiod_to_irq
};
六、编写驱动代码
1.先写个模块
#include <linux/init.h>
#include <linux/module.h>

static int __init timer_input_init(void)
{
	printk("%s:%s:%dn", __FILE__, __func__, __LINE__);
    return 0;
}
static void __exit timer_input_exit(void)
{
    printk("%s:%s:%dn", __FILE__, __func__, __LINE__);
}
module_init(timer_input_init);
module_exit(timer_input_exit);
MODULE_LICENSE("GPL");
2.再写个Makefile编译一下
ifeq ($(arch),arm)
KERNELDIR :=/home/linux/linux-5.10.61
CROSS_COMPILE ?=arm-linux-gnueabihf-
else
KERNELDIR :=/lib/modules/$(shell uname -r)/build
CROSS_COMPILE ?=
endif

modname ?=
PWD :=$(shell pwd)

CC :=$(CROSS_COMPILE)gcc

all:
	make -C $(KERNELDIR) M=$(PWD) modules
	# $(CC) test.c -o test
clean:
	make -C $(KERNELDIR) M=$(PWD) clean
	# rm test

install:
	cp *.ko ~/nfs/rootfs/
	# cp test ~/nfs/rootfs/

help:
	echo "make arch = arm or x86 modname= dirvers file name"

obj-m:=$(modname).o
3.先加入定时器驱动
#include <linux/init.h>
#include <linux/module.h>

struct timer_list mytimer;

void timer_handle(struct timer_list *timer)
{

}

static int __init timer_input_init(void)
{
    int ret, i;
    // 0.初始化定时器
    mytimer.expires = jiffies + 1;
    timer_setup(&mytimer, timer_handle, 0);
    add_timer(&mytimer);

    return 0;
}
static void __exit timer_input_exit(void)
{

}
module_init(timer_input_init);
module_exit(timer_input_exit);
MODULE_LICENSE("GPL");
4.再加入中断子系统驱动
#include <linux/init.h>
#include <linux/module.h>
#include <linux/interrupt.h>
#include <linux/of_irq.h>
#include <linux/of.h>
#include <linux/of_gpio.h>

struct timer_list mytimer;
struct device_node *node;
unsigned int irqno[3];
const char *irqname[] = {"key1", "key2", "key3"};
int gpiono[3];
void timer_handle(struct timer_list *timer)
{

}
irqreturn_t key_irq_handle(int irq, void *dev)
{
    //启动定时器
    mod_timer(&mytimer, jiffies + 1);
    return IRQ_HANDLED;
}
static int __init timer_input_init(void)
{
    int ret, i;
    // 0.初始化定时器
    mytimer.expires = jiffies + 1;
    timer_setup(&mytimer, timer_handle, 0);
    add_timer(&mytimer);


    // 1.获取节点
    node = of_find_node_by_path("/myirqs");
    if (node == NULL)
    {
        printk("find node errorn");
        return -EAGAIN;
    }

    for (i = 0; i < ARRAY_SIZE(irqno); i++)
    {
        // 2.获取gpio号
        gpiono[i] = of_get_named_gpio(node, "keys", i);
        if (gpiono[i] < 0)
        {
            printk("get gpio number errorn");
            return gpiono[i];
        }
        // 3.映射软中断号
        irqno[i] = irq_of_parse_and_map(node, i);
        if (!irqno[i])
        {
            printk("get irq number errorn");
            return -EAGAIN;
        }

        // 4.注册中断
        ret = request_irq(irqno[i], key_irq_handle,IRQF_TRIGGER_FALLING, irqname[i], (void *)i);
        if (ret)
        {
            printk("request irq errorn");
            return ret;
        }
    }

    return 0;
}
static void __exit timer_input_exit(void)
{
    int i = 0;
    for (i = 0; i < ARRAY_SIZE(irqno); i++)
    {
        free_irq(irqno[i], (void *)i);
    }
    del_timer(&mytimer);
}
module_init(timer_input_init);
module_exit(timer_input_exit);
MODULE_LICENSE("GPL");
5. 再写输入子系统驱动
#include <linux/init.h>
#include <linux/module.h>
#include <linux/interrupt.h>
#include <linux/of_irq.h>
#include <linux/of.h>
#include <linux/of_gpio.h>
#include <linux/input.h>

struct timer_list mytimer;
struct device_node *node;
unsigned int irqno[3];
const char *irqname[] = {"key1", "key2", "key3"};
int gpiono[3];
struct input_dev *key_dev = NULL;
void timer_handle(struct timer_list *timer)
{
    static int value = 0;
    value = value ? 0 : 1;

    if (gpio_get_value(gpiono[0]) == 0)
    {
        input_report_key(key_dev, KEY_1, value);
        input_sync(key_dev);
    }
    if (gpio_get_value(gpiono[1]) == 0)
    {
        input_report_key(key_dev, KEY_2, value);
        input_sync(key_dev);
    }

    if (gpio_get_value(gpiono[2]) == 0)
    {
        input_report_key(key_dev, KEY_3, value);
        input_sync(key_dev);
    }
}
irqreturn_t key_irq_handle(int irq, void *dev)
{
    //启动定时器
    mod_timer(&mytimer, jiffies + 1);
    return IRQ_HANDLED;
}
static int __init timer_input_init(void)
{
    int ret, i, j;

    // 1.分配 input_dev
    key_dev = input_allocate_device();
    if (IS_ERR_OR_NULL(key_dev))
    {
        printk("input_allocate_device");
        ret = -ENOMEM;
        goto ERR1;
    }

    // 2.初始化input_dev
    //设置上报的事件
    set_bit(EV_KEY, key_dev->evbit);
    set_bit(EV_SYN, key_dev->evbit);
    //设置会上报的键值
    set_bit(KEY_1, key_dev->keybit);
    set_bit(KEY_2, key_dev->keybit);
    set_bit(KEY_3, key_dev->keybit);

    // 3.将input_dev注册到内核
    ret = input_register_device(key_dev);
    if (ret < 0)
    {
        printk("input_register_device faild");
        ret = -EAGAIN;
        goto ERR2;
    }
    // 4.获取节点
    node = of_find_node_by_path("/myirqs");
    if (node == NULL)
    {
        printk("find node errorn");
        ret = -EAGAIN;
        goto ERR3;
    }

    for (i = 0; i < ARRAY_SIZE(irqno); i++)
    {
        // 5.获取gpio号
        gpiono[i] = of_get_named_gpio(node, "keys", i);
        if (gpiono[i] < 0)
        {
            printk("get gpio number errorn");
            ret = gpiono[i];
            goto ERR3;
        }
        // 6.映射软中断号
        irqno[i] = irq_of_parse_and_map(node, i);
        if (!irqno[i])
        {
            printk("get irq number errorn");
            ret = -EAGAIN;
            goto ERR3;
        }

        // 7.注册中断
        ret = request_irq(irqno[i], key_irq_handle, IRQF_TRIGGER_FALLING, irqname[i], (void *)i);
        if (ret)
        {
            printk("request irq errorn");
            goto ERR4;
        }
    }
    // 初始化定时器
    mytimer.expires = jiffies + 1;
    timer_setup(&mytimer, timer_handle, 0);
    add_timer(&mytimer);

    return 0;
ERR4:
    for (j = 0; j < i; j++)
        free_irq(irqno[j], (void *)i);
ERR3:
    input_unregister_device(key_dev);
ERR2:
    input_free_device(key_dev);
ERR1:
    return ret;
}
static void __exit timer_input_exit(void)
{
    int i = 0;
    del_timer(&mytimer);
    for (i = 0; i < ARRAY_SIZE(irqno); i++)
    {
        free_irq(irqno[i], (void *)i);
    }
    input_unregister_device(key_dev);
    input_free_device(key_dev);
}
module_init(timer_input_init);
module_exit(timer_input_exit);
MODULE_LICENSE("GPL");
四、测试驱动模块
1.加载驱动,查看驱动

加载成功
2.查看dev/input目录

有新的设备文件产生
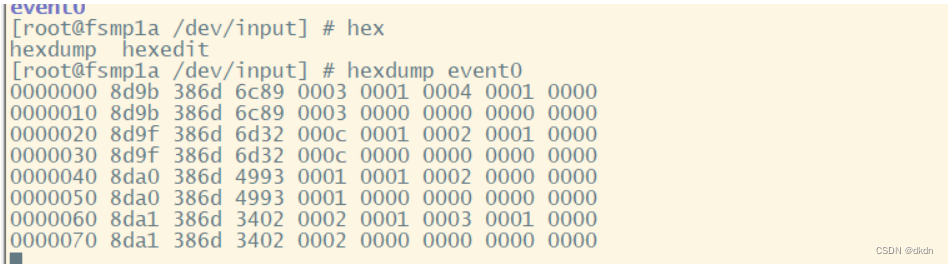
3.按键测试
使用命令hexdump evevt0可以查看上报的按键事件
最后
以上就是时尚小笼包最近收集整理的关于STM32MP157 | 使用输入(input)子系统上报按键事件一、概念二、输入子系统用来实现驱动的设备三 、输入子系统在内核中的框架四、输入子系统中设备驱动层的编程步骤四、测试驱动模块的全部内容,更多相关STM32MP157内容请搜索靠谱客的其他文章。
本图文内容来源于网友提供,作为学习参考使用,或来自网络收集整理,版权属于原作者所有。


发表评论 取消回复