文章目录
- 低电压检测
- 寄存器描述
- 原理图
- Keil 工程结构
- 源文件
- STC-ISP 硬件选项
- 测试
- 参考
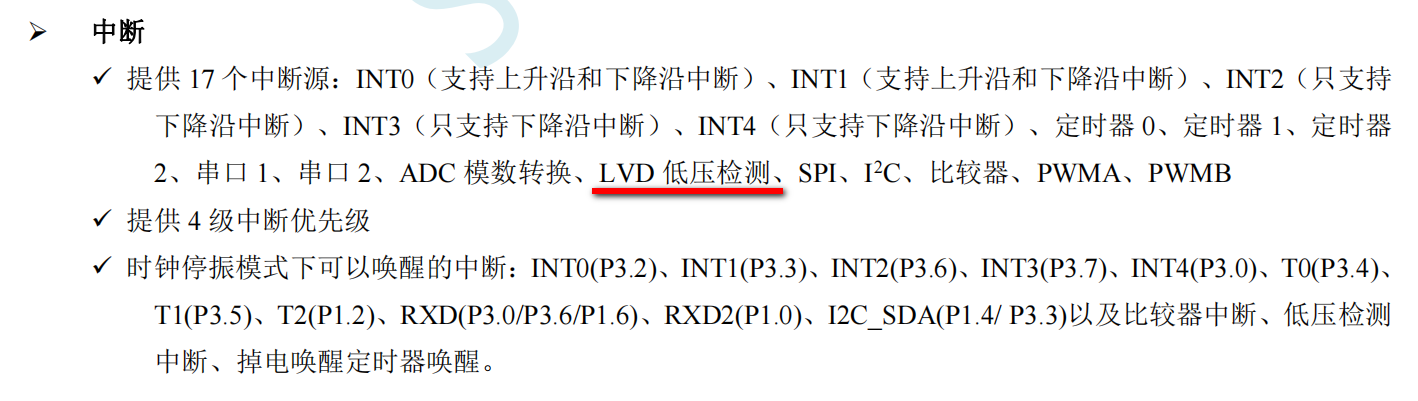
STC8H1K08-36I 支持低电压检测中断:
低电压检测
寄存器描述
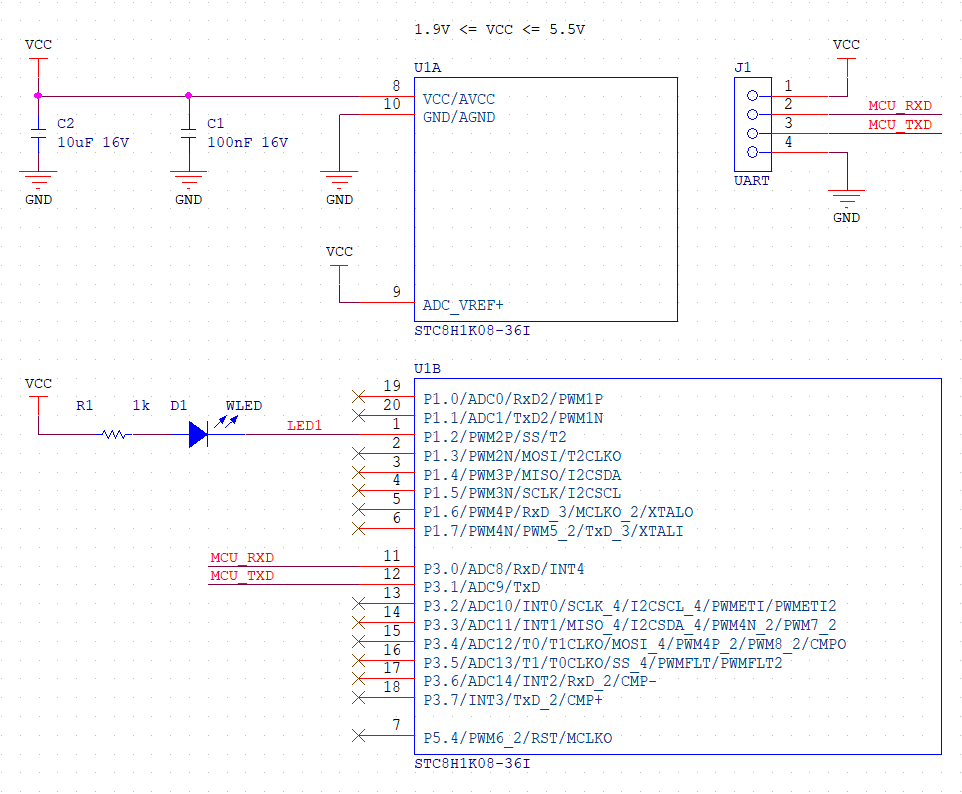
原理图
- 使用可调电源为单片机的供电(VCC);
- 端口 P1.2 连接发光二极管 D1,当该端口输出高电平时,熄灭发光二极管,反之点亮发光二极管。
Keil 工程结构
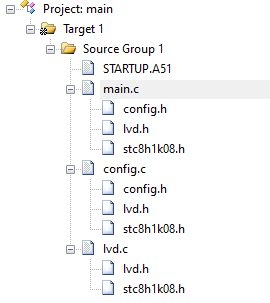
源文件
新建 stc8h1k08.h 头文件:
#ifndef __STC8H1K08_H
#define __STC8H1K08_H
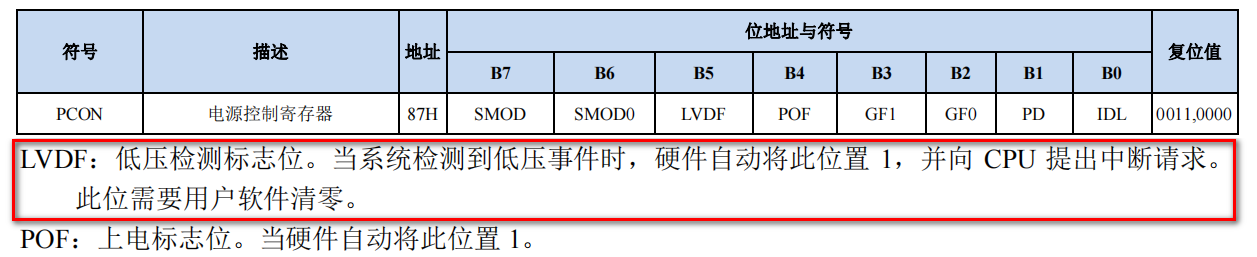
sfr PCON = 0x87; /* Power Control Register */
sfr P1 = 0x90; /* Port 1 Register */
sfr P1M1 = 0x91; /* Port 1 Configuration Register 1 */
sfr P1M0 = 0x92; /* Port 1 Configuration Register 0 */
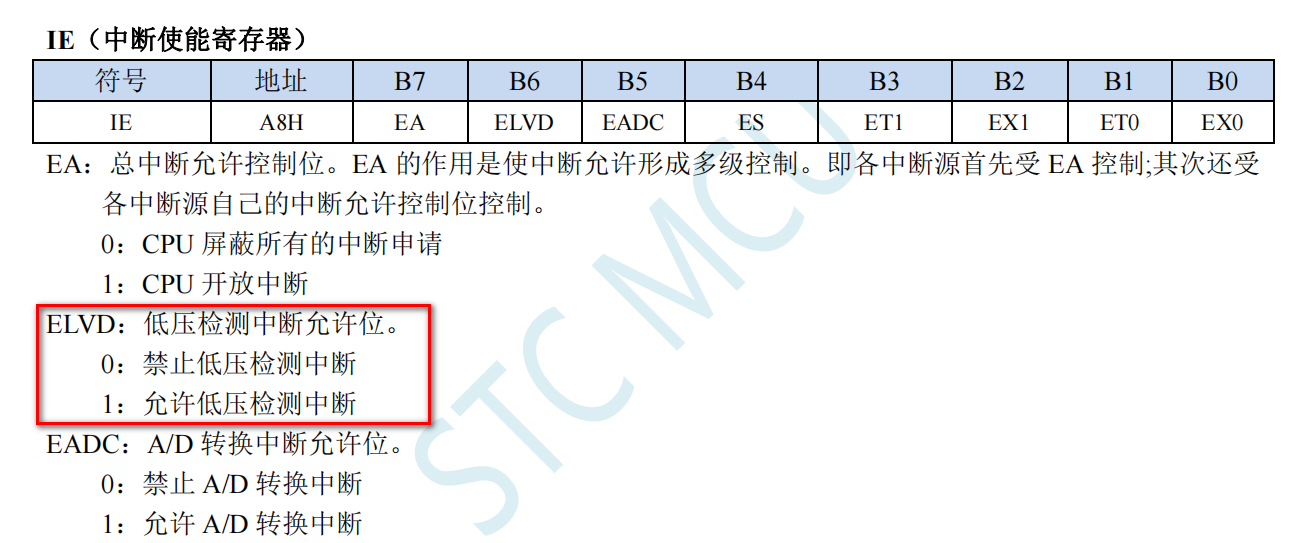
sfr IE = 0xA8; /* Interrupt Enable Register */
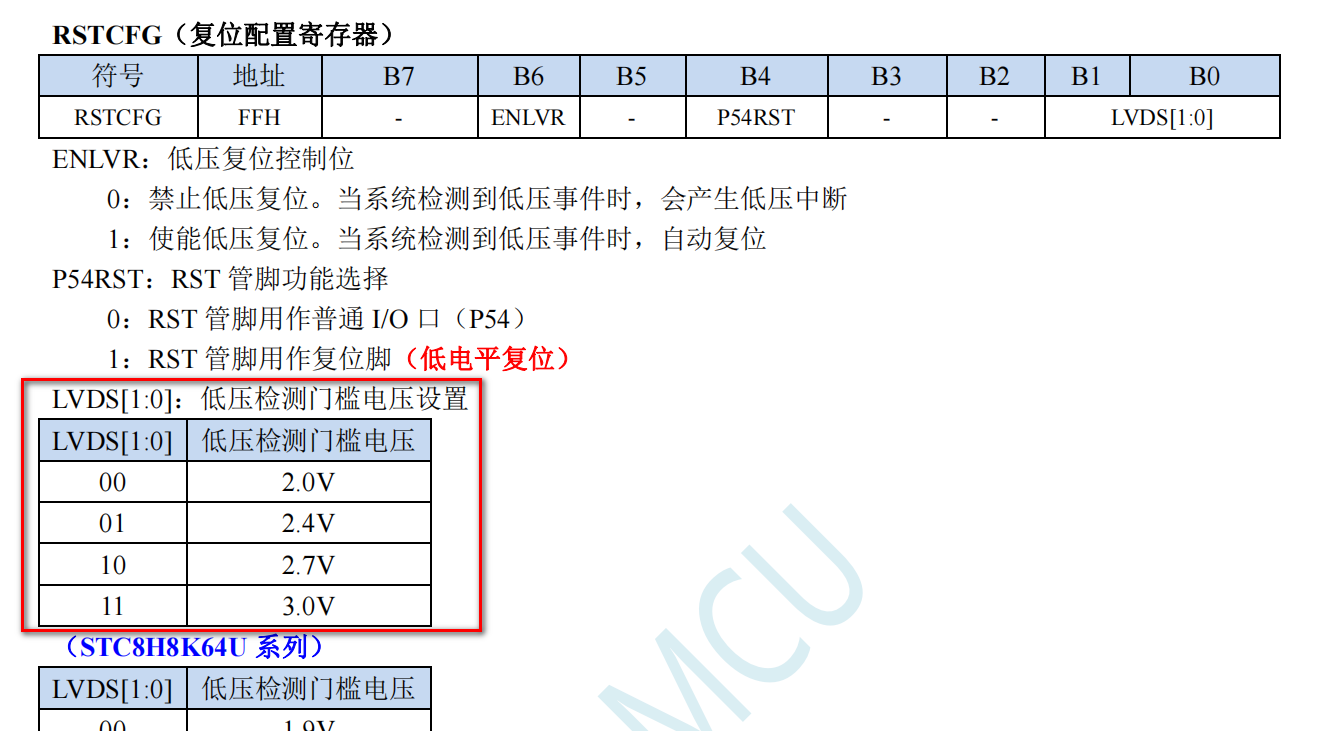
sfr RSTCFG = 0xFF; /* Reset Configuration Register */
/** PCON Register Bit Definition */
#define PCON_LVDF (0x20) /* Low Voltage Detection Flag */
/** P1M1 Register Bit Definition */
#define P12M1 (0x04) /* P1.2 Mode Selection Bit 1 */
/** P1M0 Register Bit Definition */
#define P12M0 (0x04) /* P1.2 Mode Selection Bit 0 */
/** IE Register Bits Definition */
#define IE_EA (0x80)
#define IE_ELVD (0x40) /* Enable Low Voltage Detection Interrupt */
/** RSTCFG Register Bits Definition */
#define RSTCFG_LVDS1 (0x02)
#define RSTCFG_LVDS0 (0x01)
#define utils_set_register_bit(r, b) r |= (b)
#define utils_set_register_bits(r, b) utils_set_register_bit(r, b)
#define utils_clear_register_bit(r, b) r &= ~(b)
#define utils_clear_register_bits(r, b) utils_clear_register_bit(r, b)
#define enable_interrupts() utils_set_register_bit(IE, IE_EA)
#define disable_interrupts() utils_clear_register_bit(IE, IE_EA)
#endif
新建 lvd.h 头文件:
- 声明低电压检测阈值电压常量(第 8 ~ 11 行);
- 使用宏定义封装操作低电压检测的相关寄存器的函数(第 14 ~ 21 行)。
#ifndef __LOW_VOLTAGE_DETECTION_H
#define __LOW_VOLTAGE_DETECTION_H


#include "stc8h1k08.h"


#define LVD_THRESHOLD_VOLTAGE_2V0   (0x00)
#define LVD_THRESHOLD_VOLTAGE_2V4   (0x01)
#define LVD_THRESHOLD_VOLTAGE_2V7   (0x02)
#define LVD_THRESHOLD_VOLTAGE_3V0   (0x03)


#define lvd_set_threshold_voltage(voltage) {
    utils_clear_register_bits(RSTCFG, (RSTCFG_LVDS1 | RSTCFG_LVDS0));
    utils_set_register_bits(RSTCFG, voltage);
}

#define lvd_clear_interrupt_flag()      utils_clear_register_bit(PCON, PCON_LVDF)

#define lvd_enable_interrupt()          utils_set_register_bit(IE, IE_ELVD)


#endif
新建 lvd.c 文件(该文件可省略):
#include "lvd.h"
新建 config.h 文件:
#ifndef __CONFIG_H
#define __CONFIG_H


#include "stc8h1k08.h"

#include "lvd.h"


sbit LED1   = P1^2; /* 发光二极管控制引脚。0:点亮;1:熄灭 */


void initialize();


#endif
新建 config.c 文件:
#include "config.h"


void initialize() {
    /**
     * 初始化 GPIO
     */
    LED1 = 0; // 上电点亮发光二极管
    // 将发光二极管(LED1)的控制引脚设为推挽输出
    utils_clear_register_bit(P1M1, P12M1);
    utils_set_register_bit(P1M0, P12M0);

    /**
     * 初始化低压检测
     */
//    lvd_set_threshold_voltage(LVD_THRESHOLD_VOLTAGE_2V0);
//    lvd_set_threshold_voltage(LVD_THRESHOLD_VOLTAGE_2V4);
//    lvd_set_threshold_voltage(LVD_THRESHOLD_VOLTAGE_2V7);
    lvd_set_threshold_voltage(LVD_THRESHOLD_VOLTAGE_3V0);
    lvd_clear_interrupt_flag();
    lvd_enable_interrupt();
}
新建 main.c 文件:
- 第 17 ~ 21 行:低电压检测中断服务处理程序。当单片机检测到其供电电压低于预设的阈值电压时,就会调用该函数(前提是允许低电压检测中断)。
#include "config.h"


/**
 * Low Voltage Detection
 */
void main() {
    initialize();

    enable_interrupts();

    while(1) {}
}

void lvd_interrupt_service() interrupt 6 {
    lvd_clear_interrupt_flag();

    LED1 = !LED1;
}
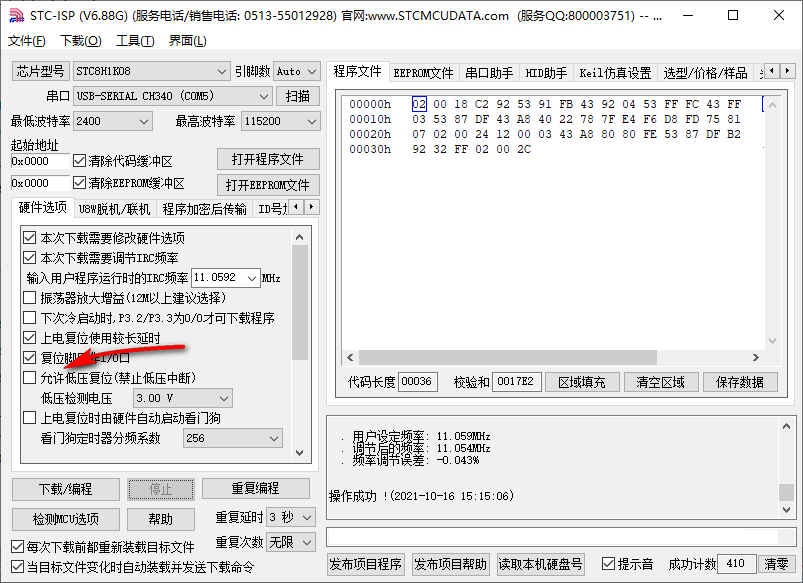
STC-ISP 硬件选项
测试
当单片机电源从高于 3V 下降到约 2.8V 时,触发低电压检测中断,由此造成 LED1 控制引脚被反复反转:
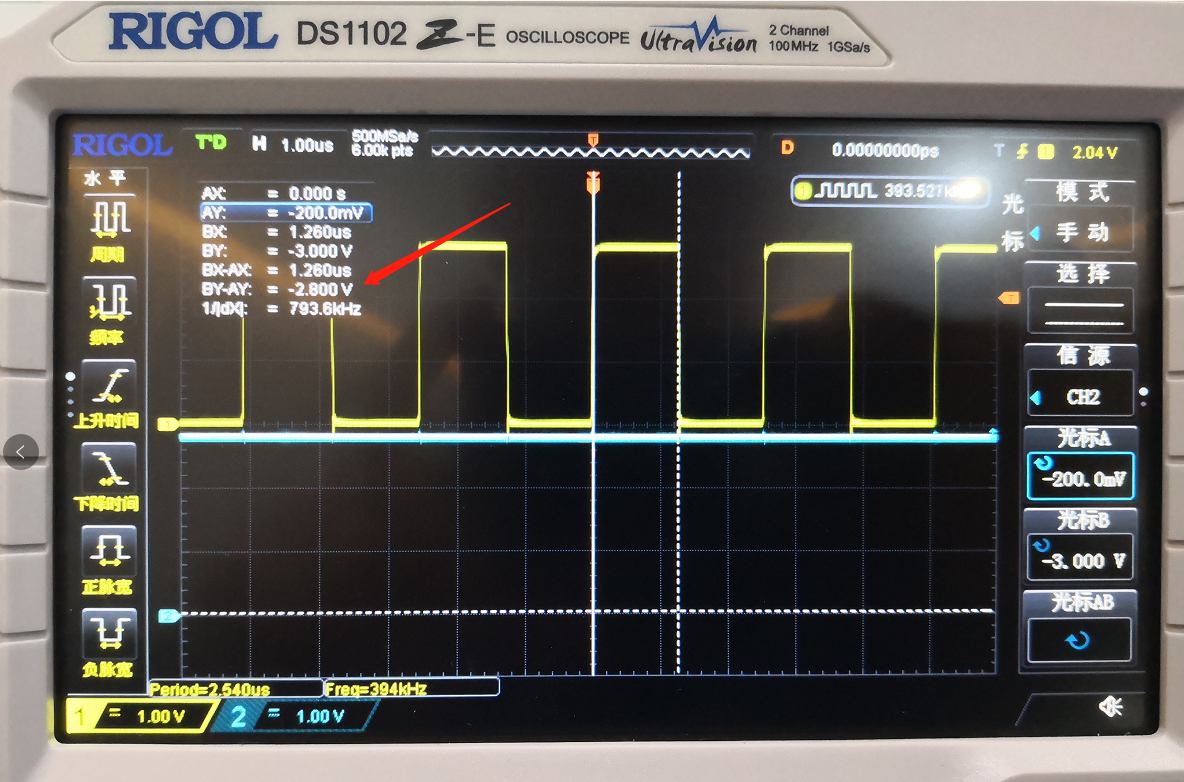
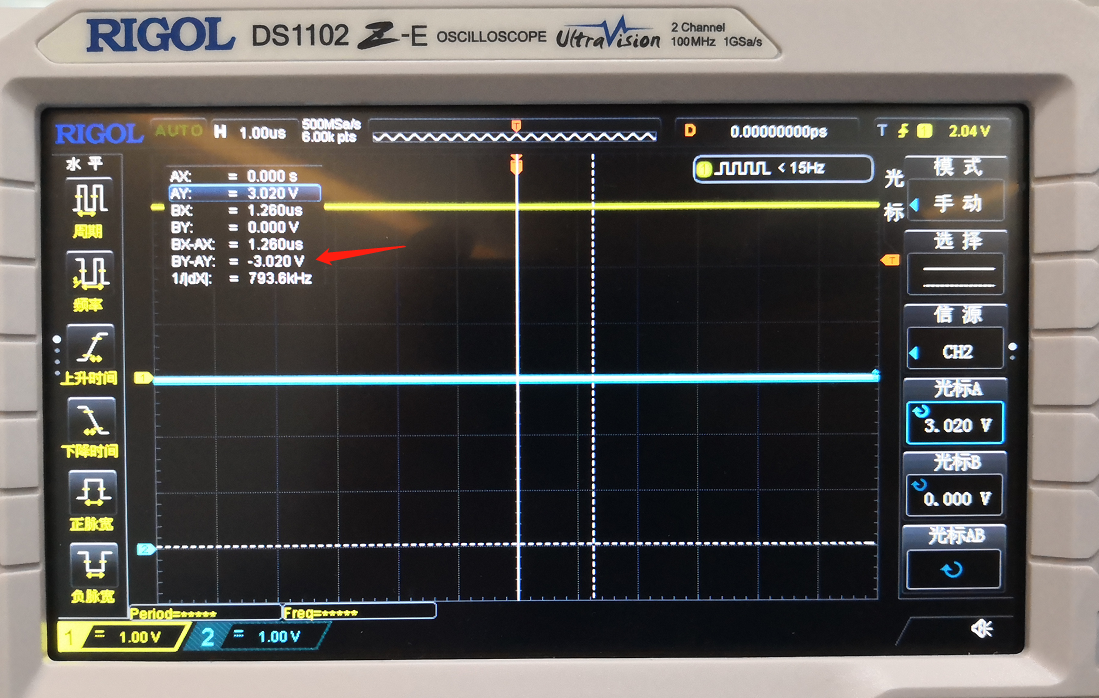
当单片机电源从约 2.8V 上升到约 3.02V 时,单片机检测不到低电压。因此 LED1 控制引脚不再被反复反转:
参考
宏晶科技 STC micro - STC8H 系列单片机技术参考手册
最后
以上就是俊逸背包最近收集整理的关于单片机 STC8H1K08-36I TSSOP20 - 低压检测低电压检测参考的全部内容,更多相关单片机内容请搜索靠谱客的其他文章。
本图文内容来源于网友提供,作为学习参考使用,或来自网络收集整理,版权属于原作者所有。


发表评论 取消回复