SPI基础支持此处不再赘述,直接分析linux中的SPI驱动源码。
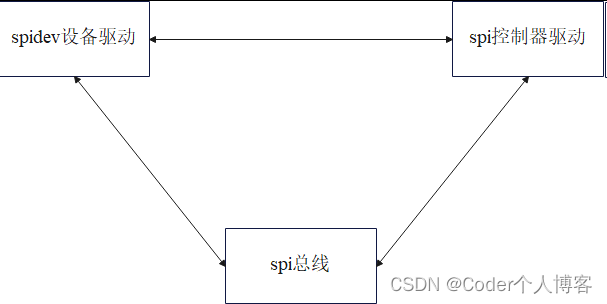
1、SPI设备驱动架构图
2、源码分析
本次分析基于kernel5.18,linux/drivers/spi/spidev.c
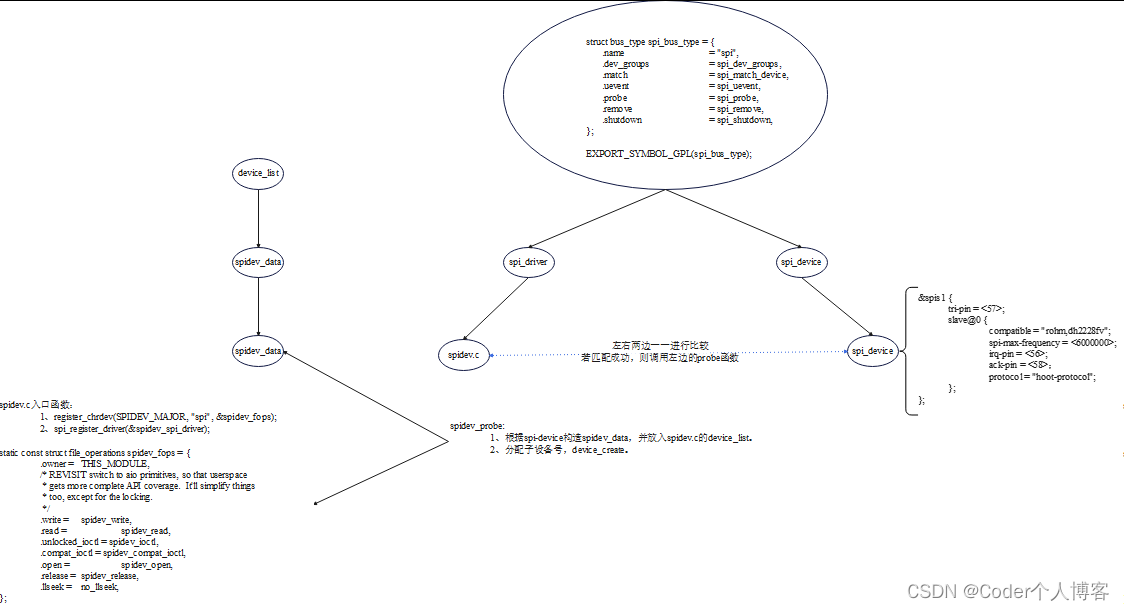
设备树示例:
    &spis1 {
    	tri-pin = <57>;
	    slave@0 {
		    compatible = "rohm,dh2228fv";
		    spi-max-frequency = <6000000>;
		    irq-pin = <56>;
		    ack-pin = <58>;
		    protocol = "hoot-protocol";
	    };
    };
设备树里面SPI设备节点的compatible属性等于如下值,就会跟spidev驱动进行匹配:
static const struct spi_device_id spidev_spi_ids[] = {
	{ .name = "dh2228fv" },
	{ .name = "ltc2488" },
	{ .name = "sx1301" },
	{ .name = "bk4" },
	{ .name = "dhcom-board" },
	{ .name = "m53cpld" },
	{ .name = "spi-petra" },
	{ .name = "spi-authenta" },
	{},
};
MODULE_DEVICE_TABLE(spi, spidev_spi_ids);
匹配成功后spidev.c里面的spidev_probe就会被调用。
spidev_spi_driver源码分析
spidev_spi_driver源码具体实现如下:
static struct spi_driver spidev_spi_driver = {
	.driver = {
		.name =		"spidev",
		.of_match_table =     spidev_dt_ids,
		.acpi_match_table =   spidev_acpi_ids,
	},
	.probe =	              spidev_probe,
	.remove =	              spidev_remove,
	.id_table =	              spidev_spi_ids,

	/* NOTE:  suspend/resume methods are not necessary here.
	 * We don't do anything except pass the requests to/from
	 * the underlying controller.  The refrigerator handles
	 * most issues; the controller driver handles the rest.
	 */
};
其中spidev_probe的具体实现如下:
static int spidev_probe(struct spi_device *spi)
{
	int (*match)(struct device *dev);
	struct spidev_data	*spidev;
	int					status;
	unsigned long		minor;

	match = device_get_match_data(&spi->dev);
	if (match) {
		status = match(&spi->dev);
		if (status)
			return status;
	}

	/* Allocate driver data */
	spidev = kzalloc(sizeof(*spidev), GFP_KERNEL);        /* 分配结构体 */
	if (!spidev)
		return -ENOMEM;

	/* Initialize the driver data */
	spidev->spi = spi;                                    /* spidev_data里面记录spi-device结构体 */
	spin_lock_init(&spidev->spi_lock);
	mutex_init(&spidev->buf_lock);

	INIT_LIST_HEAD(&spidev->device_entry);

	/* If we can allocate a minor number, hook up this device.
	 * Reusing minors is fine so long as udev or mdev is working.
	 */
	mutex_lock(&device_list_lock);
	minor = find_first_zero_bit(minors, N_SPI_MINORS);    /* 找到一个空闲的次设备号 */
	if (minor < N_SPI_MINORS) {
		struct device *dev;

		spidev->devt = MKDEV(SPIDEV_MAJOR, minor);
		dev = device_create(spidev_class, &spi->dev, spidev->devt,      /* 创建一个设备,通过、dev/spidevx.x */
				    spidev, "spidev%d.%d",
				    spi->master->bus_num, spi->chip_select);            /* spi的第几个spi_master设备,spi的片选信号信息 */
		status = PTR_ERR_OR_ZERO(dev);
	} else {
		dev_dbg(&spi->dev, "no minor number available!n");
		status = -ENODEV;
	}
	if (status == 0) {
		set_bit(minor, minors);
		list_add(&spidev->device_entry, &device_list);            /* 将这个spidev_data添加到device_list链表中 */
	}
	mutex_unlock(&device_list_lock);

	spidev->speed_hz = spi->max_speed_hz;

	if (status == 0)
		spi_set_drvdata(spi, spidev);
	else
		kfree(spidev);

	return status;
}
主要功能就是调用device_create创建设备文件,生成设备节点,用户可以通过节点进行读写和iotrol操作,其次还完成了如下操作:
1、分配一个spidev_data结构体,用来记录对应的spi_device。
2、将spi_data记录在一个链表里。
3、分配一个设备好,以后可以根据这个次设备号在上述的链表里面查找spidev_data。
4、device_create函数会生成一个设备节点:/dev/spidevB.D。B表示总线号,B表示这是SPI master下第几个设备,后续就可以通过/dev/spidevB.D来访问spidev驱动。
设备驱动的初始化和退出:
static int __init spidev_init(void)
{
	int status;

	/* Claim our 256 reserved device numbers.  Then register a class
	 * that will key udev/mdev to add/remove /dev nodes.  Last, register
	 * the driver which manages those device numbers.
	 */
	status = register_chrdev(SPIDEV_MAJOR, "spi", &spidev_fops);    /* 注册字符设备(spidev_fops) */
	if (status < 0)
		return status;

	spidev_class = class_create(THIS_MODULE, "spidev");    /* 注册sysfs spidev节点 */
	if (IS_ERR(spidev_class)) {
		unregister_chrdev(SPIDEV_MAJOR, spidev_spi_driver.driver.name);
		return PTR_ERR(spidev_class);
	}

	status = spi_register_driver(&spidev_spi_driver);    /* 注册spi设备驱动 */
	if (status < 0) {
		class_destroy(spidev_class);
		unregister_chrdev(SPIDEV_MAJOR, spidev_spi_driver.driver.name);
	}
	return status;
}

module_init(spidev_init);    /* 驱动模块初始化 */

static void __exit spidev_exit(void)
{
	spi_unregister_driver(&spidev_spi_driver);    /* 注销spi 设备驱动 */
	class_destroy(spidev_class);    /* 注销sysfs spidev节点 */
	unregister_chrdev(SPIDEV_MAJOR, spidev_spi_driver.driver.name);    /* 注销spi设备驱动 */
}

module_exit(spidev_exit);    /* 驱动模块注销 */
module_init源码分析请关注:module_init源码分析。
module_exit源码分析请关注:module_exit源码分析。
class_create源码分析请关注:class_create源码分析
class_destroy源码分析请关注:class_destroy源码分析
register_chrdev源码分析请关注:后续更新(TODO)。
unregister_chrdev源码分析请关注:后续更新(TODO)。
SPIDEV_MAJOR:#define SPIDEV_MAJOR 153 /* assigned */
spidev_init源码分析
register_chrdev:创建字符设备,spi属于字符设备驱动,定义如下:
static inline int register_chrdev(unsigned int major, const char *name,
				  const struct file_operations *fops)
入参传入 file_operations 结构体,结构体存了很多函数指针,实现读写和ioctrl相关操作,也是驱动最核心的功能,下面是spidev 实现的结构体:
static const struct file_operations spidev_fops = {
	.owner =	THIS_MODULE,
	/* REVISIT switch to aio primitives, so that userspace
	 * gets more complete API coverage.  It'll simplify things
	 * too, except for the locking.
	 */
	.write =	        spidev_write,    /* 单工写模式 */
	.read =		        spidev_read,     /* 单工读模式 */
	.unlocked_ioctl =   spidev_ioctl,    /* 设置频率、模式、进行双工传输 */
	.compat_ioctl =     spidev_compat_ioctl,
	.open =		        spidev_open,
	.release =	        spidev_release,
	.llseek =	        no_llseek,
};
spidev_fops分析
spiev_write函数分析
spidev_write的源码如下:
/* Write-only message with current device setup */
static ssize_t
spidev_write(struct file *filp, const char __user *buf,
		size_t count, loff_t *f_pos)
{
	struct spidev_data	*spidev;
	ssize_t			    status;
	unsigned long		missing;

	/* chipselect only toggles at start or end of operation */
	if (count > bufsiz)
		return -EMSGSIZE;

	spidev = filp->private_data;    /* spidev_data结构体是很重要的数据传递类型 */

	mutex_lock(&spidev->buf_lock);
	missing = copy_from_user(spidev->tx_buffer, buf, count);    /* 数据从用户态copy到内核态 */
	if (missing == 0)
		status = spidev_sync_write(spidev, count);    /* 同步数据 */
	else
		status = -EFAULT;
	mutex_unlock(&spidev->buf_lock);

	return status;
}
spidev_sync_write函数的具体实现如下:
static inline ssize_t
spidev_sync_write(struct spidev_data *spidev, size_t len)
{
	struct spi_transfer	t = {
			.tx_buf		= spidev->tx_buffer,    /* 指定tx_buffer */
			.len		= len,                  /* 指定长度 */
			.speed_hz	= spidev->speed_hz,     /* 指定传输速率 */
		};
	struct spi_message	m;

	spi_message_init(&m);            /* spi消息初始化(初始化传输事务链表头) */
	spi_message_add_tail(&t, &m);    /* 添加spi传输到spi消息传输链表,将t放到message的尾部 */
	return spidev_sync(spidev, &m);  /* spi同步传输 */
}
上述代码中的spi_message_init函数,具体实现如下:
static inline void spi_message_init_no_memset(struct spi_message *m)
{
	INIT_LIST_HEAD(&m->transfers);
	INIT_LIST_HEAD(&m->resources);
}

static inline void spi_message_init(struct spi_message *m)
{
	memset(m, 0, sizeof *m);
	spi_message_init_no_memset(m);
}
通过源码可知,spi_message_init将传入的结构体spi_message全部内容初始化为0,并被初始化过的结构体spi_message传递给了函数spi_message_init_no_memset。
在spi_message_init_no_memset通过INIT_LIST_HEAD为m->transfers和m->resources分别创建双向链表的头节点。
在spidev_sync_write函数中,在完成SPI数据的链表的初始化之后又通过调用spi_message_add_tail函数,将struct spi_transfer t和struct spi_message m分别添加到前一步创建的双向链表的尾部。
在spidev_sync_write函数的最后通过调用spidev_sync函数进行SPI的同步传输,并将结果返回,此处spidev_sync函数的具体实现如下:
static ssize_t
spidev_sync(struct spidev_data *spidev, struct spi_message *message)
{
	int status;
	struct spi_device *spi;

	spin_lock_irq(&spidev->spi_lock);
	spi = spidev->spi;
	spin_unlock_irq(&spidev->spi_lock);

	if (spi == NULL)
		status = -ESHUTDOWN;
	else
		status = spi_sync(spi, message);

	if (status == 0)
		status = message->actual_length;

	return status;
}
梳理spidev_sync的数据传输流程:spidev_sync --> spi_sync --> __spi_sync --> __spi_queued_transfer --> kthread_queue_work最终将数据放到工作队列中,通过SPI总线驱动实现数据的发送功能。
spiev_read函数分析
spidev_read函数源码如下:
/* Read-only message with current device setup */
static ssize_t
spidev_read(struct file *filp, char __user *buf, size_t count, loff_t *f_pos)
{
	struct spidev_data	*spidev;
	ssize_t			status;

	/* chipselect only toggles at start or end of operation */
	if (count > bufsiz)
		return -EMSGSIZE;

	spidev = filp->private_data;    /* 从私有数据中获取spidev_data数据 */

	mutex_lock(&spidev->buf_lock);               /* 加锁操作,数据安全 */
	status = spidev_sync_read(spidev, count);    /* 同步读取数据 */
	if (status > 0) {
		unsigned long	missing;

		missing = copy_to_user(buf, spidev->rx_buffer, status);    /* 将读取的数据从内核态copy到用户态 */
		if (missing == status)
			status = -EFAULT;
		else
			status = status - missing;
	}
	mutex_unlock(&spidev->buf_lock);             /* 解锁操作 */

	return status;
}
spidev_sync_read函数的具体实现如下:
static inline ssize_t
spidev_sync_read(struct spidev_data *spidev, size_t len)
{
	struct spi_transfer	t = {
			.rx_buf		= spidev->rx_buffer,    /* 指定rx_buffer */
			.len		= len,
			.speed_hz	= spidev->speed_hz,
		};
	struct spi_message	m;                      /* 构造一个message */

	spi_message_init(&m);                       /* 初始化spi_message */
	spi_message_add_tail(&t, &m);               /* 将transfer放到message的尾部 */
	return spidev_sync(spidev, &m);             /* 发起数据传输 */
}
将要发送的数据填充到struct spi_transfer t结构体中,跟spidev_sync_write同样的将通过spi_message_init函数初始化spi_message全部为0,通过spi_message_init_no_memset函数调用INIT_LIST_HEAD为m->transfers和m->resources分别创建双向链表的头节点。
与spidev_sync_write函数一样,在完成SPI数据的链表的初始化之后又通过调用spi_message_add_tail函数,将struct spi_transfer t和struct spi_message m分别添加到前一步创建的双向链表的尾部。
spidev_sync函数完成数据同步的流程此处不在重复。
spidev_ioctl函数分析
spidev_ioctl的源码如下:
static long
spidev_ioctl(struct file *filp, unsigned int cmd, unsigned long arg)
{
	int					retval = 0;
	struct spidev_data	*spidev;
	struct spi_device	*spi;
	u32					tmp;
	unsigned			n_ioc;
	struct spi_ioc_transfer	*ioc;

	/* Check type and command number */
	if (_IOC_TYPE(cmd) != SPI_IOC_MAGIC)
		return -ENOTTY;

	/* guard against device removal before, or while,
	 * we issue this ioctl.
	 */
	spidev = filp->private_data;
	spin_lock_irq(&spidev->spi_lock);
	spi = spi_dev_get(spidev->spi);
	spin_unlock_irq(&spidev->spi_lock);

	if (spi == NULL)
		return -ESHUTDOWN;

	/* use the buffer lock here for triple duty:
	 *  - prevent I/O (from us) so calling spi_setup() is safe;
	 *  - prevent concurrent SPI_IOC_WR_* from morphing
	 *    data fields while SPI_IOC_RD_* reads them;
	 *  - SPI_IOC_MESSAGE needs the buffer locked "normally".
	 */
	mutex_lock(&spidev->buf_lock);

	switch (cmd) {
	/* read requests */
	case SPI_IOC_RD_MODE:
		retval = put_user(spi->mode & SPI_MODE_MASK,
					(__u8 __user *)arg);
		break;
	case SPI_IOC_RD_MODE32:
		retval = put_user(spi->mode & SPI_MODE_MASK,
					(__u32 __user *)arg);
		break;
	case SPI_IOC_RD_LSB_FIRST:
		retval = put_user((spi->mode & SPI_LSB_FIRST) ?  1 : 0,
					(__u8 __user *)arg);
		break;
	case SPI_IOC_RD_BITS_PER_WORD:
		retval = put_user(spi->bits_per_word, (__u8 __user *)arg);
		break;
	case SPI_IOC_RD_MAX_SPEED_HZ:
		retval = put_user(spidev->speed_hz, (__u32 __user *)arg);
		break;

	/* write requests */
	case SPI_IOC_WR_MODE:
	case SPI_IOC_WR_MODE32:
		if (cmd == SPI_IOC_WR_MODE)
			retval = get_user(tmp, (u8 __user *)arg);
		else
			retval = get_user(tmp, (u32 __user *)arg);
		if (retval == 0) {
			struct spi_controller *ctlr = spi->controller;
			u32	save = spi->mode;

			if (tmp & ~SPI_MODE_MASK) {
				retval = -EINVAL;
				break;
			}

			if (ctlr->use_gpio_descriptors && ctlr->cs_gpiods &&
			    ctlr->cs_gpiods[spi->chip_select])
				tmp |= SPI_CS_HIGH;

			tmp |= spi->mode & ~SPI_MODE_MASK;
			spi->mode = (u16)tmp;
			retval = spi_setup(spi);
			if (retval < 0)
				spi->mode = save;
			else
				dev_dbg(&spi->dev, "spi mode %xn", tmp);
		}
		break;
	case SPI_IOC_WR_LSB_FIRST:
		retval = get_user(tmp, (__u8 __user *)arg);
		if (retval == 0) {
			u32	save = spi->mode;

			if (tmp)
				spi->mode |= SPI_LSB_FIRST;
			else
				spi->mode &= ~SPI_LSB_FIRST;
			retval = spi_setup(spi);
			if (retval < 0)
				spi->mode = save;
			else
				dev_dbg(&spi->dev, "%csb firstn",
						tmp ? 'l' : 'm');
		}
		break;
	case SPI_IOC_WR_BITS_PER_WORD:
		retval = get_user(tmp, (__u8 __user *)arg);
		if (retval == 0) {
			u8	save = spi->bits_per_word;

			spi->bits_per_word = tmp;
			retval = spi_setup(spi);
			if (retval < 0)
				spi->bits_per_word = save;
			else
				dev_dbg(&spi->dev, "%d bits per wordn", tmp);
		}
		break;
	case SPI_IOC_WR_MAX_SPEED_HZ:
		retval = get_user(tmp, (__u32 __user *)arg);
		if (retval == 0) {
			u32	save = spi->max_speed_hz;

			spi->max_speed_hz = tmp;
			retval = spi_setup(spi);
			if (retval == 0) {
				spidev->speed_hz = tmp;
				dev_dbg(&spi->dev, "%d Hz (max)n",
					spidev->speed_hz);
			}
			spi->max_speed_hz = save;
		}
		break;

	default:
		/* segmented and/or full-duplex I/O request */
		/* Check message and copy into scratch area */
		ioc = spidev_get_ioc_message(cmd,
				(struct spi_ioc_transfer __user *)arg, &n_ioc);
		if (IS_ERR(ioc)) {
			retval = PTR_ERR(ioc);
			break;
		}
		if (!ioc)
			break;	/* n_ioc is also 0 */

		/* translate to spi_message, execute */
		retval = spidev_message(spidev, ioc, n_ioc);
		kfree(ioc);
		break;
	}

	mutex_unlock(&spidev->buf_lock);
	spi_dev_put(spi);
	return retval;
}
spidev_compat_ioctl函数分析
spidev_open函数分析
spidev_open函数源码如下:
static int spidev_open(struct inode *inode, struct file *filp)
{
	struct spidev_data	*spidev;
	int			status = -ENXIO;

	mutex_lock(&device_list_lock);

    /* 在device_list链表中查找和inode下的注册此设备号一致的设备 */
	list_for_each_entry(spidev, &device_list, device_entry) {
		if (spidev->devt == inode->i_rdev) {
			status = 0;
			break;
		}
	}

	if (status) {
		pr_debug("spidev: nothing for minor %dn", iminor(inode));
		goto err_find_dev;
	}

	if (!spidev->tx_buffer) {
		spidev->tx_buffer = kmalloc(bufsiz, GFP_KERNEL);
		if (!spidev->tx_buffer) {
			dev_dbg(&spidev->spi->dev, "open/ENOMEMn");
			status = -ENOMEM;
			goto err_find_dev;
		}
	}

	if (!spidev->rx_buffer) {
		spidev->rx_buffer = kmalloc(bufsiz, GFP_KERNEL);
		if (!spidev->rx_buffer) {
			dev_dbg(&spidev->spi->dev, "open/ENOMEMn");
			status = -ENOMEM;
			goto err_alloc_rx_buf;
		}
	}

	spidev->users++;
    /* 把找到的spidev_data保存在私有数据中 */
	filp->private_data = spidev;
	stream_open(inode, filp);

	mutex_unlock(&device_list_lock);
	return 0;

err_alloc_rx_buf:
	kfree(spidev->tx_buffer);
	spidev->tx_buffer = NULL;
err_find_dev:
	mutex_unlock(&device_list_lock);
	return status;
}
最后
以上就是内向小丸子最近收集整理的关于SPI设备标准驱动源码分析(linux kernel 5.18)1、SPI设备驱动架构图2、源码分析的全部内容,更多相关SPI设备标准驱动源码分析(linux内容请搜索靠谱客的其他文章。


发表评论 取消回复