触发器基本上使您能够更改属性值或根据属性值采取行动。因此,它允许您动态地更改控件的外观和/或行为,而无需创建新的控件。
当满足某些条件时,触发器用于更改任何给定属性的值。触发器通常在应用于特定控件的样式或文档根中定义。有三种类型的触发器
• 属性触发器
• 数据触发器
• 事件触发器
事件触发器
当特定事件被触发时,事件触发器执行一些操作。它通常用来完成一些动画控制,如双数字,彩色动画等。在下面的例子中,我们将创建一个简单的按钮。当点击事件被触发时,它将扩展按钮的宽度和高度。
<Window x:Class="trigger.MainWindow"
        xmlns="http://schemas.microsoft.com/winfx/2006/xaml/presentation"
        xmlns:x="http://schemas.microsoft.com/winfx/2006/xaml"
        xmlns:d="http://schemas.microsoft.com/expression/blend/2008"
        xmlns:mc="http://schemas.openxmlformats.org/markup-compatibility/2006"
        xmlns:local="clr-namespace:trigger"
        mc:Ignorable="d"
        Title="MainWindow" Height="350" Width="525">
    <Grid>
        <Button Content = "Click Me" Width = "60" Height = "30">
            <Button.Triggers>
                <EventTrigger RoutedEvent = "Button.Click">
                    <EventTrigger.Actions>
                        <BeginStoryboard>
                            <Storyboard>
                                <DoubleAnimationUsingKeyFrames Storyboard.TargetProperty =
                           "Width" Duration = "0:0:4">
                                    <LinearDoubleKeyFrame Value = "60" KeyTime = "0:0:0"/>
                                    <LinearDoubleKeyFrame Value = "120" KeyTime = "0:0:1"/>
                                    <LinearDoubleKeyFrame Value = "200" KeyTime = "0:0:2"/>
                                    <LinearDoubleKeyFrame Value = "300" KeyTime = "0:0:3"/>
                                </DoubleAnimationUsingKeyFrames>
                                <DoubleAnimationUsingKeyFrames Storyboard.TargetProperty = "Height"
                           Duration = "0:0:4">
                                    <LinearDoubleKeyFrame Value = "30" KeyTime = "0:0:0"/>
                                    <LinearDoubleKeyFrame Value = "40" KeyTime = "0:0:1"/>
                                    <LinearDoubleKeyFrame Value = "80" KeyTime = "0:0:2"/>
                                    <LinearDoubleKeyFrame Value = "150" KeyTime = "0:0:3"/>
                                </DoubleAnimationUsingKeyFrames>
                            </Storyboard>
                        </BeginStoryboard>
                    </EventTrigger.Actions>
                </EventTrigger>
            </Button.Triggers>
        </Button>
    </Grid>
</Window>
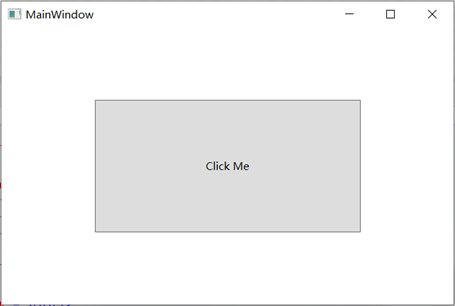
执行上述代码时,它将产生以下窗口:
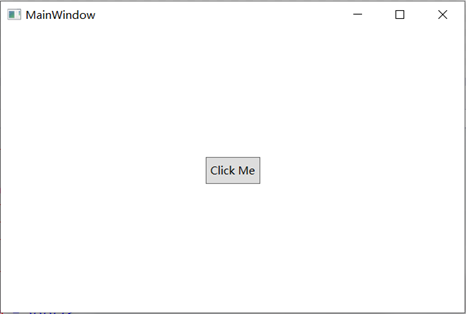
点击按钮后,您会发现它将开始在两个维度上扩展。
最后
以上就是含蓄火龙果最近收集整理的关于WPF-事件触发器的全部内容,更多相关WPF-事件触发器内容请搜索靠谱客的其他文章。
本图文内容来源于网友提供,作为学习参考使用,或来自网络收集整理,版权属于原作者所有。
![spark结构化流保存mysql_[Spark]-结构化流之输出篇(待重修)](https://www.shuijiaxian.com/files_image/reation/bcimg19.png)


发表评论 取消回复