Redis锁由来
首先我们说一下分布式出现之前的锁
进程锁:
控制某一系统中多个进程访问共享资源时候造成冲突,因为单个进程是有独立性的,进程与进程之间无法访问其他进程的资源,因此线程锁实现方式synchronized等无法完成。
线程锁:
线程锁是主要是给某一代码块加锁,当这个代码块加锁后,比如synchronized后,第二个线程进来就无法执行这一段代码。常用的还有给某一个全局变量加锁,因为全局变量如果不加锁的话,一旦多个线程进来,并发的情况下,这个变量的值就会造成混乱。常用的有threadLocal修饰全局变量。
随着分布式部署的出现,越来越多的问题开始涌现,比如之前的那些锁的问题,已经不再满足现在多个系统互相调用时候出现的变量共享了,这时候,分布式锁就应运而生。
这一节我们主要讲一下redis分布式锁,当然了分布式锁常用的还有zookeeper分布式锁,以后我们再讨论zk锁。
Redis分布式锁具体实现:
1. 引入jar包,maven依赖如下
<dependency>
 <groupId>org.redisson</groupId>
 <artifactId>redisson</artifactId>
 <version>3.1.0</version>
</dependency>
2. Java类
/**
 * 基于redisson的实现的redis分布式锁
 * com.bjrhxq.platform.application.distributedlock.redis
 **/
public class RedisDistributedLock {

 private final static Logger logger = LoggerFactory.getLogger(RedisDistributedLock.class);

 /**
 * 加锁等待时间
 */
 private Long lockWaitTime;

 /**
 *自动解锁时间
 */
 private Long autoReLockTime;

 /**
 * 时间单位 1 秒,2 分钟,3小时,4天
 */
 private Integer timeUnit;


 /**
 * rediss客户端
 */
 private RedissonClient redissonClient;

     private final static Long LOCKWAITTIME_NUM = 0L;//默认加锁等待时间(0秒)
     private final static Long AUTORELOCKTIME_NUM = 5L;//默认释放锁时间(5秒)
     private final static Integer TIMEUNIT_VALUE = 1;//单位默认值(秒)
     private RedisDistributedLock(){

 }

 public RedisDistributedLock(String redisServices,Long _lockWaitTime,Long _autoReLockTime){
     if (StringUtils.isBlank(redisServices)){
         logger.error("redisServices为空!请上传");
         throw new BzException("redisServices为空");
     }
     this.autoReLockTime = _autoReLockTime == null?AUTORELOCKTIME_NUM:_autoReLockTime;
     this.lockWaitTime = _lockWaitTime == null?LOCKWAITTIME_NUM:_lockWaitTime;
     this.timeUnit =TIMEUNIT_VALUE;
     redissonClient = RedissonUtils.getInstance().getRedisson(redisServices);
 }

 public RedisDistributedLock(String redisServices,Long _lockWaitTime,Long _autoReLockTime,Integer _timeUnit){
     if (StringUtils.isBlank(redisServices)){
     logger.error("redisServices为空!请上传");
     throw new BzException("redisServices为空");
 }
     this.autoReLockTime = _autoReLockTime == null?AUTORELOCKTIME_NUM:_autoReLockTime;
     this.lockWaitTime = _lockWaitTime == null?LOCKWAITTIME_NUM:_lockWaitTime;
     this.timeUnit =_timeUnit;
     redissonClient = RedissonUtils.getInstance().getRedisson(redisServices);
 }
 //程序一旦启用不能关闭redissonClient否则会报cannot be started once stopped 导致程序中断无法启动,该方法只用于测试使用关闭客户端与服务端连接
 public void closeReddisson(){
     redissonClient.shutdown();
 }
 /**
 * 获取锁
 * @param lockName
 */
 public boolean getLock(String lockName){
     RLock rlock = redissonClient.getLock(lockName);
     try {
         return rlock.tryLock(lockWaitTime,autoReLockTime,exchangeTimeUnit(timeUnit));
     } catch (InterruptedException e) {
         return false;
     }
 }

 /**
 * 释放锁
 * @param lockName
 */
 public void releaseLock(String lockName){
     RLock rlock = redissonClient.getLock(lockName);
     rlock.unlock();
 }

 private TimeUnit exchangeTimeUnit(int _timeUnit){
     switch (_timeUnit) {
     case 1:
         return TimeUnit.SECONDS;
     case 2:
         return TimeUnit.MINUTES;
     case 3:
         return TimeUnit.HOURS;
     case 4:
         return TimeUnit.DAYS;
     }
     return TimeUnit.SECONDS;
 }
}
3. 测试类
/**
 * src.test
 **/
public class TestRedissionShan {
 final String LOCK_KEY="TEST_123";

 public static void main(String[] args) {
 TestRedissionShan test1 = new TestRedissionShan();
 test1.testLock("test1");
 TestRedissionShan test2 = new TestRedissionShan();
 test2.testLock("test2");
 }

 public void testLock(String name){
//下面的三个地址以及端口可以参照上一篇文章redis集群,写入你配好的集群地址
 RedisDistributedLock redisDistributedLock = new RedisDistributedLock("192.168.122.32:9210,192.168.122.33:9211,192.168.122.34:9212",null,5L,1);
//第二个测试再将此段代码解除注释
// if ("test2".equals(name)){
// try {
// System.err.println(name+"准备睡眠6秒");
// Thread.sleep(6000);
// } catch (InterruptedException e) {
// e.printStackTrace();
// }
// }
 boolean lock = redisDistributedLock.getLock(LOCK_KEY);
 System.out.println(name+"拿到锁了吗?"+lock+"---线程名字:"+Thread.currentThread().getName());
 if (lock){
 System.out.println(name+"拿到锁了准备操作。。。。。");
 System.out.println(name+"我自己测试还能不能加锁<"+redisDistributedLock.getLock(LOCK_KEY)+">");
 }else{
 System.err.println(name+"未拿到锁不操作。。。。。");
 }
 }

}
测试结果:

est1拿到锁了吗?true---线程名字:main
test1拿到锁了准备操作。。。。。
test1我自己测试还能不能加锁<true>
test2拿到锁了吗?false---线程名字:main
test2未拿到锁不操作。。。。。
可见在test1拿到锁后,如果不释放,test2是没有办法对这个锁进行任何操作的
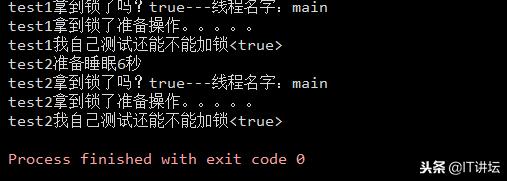
下面我们再测试下,将上面的那一段注掉的代码释放开(因为默认释放时间是5秒)
我们让test2线程等待6秒,正常情况下是可以再次对同一个锁进行操作的,因为test1过了5秒已经释放了锁
接下来看输出结果:

est1拿到锁了吗?true---线程名字:main
test1拿到锁了准备操作。。。。。
test1我自己测试还能不能加锁<true>
test2准备睡眠6秒
test2拿到锁了吗?true---线程名字:main
test2拿到锁了准备操作。。。。。
test2我自己测试还能不能加锁<true>
测试结果正如前面所说,这里需要注意下有个当前线程加完锁后,还可以对其进行加锁,我们不妨想一下,你自己加的锁,加完后你自己可以对其做任何操作,包括再次加锁(再次加锁我们只是测试,实际中并不会使用)
以上就是Redis分布式锁的一个实现方式,当然了,redis还有很多种实现方式,原生的不容易理解,这里我们选择了一种相对容易上手的。
最后
以上就是瘦瘦巨人最近收集整理的关于(11)Redis------分布式锁的实现方式之一(基于Springboot项目搭建)的全部内容,更多相关(11)Redis------分布式锁内容请搜索靠谱客的其他文章。


![Redisson类报错:ClusterConnectionManager [ERROR] Can't connect to master: redis://127.0.0.1:7000](https://www.shuijiaxian.com/files_image/reation/bcimg8.png)


发表评论 取消回复