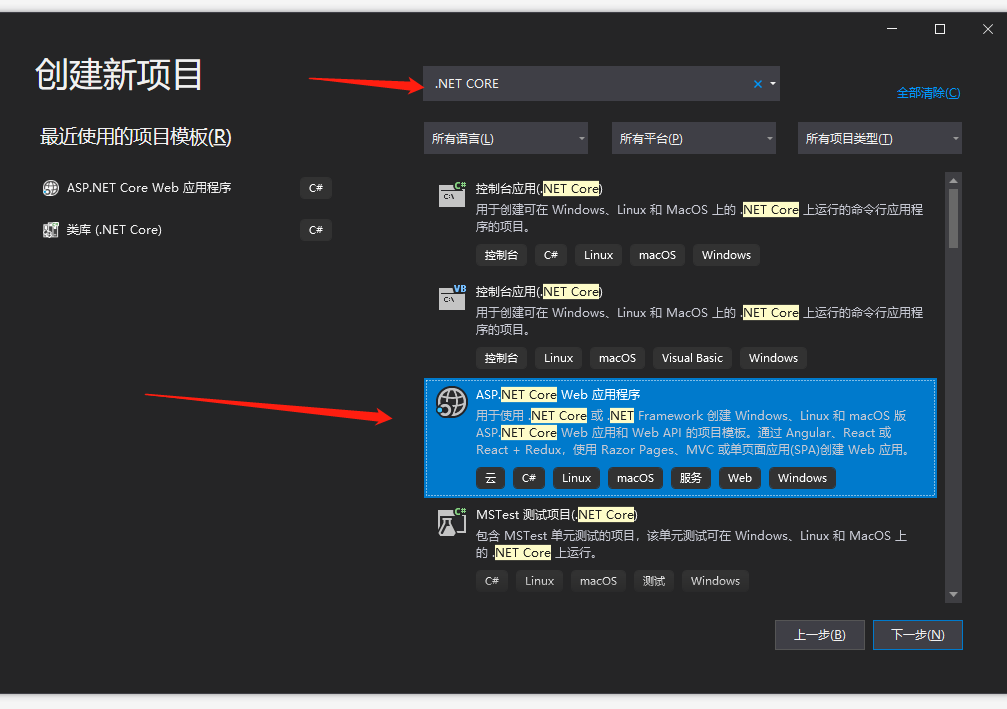
vs2019创建webapi
1.创建新的项目

2.选择.NET CORE的ASP .NET CORE WEB应用程序
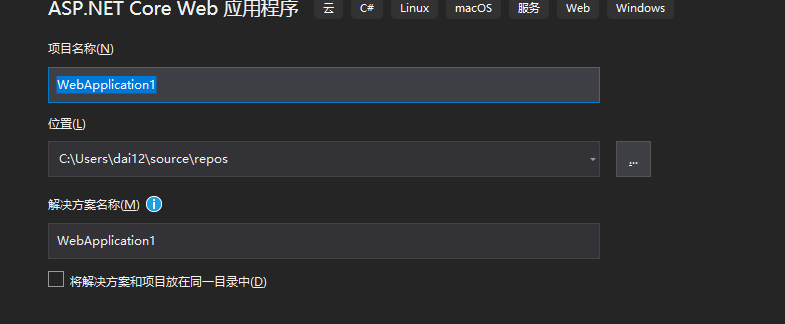
3.定义项目名称和存放地点
4.选择API创建项目

5.删除原本的无用的类
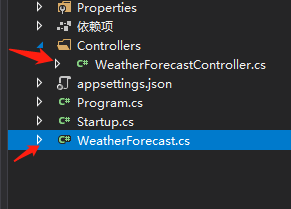
6.添加新的方法类
7.设置路由
using Microsoft.AspNetCore.Components;
using System;
using System.Collections.Generic;
using System.Linq;
using System.Threading.Tasks;

namespace WEBAPI.Controllers
{

  /// <summary>
  /// 设置路由
  /// </summary>
  [Route("api/[controller]/[action]")]
  public class Calculation
  {


  }
}

8.下面开始写你所需要的接口方法
我们分别创建一个post两个get的方法
方法如下
using System;
using System.Collections.Generic;
using System.Linq;
using System.Threading.Tasks;
using Microsoft.AspNetCore.Mvc;
using Microsoft.Extensions.Logging;

namespace WEBAPI.Controllers
{

  /// <summary>
  /// 设置路由
  /// </summary>
  [Route("api/[controller]/[action]")]
  [ApiController]
  public class Calculation
  {

    /// <summary>
    /// 获取文本
    /// </summary>
    /// <returns></returns>
    [HttpGet]
    public ActionResult<string> Get()
    {
      return "Hello World!";
    }
    /// <summary>
    /// 两数相加
    /// </summary>
    /// <param name="num1">第一个数</param>
    /// <param name="num2">第二个数</param>
    /// <returns></returns>
    [HttpGet]
    public ActionResult<int> Sum(int num1, int num2)
    {
      return num1 + num2;
    }
    /// <summary>
    /// 两数相减
    /// </summary>
    /// <param name="param">参数</param>
    /// <returns></returns>
    [HttpPost]
    public ActionResult<int> Subtract(Param param)
    {
      int result = param.num1 - param.num2;
      return result;
    }


  }

  /// <summary>
  /// 参数
  /// </summary>
  public class Param
  {
    /// <summary>
    /// 第一个数
    /// </summary>
    public int num1 { get; set; }
    /// <summary>
    /// 第二个数
    /// </summary>
    public int num2 { get; set; }
  }
}
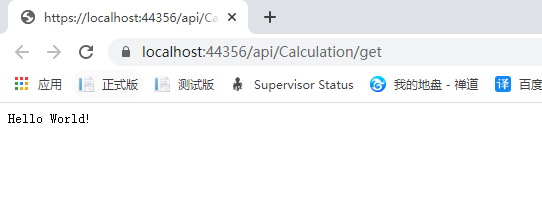
9.开始调试

在调试中修改路径为api/Calculation/get
开始运行,结果为
别的方法自行加参数修改
为了方便对api接口进行管理和调试,我使用了Swagger框架。为了更好地可视化运行我的接口
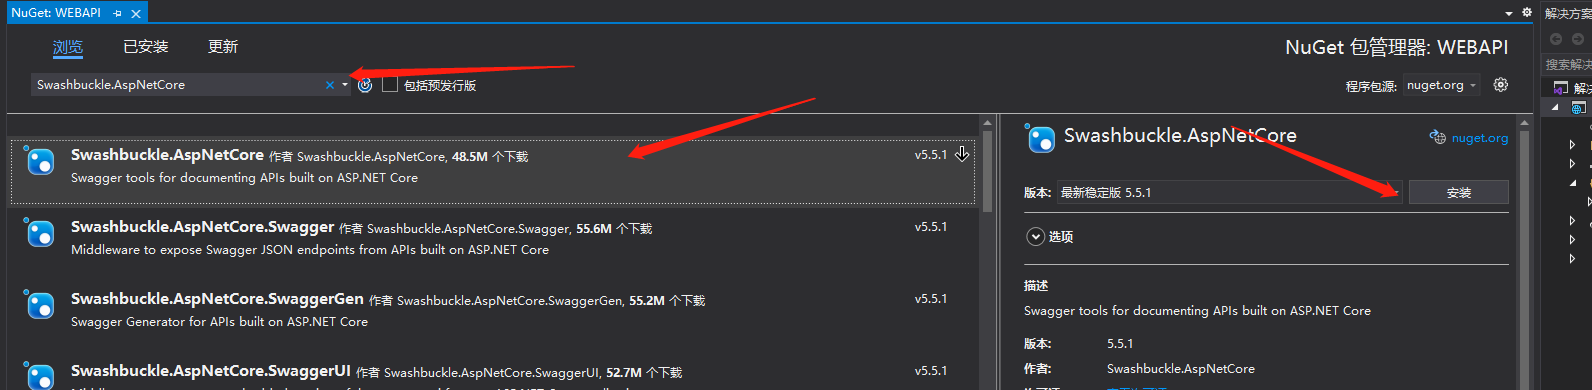
1.为项目添加NuGet包 Swashbuckle.AspNetCore
2.在Startup的ConfigureServices方法里加入下面的代码,注册Swagger生成器,定义一个文档,设置xml文档的注释路径

services.AddMvc().SetCompatibilityVersion(CompatibilityVersion.Version_2_2);
      //配置Swagger
      //注册Swagger生成器,定义一个Swagger 文档
      services.AddSwaggerGen(c =>
      {
        c.SwaggerDoc("v1", new OpenApiInfo
        {
          Version = "v1",
          Title = "接口文档",
          Description = "RESTful API"
        });
        // 为 Swagger 设置xml文档注释路径
        var xmlFile = $"{Assembly.GetExecutingAssembly().GetName().Name}.xml";
        var xmlPath = Path.Combine(AppContext.BaseDirectory, xmlFile);
        c.IncludeXmlComments(xmlPath);
      });
      services.AddMvc(x => x.EnableEndpointRouting = false);
3.在Configure方法里加入下面的代码,启用
中间件服务使用生成Swagger和SwaggerUI

//启用中间件服务生成Swagger
      app.UseSwagger();
      //启用中间件服务生成Swagger,指定Swagger JSON终结点
      app.UseSwaggerUI(c =>
      {
        c.SwaggerEndpoint("/swagger/v1/swagger.json", "Web App V1");
        c.RoutePrefix = string.Empty;//设置根节点访问
      });
      app.UseMvc();
4.然后右击项目继续选择属性,在生成中选择输出路径
并且勾选xml文档

5.清空调试的路径

6.直接启动

到此这篇关于使用vs2019加.net core 对WeiApi的创建过程详解的文章就介绍到这了,更多相关vs2019加.net core 对WeiApi的创建内容请搜索靠谱客以前的文章或继续浏览下面的相关文章希望大家以后多多支持靠谱客!
最后
以上就是强健板栗最近收集整理的关于使用vs2019加.net core 对WeiApi的创建过程详解的全部内容,更多相关使用vs2019加.net内容请搜索靠谱客的其他文章。
本图文内容来源于网友提供,作为学习参考使用,或来自网络收集整理,版权属于原作者所有。
![[Asp.Net Core] 浅谈Blazor Server Side](https://www.shuijiaxian.com/files_image/reation/bcimg6.png)

![[Asp.Net Core]用Blazor Server Side实现图片验证码](https://www.shuijiaxian.com/files_image/reation/bcimg8.png)


![[Asp.Net Core]提高开发效率的方法](https://www.shuijiaxian.com/files_image/reation/bcimg12.png)

发表评论 取消回复