我是靠谱客的博主 疯狂麦片,这篇文章主要介绍ElementUI——案例1用户管理(基于SpringBoot)1.前期准备2.案例开发3.功能模块添加4.集合SpringBoot后台实现数据异步请求,现在分享给大家,希望可以做个参考。
1.前期准备
备注:主要涉及组件container组件,导航菜单组件,router路由组件,carousel 走马灯组件,Image组件,Table表格组件
#1.在项目开发目录使用脚手架新建vue项目(需要提前安装好node和webpack)
vue init webpack element_user(项目名)
#2.进入当前构建好的vue项目下,下载elementui依赖
cd element_user
npm i element-ui -S
#3.进入项目src目录下的main.js文件加入配置
# 相当于将elementui所有样式和组件引入
import ElementUI from 'element-ui';
import 'element-ui/lib/theme-chalk/index.css';
#将elementui全局组件注册到实例上
Vue.use(ElementUI);
搭建布局如下
2.案例开发
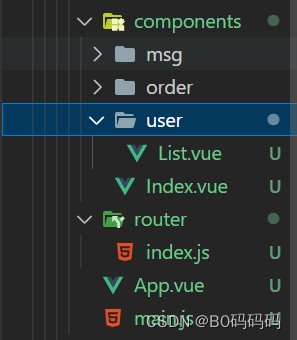
1.删除项目中components目录下的HelloWorl文件搭建如下结构,components下分模块创建目录
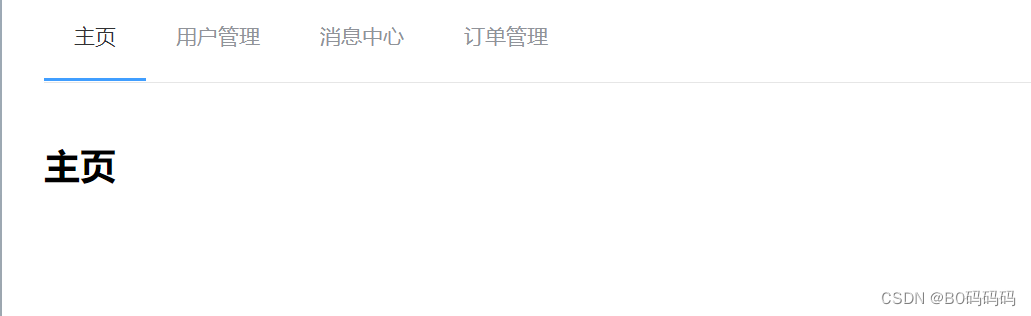
2.Index.vue
<template lang="">
    <div>
        <h1>主页</h1>
    </div>
</template>
<script>
export default {
}
</script>
<style lang="">
</style>
List.vue
<template lang="">
    <div>
        <h1>用来显示用户列表</h1>
    </div>
</template>
<script>
export default {
}
</script>
<style lang="">
</style>
App.vue中使用导航菜单组件,实现导航栏功能;底部添加路由,绑定路由功能
<template>
  <div id="app">
    <el-container>
      <el-header>
          <!--导航菜单-->
          <el-menu :default-active="activeIndex" class="el-menu-demo" mode="horizontal" @select="handleSelect">
              <el-menu-item index="/index">主页</el-menu-item></el-menu-item>
              <el-menu-item index="/userslist">用户管理</el-menu-item></el-menu-item></el-menu-item>
              <el-menu-item index="/mags">消息中心</el-menu-item>
              <el-menu-item index="/orders">订单管理</el-menu-item>
            </el-menu>
      </el-header>
      <el-main>
          <!-- 路由组件 -->
          <router-view/>
      </el-main>
    </el-container>
  </div>
</template>
<script>
export default {
  name: 'App',
  data() {
      return {
        activeIndex: this.$route.path,//获取当前路由路径,解决刷新网页报错问题
      };
    },
    methods: {
      handleSelect(key, keyPath) {
        console.log(key, keyPath);
        // 切换路由
        this.$router.push(key);
      }
    }
}
</script>
<style>
</style>
3.路由设置router下的index.js
import Vue from 'vue'
import Router from 'vue-router'
import Index from '../components/Index'
import List from '../components/user/List'
Vue.use(Router)

export default new Router({
  routes: [
  {
    path:'/',//配置根路由
    component:Index
  },
    {
      path: '/index',
      component: Index
    },
    {
      path:'/userslist',
      component:List
    }
  ]
})
3.功能模块添加
3.1 走马灯(轮播图)
修改Index.vue
<template lang="">
    <div>
        <el-carousel indicator-position="outside">
            <el-carousel-item v-for="item in imgs" :key="item">
                <el-image
                :src="item"
                fit="contain"></el-image>
            </el-carousel-item>
          </el-carousel>
    </div>
</template>
<script>
    import homeImg1 from "../assets/imgs/zjl1.jpg";
    import homeImg2 from "../assets/imgs/zjl2.jpg";
    import homeImg3 from "../assets/imgs/zjl3.jpg";
    import homeImg4 from "../assets/imgs/zjl4.jpg";
    import homeImg5 from "../assets/imgs/zjl5.jpg";
export default {
   name:"Index",
   data(){
    return {
        imgs:[homeImg1,homeImg2,homeImg3,homeImg4,homeImg5]
    }
   }
}
</script>
<style lang="">

</style>
效果

3.2用户管理
实现效果
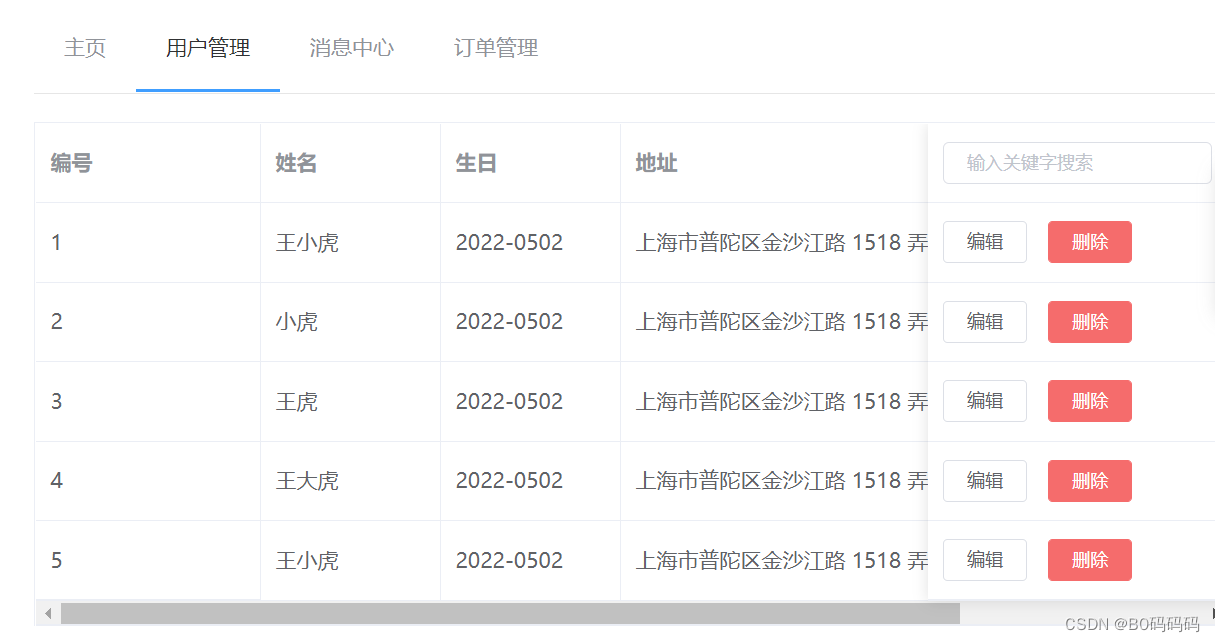
<template lang="">
    <div>
        <el-table
    :data="tableData.filter(data => !search || data.name.toLowerCase().includes(search.toLowerCase()))"
    border
    style="width: 100%">
    <el-table-column
      fixed
      prop="id"
      label="编号"
      width="150">
    </el-table-column>
    <el-table-column
      prop="name"
      label="姓名"
      width="120">
    </el-table-column>
    <el-table-column
      prop="birth"
      label="生日"
      width="120">
    </el-table-column>
    <el-table-column
      prop="address"
      label="地址"
      width="300">
    </el-table-column>
    <el-table-column
      prop="sex"
      label="性别"
      width="120">
    </el-table-column>
    <el-table-column
      fixed="right"
      width="200">
      <template slot="header" slot-scope="scope">
        <el-input
          v-model="search"
          size="mini"
          placeholder="输入关键字搜索"/>
      </template>
      <template slot-scope="scope">
        <el-button
          size="mini"
          @click="handleEdit(scope.$index, scope.row)">编辑</el-button>
        <el-button
          size="mini"
          type="danger"
          @click="handleDelete(scope.$index, scope.row)">删除</el-button>
      </template>
    </el-table-column>
  </el-table>
    </div>
</template>
<script>
export default {
    methods: {
      handleEdit(index, row) {
        console.log(index, row);
      },
      handleDelete(index, row) {
        console.log(index, row);
      }
    },
    data() {
      return {
        tableData: [{
          id: 1,
          name: '王小虎',
          birth: '2022-0502',
          address: '上海市普陀区金沙江路 1518 弄',
          sex: '男'
        }, {
          id: 2,
          name: '小虎',
          birth: '2022-0502',
          address: '上海市普陀区金沙江路 1518 弄',
          sex: '男'
        },{
          id: 3,
          name: '王虎',
          birth: '2022-0502',
          address: '上海市普陀区金沙江路 1518 弄',
          sex: '男'
        },{
          id: 4,
          name: '王大虎',
          birth: '2022-0502',
          address: '上海市普陀区金沙江路 1518 弄',
          sex: '男'
        },{
          id: 5,
          name: '王小虎',
          birth: '2022-0502',
          address: '上海市普陀区金沙江路 1518 弄',
          sex: '男'
        }],
        search: ''
      }
    }
}
</script>
<style lang="">
</style>
4.集合SpringBoot后台实现数据异步请求
准备工作:静态页面已经搭建好,现在将数据改为动态数据,后台使用SpringBoot
1.Vue前台
- 安装axios
npm i axios -S
- main.js中引入axios
import axios from 'axios'
Vue.prototype.$http=axios#通过修改原型链方式引入
- 修改List.vue脚本内容
<script>
export default {
    methods: {
      handleEdit(index, row) {
        console.log(index, row);
      },
      handleDelete(index, row) {
        console.log(index, row);
      }
    },
    data() {
      return {
        tableData: [],
        search: ''
      }
    },
    created() {
        this.$http.get("http://localhost:8989/user/findAll").then(res=>{
            //回调中获取响应结果
            this.tableData = res.data;//将tableData值设为响应结果
        })
    },
}
</script>
2.SpringBoot后台
本文后台主要涉及核心代码
@RestController
@CrossOrigin(origins = "*")//全局跨域,解决跨域相关问题
@RequestMapping("user")
public class UserController {
    @Autowired
    private UserService userService;
    @GetMapping("findAll")
    public List<User> findAll(){
        return userService.findAll();
    }
}
最后
以上就是疯狂麦片最近收集整理的关于ElementUI——案例1用户管理(基于SpringBoot)1.前期准备2.案例开发3.功能模块添加4.集合SpringBoot后台实现数据异步请求的全部内容,更多相关ElementUI——案例1用户管理(基于SpringBoot)1内容请搜索靠谱客的其他文章。
本图文内容来源于网友提供,作为学习参考使用,或来自网络收集整理,版权属于原作者所有。


发表评论 取消回复