本文实现的示例是为costmap新创建一层并在该层设置一个伪装障碍点,不让机器人移动到该出。实际应用中比如你不想让机器人去某一个地方但该地方又没有真正障碍,你就可以通过这种方式设置一个伪装障碍。
本文代码基于rbx1和costmap_2d tutorial基础代码进行必要修改而来,本文主要包括2部分: 1)创建新层插件; 2)将新层插件添加到costmap_2d
1 创建新层插件
1.1 创建工作空间
执行如下命令创建工作空间create_new_layers目录,
1)mkdir costmap2d_tutorial_study_ws
2)cd costmap2d_tutorial_study_ws/ && mkdir src
3)catkin_create_pkg create_new_layers roscpp costmap_2d dynamic_reconfigure std_msgs rospy
1.2 编写插件cpp和header文件
(1)在src/create_new_layers/src目录下添加如下2个cpp文件,创建了2个插件可供调用,我们示例中主要使用grid_layer.cpp,
1)simple_layer.cpp
#include<create_new_layers/simple_layer.h>
#include <pluginlib/class_list_macros.h>

PLUGINLIB_EXPORT_CLASS(simple_layer_namespace::SimpleLayer, costmap_2d::Layer)

using costmap_2d::LETHAL_OBSTACLE;

namespace simple_layer_namespace
{

SimpleLayer::SimpleLayer() {}

void SimpleLayer::onInitialize()
{
  ros::NodeHandle nh("~/" + name_);
  current_ = true;

  dsrv_ = new dynamic_reconfigure::Server<costmap_2d::GenericPluginConfig>(nh);
  dynamic_reconfigure::Server<costmap_2d::GenericPluginConfig>::CallbackType cb = boost::bind(
      &SimpleLayer::reconfigureCB, this, _1, _2);
  dsrv_->setCallback(cb);
}


void SimpleLayer::reconfigureCB(costmap_2d::GenericPluginConfig &config, uint32_t level)
{
  enabled_ = config.enabled;
}

void SimpleLayer::updateBounds(double robot_x, double robot_y, double robot_yaw, double* min_x,
                                           double* min_y, double* max_x, double* max_y)
{
  if (!enabled_)
    return;

  mark_x_ = robot_x + cos(robot_yaw);
  mark_y_ = robot_y + sin(robot_yaw);

  *min_x = std::min(*min_x, mark_x_);
  *min_y = std::min(*min_y, mark_y_);
  *max_x = std::max(*max_x, mark_x_);
  *max_y = std::max(*max_y, mark_y_);
}

void SimpleLayer::updateCosts(costmap_2d::Costmap2D& master_grid, int min_i, int min_j, int max_i,
                                          int max_j)
{
  if (!enabled_)
    return;
  unsigned int mx;
  unsigned int my;
  if(master_grid.worldToMap(mark_x_, mark_y_, mx, my)){
    master_grid.setCost(mx, my, LETHAL_OBSTACLE);
  }
}

} // end namespace
2)grid_layer.cpp
#include<create_new_layers/grid_layer.h>
#include <pluginlib/class_list_macros.h>

PLUGINLIB_EXPORT_CLASS(simple_layer_namespace::GridLayer, costmap_2d::Layer)

using costmap_2d::LETHAL_OBSTACLE;
using costmap_2d::NO_INFORMATION;
using costmap_2d::FREE_SPACE;

namespace simple_layer_namespace
{

unsigned flag = 0;

GridLayer::GridLayer() {}

void GridLayer::onInitialize()
{
  ros::NodeHandle nh("~/" + name_);
  current_ = true;
  default_value_ = NO_INFORMATION;
  matchSize();

  dsrv_ = new dynamic_reconfigure::Server<costmap_2d::GenericPluginConfig>(nh);
  dynamic_reconfigure::Server<costmap_2d::GenericPluginConfig>::CallbackType cb = boost::bind(
      &GridLayer::reconfigureCB, this, _1, _2);
  dsrv_->setCallback(cb);
}


void GridLayer::matchSize()
{
  Costmap2D* master = layered_costmap_->getCostmap();
  resizeMap(master->getSizeInCellsX(), master->getSizeInCellsY(), master->getResolution(),
            master->getOriginX(), master->getOriginY());
}


void GridLayer::reconfigureCB(costmap_2d::GenericPluginConfig &config, uint32_t level)
{
  enabled_ = config.enabled;
}

void GridLayer::updateBounds(double robot_x, double robot_y, double robot_yaw, double* min_x,
                                           double* min_y, double* max_x, double* max_y)
{
  if (!enabled_)
    return;

  if (flag == 0)
  {
	  flag = 1;
  }else
	return;

  double mark_x = robot_x + cos(robot_yaw), mark_y = robot_y + sin(robot_yaw);
  unsigned int mx;
  unsigned int my;
  if(worldToMap(mark_x, mark_y, mx, my)){
	       setCost(mx, my,LETHAL_OBSTACLE);
  }

  *min_x = std::min(*min_x, mark_x);
  *min_y = std::min(*min_y, mark_y);
  *max_x = std::max(*max_x, mark_x);
  *max_y = std::max(*max_y, mark_y);
}

void GridLayer::updateCosts(costmap_2d::Costmap2D& master_grid, int min_i, int min_j, int max_i,
                                          int max_j)
{
  if (!enabled_)
    return;

  for (int j = min_j; j < max_j; j++)
  {
    for (int i = min_i; i < max_i; i++)
    {
      int index = getIndex(i, j);
      if (costmap_[index] == NO_INFORMATION)
        continue;
      master_grid.setCost(i, j, costmap_[index]);
    }
  }
}

} // end namespace
(2)然后在src/create_new_layers/include/create_new_layers目录下创建2个如下头文件,
1)simple_layer.h
#ifndef SIMPLE_LAYER_H_
#define SIMPLE_LAYER_H_
#include <ros/ros.h>
#include <costmap_2d/layer.h>
#include <costmap_2d/layered_costmap.h>
#include <costmap_2d/GenericPluginConfig.h>
#include <dynamic_reconfigure/server.h>

namespace simple_layer_namespace
{

class SimpleLayer : public costmap_2d::Layer
{
public:
  SimpleLayer();

  virtual void onInitialize();
  virtual void updateBounds(double robot_x, double robot_y, double robot_yaw, double* min_x, double* min_y, double* max_x,
                             double* max_y);
  virtual void updateCosts(costmap_2d::Costmap2D& master_grid, int min_i, int min_j, int max_i, int max_j);

private:
  void reconfigureCB(costmap_2d::GenericPluginConfig &config, uint32_t level);

  double mark_x_, mark_y_;
  dynamic_reconfigure::Server<costmap_2d::GenericPluginConfig> *dsrv_;
};
}
#endif
2)grid_layer.h
#ifndef GRID_LAYER_H_
#define GRID_LAYER_H_
#include <ros/ros.h>
#include <costmap_2d/layer.h>
#include <costmap_2d/layered_costmap.h>
#include <costmap_2d/GenericPluginConfig.h>
#include <dynamic_reconfigure/server.h>

namespace simple_layer_namespace
{

class GridLayer : public costmap_2d::Layer, public costmap_2d::Costmap2D
{
public:
  GridLayer();

  virtual void onInitialize();
  virtual void updateBounds(double robot_x, double robot_y, double robot_yaw, double* min_x, double* min_y, double* max_x,
                             double* max_y);
  virtual void updateCosts(costmap_2d::Costmap2D& master_grid, int min_i, int min_j, int max_i, int max_j);
  bool isDiscretized()
  {
    return true;
  }

  virtual void matchSize();

private:
  void reconfigureCB(costmap_2d::GenericPluginConfig &config, uint32_t level);
  dynamic_reconfigure::Server<costmap_2d::GenericPluginConfig> *dsrv_;
};
}
#endif
1.3 创建插件描述符文件
在src/create_new_layers/目录下创建插件描述符文件costmap_plugins.xml,
<class_libraries>
  <library path="lib/libsimple_layer">
    <class type="simple_layer_namespace::SimpleLayer" base_class_type="costmap_2d::Layer">
      <description>Demo Layer that adds a point 1 meter in front of the robot</description>
    </class>
  </library>
  <library path="lib/libgrid_layer">
    <class type="simple_layer_namespace::GridLayer" base_class_type="costmap_2d::Layer">
      <description>Demo Layer that marks all points that were ever one meter in front of the robot</description>
    </class>
  </library>
</class_libraries>
1.4 导出插件
在package.xml文件导出插件,供costmap_2d包使用
  <export>
    <costmap_2d plugin="${prefix}/costmap_plugins.xml" />
  </export>
1.5 编译文件修改
修改CMakeLists.txt文件,
include_directories(include
${catkin_INCLUDE_DIRS}
)
add_library(simple_layer src/simple_layer.cpp)
add_library(grid_layer src/grid_layer.cpp)
1.6 编译插件并导出目录
(1)在工作空间主目录costmap2d_tutorial_study_ws下,执行命令catkin_make;
(2)导出二进制插件目录供调用,执行命令source costmap2d_tutorial_study_ws/devel/setup.bash
1.7 检查插件是否编译成功
rospack plugins --attrib=plugin costmap_2d
从如下输出内容应该看到costmap_2d包插件已经包含你刚才创建的插件,
frontier_exploration /opt/ros/kinetic/share/frontier_exploration/costmap_plugins.xml
create_new_layers /home/xxx/costmap2d_tutorial_study_ws/src/create_new_layers/costmap_plugins.xml
costmap_2d /opt/ros/kinetic/share/costmap_2d/costmap_plugins.xml
2 调用新插件
以下我们将调用刚刚创建的新层插件,通过简单修改rbx1示例代码完成,为了完成示例一共修改2个导航配置文件。
2.1 修改rbx1_nav/config/fake/costmap_common_params.yaml
添加obstacles,说明障碍数据来源,同时强调了命名空间
obstacles:
observation_sources: scan
scan: {data_type: LaserScan, topic: /scan, marking: true, clearing: true, expected_update_rate: 0}
2.2 修改rbx1_nav/config/fake/global_costmap_params.yaml
本示例我们在全局代价地图配置文件添加如下代码,加入插件规范请参考Configuring Layered Costmaps
plugins:
- {name: static_map, type: "costmap_2d::StaticLayer"}
- {name: obstacles, type: "costmap_2d::VoxelLayer"}
- {name: gridlayer, type: "simple_layer_namespace::GridLayer"}
- {name: inflation_layer, type: "costmap_2d::InflationLayer"}
注意:这里我们假定会发布static map并使用它
2.3 仿真运行
(1)提起fake turtlebot机器人
roslaunch rbx1_bringup fake_turtlebot.launch
(2)提起导航功能包集
roslaunch rbx1_nav fake_amcl.launch map:=test_map.yaml
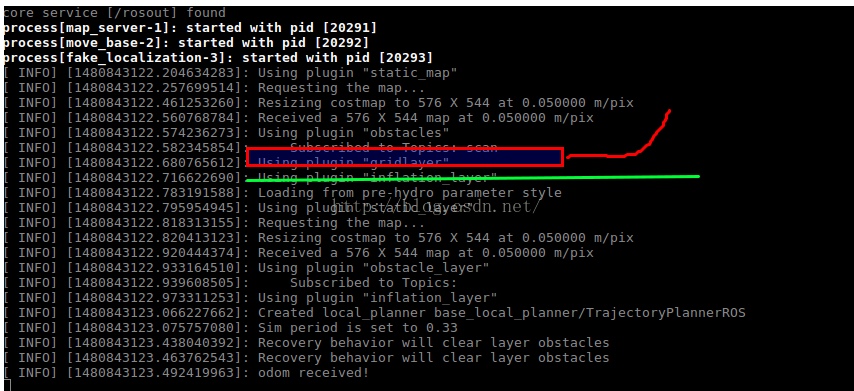
从终端输出我们可以看到,已经在全局层加入我们创建的新层gridlayer(红框内),绿线以下是local costmap层没有修改依然使用默认3层(有标记pre-hydro)
(3)启动可视化
rosrun rviz rviz -d `rospack find rbx1_nav`/amcl.rviz
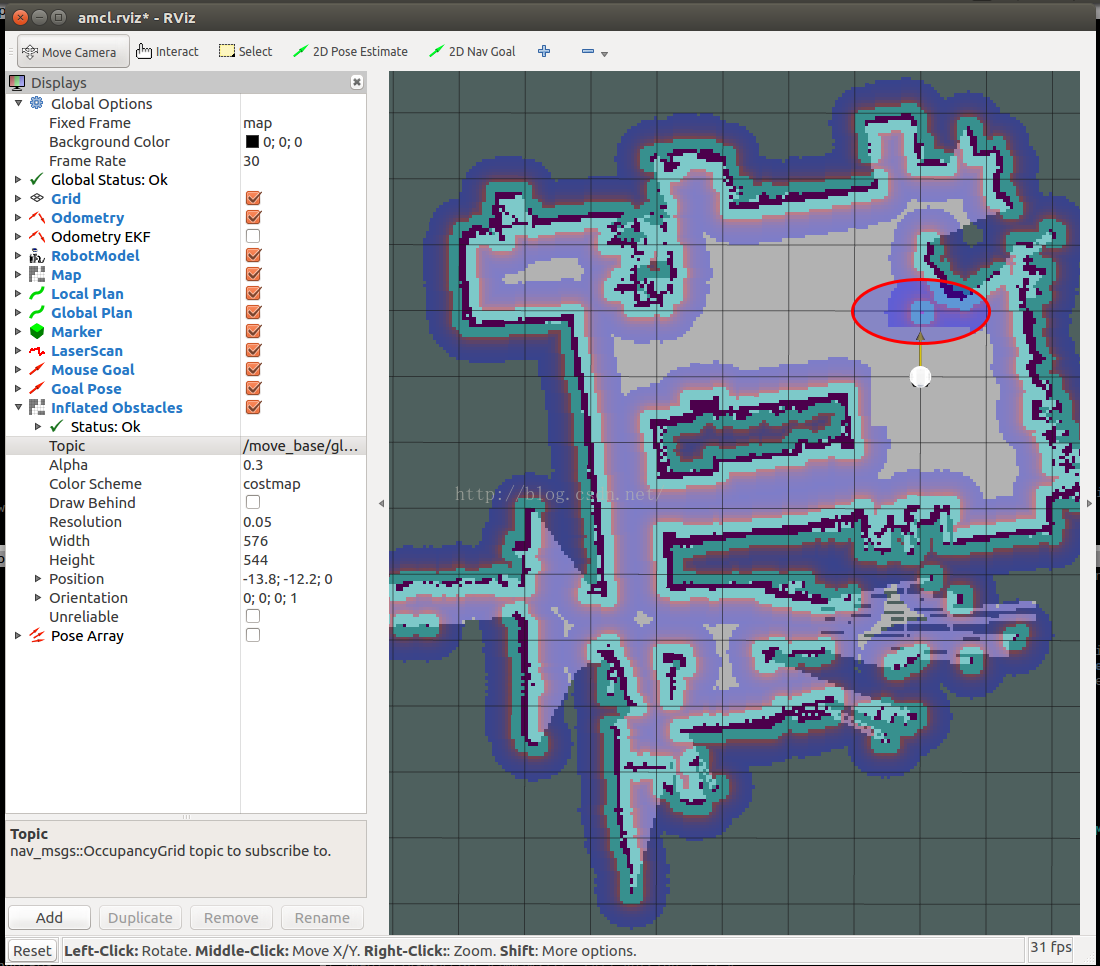
下图中红色圆形框中即为新创建的障碍点,
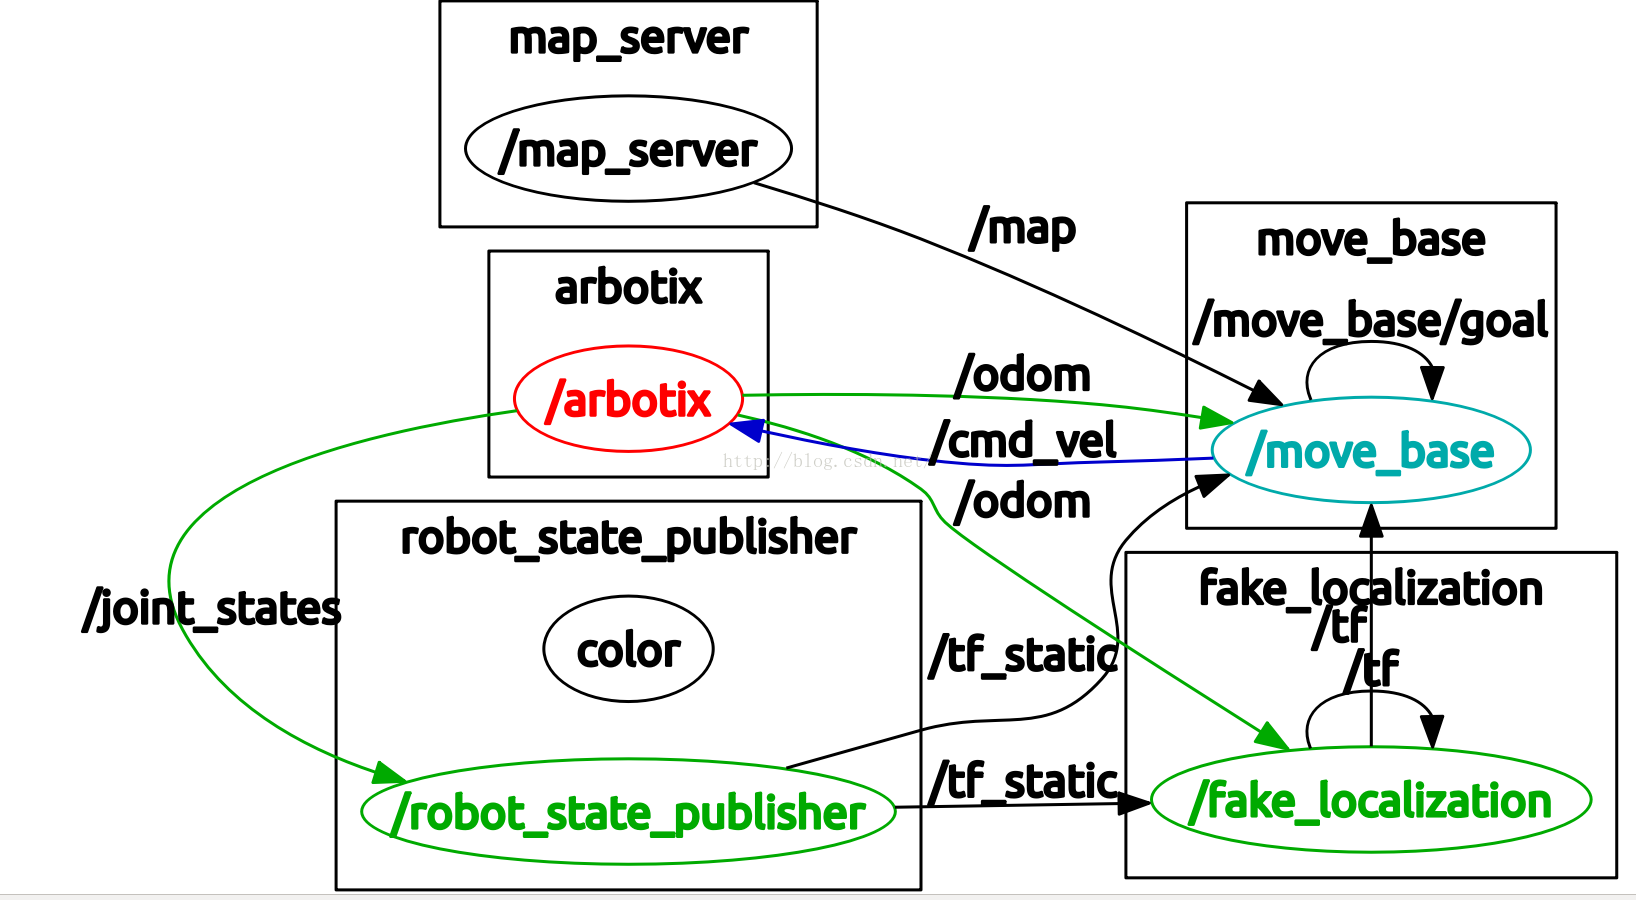
(4)查看node与topic关系图
最后
以上就是难过芝麻最近收集整理的关于ROS Navigation-----costmap_2d之创建自定义用户层的全部内容,更多相关ROS内容请搜索靠谱客的其他文章。


发表评论 取消回复