项目开发环境
springboot2.0
jdk1.8
如何利用maven对springboot项目进行多环境打包呢?
springboot运行的时候默认是加载application.properties的,如果还是按照传统springmvc的maven多环境打包方式直接将配置命名为application-dev.properties,application-sit.properties等等是无法运行成功的。
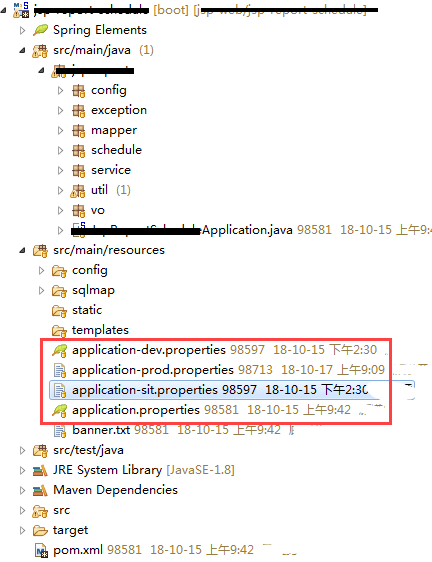
那么该怎么办呢?首先找到突破口——application.properties,在项目中还是保留application.properties,根据springboot的多环境启动配置,可以在application.properties中配置启动哪个环境的配置,具体项目结构如下:

红圈圈中的即为需要定义的properties
首先看下application.properties这个配置文件的内容,本地启动时通过spring.profiles.active=dev直接来指定需要的环境的配置文件,但在通过maven打包的时候启用这个配置spring.profiles.active=@profiles.active@。spring.profiles.active就是springboot提供的在多环境配置的时候用来指定要加载对应的配置文件的。
application.properties文件如下:
#指定运行环境dev(开发环境使用), sit(测试环境使用), prod(生产环境使用).
#maven打包的时候改为spring.profiles.active=@profiles.active@,@profiles.active@来自maven打包时指定的打包环境, 对应pom文件中的标签profiles.active
#spring.profiles.active=dev
spring.profiles.active=@profiles.active@
另外说明下,在Spring Boot中多环境配置文件名需要满足application-{profile}.properties的格式,其中{profile}对应你的环境标识,比如:
application-dev.properties:开发环境application-test.properties:测试环境application-prod.properties:生产环境
pom文件配置
<?xml version="1.0" encoding="UTF-8"?>
<project xmlns="http://maven.apache.org/POM/4.0.0" xmlns:xsi="http://www.w3.org/2001/XMLSchema-instance"
	xsi:schemaLocation="http://maven.apache.org/POM/4.0.0 http://maven.apache.org/xsd/maven-4.0.0.xsd">
	<modelVersion>4.0.0</modelVersion>

	<groupId>com.xxx</groupId>
	<artifactId>xxx-xxx-xxxx</artifactId>
	<version>0.0.1-SNAPSHOT</version>
	<packaging>jar</packaging>

	<name>xxx-xxxx-xxx</name>
	<description>xxx任务</description>

	<parent>
		<groupId>org.springframework.boot</groupId>
		<artifactId>spring-boot-starter-parent</artifactId>
		<version>2.0.5.RELEASE</version>
		<relativePath/> <!-- lookup parent from repository -->
	</parent>

	<properties>
		<project.build.sourceEncoding>UTF-8</project.build.sourceEncoding>
		<project.reporting.outputEncoding>UTF-8</project.reporting.outputEncoding>
		<java.version>1.8</java.version>
	</properties>

	<dependencies>
		<dependency>
			<groupId>org.springframework.boot</groupId>
			<artifactId>spring-boot-starter-web</artifactId>
		</dependency>
		<!-- mybatis -->
		<dependency>
			<groupId>org.mybatis.spring.boot</groupId>
			<artifactId>mybatis-spring-boot-starter</artifactId>
			<version>1.3.2</version>
		</dependency>
		<!-- oracle 驱动-->
		<dependency>
		    <groupId>com.oracle</groupId>
		    <artifactId>ojdbc6</artifactId>
		    <version>11.2.0.3</version>
		</dependency>
		<!-- 阿里巴巴Druid -->
		<dependency>
			<groupId>com.alibaba</groupId>
			<artifactId>druid</artifactId>
			<version>1.1.9</version>
		</dependency>
		<!-- json -->
		<dependency>
		    <groupId>com.alibaba</groupId>
		    <artifactId>fastjson</artifactId>
		    <version>1.2.49</version>
		</dependency>

		<dependency>
		  <groupId>org.apache.commons</groupId>
		  <artifactId>commons-lang3</artifactId>
		  </dependency>
		<!-- hessian -->
		<dependency>
		    <groupId>com.caucho</groupId>
		    <artifactId>hessian</artifactId>
		    <version>4.0.38</version>
		</dependency>

		<dependency>
		    <groupId>commons-io</groupId>
		    <artifactId>commons-io</artifactId>
		    <version>2.6</version>
		</dependency>
		<!-- 钉钉  -->
		<dependency>
		    <groupId>com.dingtalk.chatbot</groupId>
		    <artifactId>dingtalk-chatbot-sdk</artifactId>
		    <version>0.9.0-SNAPSHOT</version>
		</dependency>

        <dependency>
            <groupId>org.apache.httpcomponents</groupId>
            <artifactId>httpclient</artifactId>
         </dependency>
		<!-- logback日志输出到redis使用 -->
		<dependency>
			<groupId>com.cwbase</groupId>
			<artifactId>logback-redis-appender</artifactId>
			<version>1.1.5</version>
		</dependency>

		<dependency>
		    <groupId>org.apache.commons</groupId>
		    <artifactId>commons-pool2</artifactId>
		    </dependency>

		<dependency>
			<groupId>org.springframework.boot</groupId>
			<artifactId>spring-boot-starter-test</artifactId>
			<scope>test</scope>
		</dependency>
		<dependency>
			<groupId>org.springframework.boot</groupId>
			<artifactId>spring-boot-configuration-processor</artifactId>
			<optional>true</optional>
		</dependency>
	</dependencies>

	<!-- 多环境打包配置, 使用如下命令打包
		mvn clean package -Pprod
		#或者
		mvn clean package -Dprofiles.active=prod
	 -->
	<profiles>
	    <profile>
			<!--本地开发环境-->
			<id>dev</id>
			<properties>
				<profiles.active>dev</profiles.active>
			</properties>
	<!--自动触发profile的条件逻辑。Activation是profile的开启钥匙。profile的力量来自于它
   能够在某些特定的环境中自动使用某些特定的值;这些环境通过activation元素指定。activation元素并不是激活profile的唯一方式。-->
			<activation>
    		<!--profile默认是否激活的标志 ,  maven打包不指定profile参数时执行这个profile, true 执行这个profile-->
				<activeByDefault>true</activeByDefault>
			</activation>
		</profile>
		<profile>
			<!--SIT 测试环境-->
			<id>sit</id>
			<properties>
				<profiles.active>sit</profiles.active>
			</properties>
		</profile>
		<profile>
			<!--生产环境-->
			<id>prod</id>
			<properties>
				<profiles.active>prod</profiles.active>
			</properties>
		</profile>
	</profiles>

	<build>
		<!-- 指定打包后生成的文件名 -->
		<finalName>指定打包后生成的包名</finalName>

		<plugins>
			<plugin>
				<groupId>org.springframework.boot</groupId>
				<artifactId>spring-boot-maven-plugin</artifactId>
				<configuration>
					<source>${java.version}</source>
					<target>${java.version}</target>
				</configuration>
			</plugin>
		</plugins>
		<!-- 指定不同环境资源 -->
		<resources>
			<resource>
				<directory>src/main/resources</directory>
				<!-- 先排除不需要的配置 -->
				<excludes>
					<exclude>config/dev/*</exclude>
					<exclude>config/sit/*</exclude>
					<exclude>config/prod/*</exclude>
					<exclude>**/*.properties</exclude>
				</excludes>
			</resource>
			<resource>
				<directory>src/main/resources/config/${profiles.active}</directory>
			</resource>

		     <resource>
		         <directory>src/main/resources</directory>
		         <!-- 引入需要的已被排除的配置 -->
		         <includes>
		             <include>application-${profiles.active}.properties</include>
		             <include>application.properties</include><!-- 要用pom中的值替换到properties的变量@profiles.active@,需要指定包含的文件 -->
		         </includes>
		         <filtering>true</filtering>
		     </resource>

		     <resource>
				<directory>src/main/java</directory>
				<!-- 先排除不需要的配置 -->
				<excludes>
					<exclude>jsp/report/schedule/template/*</exclude>
				</excludes>
			</resource>
		     <resource>
		         <directory>src/main/java</directory>
		         <!-- 引入需要的已被排除的配置 -->
		         <includes>
		             <include>jsp/report/schedule/template/template-${profiles.active}</include>
		         </includes>
		         <filtering>true</filtering>
		     </resource>

		</resources>

	</build>


</project>
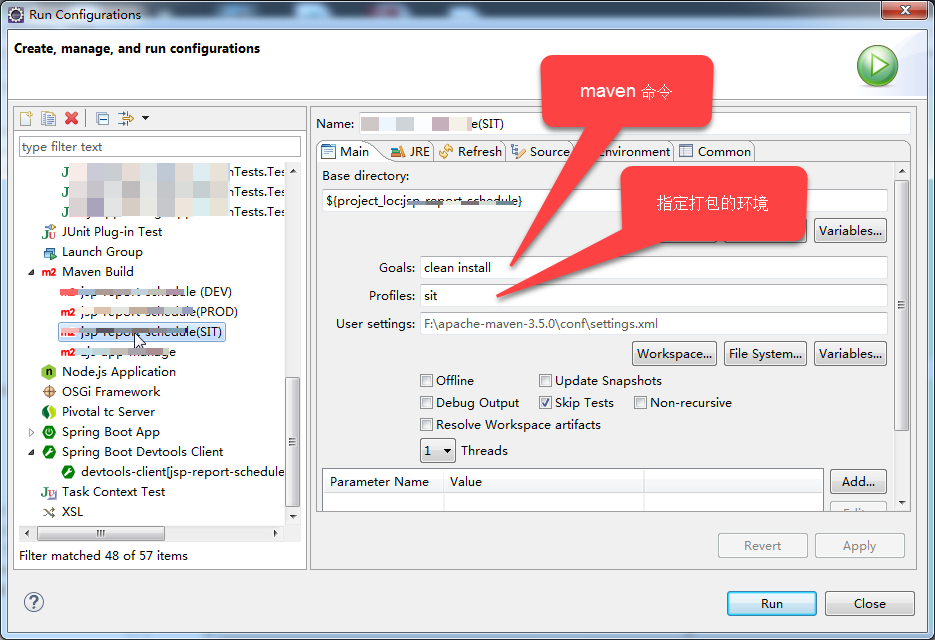
如果通过eclipse进行打包的话,只需要改两个地方,看下面的截图:

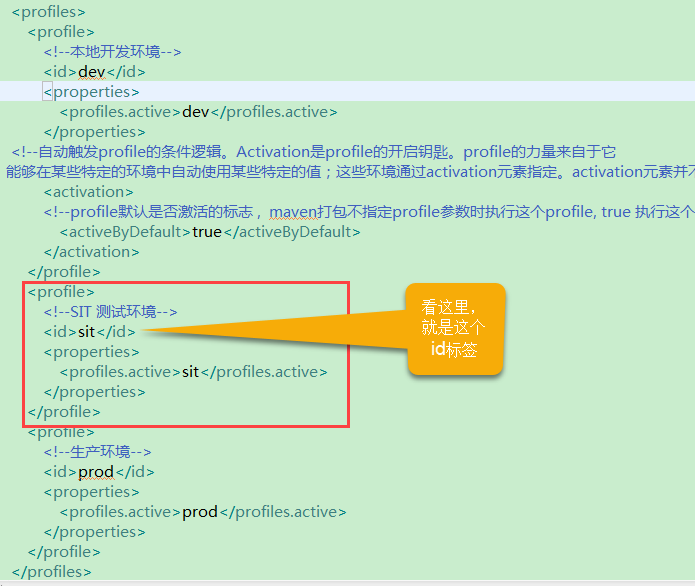
上图中的profiles的值sit对应pom文件中多文件配置profile下的子标签id,看下图

总结
至此这个maven的打包配置完成,其实springboot多环境打包的难点就是如何保留application.properties

最后
以上就是英勇紫菜最近收集整理的关于springboot项目利用maven进行多环境打包的全部内容,更多相关springboot项目利用maven进行多环境打包内容请搜索靠谱客的其他文章。


发表评论 取消回复