一、什么是Token
在Web领域基于Token的身份验证随处可见。在大多数使用Web API的互联网公司中,例如Facebook, Twitter, Google+, GitHub等。tokens 是多用户下处理认证的最佳方式。
以下几点特性会让你在程序中使用基于Token的身份验证
1.无状态、可扩展

 2.支持移动设备

 3.跨程序调用

 4.安全
二、Vue前后端分离项目中如何使用Token
1、第一次登录的时候,前端调后端的登陆接口,发送用户名和密码
2、后端收到请求,验证用户名和密码,验证成功,就给前端返回一个token
3、前端拿到token,将token存储到sessionStorage,并跳转路由页面
4、前端每次跳转路由,就判断 sessionStorage中有无 token ,没有就跳转到登录页面,有则跳转到对应路由页面
5、每次调后端接口,都要在请求头中加token
6、后端判断请求头中有无token,有token,就拿到token并验证token,验证成功就返回数据,验证失败则返回错误信息
7、如果前端拿到状态码为错误信息的状态码,就清除token信息并跳转到登录页面
三、代码
1.TokenUtil:Token工具类
package com.mall.util;

import com.auth0.jwt.JWT;
import com.auth0.jwt.JWTVerifier;
import com.auth0.jwt.algorithms.Algorithm;
import com.auth0.jwt.interfaces.DecodedJWT;

import java.util.Date;

/**
 * Token工具类
 * @author : Bei-Zhen
 * @date : 2020-12-26 8:58
 */
public class TokenUtil {

    /**
     * 有效时长
     */
    private static final long EXPIRE_TIME = 24 * 60 * 60 * 1000;
    /**
     * 密钥
     */
    private static final String TOKEN_SECRET = "ben";

    /**
     * 签名生成
     * @param username
     * @return
     */
    public static String sign(String username){
        String token = null;
        try {
            Date expiresAt = new Date(System.currentTimeMillis() + EXPIRE_TIME);
            token = JWT.create()
                    .withIssuer("auth0")
                    .withClaim("username",username)
                    .withExpiresAt(expiresAt)
                    //使用HMAC256算法加密
                    .sign(Algorithm.HMAC256(TOKEN_SECRET));
        } catch (Exception e){
            e.printStackTrace();
        }
        return token;
    }

    public static boolean verify(String token){
        try {
            JWTVerifier verifier = JWT.require(Algorithm.HMAC256((TOKEN_SECRET)))
                    .withIssuer("auth0").build();
            DecodedJWT jwt = verifier.verify(token);
            System.out.println("认证通过");
            System.out.println("username" +jwt.getClaim("username").asString());
            System.out.println("过期时间:" + jwt.getExpiresAt());
            return true;
        } catch (Exception e){
            return false;
        }
    }
}
2.TokenInterceptor:Token拦截器
package com.mall.controller.interceptor;

import com.mall.util.TokenUtil;
import org.springframework.web.servlet.HandlerInterceptor;

import javax.servlet.http.HttpServletRequest;
import javax.servlet.http.HttpServletResponse;

/**
 * Token拦截器
 * @author : Bei-Zhen
 * @date : 2020-12-26 9:27
 */
public class TokenInterceptor implements HandlerInterceptor {


    @Override
    public boolean preHandle(HttpServletRequest request, HttpServletResponse response, Object handler) throws Exception {
        String url = request.getRequestURI();
        System.out.println(url);
        if(!url.endsWith("user/login")){
            //从http请求头中取出token
            String token = request.getHeader("Authorization");
            System.out.println(token);
            //执行认证
            if(TokenUtil.verify(token)){
                return true;
            } else {
                return false;
            }
        }
        return true;
    }
}
3.登录控制层
package com.mall.controller;

import com.mall.domain.User;
import com.mall.service.impl.UserServiceImpl;
import com.mall.util.TokenUtil;
import org.springframework.beans.factory.annotation.Autowired;
import org.springframework.stereotype.Controller;
import org.springframework.web.bind.annotation.RequestBody;
import org.springframework.web.bind.annotation.RequestMapping;
import org.springframework.web.bind.annotation.ResponseBody;

import java.util.HashMap;
import java.util.Map;

/**
 * @author: Bei-Zhen
 * @date: 2020-12-25 11:51
 * @description: 用户web层
 */
@Controller
@RequestMapping("/user")
public class UserController {

    @Autowired
    private UserServiceImpl userService;


    /**
     * 测试
     * @param loginUser
     * @return
     */
    @RequestMapping("/login")
    public  @ResponseBody
    Map<String,Object> login(@RequestBody User loginUser) {
        Map<String,Object> loginMap = new HashMap<>();
        Map<String,Object> dataMap = new HashMap<>();
        String token = TokenUtil.sign(loginUser.getUsername());
        dataMap.put("token",token);
        loginMap.put("data",dataMap);
        Map<String,Object> metaMap = new HashMap<>();
        User user = userService.login(loginUser);
        if(user != null){
            metaMap.put("msg","登录成功");
            metaMap.put("status",200);
        } else {
            metaMap.put("msg","登录失败");
            metaMap.put("status",0);
        }
        loginMap.put("meta",metaMap);
        return  loginMap;
    }

}
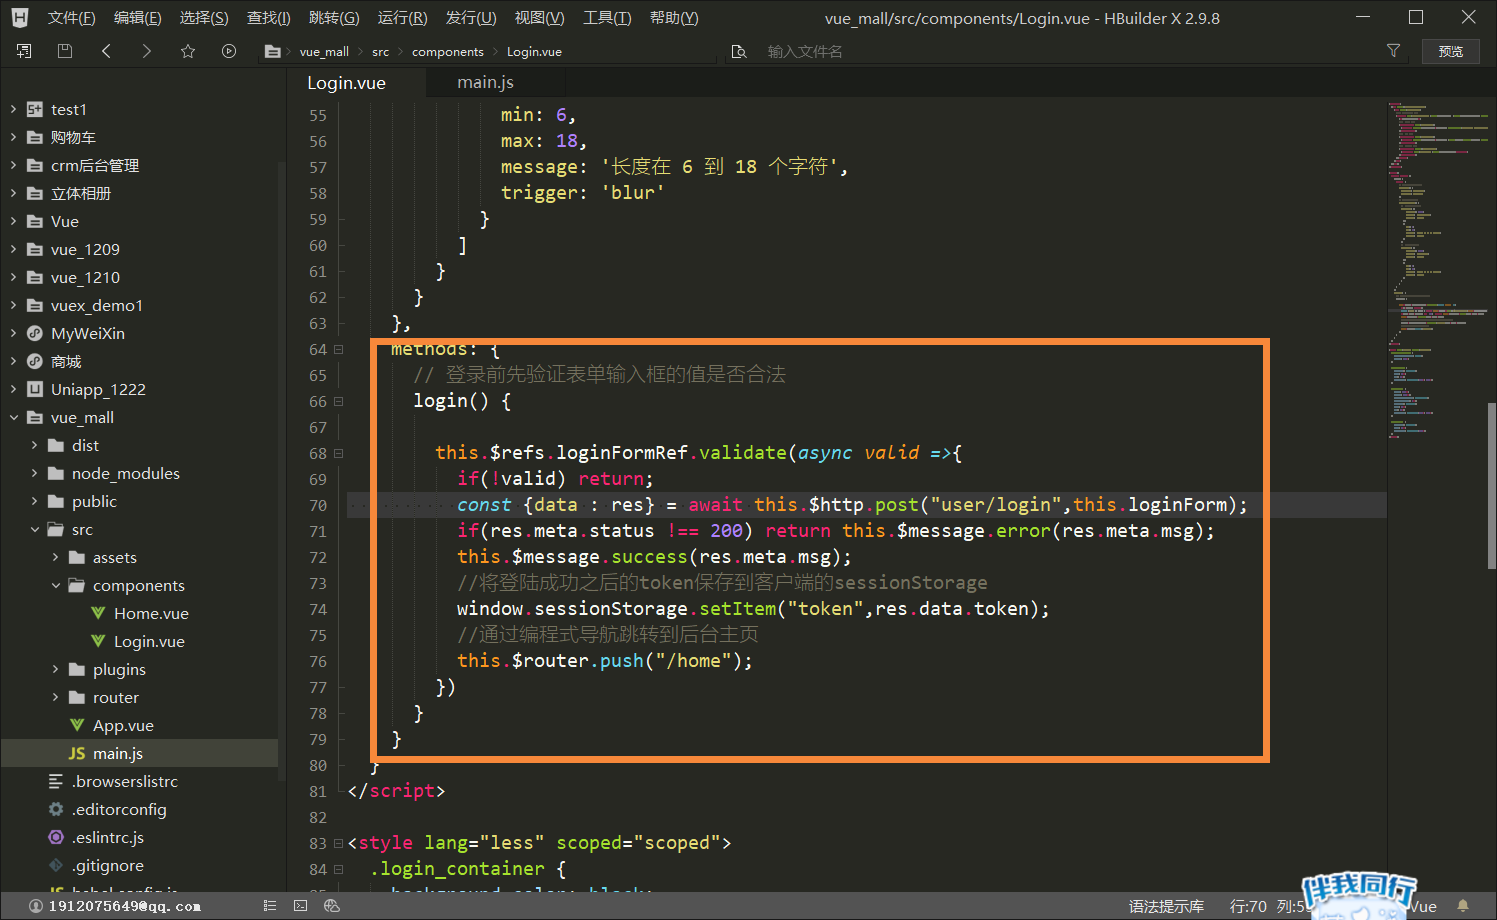
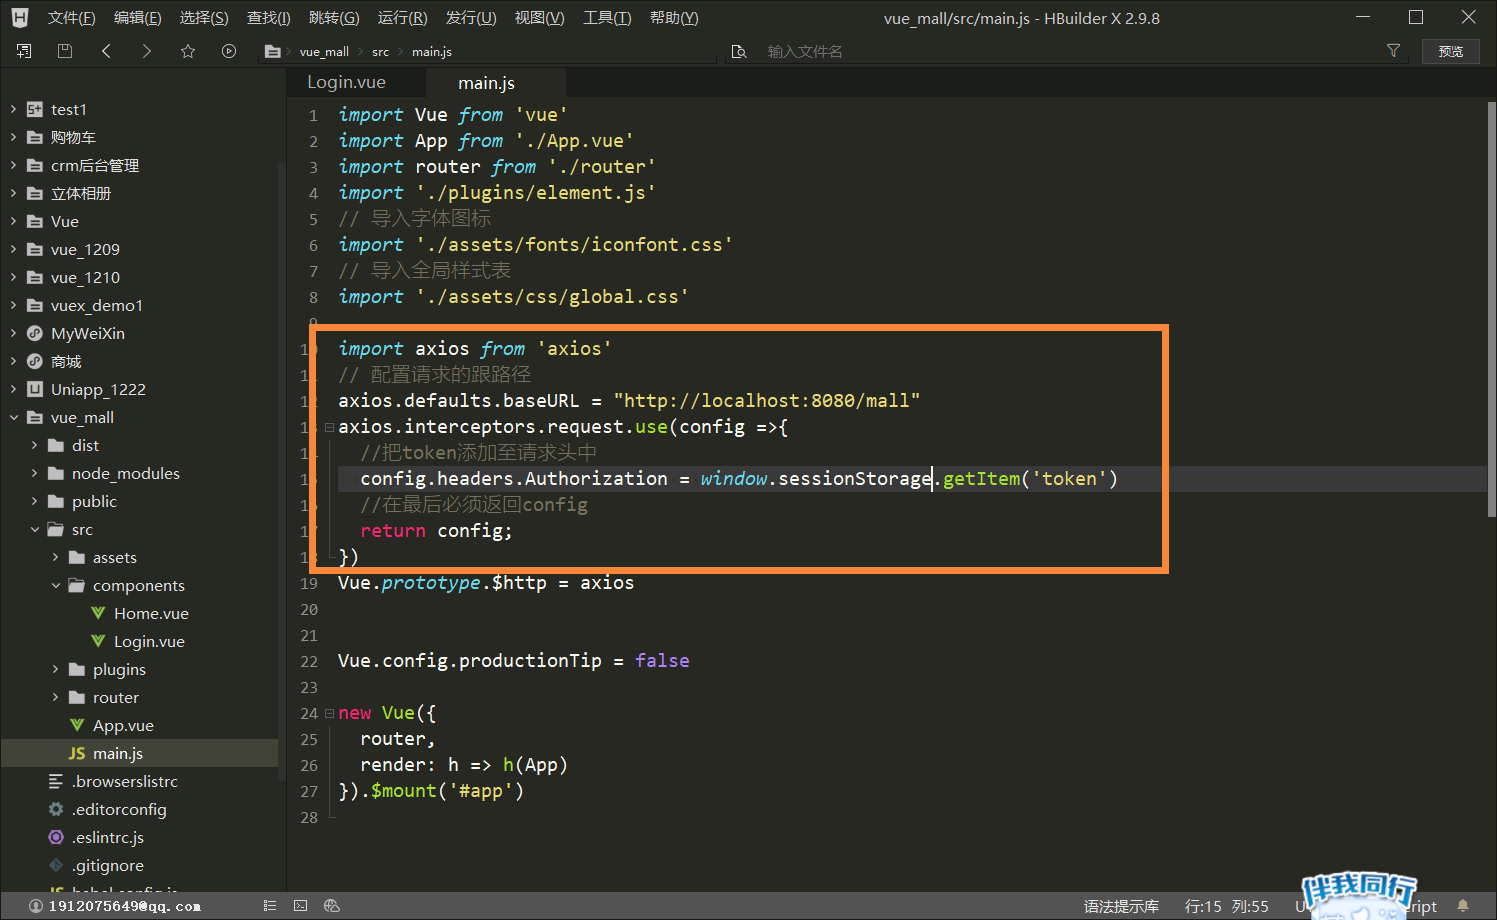
4.前端代码
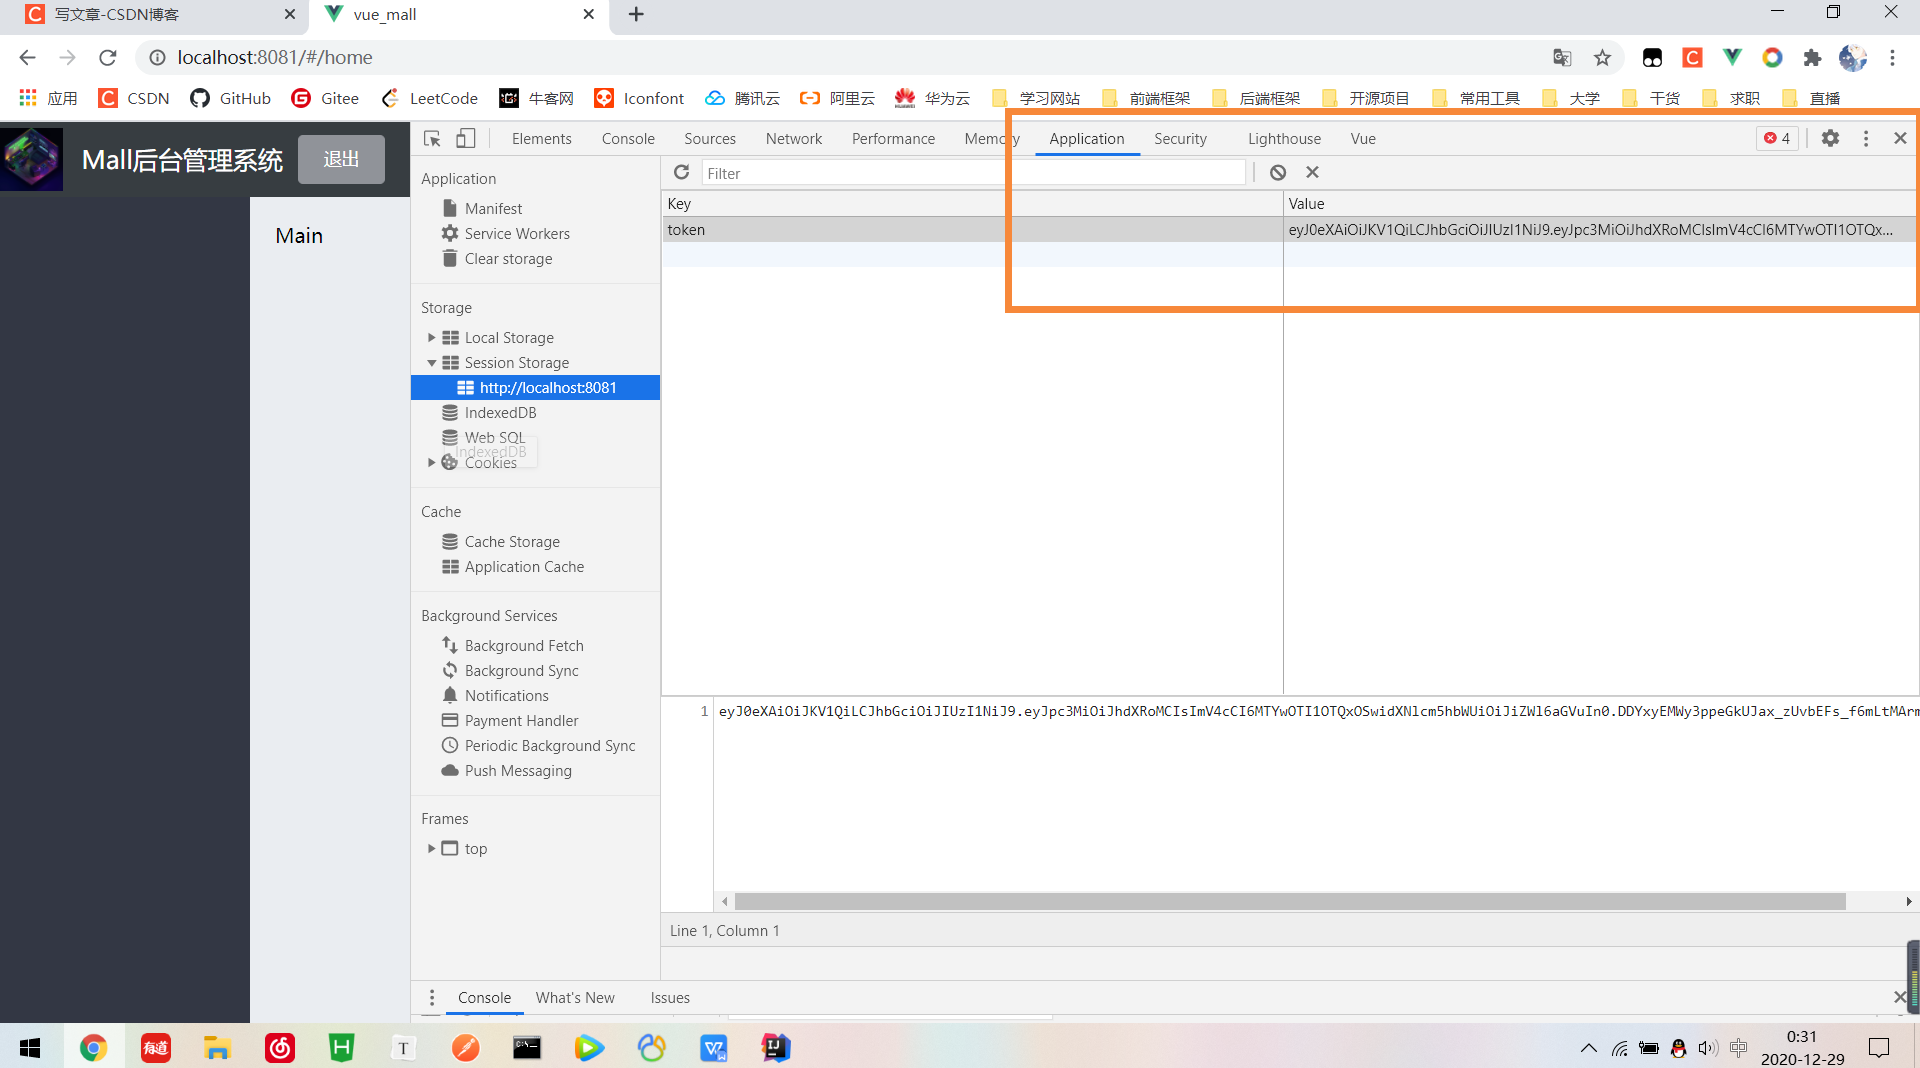
四、运行效果
前端的token值
后端的认证

最后
以上就是有魅力战斗机最近收集整理的关于SSM——Spring MVC Vue token的生成和校检(三)的全部内容,更多相关SSM——Spring内容请搜索靠谱客的其他文章。
本图文内容来源于网友提供,作为学习参考使用,或来自网络收集整理,版权属于原作者所有。


发表评论 取消回复