1,技术介绍
(1)
AVFoundation.framework
框架提供了
AVCaptureSession
类。使用它可以实现视频捕获功能。
(2)使用
AVCaptureVideoPreviewLayer 可以将摄像头拍摄的画面实时显示在
ViewController 上。
(3)对于捕获到的视频,我们使用 AVCaptureMovieFileOutput 将其输出到文件中。
2,下面实现一个录像功能
(3)对于捕获到的视频,我们使用 AVCaptureMovieFileOutput 将其输出到文件中。
2,下面实现一个录像功能
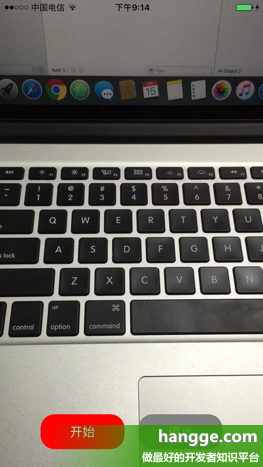
(1)点击“开始”按钮,开始录制视频。默认先保存到
Documents 目录下,命名为
temp.mp4。
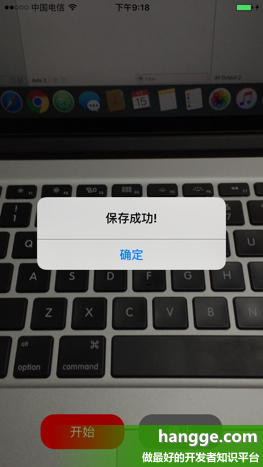
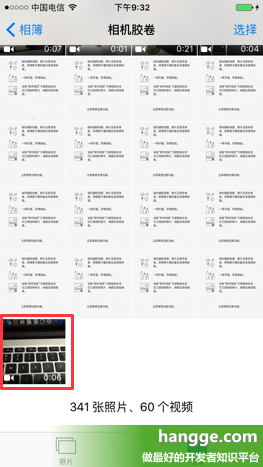
(2)点击“停止”按钮,停止视频录制。将录制好的录像再转存到系统照片库中。
3,效果图如下:


4,样例代码
|
1
2
3
4
5
6
7
8
9
10
11
12
13
14
15
16
17
18
19
20
21
22
23
24
25
26
27
28
29
30
31
32
33
34
35
36
37
38
39
40
41
42
43
44
45
46
47
48
49
50
51
52
53
54
55
56
57
58
59
60
61
62
63
64
65
66
67
68
69
70
71
72
73
74
75
76
77
78
79
80
81
82
83
84
85
86
87
88
89
90
91
92
93
94
95
96
97
98
99
100
101
102
103
104
105
106
107
108
109
110
111
112
113
114
115
116
117
118
119
120
121
122
123
124
125
126
127
128
129
130
131
132
133
134
135
136
137
138
139
140
141
142
143
144
145
|
import
UIKit
import
AVFoundation
import
Photos
class
ViewController
:
UIViewController
,
AVCaptureFileOutputRecordingDelegate
{
//视频捕获会话。它是input和output的桥梁。它协调着intput到output的数据传输
let
captureSession =
AVCaptureSession
()
//视频输入设备
let
videoDevice =
AVCaptureDevice
.defaultDeviceWithMediaType(
AVMediaTypeVideo
)
//音频输入设备
let
audioDevice =
AVCaptureDevice
.defaultDeviceWithMediaType(
AVMediaTypeAudio
)
//将捕获到的视频输出到文件
let
fileOutput =
AVCaptureMovieFileOutput
()
//开始、停止按钮
var
startButton, stopButton :
UIButton
!
//表示当时是否在录像中
var
isRecording =
false
override
func
viewDidLoad() {
super
.viewDidLoad()
//添加视频、音频输入设备
let
videoInput = try!
AVCaptureDeviceInput
(device:
self
.videoDevice)
self
.captureSession.addInput(videoInput)
let
audioInput = try!
AVCaptureDeviceInput
(device:
self
.audioDevice)
self
.captureSession.addInput(audioInput);
//添加视频捕获输出
self
.captureSession.addOutput(
self
.fileOutput)
//使用AVCaptureVideoPreviewLayer可以将摄像头的拍摄的实时画面显示在ViewController上
let
videoLayer =
AVCaptureVideoPreviewLayer
(session:
self
.captureSession)
videoLayer.frame =
self
.view.bounds
videoLayer.videoGravity =
AVLayerVideoGravityResizeAspectFill
self
.view.layer.addSublayer(videoLayer)
//创建按钮
self
.setupButton()
//启动session会话
self
.captureSession.startRunning()
}
//创建按钮
func
setupButton(){
//创建开始按钮
self
.startButton =
UIButton
(frame:
CGRectMake
(0,0,120,50))
self
.startButton.backgroundColor =
UIColor
.redColor();
self
.startButton.layer.masksToBounds =
true
self
.startButton.setTitle(
"开始"
, forState: .
Normal
)
self
.startButton.layer.cornerRadius = 20.0
self
.startButton.layer.position =
CGPoint
(x:
self
.view.bounds.width/2 - 70,
y:
self
.view.bounds.height-50)
self
.startButton.addTarget(
self
, action: #selector(onClickStartButton(_:)),
forControlEvents: .
TouchUpInside
)
//创建停止按钮
self
.stopButton =
UIButton
(frame:
CGRectMake
(0,0,120,50))
self
.stopButton.backgroundColor =
UIColor
.grayColor();
self
.stopButton.layer.masksToBounds =
true
self
.stopButton.setTitle(
"停止"
, forState: .
Normal
)
self
.stopButton.layer.cornerRadius = 20.0
self
.stopButton.layer.position =
CGPoint
(x:
self
.view.bounds.width/2 + 70,
y:
self
.view.bounds.height-50)
self
.stopButton.addTarget(
self
, action: #selector(onClickStopButton(_:)),
forControlEvents: .
TouchUpInside
)
//添加按钮到视图上
self
.view.addSubview(
self
.startButton);
self
.view.addSubview(
self
.stopButton);
}
//开始按钮点击,开始录像
func
onClickStartButton(sender:
UIButton
){
if
!
self
.isRecording {
//设置录像的保存地址(在Documents目录下,名为temp.mp4)
let
paths =
NSSearchPathForDirectoriesInDomains
(.
DocumentDirectory
,
.
UserDomainMask
,
true
)
let
documentsDirectory = paths[0]
as
String
let
filePath :
String
? =
"(documentsDirectory)/temp.mp4"
let
fileURL :
NSURL
=
NSURL
(fileURLWithPath: filePath!)
//启动视频编码输出
fileOutput.startRecordingToOutputFileURL(fileURL, recordingDelegate:
self
)
//记录状态:录像中...
self
.isRecording =
true
//开始、结束按钮颜色改变
self
.changeButtonColor(
self
.startButton, color:
UIColor
.grayColor())
self
.changeButtonColor(
self
.stopButton, color:
UIColor
.redColor())
}
}
//停止按钮点击,停止录像
func
onClickStopButton(sender:
UIButton
){
if
self
.isRecording {
//停止视频编码输出
fileOutput.stopRecording()
//记录状态:录像结束
self
.isRecording =
false
//开始、结束按钮颜色改变
self
.changeButtonColor(
self
.startButton, color:
UIColor
.redColor())
self
.changeButtonColor(
self
.stopButton, color:
UIColor
.grayColor())
}
}
//修改按钮的颜色
func
changeButtonColor(target:
UIButton
, color:
UIColor
){
target.backgroundColor = color
}
//录像开始的代理方法
func
captureOutput(captureOutput:
AVCaptureFileOutput
!,
didStartRecordingToOutputFileAtURL fileURL:
NSURL
!,
fromConnections connections: [
AnyObject
]!) {
}
//录像结束的代理方法
func
captureOutput(captureOutput:
AVCaptureFileOutput
!,
didFinishRecordingToOutputFileAtURL outputFileURL:
NSURL
!,
fromConnections connections: [
AnyObject
]!, error:
NSError
!) {
var
message:
String
!
//将录制好的录像保存到照片库中
PHPhotoLibrary
.sharedPhotoLibrary().performChanges({
PHAssetChangeRequest
.creationRequestForAssetFromVideoAtFileURL(outputFileURL)
}, completionHandler: { (isSuccess:
Bool
, error:
NSError
?)
in
if
isSuccess {
message =
"保存成功!"
}
else
{
message =
"保存失败:(error!.localizedDescription)"
}
dispatch_async(dispatch_get_main_queue(), {
//弹出提示框
let
alertController =
UIAlertController
(title: message,
message:
nil
, preferredStyle: .
Alert
)
let
cancelAction =
UIAlertAction
(title:
"确定"
, style: .
Cancel
, handler:
nil
)
alertController.addAction(cancelAction)
self
.presentViewController(alertController, animated:
true
, completion:
nil
)
})
})
}
}
|
原文出自: www.hangge.com 转载请保留原文链接: http://www.hangge.com/blog/cache/detail_1184.html
最后
以上就是称心咖啡最近收集整理的关于Swift - 视频录制教程1(调用摄像头录像,并保存到系统相册)的全部内容,更多相关Swift内容请搜索靠谱客的其他文章。
本图文内容来源于网友提供,作为学习参考使用,或来自网络收集整理,版权属于原作者所有。


![闪光灯使用时崩溃[AVCaptureDevice setTorchMode:]](https://file2.kaopuke.com:8081/files_image/reation/bcimg13.png)

发表评论 取消回复