Grunt和 Grunt 插件是通过 npm 安装并管理的,npm是 Node.js 的包管理器。
Grunt 0.4.x 必须配合Node.js >= 0.8.0版本使用。;奇数版本号的 Node.js 被认为是不稳定的开发版。
在安装 Grunt 前,请确保当前环境中所安装的 npm 已经是最新版本,执行 npm update -g npm 指令进行升级(在某些系统中可能需要 sudo 指令)。
安装:grunt-cli
npm install -g grunt-cli

在使用Grunt时,请先看看官网,先创建两个文件
package.json:配制插件,等其他参数
{
    "name": "WebApp",
    "version": "0.1.0",//这个请注意格式,防止出现'0.1’,'1',这些值会出现莫名错误
    "repository": {
        "type": "git",
        "url": "git://github.com/gruntjs/grunt.git"
    },
    "devDependencies": {
        "grunt": "~0.4.5",
        "grunt-contrib-clean": "~0.6.0",
        "grunt-contrib-coffee": "~0.12.0",
        "grunt-contrib-compass": "~1.0.3",
        "grunt-contrib-concat": "~0.5.1",
        "grunt-contrib-cssmin": "~0.12.2",
        "grunt-contrib-csslint": "~0.4.0",
        "grunt-contrib-htmlmin": "~0.4.0",
        "grunt-contrib-imagemin": "~0.9.4",
        "grunt-contrib-uglify": "~0.9.1",
        "grunt-contrib-jshint": "~0.11.2",
        "grunt-contrib-watch": "~0.6.1",
        "grunt-contrib-requirejs": "~0.4.4",
        "grunt-usemin": "~3.0.0",
        "grunt-filerev": "~2.3.1",
        "grunt-contrib-copy": "~0.8.0"
    }
}
Gruntfile.js:自定义任务
module.exports = function (grunt) {
    grunt.initConfig({
        pkg: grunt.file.readJSON('package.json'),
        useminPrepare: {
            html: 'app/index.html'
        },
        concat: {
            js: {
                dest: 'tmp/concat/app.js',
                src: [
                  'app/js/app.js',
                  'app/js/index.js',
                  'app/js/thing-model.js',
                  'app/js/thing-view.js'
                ]
            }
        },
        uglify: {
            js: {
                dest: 'tmp/uglify/app.js',
                src: ['tmp/concat/app.js']
            }
        },
        filerev: {
            js: {
                dest: 'filerev/js',
                src: ['app/js/*.js', 'tmp/uglify/*.js']
            },
            scc: {
                dest: 'filerev/css',
                src: ['app/css/*.css']
            }
        },
        usemin: {
            html: 'app/index.html',
            options: {
                assetsDirs: ['tmp/uglify', '']//这个值请注意,当执行时不能正常替换静态资源引用时,就是他在作怪
            }
        }
    });
    grunt.loadNpmTasks('grunt-contrib-copy');//注册插件,必需
    grunt.loadNpmTasks('grunt-contrib-concat');
    grunt.loadNpmTasks('grunt-contrib-uglify');
    grunt.loadNpmTasks('grunt-contrib-cssmin');
    grunt.loadNpmTasks('grunt-filerev');
    grunt.loadNpmTasks('grunt-usemin');
    grunt.loadNpmTasks('grunt-contrib-clean');
//默认任务顺序
    grunt.registerTask('default', [
        'useminPrepare',
        'concat',
        'uglify',
        'filerev',
        'usemin'
    ]);
};
配制成功后cmd进入你的项目根目录下
npm install
安装插件,时间很长点
然在根目录下执行
grunt
执行默认任务
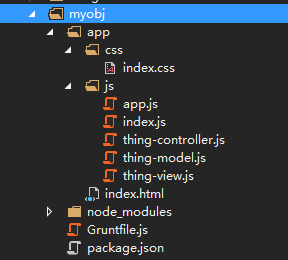
demo:
目录:
<!DOCTYPE html>
<html>
<head>
    <meta content="width =device-width, initial-scale=1.0, maximum-scale=1.0, user-scalable=no" name="viewport" />
    <title>Title</title>
    <!-- build:js /tmp/uglify/app.js-->
    <script src="/app/js/app.js"></script>
    <script src="/app/js/index.js"></script>
    <script src="/app/js/thing-model.js"></script>
    <script src="/app/js/thing-view.js"></script>
    <!-- endbuild -->
    <script src="/app/js/app.js"></script>
    <script src="/app/js/index.js"></script>
    <script src="/app/js/thing-model.js"></script>
    <script src="/app/js/thing-view.js"></script>
    <link href="/app/css/index.css" rel="stylesheet" />
</head>
<body>
    <!--{"app\js\app.js":"filerev\js\app.bc7ed700.js",
    "app\js\index.js":"filerev\js\index.7f1f0127.js",
    "app\js\thing-controller.js":"filerev\js\thing-controller.7f1f0127.js",
    "app\js\thing-model.js":"filerev\js\thing-model.a74d0e62.js",
    "app\js\thing-view.js":"filerev\js\thing-view.d80fca0d.js"}-->
    <p>this is a grunt usemin</p>
    <img src="image.png" />
</body>
</html>
body中的注释内容为
grunt-filerev插件的map,grunt-usemin就是使用他来替换引用

替换引用后得:
<!DOCTYPE html>
<html>
<head>
    <meta content="width =device-width, initial-scale=1.0, maximum-scale=1.0, user-scalable=no" name="viewport" />
    <title>Title</title>
    <script src="/tmp/uglify/app.6bdcf715.js"></script>
    <script src="/app/js/app.bc7ed700.js"></script>
    <script src="/app/js/index.7f1f0127.js"></script>
    <script src="/app/js/thing-model.a74d0e62.js"></script>
    <script src="/app/js/thing-view.d80fca0d.js"></script>
    <link href="/app/css/index.704e3ff7.css" rel="stylesheet" />
</head>
<body>
    <!--{"app\js\app.js":"filerev\js\app.bc7ed700.js",
    "app\js\index.js":"filerev\js\index.7f1f0127.js",
    "app\js\thing-controller.js":"filerev\js\thing-controller.7f1f0127.js",
    "app\js\thing-model.js":"filerev\js\thing-model.a74d0e62.js",
    "app\js\thing-view.js":"filerev\js\thing-view.d80fca0d.js"}-->
    <p>this is a grunt usemin</p>
    <img src="image.png" />
</body>
</html>
以上就是我现在,还在摸索的grunt,后面慢慢研究研究!希望有一天能用上他
转载于:https://www.cnblogs.com/yc-code/p/4469578.html
最后
以上就是悲凉星星最近收集整理的关于Grunt——前端自动化构建工具的全部内容,更多相关Grunt——前端自动化构建工具内容请搜索靠谱客的其他文章。
本图文内容来源于网友提供,作为学习参考使用,或来自网络收集整理,版权属于原作者所有。


发表评论 取消回复