解析vue中的build.js文件
'use strict'
require('./check-versions')()

process.env.NODE_ENV = 'production'
//显示进度条
const ora = require('ora')
//用于删除文件夹,node自身不能读取或删除文件夹
const rm = require('rimraf')
//操作路径
const path = require('path')
//改变打印的字体颜色
const chalk = require('chalk')
const webpack = require('webpack')
//参数配置
const config = require('../config')
//打包配置
const webpackConfig = require('./webpack.prod.conf')

const spinner = ora('building for production...')
//开启进度条
spinner.start()
//删除掉dist目录
rm(path.join(config.build.assetsRoot, config.build.assetsSubDirectory), err => {
  if (err) throw err
  //webpack本质来说就是一个方法
  webpack(webpackConfig, (err, stats) => {
    //关闭进度条
    spinner.stop()
    if (err) throw err
    //向线程内写入提示
    process.stdout.write(stats.toString({
      colors: true,
      modules: false,
      children: false, // If you are using ts-loader, setting this to true will make TypeScript errors show up during build.
      chunks: false,
      chunkModules: false
    }) + 'nn')

    if (stats.hasErrors()) {
      console.log(chalk.red('  Build failed with errors.n'))
      process.exit(1)
    }

    console.log(chalk.cyan('  Build complete.n'))
    console.log(chalk.yellow(
      '  Tip: built files are meant to be served over an HTTP server.n' +
      '  Opening index.html over file:// won't work.n'
    ))
  })
})
构建工具常用包
commander
定义命令,解析命令
const commander = require('commander');
//定义版本号
commander.version('1.1','-v --version');
//自定义指令
commander.option('-asd -fds','sdfhjdsf');
//初始化命令
commander.command('init <name>').action(()=>{
    //相关处理语句
})
ora
显示进度条
const ora = require('ora');
const spinner = ora('hello ora').start();//启动,显示对应的文字
spinner.color = "red";//改变转圈的颜色
setTimeout(()=>{
    spinner.stop();//关闭
},2000)

chalk
改变打印文字的颜色,凡是文字都可以去处理
const chalk = require('chalk');
console.log(chalk.rgb(255,255,255).bgRgb(255,0,0)('hello chalk'));//改变字体颜色和背景色

inquirer
与用户进行交互,提出一些问题供用户选择
项目脚手架做了什么
- 下载项目初始化模板
- 定义项目规则
- 定义项目操作命令
脚手架工作流程

自定义脚手架
-
创建文件夹,npm init,生成package.json文件
-
安装我们需要用到的模块
npm install node commander inquirer ora --save -dev -
修改package.json文件,加入下面指令
“bin”: {
“my-cli1”:"./build.js" //自己的构建文件
} -
自定义的my-cli因为没有发布进行全局安装,命令行无法直接访问,使用npm link链接到本地
报下面问题
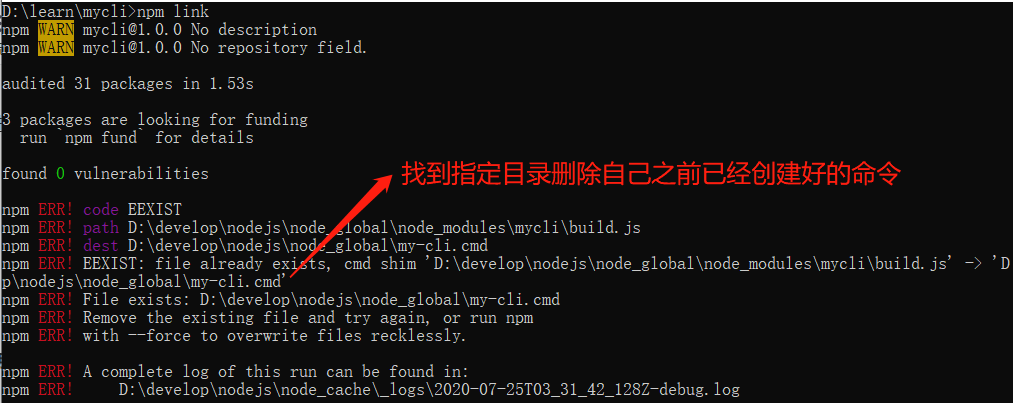
-
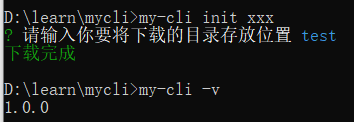
在命令行内输入my-cli
当前build.js没有执行环境,则会报下面错误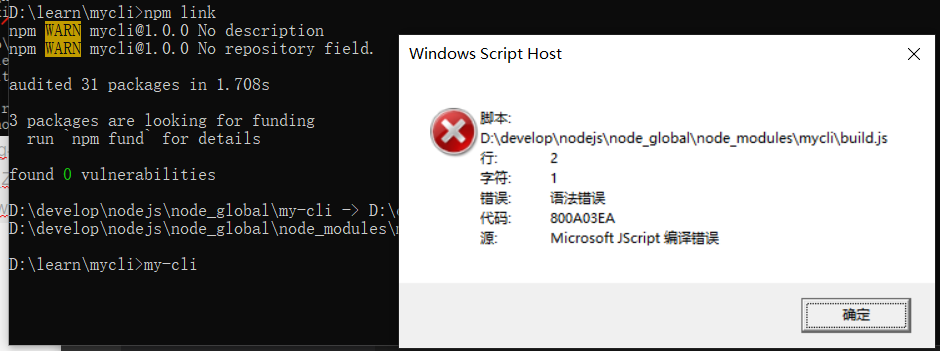
解决办法,在build.js内部指定当前环境为node环境,node可以直接执行js文件
在js文件第一行加入下面语句
#!/usr/bin/env node -
构建文件(build.js)内部编写相关指令
#!/usr/bin/env node
const commander = require('commander');
const inquirer = require('inquirer');//与用户交互
commander.version('1.0.0','-v -version');//定义版本
commander.command('init <name>').action(()=>{
    inquirer.prompt([//这儿是个数组,有几个问题,建几个对象即可
        {
            type: 'input',
            name: 'author',
            message: '请输入你要将下载的目录存放位置'
        }
    ]).then((answer)=>{
        //进行模板下载操作
        require('./bin')(answer.author);
    })
})
//获取额外输入
commander.parse(process.argv);
- 创建bin/index.js,编写模板下载逻辑
/**
 * node不能读取整个文件夹
 * 这块采用数据驱动的思维,将文件夹转为一个二维数组的形式,然后去创建我们想要的目录
 * [
 *  ['dir','./src'],
 *  ['files','./app.js'],
 *  ['dir','./src/router']
 * ]
 */
const ora = require('ora');
const chalk = require('chalk');
const fs = require('fs');
const download = require('download-git-repo');
/**
 * 模板
 * 1、和脚手架放在一起
 * 2、模板放在git上
 * npm install download-git-repo
 * 通过download-git-repo(username/仓库名)进行下载
 */
function modelLoad(name){
	//账户名/仓库名
    download('zhangstar1331/my_vue_cli', 'test/tmp', function (err) {
        console.log(err ? 'Error' : 'Success')
    })
}
function modelLoad(name){
    //需要下载的目录地址

    let demoPath = "./project";
    //下载好的文件保存路径
    let targetPath = "./" + name;
    const spinner = ora('下载中').start();
    function down(arr){
        function finish(){
            spinner.stop();
            console.log(chalk.green("下载完成"));
        }
        while(arr.length>0){
            //每次创建完之后就移除一个,直到数组清空为止
            let item = arr.shift();
            if(item[0]=='file'){
                //读取文件内容
                let data = fs.readFileSync(item[1]);
                //写入文件内容
                fs.writeFileSync(targetPath+"/"+item[1].replace("./project","."),data)
            }else{
                //获取目录结构
                let path = targetPath+"/"+item[1].replace("./project",".");
                //创建文件夹
                fs.mkdirSync(path);
            }
        }
        finish();
    }
    function makearr(){
        let arr = [];
        function read(path){
            //同步读取文件夹,读取文件夹返回的是一个数组['./src','./app.js']
            let files = fs.readdirSync(path);
            files.forEach((item,index)=>{
                let nowpath = path + "/" +item;//'./project/src'
                let stat = fs.statSync(nowpath);
                //判断当前目录是否为文件夹
                if(stat.isDirectory()){
                    arr.push(['dir',nowpath]);
                    read(nowpath);//递归操作,进一步读取
                }else{
                    arr.push(['file',nowpath])
                }
            })
        }
        read(demoPath);
        return arr;
    }
    //存放路径设置
    fs.mkdir("./"+name,function(){
        down(makearr());
    })
}
module.exports=modelLoad;
- 执行my-cli命令
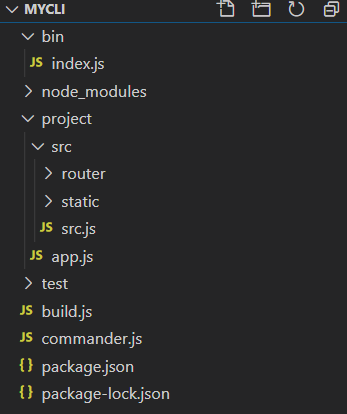
项目目录结构
思考
webpack4以后需要全局安装,那么命令行内直接用webpack打包和项目内建立webpack命令打包有什么区别呢?
命令行中直接用到的webpack是全局的,webpack版本不断更迭,不同项目中用到的版本不同。如果直接用全局进行打包,可能会有冲突。所以每个项目中都内嵌了一套webpack,用于自身项目的构建。
添加选项
https://www.npmjs.com/package/question
最后
以上就是冷傲手套最近收集整理的关于基于node构建前端脚手架工具的全部内容,更多相关基于node构建前端脚手架工具内容请搜索靠谱客的其他文章。


发表评论 取消回复