转载请标明地址https://blog.csdn.net/weixin_42068117/article/details/84379282
官方文档地址,一般按着安装就可以,但是偶尔会遇到问题。https://docs.gitlab.com/runner/install/
windows安装按照文档没什么问题。
作用:老版本需要有runner和服务。现在有runner安装就可以了。每当我们推送代码到gitlab上的时候,会触发任务,根据我们的配置由特定的runner去跑特定的任务,可以是测试,也可以是部署任务。具体工作原理我就不去复制了。
https://docs.gitlab.com/runner/install/linux-manually.html linux,centos 安装,腾讯云安装没有问题,但是阿里云遇到坑了。
一 安装
1 .下载
[user ~]$ uname -a
Linux wonalisvcstage 3.10.0-514.26.2.el7.x86_64 #1 SMP Tue Jul 4 15:04:05 UTC 2017 x86_64 x86_64 x86_64 GNU/Linux
根据版本选择安装命令。我是x86_64
# Linux x86-64
sudo wget -O /usr/local/bin/gitlab-runner https://gitlab-runner-downloads.s3.amazonaws.com/latest/binaries/gitlab-runner-linux-amd64 安装地址是 /usr/local/bin 此时的 gitlab-runner还不是可用命令。
![]()
此时的gitlab-runner应该是白色
2. 给予可执行权限
sudo chmod +x /usr/local/bin/gitlab-runner执行之后应该变成上图的绿色。
使用docker 需要执行 curl -sSL https://get.docker.com/ | sh
我这里不用,所有直接下一步。
3. 创建执行人和执行地址。
sudo useradd --comment 'GitLab Runner' --create-home gitlab-runner --shell /bin/bash我使用的是当前用户所有这一步我也不需要。如果你们是测试学习建议执行一下,使得工作不影响之前的资源。
4. 这一步算是真正的执行安装。
解释一下用户和工作地址
[zch@******* gitlab_runner_build]$ pwd
/home/zch/gitlab_runner_build
我的用户名是 zch ,我建立的工作地址是 /home/zch/gitlab_runner_build
 sudo gitlab-runner install --user=gitlab-runner --working-directory=/home/gitlab-runner
 sudo gitlab-runner start
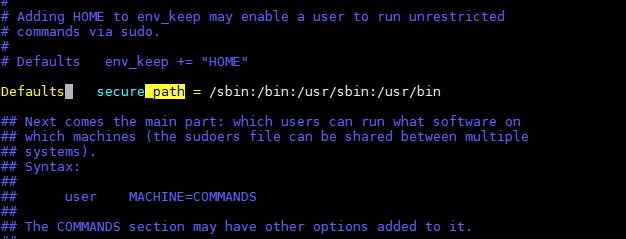
上面的命令是官方提供的安装命令,但是不是所有人都可以执行的。看一下sudoer的命令配置。

由于/usr/local/bin 不在目录中所以不可以使用sudo。
因为需要sudo权限所以需要拼全路径,或者修改配置文件,我执行的是下面命令。
sudo /usr/local/bin/gitlab-runner install --user=zch --working-directory=/home/zch/gitlab_runner_build
测试 start
[zch@*********bin]$  sudo /usr/local/bin/gitlab-runner start
[sudo] password for zch:
Runtime platform                                    arch=amd64 os=linux pid=9989 revision=3afdaba6 version=11.5.0
安装完成,之后是注册。
二. 注册
需要用户有gitlab项目的master权限,可以自己新建一个测试。

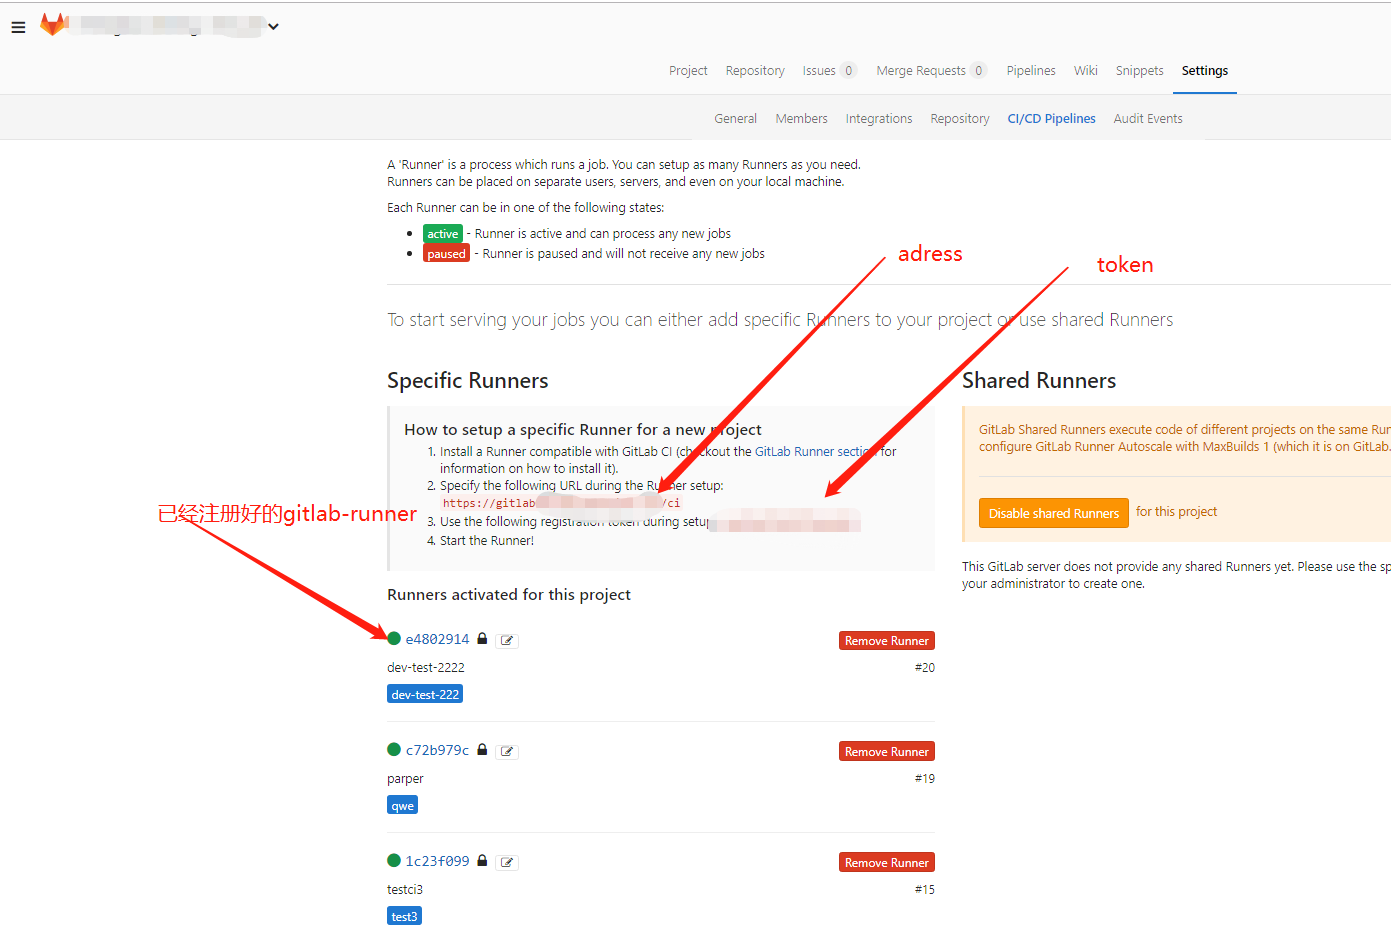
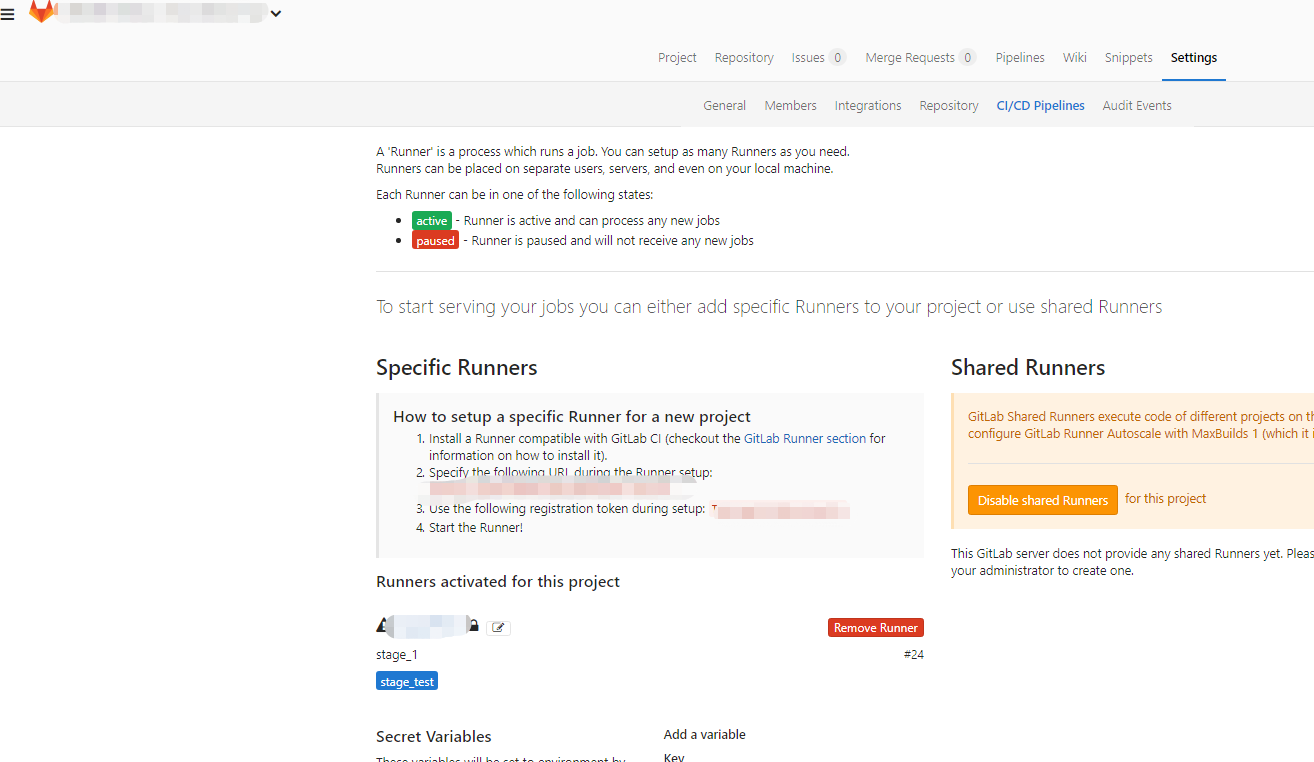
需要权限能看到这个页面,配置需要这里的registration token。我们也能在这个页面做一些配置。
[zch@******** bin]$  sudo /usr/local/bin/gitlab-runner register
Runtime platform                                    arch=amd64 os=linux pid=10283 revision=3afdaba6 version=11.5.0
Running in system-mode.

Please enter the gitlab-ci coordinator URL (e.g. https://gitlab.com/):
#上图adress#
Please enter the gitlab-ci token for this runner:
#上图token#
Please enter the gitlab-ci description for this runner:
[*******]: '随便添加描述'
Please enter the gitlab-ci tags for this runner (comma separated):
runner的标志名字(每个runner不一样即可)
Registering runner... succeeded                     runner=******
Please enter the executor: shell, virtualbox, kubernetes, docker, parallels, ssh, docker+machine, docker-ssh+machine, docker-ssh:
shell(我选择的执行方式,按项目要求来)
Runner registered successfully. Feel free to start it, but if it's running already the config should be automatically reloaded!
看一下注册列表有没有
[zch@********* bin]$  sudo /usr/local/bin/gitlab-runner list
Runtime platform                                    arch=amd64 os=linux pid=10393 revision=                                                                                                                         3afdaba6 version=11.5.0
Listing configured runners                          ConfigFile=/etc/gitlab-runner/config.to                                                                                                                         ml
stage_1                                             Executor=shell Token=******* URL=https://gitlab01.**********.com/
stage_1 是我的描述
注册出错的卸载:
gitlab-runner unregister --url http://gitlab.example.com/ --token t0k3n

注册完成,页面也能看到,启动后会变绿。
三. 设置触发,完成测试或部署任务。
stages:

 - test

 - deploy


testjob:

    stage: test

    script:
     - ls

    tags:

     - stage_test

    allow_failure: true

    only:
     - dev-zch
接下来写 .gitlab-ci.yml ,上面是参考。具体写法看官方文档。script后是执行的命令。 tags 指定执行runner. only指定触发时间
最后
以上就是等待宝马最近收集整理的关于gitlab-ci 自动部署 阿里云centos7 腾讯云 windows的全部内容,更多相关gitlab-ci内容请搜索靠谱客的其他文章。


发表评论 取消回复