介绍
在 Flutter 1.20, 官方推出了Hybrid Composition,此方法仿照ios端的platform view 在flutter中的显示方式,相较于原来的AndroidView性能要更好。
此文将分析Hybrid Composition 在绘制方面的工作流程。
在此之前建议先了解使用一下,具体使用方法,可点击下方链接:
官方使用文档
此文将会横跨 flutter、android和engine,我会尽量简要以缩短篇幅。

你可能还需要对surface有一定的了解。
我们就从Flutter侧开始吧。
Flutter
我们先来看一下Flutter 侧的代码:
PlatformViewLink(
                viewType: viewType,
                surfaceFactory: (ctx,PlatformViewController controller){
                  return AndroidViewSurface(
                    controller: controller,
                    gestureRecognizers: const <Factory<OneSequenceGestureRecognizer>>{},
                    hitTestBehavior: PlatformViewHitTestBehavior.opaque,
                  );
                },
                onCreatePlatformView: (PlatformViewCreationParams params){
                  return PlatformViewsService.initSurfaceAndroidView(id: params.id,
                      viewType: viewType,
                      layoutDirection: TextDirection.ltr,creationParams: creationParams,
                      creationParamsCodec: StandardMessageCodec())
                    ..addOnPlatformViewCreatedListener(params.onPlatformViewCreated)
                    ..create();
                },
              )
PlatformViewLink
其结构图如下:
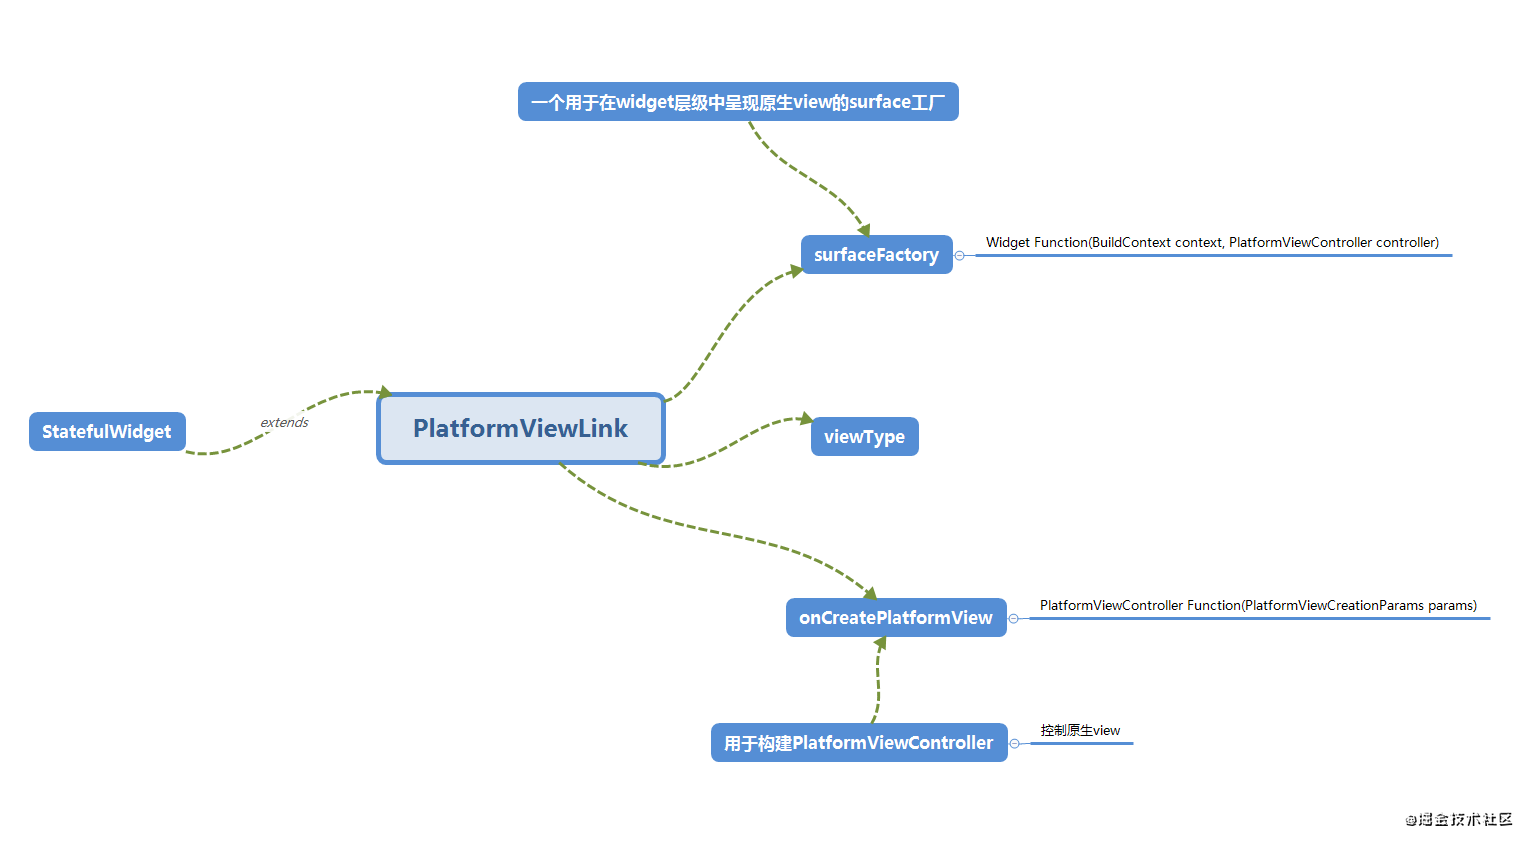
有用户定义一个viewType,并实现两个回调。 而其本身是statefulWidget,所以我们直接看它的state类。
_PlatformViewLinkState
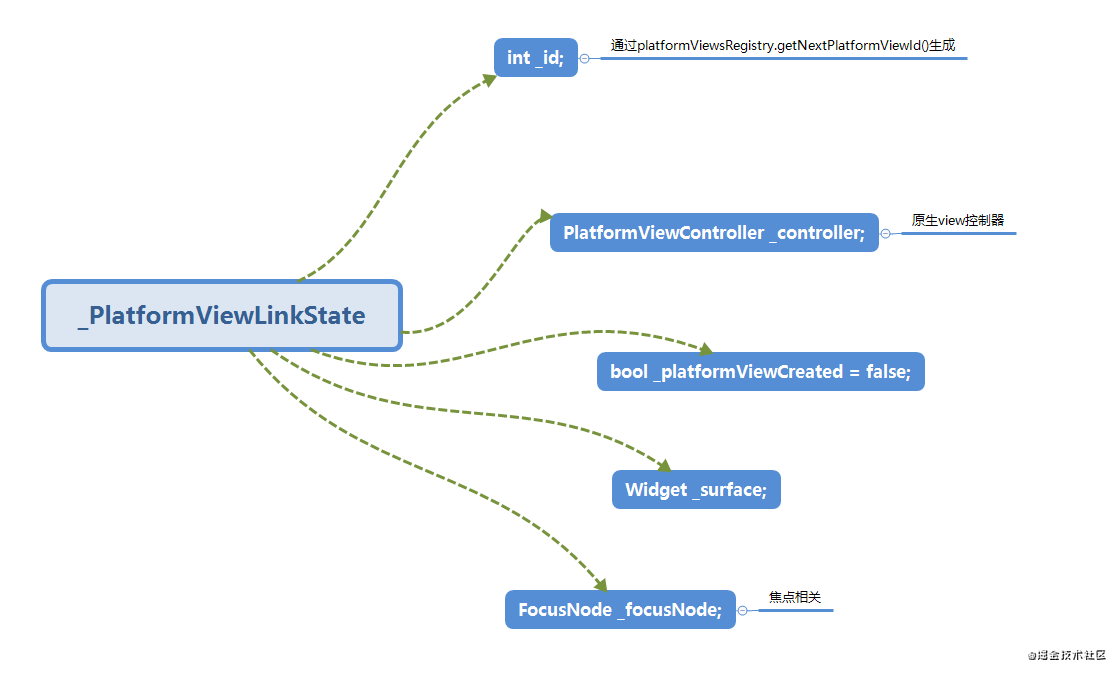
属性比较简单,两个比较重要的是:
_controller
_surface
我们从state的调用流程中,来了解一下这两个属性的创建。流程图如下:
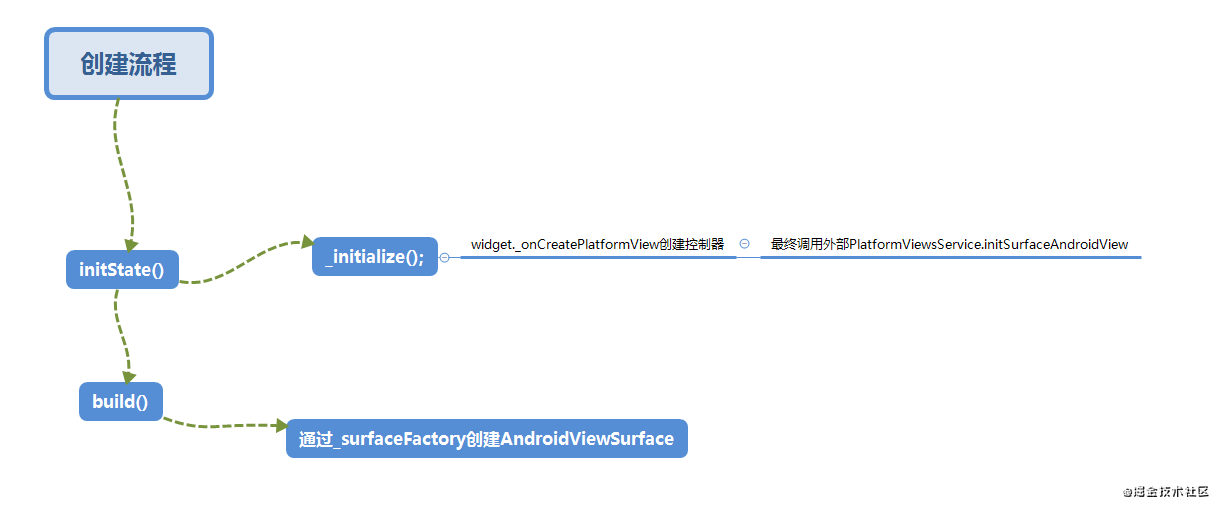
由上图可以看到,最先执行的时_initialize 这个方法:
  void _initialize() {
   _id = platformViewsRegistry.getNextPlatformViewId();
   _controller = widget._onCreatePlatformView(
     PlatformViewCreationParams._(
       id: _id,
       viewType: widget.viewType,
       onPlatformViewCreated: _onPlatformViewCreated,
       onFocusChanged: _handlePlatformFocusChanged,
     ),
   );
 }
此方法最终调用我们所实现的_onCreatePlatformView方法,实例化 PlatformViewController控制器。
一个接口,除了提供其所控制的原生viewId外,还分发指针事件
而在其后的build()方法中,我们调用所实现的_surfaceFactory方法,初始化了_surface:
  @override
  Widget build(BuildContext context) {
    if (!_platformViewCreated) {
      return const SizedBox.expand();
    }
    _surface ??= widget._surfaceFactory(context, _controller);
    return Focus(
      focusNode: _focusNode,
      onFocusChange: _handleFrameworkFocusChanged,
      child: _surface,
    );
  }
至此,我们所实现的两个方法:surfaceFactory和onCreatePlatformView均被调用了,我们调用按顺序看一下内部细节。
onCreatePlatformView()
                onCreatePlatformView: (PlatformViewCreationParams params){
                  return PlatformViewsService.initSurfaceAndroidView(id: params.id,
                      viewType: viewType,
                      layoutDirection: TextDirection.ltr,creationParams: creationParams,
                      creationParamsCodec: StandardMessageCodec())
                    ..addOnPlatformViewCreatedListener(params.onPlatformViewCreated)
                    //最终调用了一个create方法
                    ..create();
                },
这里我们通过initSurfaceAndroidView 创建了一个SurfaceAndroidViewController
  static SurfaceAndroidViewController initSurfaceAndroidView({
    @required int id,
    @required String viewType,
    @required TextDirection layoutDirection,
    dynamic creationParams,
    MessageCodec<dynamic> creationParamsCodec,
    VoidCallback onFocus,
  }) {
    assert(id != null);
    assert(viewType != null);
    assert(layoutDirection != null);
    assert(creationParams == null || creationParamsCodec != null);

    final SurfaceAndroidViewController controller = SurfaceAndroidViewController._(
      viewId: id,
      viewType: viewType,
      layoutDirection: layoutDirection,
      creationParams: creationParams,
      creationParamsCodec: creationParamsCodec,
    );

    _instance._focusCallbacks[id] = onFocus ?? () {};
    return controller;
  }
它的结构关系图如下:
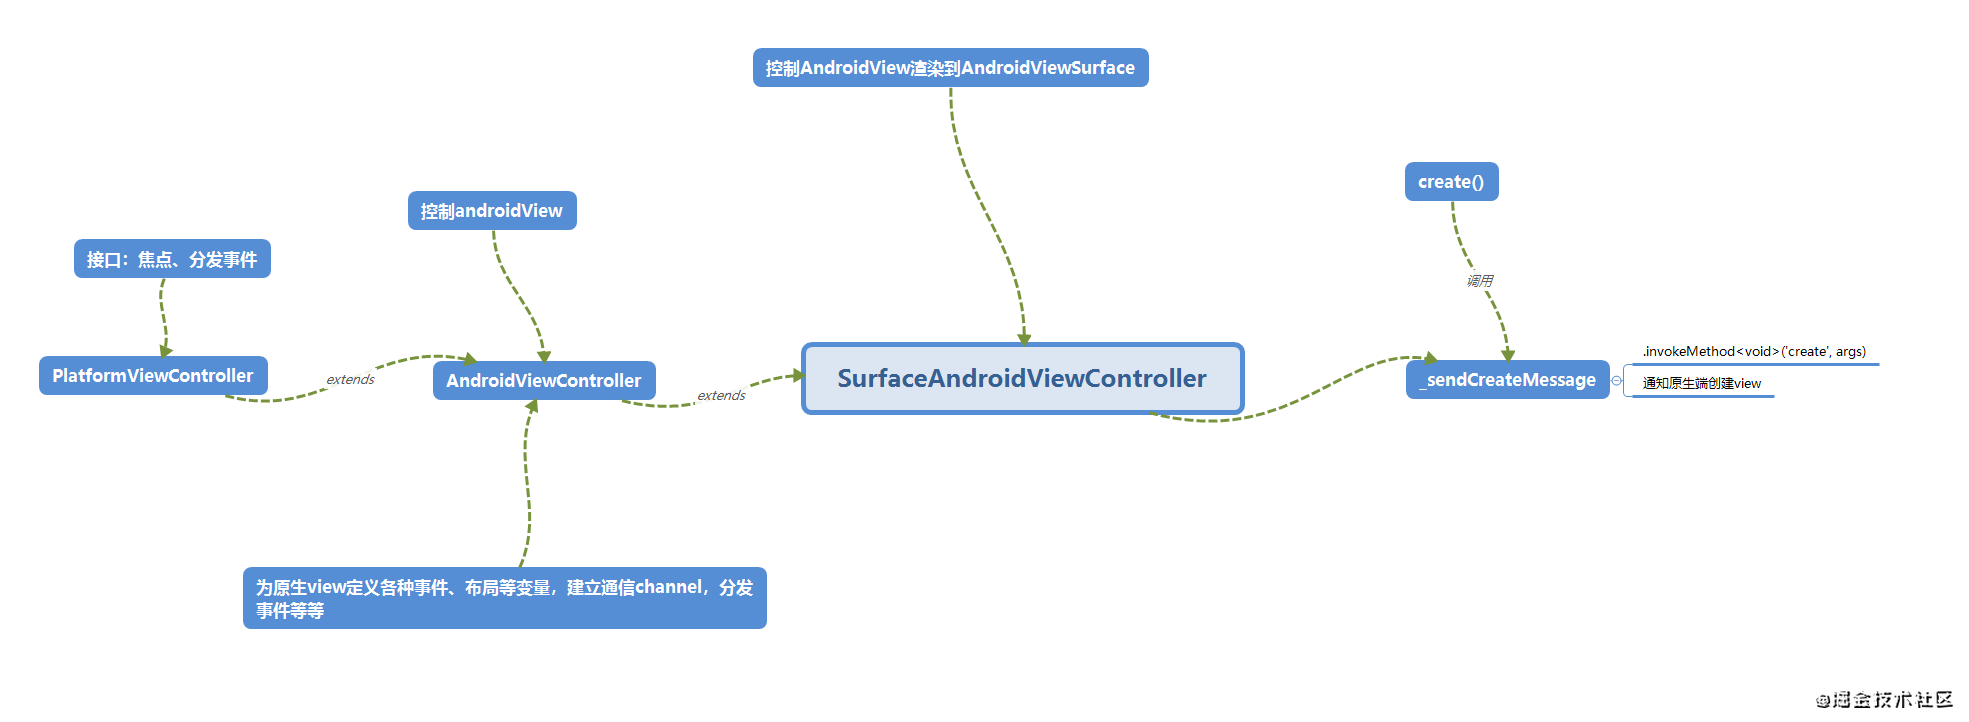
可以看到,绑定了一些channel、事件分发回调等,我们主要看显示相关的。还记得上面我们调用的create方法吗?
//创建一个android view
  Future<void> create() async {
    assert(_state != _AndroidViewState.disposed, 'trying to create a disposed Android view');

    await _sendCreateMessage();
	//更改状态
    _state = _AndroidViewState.created;
    //调用一些回调
    for (final PlatformViewCreatedCallback callback in _platformViewCreatedCallbacks) {
      callback(viewId);
    }
  }
它调用了 await _sendCreateMessage(); 这个方法,而这个方法则是在 SurfaceAndroidViewController中实现的:
  @override
  Future<void> _sendCreateMessage() {
    final Map<String, dynamic> args = <String, dynamic>{
      'id': viewId,
      'viewType': _viewType,
      'direction': AndroidViewController._getAndroidDirection(_layoutDirection),
      'hybrid': true,
    };
    if (_creationParams != null) {
      final ByteData paramsByteData =
          _creationParamsCodec.encodeMessage(_creationParams);
      args['params'] = Uint8List.view(
        paramsByteData.buffer,
        0,
        paramsByteData.lengthInBytes,
      );
    }
    return SystemChannels.platform_views.invokeMethod<void>('create', args);
  }
这个方法最终会向原生端发送一条“create”指令,而这条指令则由 PlatformViewsChannel (这是一个系统级的channel) 的 create()方法来处理 :
        private void create(@NonNull MethodCall call, @NonNull MethodChannel.Result result) {

         ------删除一些代码----

         ///封装一个请求
         PlatformViewCreationRequest request =
              new PlatformViewCreationRequest(
               ///flutter 那边定义好的id
                  (int) createArgs.get("id"),
                  ///长宽、类型等等
                  (String) createArgs.get("viewType"),
                  width,
                  height,
                  (int) createArgs.get("direction"),
                  createArgs.containsKey("params")
                      ? ByteBuffer.wrap((byte[]) createArgs.get("params"))
                      : null);

          try {
            // flutter 1.20 HybridComposition
            if (usesHybridComposition) {
              handler.createAndroidViewForPlatformView(request);
              result.success(null);
            } else {
            //老版本的 AndroidView 方式
              long textureId = handler.createVirtualDisplayForPlatformView(request);
              result.success(textureId);
            }
          } catch (IllegalStateException exception) {
            result.error("error", detailedExceptionString(exception), null);
          }
        }
这里是新旧两条路,我们直接看 usesHybridComposition 为True, 会调用 createAndroidViewForPlatformView()这个方法,而这个方法的实现则在PlatformViewsController。
看类名也知道,用于管理 platformView 的
我们看一下createAndroidViewForPlatformView()的实现:
        @Override
        public void createAndroidViewForPlatformView(
            @NonNull PlatformViewsChannel.PlatformViewCreationRequest request) {
          // API level 19 is required for android.graphics.ImageReader.
          ensureValidAndroidVersion(Build.VERSION_CODES.KITKAT);
          platformViewRequests.put(request.viewId, request);
        }
只是保存了一下我们上面封装的请求,并以ID作为key,这个id就是两端确定view的标志。
至此onCreatePlatformView()方法告一段落,我们接着看我们所实现的surfaceFactory 回调。
surfaceFactory
看起来是个吹风机,实际它是个刮胡刀。
而这个虽然名字有suraface,但是是个widget。
                surfaceFactory: (ctx,PlatformViewController controller){
                  return AndroidViewSurface(
                    controller: controller,
                    gestureRecognizers: const <Factory<OneSequenceGestureRecognizer>>{},
                    hitTestBehavior: PlatformViewHitTestBehavior.opaque,
                  );
                },
我们直接创建了一个AndroidViewSurface,它继承自PlatformViewSurface,与咱们分析相关的全在PlatformViewSurface里,所以我们直接看它:
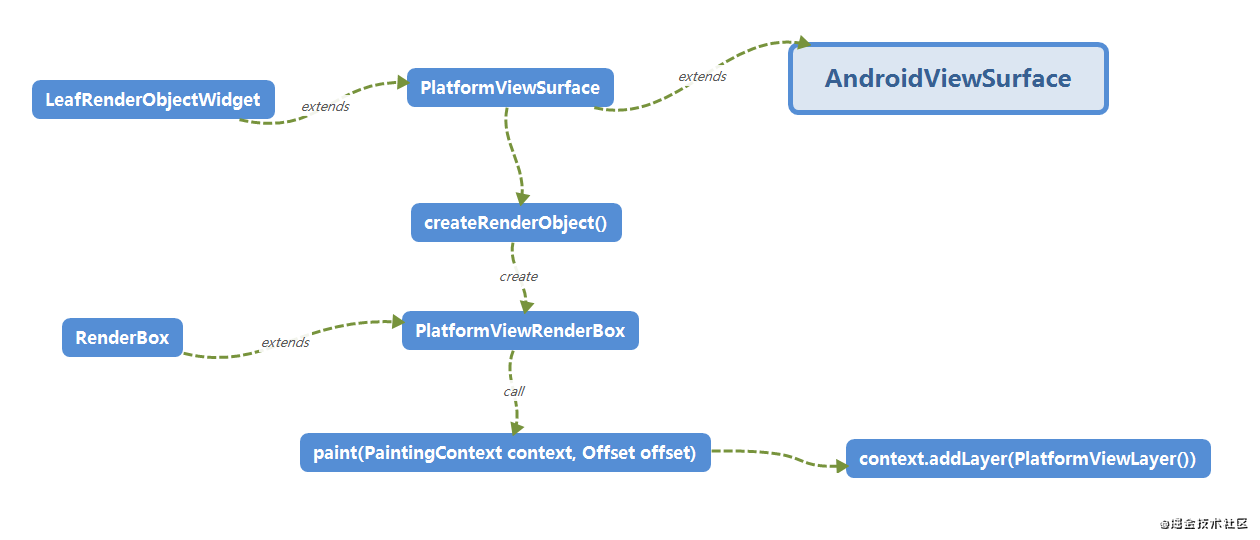
一般 xxRenderObjectWidget 多用于自定义view,我们常用的大多数widget都是它的子类

另外,常说的layerTree,就在PaintingContext里

更多关于这方面的知识,大家可以百度了解一下
按照上图流程,可知最终创建一个PlatformViewRenderBox,并在其Paint方法中添加一个PlatformViewLayer:
  @override
  void paint(PaintingContext context, Offset offset) {
    assert(_controller.viewId != null);
    ///创建一个layer 添加到layerTree上
    context.addLayer(PlatformViewLayer(
      rect: offset & size,
      viewId: _controller.viewId,
    ));
  }
先暂停一下, 从这里我们可以看到,我们在页面中创建的AndroidSurafeView,其实内部啥都没有,只是在 layer树上加了一个rect大小的layer,并且 带一个和原生端相关的viewId。
我们继续看PlatformViewLayer
PlatformViewLayer
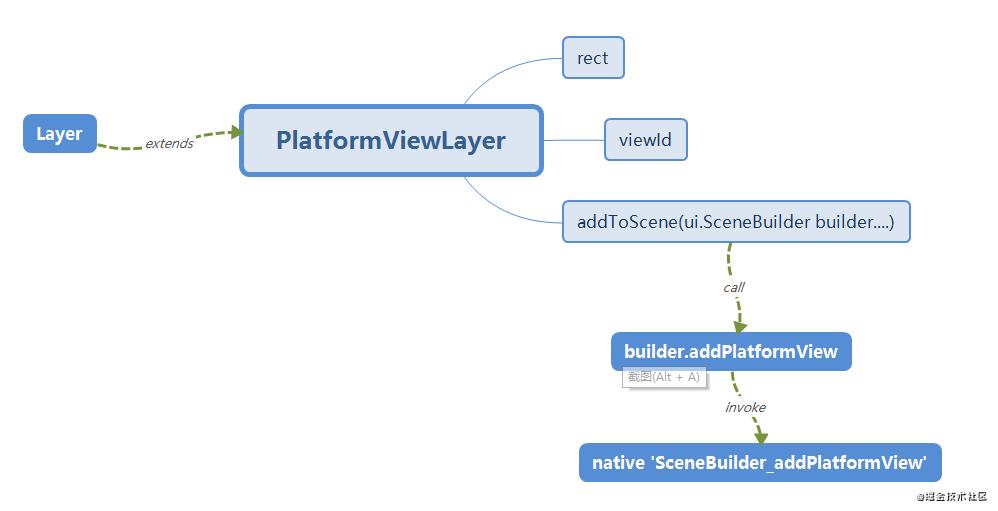
这里简单说一下,当flutter 的widget构建时,最终会生成layer tree,并且最终生成scene发送到engine进行渲染。
layer添加到scene时,就会调用addToScene()方法:
  @override
  void addToScene(ui.SceneBuilder builder, [ Offset layerOffset = Offset.zero ]) {
    final Rect shiftedRect = layerOffset == Offset.zero ? rect : rect.shift(layerOffset);
    builder.addPlatformView(
      viewId,
      offset: shiftedRect.topLeft,
      width: shiftedRect.width,
      height: shiftedRect.height,
    );
  }
进一步来看addPlatformView方法:
  void addPlatformView(
    int viewId, {
    Offset offset = Offset.zero,
    double width = 0.0,
    double height = 0.0,
  }) {
    assert(offset != null, 'Offset argument was null'); // ignore: unnecessary_null_comparison
    _addPlatformView(offset.dx, offset.dy, width, height, viewId);
  }

  void _addPlatformView(double dx, double dy, double width, double height, int viewId)
      native 'SceneBuilder_addPlatformView';
这里直接调用了 native 方法,并将viewId传过去。
停顿梳理下一下
到这里我们先回顾一下:
目前我们已经通知了安卓端保存了我们的viewId,还有一些绘制参数。
flutter端,我们也向layerTree里添加了一个Layer,虽然没有什么绘制内容
(实际上还绑定了事件、焦点回调啥的)
ok,现在我们看一下native方法 :SceneBuilder_addPlatformView
Engine
你如果感兴趣的话,可以clone一份 engine的代码
由上面可知,最终会调用SceneBuilder的addPlatformView方法:
void SceneBuilder::addPlatformView(double dx,
                                   double dy,
                                   double width,
                                   double height,
                                   int64_t viewId) {
  auto layer = std::make_unique<flutter::PlatformViewLayer>(
      SkPoint::Make(dx, dy), SkSize::Make(width, height), viewId);
  AddLayer(std::move(layer));
}
此方法会创建一个指向PlatformViewLayer类型的layer指针(带着view的id),并添加到layer_stack_中,这里我们只看PlatformViewLayer。
在进行 paint以及CompositeEmbeddedView 之前,会先preRoll操作 :
void PlatformViewLayer::Preroll(PrerollContext* context,
                                const SkMatrix& matrix) {
	------删除一些代码-----
  context->view_embedder->PrerollCompositeEmbeddedView(view_id_,
                                                       std::move(params));
}
实际会调用AndroidExternalViewEmbedder的PrerollCompositeEmbeddedView这个方法,其实现:
AndroidExternalViewEmbedder 这个类将回通过PlatformViewAndroidJNI 调用android端的方法
void AndroidExternalViewEmbedder::PrerollCompositeEmbeddedView(
    int view_id,
    std::unique_ptr<EmbeddedViewParams> params) {
  TRACE_EVENT0("flutter",
               "AndroidExternalViewEmbedder::PrerollCompositeEmbeddedView");

    ///这里生成一颗R树,B树的升级版
  auto rtree_factory = RTreeFactory();
  view_rtrees_.insert_or_assign(view_id, rtree_factory.getInstance());

  ///拿到一个指向SkPictureRecorder的指针
  auto picture_recorder = std::make_unique<SkPictureRecorder>();
  ///开始录制绘制命令
  picture_recorder->beginRecording(SkRect::Make(frame_size_), &rtree_factory);
  ///将上面的recoder收集起来,因为可能有很多view
  picture_recorders_.insert_or_assign(view_id, std::move(picture_recorder));
  composition_order_.push_back(view_id);
  // Update params only if they changed.
  if (view_params_.count(view_id) == 1 &&
      view_params_.at(view_id) == *params.get()) {
    return;
  }
  ///保存了view相关参数,大小啊、位置啥的
  view_params_.insert_or_assign(view_id, EmbeddedViewParams(*params.get()));
}
到这里,我们的layer就添加完成,并且准备好录制绘制指令了,而此时我们发现,原生view貌似还没有调用过,即,得不到原生view的绘制指令。
这时就要看 rasterizer 这个类了。
skia的绘制会经过pathGeneration、rasterizer、shading和transfer
其方法:
 ///代码较多,我以伪代码来概括
RasterStatus Rasterizer::DrawToSurface(flutter::LayerTree& layer_tree){
	-----非常长------
    ///当我们使用了 hybird composition时
    if (external_view_embedder_){
    	///将会进入这里
        external_view_embedder_->BeginFrame
    }

    /.../

    if (external_view_embedder_){
    	///将会进入这里
        external_view_embedder_->SubmitFrame
    }

    /.../


}
这里,我们只看SubmitFrame方法,它的实现在 AndroidExternalViewEmbedder::SubmitFrame 中:
///这个方法很长
///还是用伪代码来概括

void AndroidExternalViewEmbedder::SubmitFrame(...){

	///算出 flutterUI和 原生view的相交区域

    /// 录制背景绘制指令
    ///提交一下

    ///这里是真代码
    ///开始原生view的显示

      for (int64_t view_id : composition_order_) {
    SkRect view_rect = GetViewRect(view_id);
    const EmbeddedViewParams& params = view_params_.at(view_id);
    // Display the platform view. If it's already displayed, then it's
    // just positioned and sized.
    jni_facade_->FlutterViewOnDisplayPlatformView(
        view_id,             //
        view_rect.x(),       //
        view_rect.y(),       //
        view_rect.width(),   //
        view_rect.height(),  //
        params.sizePoints().width() * device_pixel_ratio_,
        params.sizePoints().height() * device_pixel_ratio_,
        params.mutatorsStack()  //
    );
    for (const SkRect& overlay_rect : overlay_layers.at(view_id)) {
      std::unique_ptr<SurfaceFrame> frame =
          CreateSurfaceIfNeeded(context,               //
                                view_id,               //
                                pictures.at(view_id),  //
                                overlay_rect           //
          );
      if (should_submit_current_frame) {
        frame->Submit();
      }
    }
  }


}
此处,通过jni_facade_->FlutterViewOnDisplayPlatformView 方法,来显示原生view,
jni_facade 是一个指针,指向PlatformViewAndroidJNI
这个方法最终会调用 安卓端的 onDisplayPlatformView方法。
Android
上面的方法,会进入到 FlutterJNI.Java类,并调用它的onDisplayPlatformView方法
FlutterJNI.onDisplayPlatformView
我们看一下onDisplayPlatformView 这个方法
  @UiThread
  public void onDisplayPlatformView(
      int viewId,
      int x,
      int y,
      int width,
      int height,
      int viewWidth,
      int viewHeight,
      FlutterMutatorsStack mutatorsStack) {
    ensureRunningOnMainThread();
    if (platformViewsController == null) {
      throw new RuntimeException(
          "platformViewsController must be set before attempting to position a platform view");
    }
    platformViewsController.onDisplayPlatformView(
        viewId, x, y, width, height, viewWidth, viewHeight, mutatorsStack);
  }
可以看到,将viewId传给了controller,并调用它的onDisplayPlatformView方法:
  public void onDisplayPlatformView(
      int viewId,
      int x,
      int y,
      int width,
      int height,
      int viewWidth,
      int ViewHeight,
      FlutterMutatorsStack mutatorsStack) {
    initializeRootImageViewIfNeeded();
    /// 第一步
    initializePlatformViewIfNeeded(viewId);

    FlutterMutatorView mutatorView = mutatorViews.get(viewId);
    mutatorView.readyToDisplay(mutatorsStack, x, y, width, height);
    mutatorView.setVisibility(View.VISIBLE);
    mutatorView.bringToFront();
    ///第二步
    FrameLayout.LayoutParams layoutParams = new FrameLayout.LayoutParams(viewWidth, ViewHeight);
    View platformView = platformViews.get(viewId);
    platformView.setLayoutParams(layoutParams);
    platformView.bringToFront();
    currentFrameUsedPlatformViewIds.add(viewId);
  }
关注,第一步initializePlatformViewIfNeeded 这个方法
  private void initializePlatformViewIfNeeded(int viewId) {

    ----删除一部分代码----
	///这个 factory.create 熟悉不?
    ///如果不熟悉的话,可以去看一下文章开头的使用文档
    PlatformView platformView = factory.create(context, viewId, createParams);
    ///我们的原生view
    View view = platformView.getView();
    ///把我们的view和viewId 保存起来
    platformViews.put(viewId, view);

    FlutterMutatorView mutatorView =
        new FlutterMutatorView(context, context.getResources().getDisplayMetrics().density);
    mutatorViews.put(viewId, mutatorView);
    mutatorView.addView(platformView.getView());
    ((FlutterView) flutterView).addView(mutatorView);
  }
接下来我们看第二步:
    FrameLayout.LayoutParams layoutParams = new FrameLayout.LayoutParams(viewWidth, ViewHeight);
    View platformView = platformViews.get(viewId);
    ///设置宽高
    platformView.setLayoutParams(layoutParams);
    ///切换到前台
    platformView.bringToFront();
    currentFrameUsedPlatformViewIds.add(viewId);
通过这一步,我们的原生view就会被切换到前台,之后便可以向engine提供绘制指令了。
至此,整个Hybrid Composition 的绘制工作流程就大致梳理完成了,谢谢大家的阅读。
如果有错误,请指出,非常感谢!
其他文章
Flutter 仿网易云音乐App(基础版)
Flutter版 仿.知乎列表的视差效果
Flutter——实现网易云音乐的渐进式卡片切换
Flutter 仿同花顺自选股列表
最后
以上就是迷人板凳最近收集整理的关于Flutter 1.20之Hybrid Composition混合图层的原理分析介绍FlutterEngineAndroid其他文章的全部内容,更多相关Flutter内容请搜索靠谱客的其他文章。


发表评论 取消回复