一、为什么要进行集群部署,集群解决的问题
1,单节点容量小,集群可以进行扩容;
2,单节点故障问题,集群其他机器可以继续提供服务;
3,可以解决高并发问题;
二、集群搭建步骤
以我们之前文章做介绍安装部署后的为单节点,此时我们需要进行集群部署,我们部署三台es作为集群。
步骤一:
我们复制之前es安装目录 /home/elastic/elasticsearch 目录分别为elasticsearch_02、elasticsearch_03,自身名称修改为elasticsearch_01,在复制之前删除elasticsearch/data 下所有文件。
步骤二:
修改每个elasticsearch_0n/config下配置文件 elasticsearch.yml
要修改的八处:
cluster.name(三台配置一样)、node.name、path.data、path.logs、http.port、transport.tcp.port、discovery.zen.ping.unicast.hosts(三台配置一样)、discovery.zen.minimum_master_nodes(三台配置一样)
#
# Use a descriptive name for your cluster:
#
cluster.name: cluster_name
#
# ------------------------------------ Node ------------------------------------
#
# Use a descriptive name for the node:
#
node.name: node-1
#
# Add custom attributes to the node:
#
#node.attr.rack: r1
#
# ----------------------------------- Paths ------------------------------------
#
# Path to directory where to store the data (separate multiple locations by comma):
#
path.data: /home/elastic/elasticsearch_01/data
#
# Path to log files:
#
path.logs: /home/elastic/elasticsearch_01/logs
# ---------------------------------- Network -----------------------------------
#
# Set the bind address to a specific IP (IPv4 or IPv6):
#
network.host: 0.0.0.0
#
# Set a custom port for HTTP:
#
http.port:9201
transport.tcp.port:9301
#
# For more information, consult the network module documentation.
#
# --------------------------------- Discovery ----------------------------------
#
# Pass an initial list of hosts to perform discovery when new node is started:
# The default list of hosts is ["127.0.0.1", "[::1]"]
#
discovery.zen.ping.unicast.hosts: ["127.0.0.1:9301","127.0.0.1:9302","127.0.0.1:9303"]
#
# Prevent the "split brain" by configuring the majority of nodes (total number of master-eligible nodes / 2 + 1):
#
discovery.zen.minimum_master_nodes: 2
调整完毕,在需要调整下kibana的链接配置:~/kibana/config/kibana.yml

步骤三:分别启动三台es,启动完成后启动kibana
三、创建索引中分片数量以及副本数量设置;
PUT /custerindex
{
  "settings": {
    "number_of_shards": 3,
    "number_of_replicas": 1
  }
}
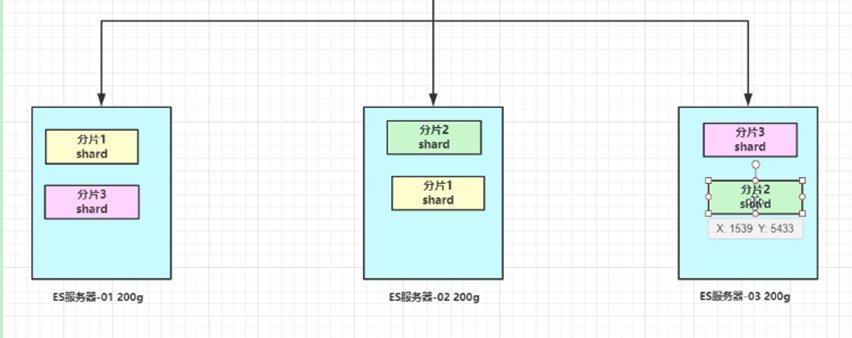
number_of_shards:索引分片数:表示改索引数据中的数据将被拆分为多少个分片,每个分片上记录了不同的数量,全部分片数据之和为索引全部数据;
number_of_replicas:索引分片副本数:表示分片的备份数量;设置为一时表示 除了主分片还有一个副分片,一共俩个分片;

如上图则表示了索引分片为3,分片副本为一的 配置。当其中任何一个节点挂掉之后,其索引的全部信息 其他两台还有其完整的数据信息(分片1,分片2,分片3)。
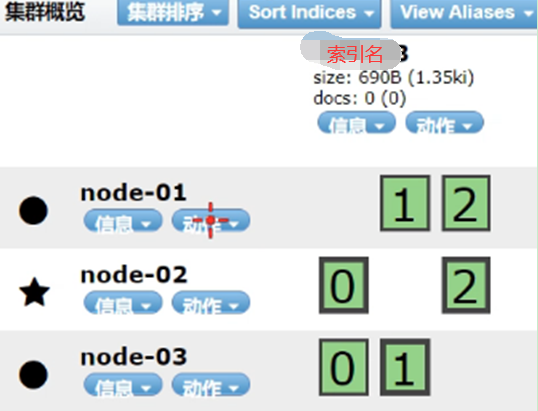
通过Head插件我们看到了如下的集群信息:
其中有三台集群几点分别为 node-01、node-02、node-03。前面有五角星的表示为主节点。其他的为工作节点。右边的 0 1 2 表示索引的分片在集群节点上的信息。边框为粗的表示主分片,其他为副分片。由图可以看出 在节点1上有副分片 1 和 2;主节点 node-02上有主分片 分片0 和 分片2;节点3上有副分片0 和主分片1;

最后
以上就是忧心毛衣最近收集整理的关于Elasticsearch(四) es集群搭建部署以及节点分片介绍的全部内容,更多相关Elasticsearch(四)内容请搜索靠谱客的其他文章。


发表评论 取消回复