文章目录
- 一. 问题背景
- 二. 准备资源
- 2.1 三台虚拟机
- 2.2 MySQL8.0以及MySQLShell
- 三. 准备环境
- 3.1 修改Linux系统配置
- 3.2 关闭Linux的防火墙
- 3.3 卸载CentOS自带的Mariadb数据库
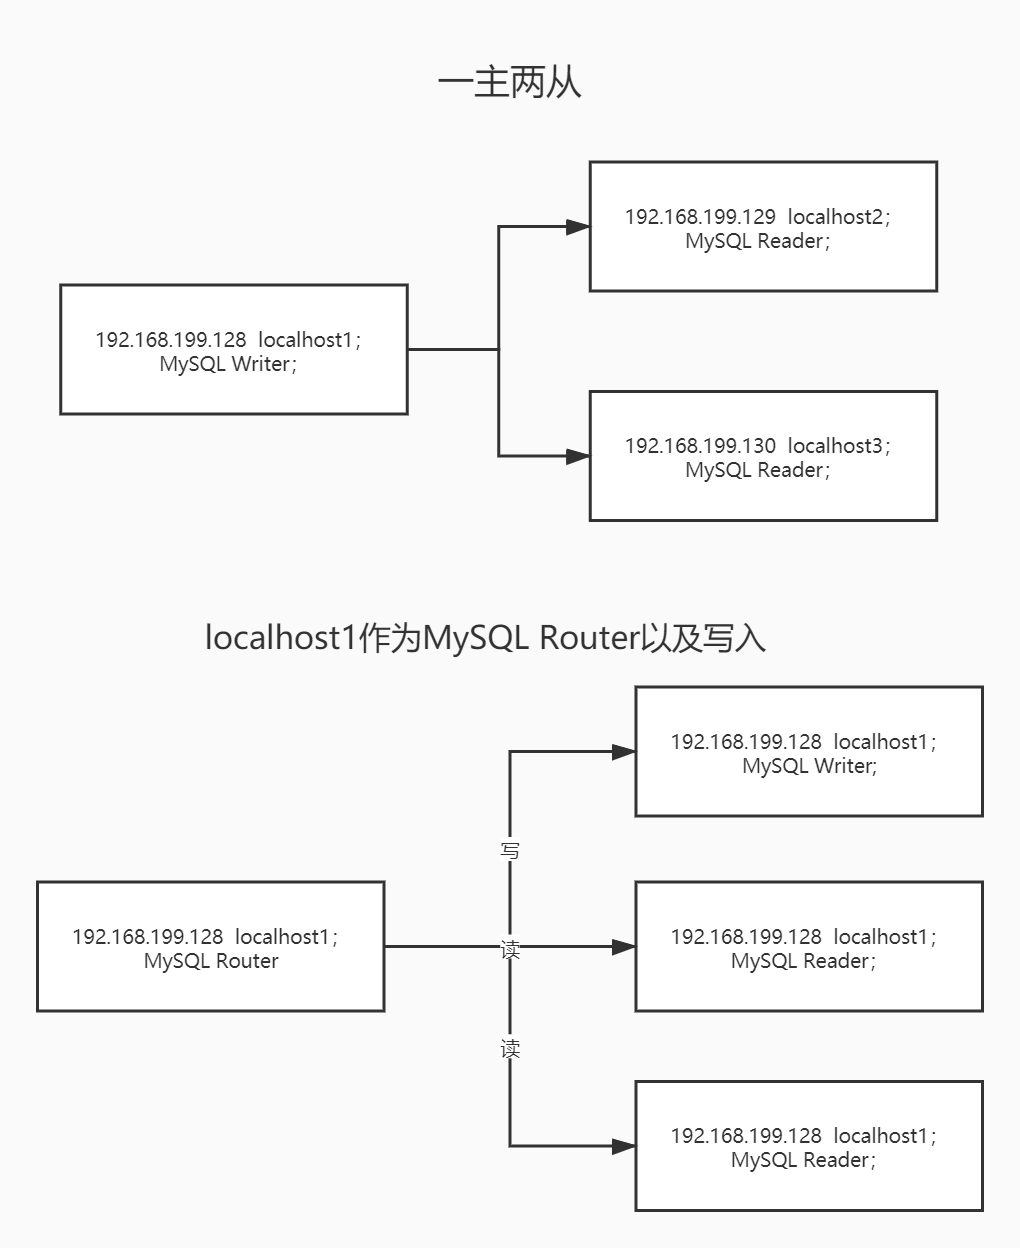
- 四. MySQL Cluster部署说明
- 五. 具体部署操作
- 六. 集群验证
- 七. 总结
一. 问题背景
前面搭建CentOS集群并配置NAT网络模式,今天基于Linux搭建MySQL8.0 Cluster集群。
参考自:烹饪MySQL8.0 Cluster这道菜
注意,搭建MySQL集群前必须已经把搭建CentOS集群并配置NAT网络模式中讲述的环境已经准备好了。否则会有一堆乱七八糟的问题。
二. 准备资源
2.1 三台虚拟机
三台CentOS虚拟机,搭建详情见:搭建CentOS集群并配置NAT网络模式。
虚拟机的ip地址分别如下:
192.168.199.128  localhost1
192.168.199.129  localhost2
192.168.199.130  localhost3
2.2 MySQL8.0以及MySQLShell
下载mysql-8.0.22-linux-glibc2.12-x86_64.tar.xz
下载mysql-shell-8.0.22-linux-glibc2.12-x86-64bit.tar.gz
也可以前往MySQL官方产品下载页面下载,操作系统要选择Linux generic
三. 准备环境
3.1 修改Linux系统配置
如果不进行以下操作,后面初始化MySQL8.0的时候会发生报错。
在Linux命令行终端或者Xshell中执行以下代码:
[root@localhost1 security]# vim /etc/security/limits.conf
在limits.conf文件内增加以下内容:
soft nofile 65535
hard nofile 65535
soft nproc 65535
hard nproc 65535
在Linux命令行终端或者Xshell中执行以下代码:
root@localhost1 limits.d]# vim /etc/security/limits.d/20-nproc.conf
将原本的内容
*          soft    nproc     1024
root       soft    nproc     unlimited
改成
*          soft    nproc     unlimited
root       soft    nproc     unlimited
3.2 关闭Linux的防火墙
必须关闭防火墙或者开放3306端口,否则后面创建集群的时候,无法连接其他数据库。
执行以下代码:
[root@localhost1 limits.d]# firewall-cmd --state
[root@localhost1 limits.d]# systemctl stop firewalld.service
[root@localhost1 limits.d]# firewall-cmd --state
3.3 卸载CentOS自带的Mariadb数据库
Mariadb是MySQL的开源版,所以必须卸载,否则会存在冲突导致无法安装MySQL。
执行以下代码:
[root@localhost1 limits.d]# rpm -qa|grep mariadb
mariadb-libs-5.5.64-1.el7.x86_64 --nodeps
[root@localhost1 limits.d]# rpm -e mariadb-libs-5.5.64-1.el7.x86_64 --nodeps
四. MySQL Cluster部署说明

五. 具体部署操作
-
创建一个操作系统用户cook,并设置权限,并创建MySQL工作目录,详情见CentOS 7创建用户并授权。
-
以下所有操作都将使用cook用户进行,在切换用户的过程中如果遇到
su: 鉴定故障、sudo不能执行等问题,解决方法见遇到的su: 鉴定故障、sudo不能执行等问题 -
将
mysql-8.0.22-linux-glibc2.12-x86_64.tar.xz、mysql-shell-8.0.22-linux-glibc2.12-x86-64bit.tar.gz都上传到三台服务器中。(其实可以只上传到一台中,做好所有部署后,只需打包部署好的资料上传另外两台服务器中即可) -
对文件进行解压,整理,重命名,如下:
[root@localhost1 mysql8.0]# cd /work/cook/mysql8.0
[root@localhost1 mysql8.0]# pwd
/work/cook/mysql8.0
[root@localhost1 mysql8.0]# ll
总用量 879556
drwxrwxr-x. 10 cook cook       175 10月 26 12:14 mysql-8.0.22
drwx------.  5 cook cook        41 10月  2 17:16 mysql-shell-8.0.22
- 修改MySQL的配置文件my.cnf,放在/work/cook/mysql8.0/mysql-8.0.22下,my.cnf文件如下:
[mysqld]
character-set-server=utf8
port=3306
socket=/tmp/mysql.sock
basedir=/work/cook/mysql8.0/mysql-8.0.20
datadir=/work/cook/mysql8.0/mysql-8.0.20/data
log-error=/work/cook/mysql8.0/mysql-8.0.20/data/mysqld.log
pid-file=/work/cook/mysql8.0/mysql-8.0.20/data/mysql.pid
user=cook
tmpdir=/tmp
default-storage-engine=INNODB
lower-case-table-names=1

#复制框架
server_id=1
gtid_mode=ON
enforce_gtid_consistency=ON
master_info_repository=TABLE
relay_log_info_repository=TABLE
binlog_checksum=NONE
log_slave_updates=ON
log_bin=binlog
binlog_format=ROW

#组复制设置
#server必须为每个事务收集写集合,并使用XXHASH64哈希算法将其编码为散列
transaction_write_set_extraction=XXHASH64
#告知插件加入或创建组命名,UUID
loose-group_replication_group_name="f703d586-8d16-11ea-aa98-005090e3c222"
#server启动时不自启组复制,为了避免每次启动自动引导具有相同名称的第二个组,所以设置为OFF。
loose-group_replication_start_on_boot=off
#告诉插件使用IP地址,端口33061用于接收组中其他成员转入连接
loose-group_replication_local_address="10.0.2.188:33061"
#启动组server,种子server,加入组应该连接这些的ip和端口;其他server要加入组得由组成员同意
loose-group_replication_group_seeds="10.0.2.188:33061,10.0.2.189:33061,10.0.2.190:33061"
loose-group_replication_ip_whitelist="10.0.2.188,10.0.2.189,10.0.2.190"
loose-group_replication_bootstrap_group=off
# 使用MGR的单主模式
loose-group_replication_single_primary_mode=on
loose-group_replication_enforce_update_everywhere_checks=off
disabled_storage_engines = MyISAM,BLACKHOLE,FEDERATED,CSV,ARCHIVE
- 执行MySQL的安装命令,进入到MySQL的bin目录下,执行以下代码:
[cook@localhost1 bin]$ cd /work/cook/mysql8.0/mysql-8.0.22/bin
[cook@localhost1 bin]$ pwd
/work/cook/mysql8.0/mysql-8.0.22/bin
[cook@localhost1 bin]$ ./mysqld  --initialize-insecure --basedir=/work/cook/mysql8.0/mysql-8.0.22 --datadir=/work/cook/mysql8.0/mysql-8.0.22/data --lower-case-table-names=1
- 如出现以下信息,则表示安装成功,如下:
root@localhost is created with empty password!
注意:如果这里安装失败,到/work/cook/mysql8.0/mysql-8.0.22/data目录下,用ll命令看看data文件夹的拥有者是否是cook,若不是则执行以下命令来修改文件拥有者,如下:
[cook@localhost1 mysql8.0]$ cd /work/cook
[cook@localhost1 cook]$ pwd
/work/cook
[cook@localhost1 cook]$ chown -R cook:cook *
- 使用MySQL的
support-files/mysql.server进行MySQL的启动、停止以及重启等。复制support-files/mysql.server文件到/work/cook/mysql8.0/mysql-8.0.22下,然后编辑mysql.server,补充basedir与datadir对应的值,如下:
basedir=/work/cook/mysql8.0/mysql-8.0.22
datadir=/work/cook/mysql8.0/mysql-8.0.22/data
-
在
/work/cook/mysql8.0/mysql-8.0.22的data文件夹下面新建一个mysql.pid文件 -
执行以下代码启动MySQL,如下:
[cook@localhost1 mysql-8.0.22]$ /work/cook/mysql8.0/mysql-8.0.22/mysql.server start
或者
[cook@localhost1 mysql-8.0.22]$ cd /work/cook/mysql8.0/mysql-8.0.22
[cook@localhost1 mysql-8.0.22]$ ./mysql.server start
如果启动失败,看看防火墙是否已经关闭了。看看MySQL所在目录的文件夹拥有者是不是cook,若不是则使用上面的chown命令修改过来。
- 执行以下代码查看MySQL是否已经启动成功了,如下:
[cook@localhost1 cook]$ ps -ef|grep mysql
cook       1193      1  0 00:54 ?        00:00:00 /bin/sh /work/cook/mysql8.0/mysql-8.0.22/bin/mysqld_safe --datadir=/work/cook/mysql8.0/mysql-8.0.22/data --pid-file=/work/cook/mysql8.0/mysql-8.0.22/data/mysql.pid
cook       1651   1193  0 00:54 ?        00:07:07 /work/cook/mysql8.0/mysql-8.0.22/bin/mysqld --basedir=/work/cook/mysql8.0/mysql-8.0.22 --datadir=/work/cook/mysql8.0/mysql-8.0.22/data --plugin-dir=/work/cook/mysql8.0/mysql-8.0.22/lib/plugin --log-error=/work/cook/mysql8.0/mysql-8.0.22/data/mysqld.log --pid-file=/work/cook/mysql8.0/mysql-8.0.22/data/mysql.pid --socket=/tmp/mysql.sock --port=3306
cook       2638   2599  0 17:02 pts/1    00:00:00 grep --color=auto mysql
- 进入MySQL的命令行,设置root密码,增加admin用户,如下:
[cook@localhost1 bin]$ cd /work/cook/mysql8.0/mysql-8.0.22/bin
[cook@localhost1 bin]$ pwd
/work/cook/mysql8.0/mysql-8.0.22/bin
[cook@localhost1 bin]$ ./mysql -uroot -p
Enter password:
Welcome to the MySQL monitor.  Commands end with ; or g.
Your MySQL connection id is 70
Server version: 8.0.22 MySQL Community Server - GPL

Copyright (c) 2000, 2020, Oracle and/or its affiliates. All rights reserved.

Oracle is a registered trademark of Oracle Corporation and/or its
affiliates. Other names may be trademarks of their respective
owners.

Type 'help;' or 'h' for help. Type 'c' to clear the current input statement.

mysql> alter user 'root'@'localhost' identified by '123456';
Query OK, 0 rows affected (0.02 sec)

mysql> create user 'admin'@'%' identified by '123456';
Query OK, 0 rows affected (0.02 sec)

mysql> grant all privileges on *.* to 'admin'@'%' with grant option;
Query OK, 0 rows affected (0.01 sec)
-
至此,localhost1节点的MySQL已经成功运行了。
-
可直接将
/work/cook/mysql8.0打包(使用tar -zcvf mysql8.0.tar.gz mysql8.0),分别放到另外两台服务器上面进行快速配置。快速配置时,注意修改my.cnf中的
(1)server_id=1修改为server_id=2、server_id=3

(2)loose-group_replication_local_address="192.168.199.128:33061"

对应修改为loose-group_replication_local_address="192.168.199.129:33061"

loose-group_replication_local_address="192.168.199.130:33061"
-
通过以上步骤,即可将3个服务器上的mysql运行起来。接下来创建MySQL Cluster集群
-
选择192.168.199.128作为mysql-shell的管理节点,通过mysql-shell进行集群管理
-
将
mysql-shell-8.0.22-linux-glibc2.12-x86-64bit.tar.gz解压,并且重名为mysql-shell-8.0.22,放在/work/cook/mysql8.0下:
[cook@localhost1 mysql8.0]$ ll
总用量 879556
drwxrwxr-x. 10 cook cook       175 10月 30 16:49 mysql-8.0.22
drwx------.  5 cook cook        41 10月  2 17:16 mysql-shell-8.0.22
-
进入
/work/cook/mysql8.0/mysql-shell-8.0.20/bin,通过./mysqlsh --uri admin@10.0.2.188:3306链接到集群控制中,通过var cluster = dba.createCluster('cookMysqlCluster');可新建一个名为cookMysqlCluster的集群。 -
执行完以上命令后,可通过
cluster.status();查看集群状态。如果是中途关闭服务器,重新打开就会提示cluster未定义,使用var cluster = dba.getCluster()来获取cluster。 -
可通过以下命令增加另外两台服务器到集群中:
cluster.addInstance('admin@192.168.199.129:3306');,cluster.addInstance('admin@192.168.199.130:3306');。如果有报错,则看看是否已经关闭了方法墙以及mysql是否已经运行起来了 -
如果出现
Cannot add an instance with the same server UUID(xxxxxxxx-xxxxxxx-).Please change the server UUID of the instance to add.报错,原因是我们的192.168.199.129:3306的mysql服务是通过复制了192.168.199.128:3306的mysql服务部署的,故存在server-uuid重复,只需要把192.168.199.129:3306的mysql服务中/work/cook/mysql8.0/mysql-8.0.20/data/auto.cnf文件删除,再重新启动mysql服务即可。 -
再次通过
cluster.status();查看集群状态 -
采用相同的方式,删除
192.168.199.130:3306的auto.cnf文件,重启mysql服务。再通过cluster.addInstance('admin@192.168.199.130:3306');增加该集群节点。 -
最后再次执行
cluster.status();查看集群状态。
六. 集群验证
在192.168.199.128:3306中新建数据库cluster_test_db; 再在192.168.199.129:3306、192.168.199.130:3306数据库中查看是否存在该数据库。
七. 总结
以上很多笔记都是摘抄烹饪MySQL8.0 Cluster这道菜,搭建期间踩了很多坑,花了很多时间解决。写下本博客以此来写一篇更加完整的搭建步骤。
最后
以上就是难过乐曲最近收集整理的关于基于Linux搭建MySQL8.0 Cluster集群一. 问题背景二. 准备资源三. 准备环境四. MySQL Cluster部署说明五. 具体部署操作六. 集群验证七. 总结的全部内容,更多相关基于Linux搭建MySQL8.0内容请搜索靠谱客的其他文章。


发表评论 取消回复