我是靠谱客的博主 心灵美红牛,这篇文章主要介绍【SSH】Struts2学习(二)(待完善)结果视图、访问ServletAPI、数据封装(获取页面参数)、Struts校验一、Struts2结果类型视图(逻辑结果视图)二、访问ServletAPI的3种方式三、数据封装(struts获得页面参数)3种方式四、集合类型参数封装五、Struts2校验六、Struts2对json的支持,现在分享给大家,希望可以做个参考。
一、Struts2结果类型视图(逻辑结果视图)
前奏:该部分内容指的就是struts2配置文件中的result元素的使用
1、result元素
作用:为动作指定结果视图
属性:name:逻辑视图的名称,对应着动作方法的返回值。默认值是success。
type:结果类型,指的就是用什么方式转到定义的页面。默认是dispatcher。
属性:name:逻辑视图的名称,对应着动作方法的返回值。默认值是success。
type:结果类型,指的就是用什么方式转到定义的页面。默认是dispatcher。
2、result元素中type的取值
type属性的取值在struts-default.xml中定义着。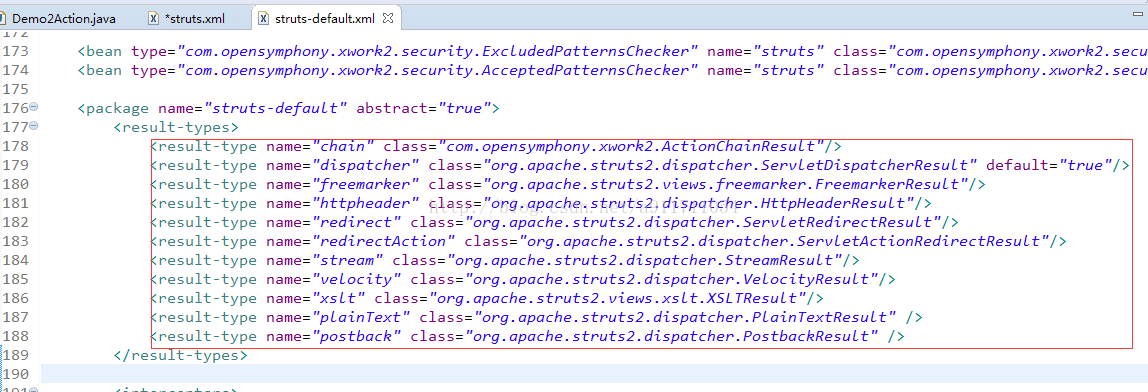
常用结果类型介绍:
dispatcher:(默认值) 使用请求转发,转向一个页面。
redirect: 使用重定向,转向一个页面。
redirectAction:注意:使用的是重定向。
a.重定向到另一个相同名称空间的动作。
b.重定向到不同名称空间的动作 必须使用result下的子元素,param来指定
如:
dispatcher:(默认值) 使用请求转发,转向一个页面。
redirect: 使用重定向,转向一个页面。
redirectAction:注意:使用的是重定向。
a.重定向到另一个相同名称空间的动作。
b.重定向到不同名称空间的动作 必须使用result下的子元素,param来指定
如:
<result  type=”redirectAction” >
		<param name=”namespace”>/house</param>
		<param name=”actionName”>/addhouse</param>
</result>chain:注意: 使用的是请求转发。
a.转发到另一个相同名称空间的动作。
b.请求转发到不同名称空间的动作
四种结果处理方式示例:
<?xml version="1.0" encoding="UTF-8"?>
 <!DOCTYPE struts PUBLIC
	"-//Apache Software Foundation//DTD Struts Configuration 2.3//EN"
	"http://struts.apache.org/dtds/struts-2.3.dtd">
<struts>
	<package name="result" namespace="/" extends="struts-default">
		<!-- 转发 -->
		<action name="Demo1Action" class="com.sh.a_result.Demo1Action" method="execute">
			<result name="success" type="dispatcher">/hello.jsp</result>
		</action>
		<!-- 重定向 -->
		<action name="Demo2Action" class="com.sh.a_result.Demo2Action" method="execute">
			<result name="success" type="redirect">/hello.jsp</result>
		</action>
		<!-- 转发到Action -->
		<action name="Demo3Action" class="com.sh.a_result.Demo3Action" method="execute">
			<result type="chain">
			 <!-- Action的名字 -->
             <param name="actionName">Demo2Action</param>
             <!-- Action所在的命名空间 -->
             <param name="namespace">/</param>
        	</result>
		</action>
		<!-- 重定向到Action -->
		<action name="Demo4Action" class="com.sh.a_result.Demo4Action" method="execute">
			<result name="success" type="redirectAction">
			 <!-- Action的名字 -->
             <param name="actionName">Demo1Action</param>
             <!-- Action所在的命名空间 -->
             <param name="namespace">/</param>
        	</result>
		</action>
	</package>
</struts>
3、result元素中param子元素
在转发或者重定向到不同包下的动作时,都用到了result元素的子元素param。param元素的作用:依赖注入(Dependence Injection)思想
我们通过struts-default.xml中的resultTypes元素中配置可以看出,每个结果类型视图其实都是靠一个类来实现的。而param元素就是将配置的参数,注入到该类中。
调用的是对应类的setter方法进行注入的。
例如:redirectAction结果视图

该类中肯定会有对actionName和namespace属性的注入方法(setter方法)。
4、自定义结果类型
通过前面的内容,我们看出,其实结果类型就是一个类,这些类都实现了com.opensymphony.xwork2.Result接口。或者继承自该接口的实现类org.apache.struts2.dispatcher.StrutsResultSupport。
这些类都有一个doExecute方法,用于执行结果视图。
综上:我们也可以自己写一个结果视图。
例子:
输出CAPTCHA(验证码)图像的结果类型。
第一步:写一个类,实现接口或者继承接口的实现类
关键:在struts中怎么使用servlet中的对象:ServletActionContext
public class MyResultType implements Result {

	private int width ;
	private int height  ;

	public int getWidth() {
		return width;
	}
	public void setWidth(int width) {
		this.width = width;
	}
	public int getHeight() {
		return height;
	}
	public void setHeight(int height) {
		this.height = height;
	}
	@Override
	public void execute(ActionInvocation invocation) throws Exception {
		//生成验证码
		ValidateCode validateCode = new ValidateCode(width,height,4,10);
		String code = validateCode.getCode();
		System.out.println("验证码:"+code);
		//怎么把验证码显示到页面
		//怎么在struts2中使用servlet的api
		HttpServletResponse response =   ServletActionContext.getResponse();
		//把验证码展示到页面
		validateCode.write(response.getOutputStream());

	}

}第三步:在action配置时引用 把result的type属性设置为自定义结果视图。
扩展:通过可配置的参数,实现图像大小的调整
使用param标签给自定义结果类注入高度和宽度
<?xml version="1.0" encoding="UTF-8" ?>
<!DOCTYPE struts PUBLIC
	"-//Apache Software Foundation//DTD Struts Configuration 2.3//EN"
	"http://struts.apache.org/dtds/struts-2.3.dtd">

<struts>
    <constant name="struts.devMode" value="true" />
    <package name="default" namespace="/" extends="struts-default">
    		<!-- 配置自定义结果 -->
    		<result-types>
    			<result-type name="yanzhengma" class="com.itqf.resulttype.MyResultType"></result-type>
    		</result-types>
    		<!-- 全局视图 -->
    		<global-results>
    			<result name="error">/error.jsp</result>
    		</global-results>

    		<action name="showImg" >
    			<result type="yanzhengma">
    				<!-- 给自定义结果类型注入值
    				-->
    				<param name="width">500</param>
    				<param name="height">100</param>
    			</result>
    		</action>

    		<action name="toLogin"  class="com.itqf.action.UserAction">
    			<result>/login.jsp</result>
    			 <!-- 局部结果 -->
    			 <result name="error">/error1.jsp</result>
    		</action>
    </package>
</struts>
5、全局视图和局部视图
5.1、局部视图
5.2、全局视图
使用global-results配置全局视图原则:先查找局部视图,如果没有,再查找全局结果视图
<!-- 全局视图 -->
    		<global-results>
    			<result name="error">/error.jsp</result>
    		</global-results>
二、访问ServletAPI的3种方式
访问原理:
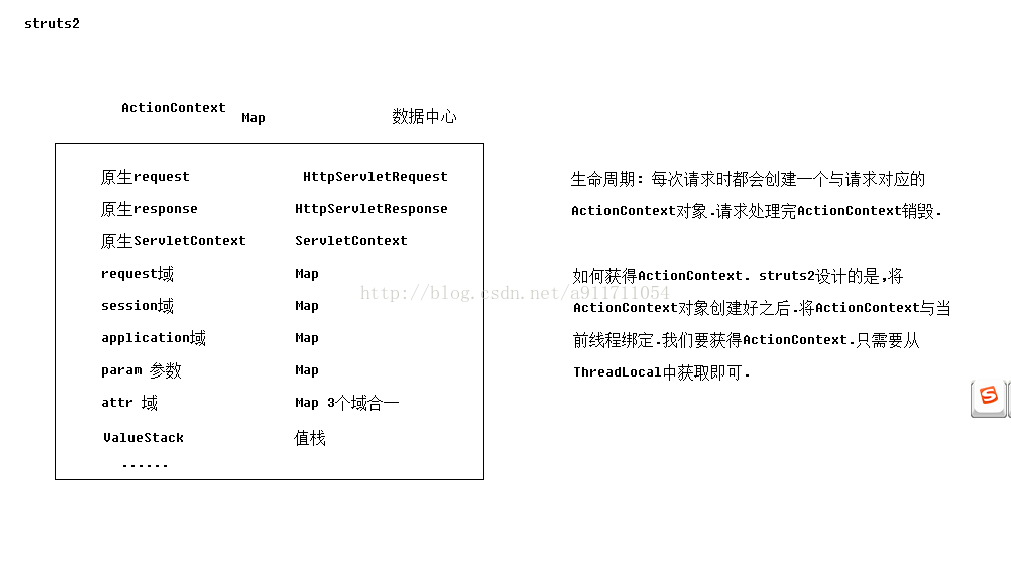
1、第1种方式——通过ActionContext(常用)
/**
 * 如何在action中获得原生ServletAPI
 * @author Administrator
 *
 */
public class Demo5Action extends ActionSupport{

	public String execute() throws Exception {
		//request域 => map	(struts2并不推荐使用原生request域)
		Map<String, Object> requestScope = (Map<String, Object>) ActionContext.getContext().get("request");
		//推荐
		ActionContext.getContext().put("name", "requestTom");

		//Session域 => map
		Map<String, Object> sessionScope = ActionContext.getContext().getSession();
		sessionScope.put("name", "sessionTom");

		//application域 => map
		Map<String, Object> applicationScope = ActionContext.getContext().getApplication();
		applicationScope.put("name", "applicationTom");
		return SUCCESS;
	}
}
2、第2种方式 ——通过ServletActionContext
public class Demo6Action extends ActionSupport {
	//并不推荐
	public String execute() throws Exception {
		//原生request
		HttpServletRequest request = ServletActionContext.getRequest();
		//原生session
		HttpSession session = request.getSession();
		//原生response
		HttpServletResponse response = ServletActionContext.getResponse();
		//原生servletContext
		ServletContext servletContext = ServletActionContext.getServletContext();
		return SUCCESS;
	}
}
3、第3种方式——通过实现相关接口 XXXAware
public class Demo7Action extends ActionSupport implements ServletRequestAware,ServletResponseAware,ServletContextAware {

	private HttpServletRequest request;

	public String execute() throws Exception {

		System.out.println("原生request:"+request);
		return SUCCESS;
	}

	@Override
	public void setServletRequest(HttpServletRequest request) {
		this.request = request;
	}

	@Override
	public void setServletContext(ServletContext arg0) {
		// TODO Auto-generated method stub

	}

	@Override
	public void setServletResponse(HttpServletResponse arg0) {
		// TODO Auto-generated method stub

	}
}
三、数据封装(struts获得页面参数)3种方式
struts2将数据的封装分为两大类,一类为属性驱动,一类为模型驱动,属性驱动可分为两种,一种只需要提供属性的set方法即可,另一种则是通过表达式的方式直接封装到对象当中
1、提供属性的set方法的方式(属性驱动)
页面:
<%@ page language="java" contentType="text/html; charset=UTF-8"
    pageEncoding="UTF-8"%>
<!DOCTYPE html PUBLIC "-//W3C//DTD HTML 4.01 Transitional//EN" "http://www.w3.org/TR/html4/loose.dtd">
<html>
<head>
<meta http-equiv="Content-Type" content="text/html; charset=UTF-8">
<title>Insert title here</title>
</head>
<body>
	<form action="${pageContext.request.contextPath }/Demo8Action">
		用户名:<input type="text" name="name">
		年龄:<input type="text" name="age">
		生日:<input type="text" name="birthday">
		<input type="submit" value="提交">
	</form>

</body>
</html>
Action类:
public class Demo8Action extends ActionSupport {

	public Demo8Action() {
		super();
		System.out.println("demo8Action被创建了!");
	}

	// 准备与参数键名称相同的属性
	private String name;
	// 自动类型转换 只能转换8大基本数据类型以及对应包装类
	private Integer age;
	// 支持特定类型字符串转换为Date ,例如 yyyy-MM-dd
	private Date birthday;

	public String execute() throws Exception {

		System.out.println("name参数值:" + name + ",age参数值:" + age + ",生日:" + birthday);

		return SUCCESS;
	}

	public String getName() {
		return name;
	}

	public void setName(String name) {
		this.name = name;
	}

	public Integer getAge() {
		return age;
	}

	public void setAge(Integer age) {
		this.age = age;
	}

	public Date getBirthday() {
		return birthday;
	}

	public void setBirthday(Date birthday) {
		this.birthday = birthday;
	}
}
弊端:传的字段比较少,属性很多的情况下,代码量会非常臃肿
2、页面提供表达式的方式(对象驱动)
<%@ page language="java" contentType="text/html; charset=UTF-8"
    pageEncoding="UTF-8"%>
<!DOCTYPE html PUBLIC "-//W3C//DTD HTML 4.01 Transitional//EN" "http://www.w3.org/TR/html4/loose.dtd">
<html>
<head>
<meta http-equiv="Content-Type" content="text/html; charset=UTF-8">
<title>Insert title here</title>
</head>
<body>
	<form action="${pageContext.request.contextPath }/Demo9Action">
		用户名:<input type="text" name="user.name">
		年龄:<input type="text" name="user.age">
		生日:<input type="text" name="user.birthday">
		<input type="submit" value="提交">
	</form>

</body>
</html>public class Demo9Action extends ActionSupport {
private User user;
public String execute() throws Exception {
System.out.println(user);
return SUCCESS;
}
public User getUser() {
return user;
}
public void setUser(User user) {
this.user = user;
}
}这种方式需要封装一个实体类,在Action中要提供user的get方法
3、模型驱动
页面:<%@ page language="java" contentType="text/html; charset=UTF-8"
pageEncoding="UTF-8"%>
<!DOCTYPE html PUBLIC "-//W3C//DTD HTML 4.01 Transitional//EN" "http://www.w3.org/TR/html4/loose.dtd">
<html>
<head>
<meta http-equiv="Content-Type" content="text/html; charset=UTF-8">
<title>Insert title here</title>
</head>
<body>
<form action="${pageContext.request.contextPath }/Demo10Action">
用户名:<input type="text" name="name">
年龄:<input type="text" name="age">
生日:<input type="text" name="birthday">
<input type="submit" value="提交">
</form>
</body>
</html>Action类:
public class Demo10Action extends ActionSupport implements ModelDriven<User>{
	//手动构建对象
	private User user = new User();

	public String execute() throws Exception {

		System.out.println(user);

		return SUCCESS;
	}

	public User getUser() {
		return user;
	}

	public void setUser(User user) {
		this.user = user;
	}

	@Override
	public User getModel() {
		// TODO Auto-generated method stub
		return user;
	}

}
该方法需要Action实现ModelDriven接口,需要手动构建对象
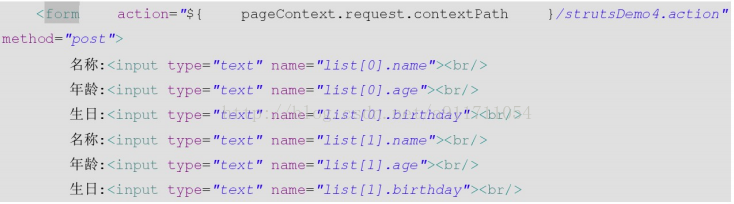
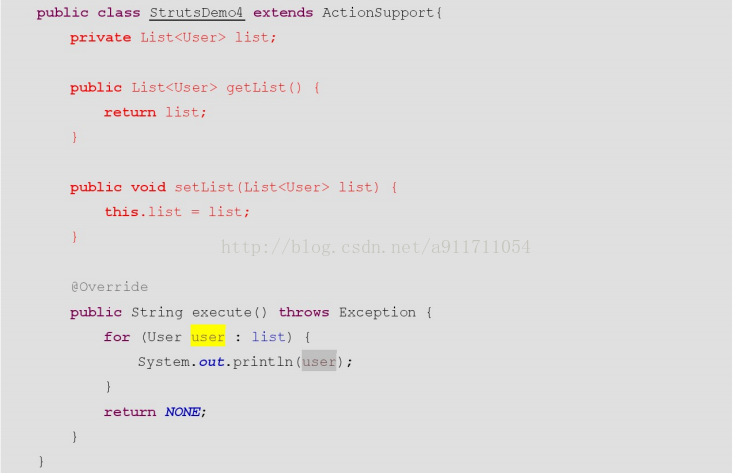
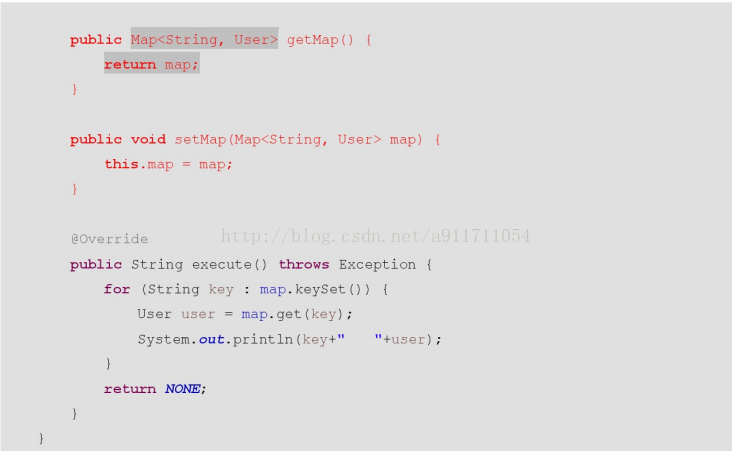
四、集合类型参数封装
1、封装到List集合中
页面:

Action:
2、封装到Map集合中
页面:

Action:

五、Struts2校验
待完善
六、Struts2对json的支持
待完善
参考源码:https://github.com/AmazeLee/Struts2.git
To live is the rarest thing in the world. Most people exist. That is all.
生活,世间最罕见之事。生存,世间最常见之事。仅此而已。
最后
以上就是心灵美红牛最近收集整理的关于【SSH】Struts2学习(二)(待完善)结果视图、访问ServletAPI、数据封装(获取页面参数)、Struts校验一、Struts2结果类型视图(逻辑结果视图)二、访问ServletAPI的3种方式三、数据封装(struts获得页面参数)3种方式四、集合类型参数封装五、Struts2校验六、Struts2对json的支持的全部内容,更多相关【SSH】Struts2学习(二)(待完善)结果视图、访问ServletAPI、数据封装(获取页面参数)、Struts校验一、Struts2结果类型视图(逻辑结果视图)二、访问ServletAPI内容请搜索靠谱客的其他文章。
本图文内容来源于网友提供,作为学习参考使用,或来自网络收集整理,版权属于原作者所有。


发表评论 取消回复