注意:该文档正在优化更新,更新内容更加逻辑,具体请查看《前后端分离项目入门开发》专栏
项目名称:ftest测试公开版(博客)
开发日期:2020-11-15
开发者:fnee
环境:工具/IDEAIU | jdk/1.8 | maven/4.0.0 | SpringBoot/2.3.5.RELEASE
系统:Windows/开发
文章目录
- 一、项目基础搭建
- 1.新建项目
- 2.引入MyBatis-Plus依赖
- 3.修改配置
- 4.添加分页插件
- 5.创建数据库
- 6.生成代码
- ->测试1
- 二、项目二层搭建
- 1.统一结果封装
- 2.安装redis(5.0.10)
- 3.Shiro-redis整合
- >1.配置基础环境
- >2.添加基础类
- >3.创建Filter
- >4.创建授权信息
- 三、全局异常处理
- ->测试2
- 四、实体校验
- ->测试3
- 五、跨域问题
- 六、接口开发
- 1.登录
- 2.退出
- 3.博客列表
- >1.全部
- >2.按分类
- >3.最热
- 4.博客详情
- 5.添加或修改
- 6.总阅读量
- 7.分栏列表
- 8.分栏数量
- 七、源码下载
一、项目基础搭建
1.新建项目
创建新项目Spring Assistant,基础信息如下
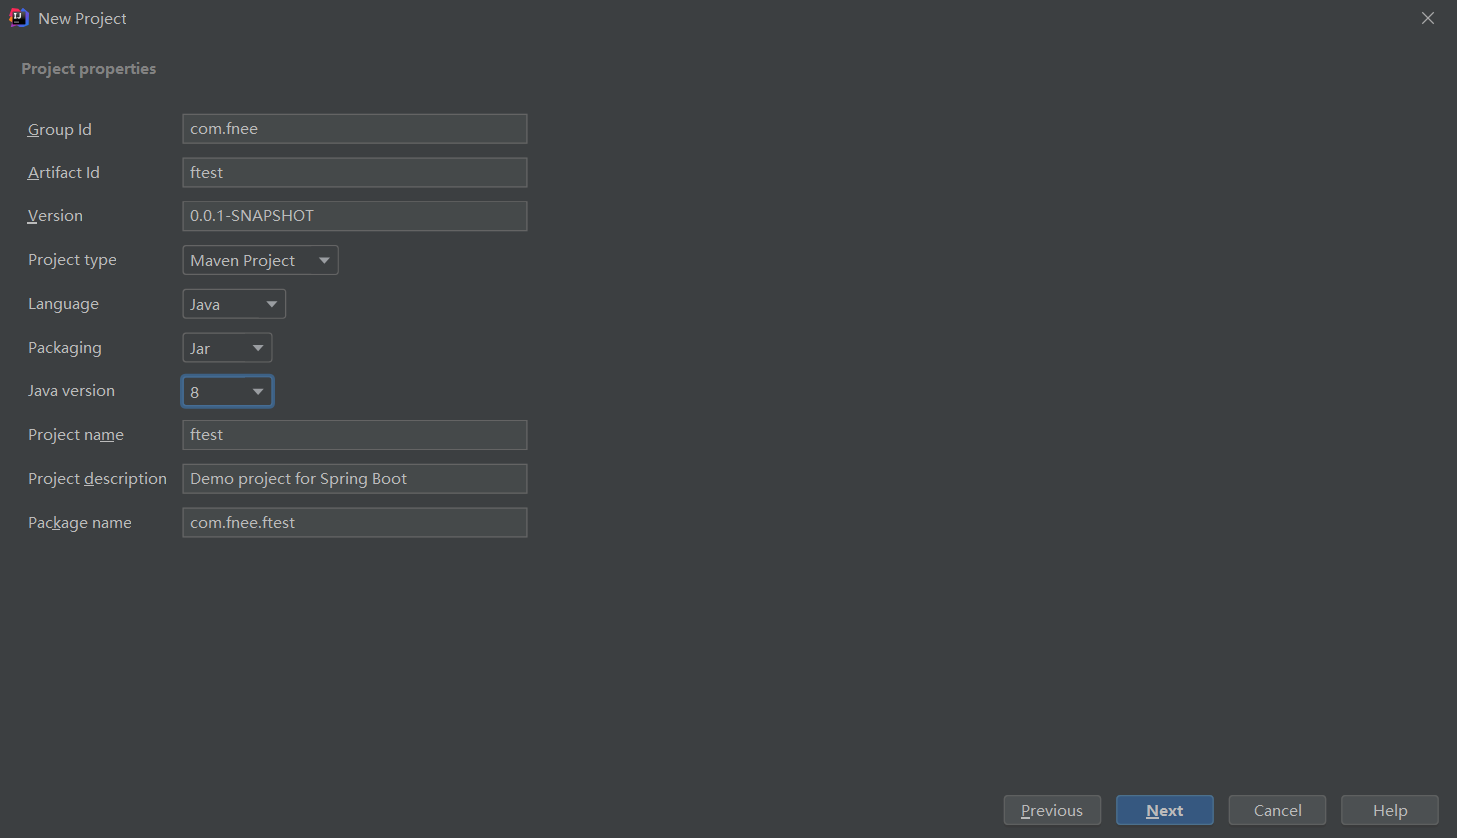
选中添加的依赖spring-boot-devtools,spring-boot-starter-web,lombok,MySQL Drive,如果没有对应的依赖选项,可以先跳过,在项目创建完毕再在pom.xml中添加依赖,Maven依赖资源:https://mvnrepository.com/
2.引入MyBatis-Plus依赖
可以参考官方文档:https://mybatis.plus/guide/
因为我们使用的是Mybatis-plus,所以在pom.xml中添加以下代码,引入MyBatis-Plus依赖,用来自动生成代码,提高开发效率
<!-- mybatis-plus依赖 -->
<dependency>
    <groupId>com.baomidou</groupId>
    <artifactId>mybatis-plus-boot-starter</artifactId>
    <version>3.4.0</version>
</dependency>
<!-- 模板 -->
<dependency>
    <groupId>org.springframework.boot</groupId>
    <artifactId>spring-boot-starter-freemarker</artifactId>
    <version>2.1.3.RELEASE</version>
</dependency>
<!-- 代码生成器 -->
<dependency>
    <groupId>com.baomidou</groupId>
    <artifactId>mybatis-plus-generator</artifactId>
    <version>3.4.0</version>
</dependency>
3.修改配置
将application.properties配置文件改为application.yml,并添加以下代码(注意修改自己的数据库密码)
spring:
  datasource:
    driver-class-name: com.mysql.cj.jdbc.Driver
    url: jdbc:mysql://localhost:3306/ftest?useUnicode=true&useSSL=false&characterEncoding=utf8&serverTimezone=Asia/Shanghai
    username: root
    password: 这里是你的数据库密码
mybatis-plus:
  mapper-locations: classpath*:/mapper/**Mapper.xml
server:
  port: 80
4.添加分页插件
在包com.fnee.ftest(以下称为“根包”)下创建class,命名为config.MybatisPlusConfig,并添加如下代码
package com.fnee.ftest.config;

import com.baomidou.mybatisplus.extension.plugins.PaginationInterceptor;
import org.mybatis.spring.annotation.MapperScan;
import org.springframework.context.annotation.Bean;
import org.springframework.context.annotation.Configuration;
import org.springframework.transaction.annotation.EnableTransactionManagement;

@Configuration
@EnableTransactionManagement
@MapperScan("com.fnee.ftest.mapper")
public class MybatisPlusConfig {
    //分页
    @Bean
    public PaginationInterceptor paginationInterceptor(){
        return new PaginationInterceptor();
    }
}
5.创建数据库
数据库结构如下
/*
 Navicat MySQL Data Transfer

 Source Server         : localhost_3306
 Source Server Type    : MySQL
 Source Server Version : 80021
 Source Host           : localhost:3306
 Source Schema         : fneeblog

 Target Server Type    : MySQL
 Target Server Version : 80021
 File Encoding         : 65001

 Date: 15/11/2020 15:29:35
*/

SET NAMES utf8mb4;
SET FOREIGN_KEY_CHECKS = 0;

-- ----------------------------
-- Table structure for t_blog
-- ----------------------------
DROP TABLE IF EXISTS `t_blog`;
CREATE TABLE `t_blog`  (
    `id` bigint(0) NOT NULL AUTO_INCREMENT,
    `user_id` bigint(0) NOT NULL COMMENT '用户',
    `title` varchar(255) CHARACTER SET utf8mb4 COLLATE utf8mb4_0900_ai_ci NOT NULL COMMENT '标题',
    `description` varchar(255) CHARACTER SET utf8mb4 COLLATE utf8mb4_0900_ai_ci NOT NULL COMMENT '摘要',
    `content` longtext CHARACTER SET utf8mb4 COLLATE utf8mb4_0900_ai_ci NULL COMMENT '内容',
    `created` datetime(0) NOT NULL ON UPDATE CURRENT_TIMESTAMP(0) COMMENT '创建时间',
    `status` tinyint(0) NULL DEFAULT NULL COMMENT '状态0正常',
    `type_id` bigint(0) NULL DEFAULT NULL COMMENT '分栏',
    `visit` bigint(0) NULL DEFAULT 0 COMMENT '访问数量',
    PRIMARY KEY (`id`) USING BTREE
) ENGINE = InnoDB AUTO_INCREMENT = 22 CHARACTER SET = utf8mb4 COLLATE = utf8mb4_0900_ai_ci ROW_FORMAT = Dynamic;

-- ----------------------------
-- Table structure for t_type
-- ----------------------------
DROP TABLE IF EXISTS `t_type`;
CREATE TABLE `t_type`  (
    `id` bigint(0) NOT NULL,
    `user_id` bigint(0) NULL DEFAULT NULL,
    `type` varchar(255) CHARACTER SET utf8 COLLATE utf8_unicode_ci NULL DEFAULT NULL,
    `status` tinyint(0) NULL DEFAULT NULL,
    PRIMARY KEY (`id`) USING BTREE
) ENGINE = InnoDB CHARACTER SET = utf8 COLLATE = utf8_unicode_ci ROW_FORMAT = Dynamic;

-- ----------------------------
-- Table structure for t_user
-- ----------------------------
DROP TABLE IF EXISTS `t_user`;
CREATE TABLE `t_user`  (
    `id` bigint(0) NOT NULL AUTO_INCREMENT,
    `username` varchar(64) CHARACTER SET utf8 COLLATE utf8_general_ci NULL DEFAULT NULL COMMENT '用户名',
    `avatar` varchar(255) CHARACTER SET utf8 COLLATE utf8_general_ci NULL DEFAULT NULL COMMENT '头像',
    `nick` varchar(255) CHARACTER SET utf8 COLLATE utf8_general_ci NULL DEFAULT NULL COMMENT '昵称',
    `email` varchar(64) CHARACTER SET utf8 COLLATE utf8_general_ci NULL DEFAULT NULL COMMENT '邮箱',
    `password` varchar(64) CHARACTER SET utf8 COLLATE utf8_general_ci NULL DEFAULT NULL COMMENT '密码',
    `status` int(0) NOT NULL COMMENT '状态',
    `created` datetime(0) NULL DEFAULT NULL COMMENT '创建日期',
    `last_login` datetime(0) NULL DEFAULT NULL COMMENT '最后登录',
    PRIMARY KEY (`id`) USING BTREE,
    INDEX `UK_USERNAME`(`username`) USING BTREE
) ENGINE = InnoDB AUTO_INCREMENT = 2 CHARACTER SET = utf8 COLLATE = utf8_general_ci ROW_FORMAT = Dynamic;

SET FOREIGN_KEY_CHECKS = 1;
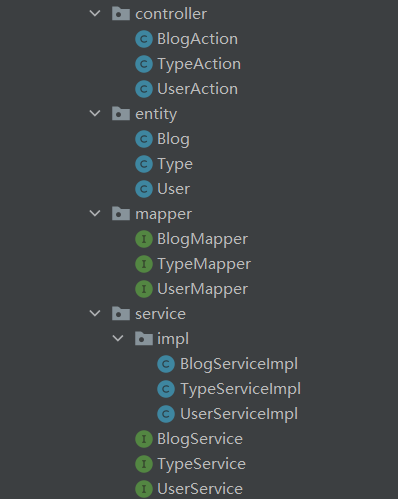
6.生成代码
在根包下创建代码生成类,代码如下(注意修改自己的数据库密码)
package com.fnee.ftest;

import com.baomidou.mybatisplus.core.exceptions.MybatisPlusException;
import com.baomidou.mybatisplus.core.toolkit.StringPool;
import com.baomidou.mybatisplus.core.toolkit.StringUtils;
import com.baomidou.mybatisplus.generator.AutoGenerator;
import com.baomidou.mybatisplus.generator.InjectionConfig;
import com.baomidou.mybatisplus.generator.config.*;
import com.baomidou.mybatisplus.generator.config.po.TableInfo;
import com.baomidou.mybatisplus.generator.config.rules.NamingStrategy;
import com.baomidou.mybatisplus.generator.engine.FreemarkerTemplateEngine;

import java.util.ArrayList;
import java.util.List;
import java.util.Scanner;

public class CodeGenerator {

    /**
     * <p>
     * 读取控制台内容
     * </p>
     */
    public static String scanner(String tip) {
        Scanner scanner = new Scanner(System.in);
        StringBuilder help = new StringBuilder();
        help.append("请输入" + tip + ":");
        System.out.println(help.toString());
        if (scanner.hasNext()) {
            String ipt = scanner.next();
            if (StringUtils.isNotBlank(ipt)) {
                return ipt;
            }
        }
        throw new MybatisPlusException("请输入正确的" + tip + "!");
    }

    public static void main(String[] args) {
        // 代码生成器
        AutoGenerator mpg = new AutoGenerator();

        // 全局配置
        GlobalConfig gc = new GlobalConfig();
        String projectPath = System.getProperty("user.dir");
        gc.setOutputDir(projectPath + "/src/main/java");
        gc.setAuthor("fnee"); //这里是作者名称
        gc.setOpen(false);
        gc.setServiceName("%sService"); //Service接口类命名规则
        gc.setServiceImplName("%sServiceImpl"); //Service实现类
        gc.setControllerName("%sAction"); //Controller类
        // gc.setSwagger2(true); 实体属性 Swagger2 注解
        mpg.setGlobalConfig(gc);

        // 数据源配置
        DataSourceConfig dsc = new DataSourceConfig();
        dsc.setUrl("jdbc:mysql://localhost:3306/ftest?useUnicode=true&useSSL=false&characterEncoding=utf8&serverTimezone=Asia/Shanghai");
        // dsc.setSchemaName("public");
        dsc.setDriverName("com.mysql.cj.jdbc.Driver");
        dsc.setUsername("root");
        dsc.setPassword("你自己的数据库密码");
        mpg.setDataSource(dsc);

        // 包配置
        PackageConfig pc = new PackageConfig();
        pc.setModuleName(null);
        pc.setParent("com.fnee.ftest");
        mpg.setPackageInfo(pc);

        // 自定义配置
        InjectionConfig cfg = new InjectionConfig() {
            @Override
            public void initMap() {
                // to do nothing
            }
        };

        // 如果模板引擎是 freemarker
        String templatePath = "/templates/mapper.xml.ftl";
        // 如果模板引擎是 velocity
        // String templatePath = "/templates/mapper.xml.vm";

        // 自定义输出配置
        List<FileOutConfig> focList = new ArrayList<>();
        // 自定义配置会被优先输出
        focList.add(new FileOutConfig(templatePath) {
            @Override
            public String outputFile(TableInfo tableInfo) {
                // 自定义输出文件名 , 如果你 Entity 设置了前后缀、此处注意 xml 的名称会跟着发生变化!!
                return projectPath + "/src/main/resources/mapper/"
                        + "/" + tableInfo.getEntityName() + "Mapper" + StringPool.DOT_XML;
            }
        });
        /*
        cfg.setFileCreate(new IFileCreate() {
            @Override
            public boolean isCreate(ConfigBuilder configBuilder, FileType fileType, String filePath) {
                // 判断自定义文件夹是否需要创建
                checkDir("调用默认方法创建的目录,自定义目录用");
                if (fileType == FileType.MAPPER) {
                    // 已经生成 mapper 文件判断存在,不想重新生成返回 false
                    return !new File(filePath).exists();
                }
                // 允许生成模板文件
                return true;
            }
        });
        */
        cfg.setFileOutConfigList(focList);
        mpg.setCfg(cfg);

        // 配置模板
        TemplateConfig templateConfig = new TemplateConfig();

        // 配置自定义输出模板
        //指定自定义模板路径,注意不要带上.ftl/.vm, 会根据使用的模板引擎自动识别
        // templateConfig.setEntity("templates/entity2.java");
        // templateConfig.setService();
        // templateConfig.setController();

        templateConfig.setXml(null);
        mpg.setTemplate(templateConfig);

        // 策略配置
        StrategyConfig strategy = new StrategyConfig();
        strategy.setNaming(NamingStrategy.underline_to_camel);
        strategy.setColumnNaming(NamingStrategy.underline_to_camel);
        strategy.setEntityLombokModel(true);
        strategy.setRestControllerStyle(true);
        strategy.setInclude(scanner("表名,多个英文逗号分割").split(","));
        strategy.setControllerMappingHyphenStyle(true);
        strategy.setTablePrefix("t_"); //数据库名前缀,生成类时用来除去数据库名前缀
        mpg.setStrategy(strategy);
        mpg.setTemplateEngine(new FreemarkerTemplateEngine());
        mpg.execute();
    }
}
然后运行main方法,输入表名回车即可自动生成代码,如果出错可能是数据库配置问题

->测试1
在数据库中的t_user表中添加一条id为1的数据,在UserAction中添加以下代码,然后运行FneeblogApplication,在浏览器中输入http://localhost/user/index查看是否有数据输出
package com.fnee.ftest.controller;

import com.fnee.ftest.service.UserService;
import org.springframework.beans.factory.annotation.Autowired;
import org.springframework.web.bind.annotation.GetMapping;
import org.springframework.web.bind.annotation.RequestMapping;

import org.springframework.web.bind.annotation.RestController;

/**
 * <p>
 *  前端控制器
 * </p>
 *
 * @author fnee
 * @since 2020-11-15
 */
@RestController
@RequestMapping("/user")
public class UserAction {

    @Autowired
    UserService userService;

    @GetMapping("/index")
    public Object index(){
        return userService.getById(1L);
    }
}
二、项目二层搭建
1.统一结果封装
在前端请求之后,为方便数据处理,我们往往对后端返回的数据进行格式统一封装
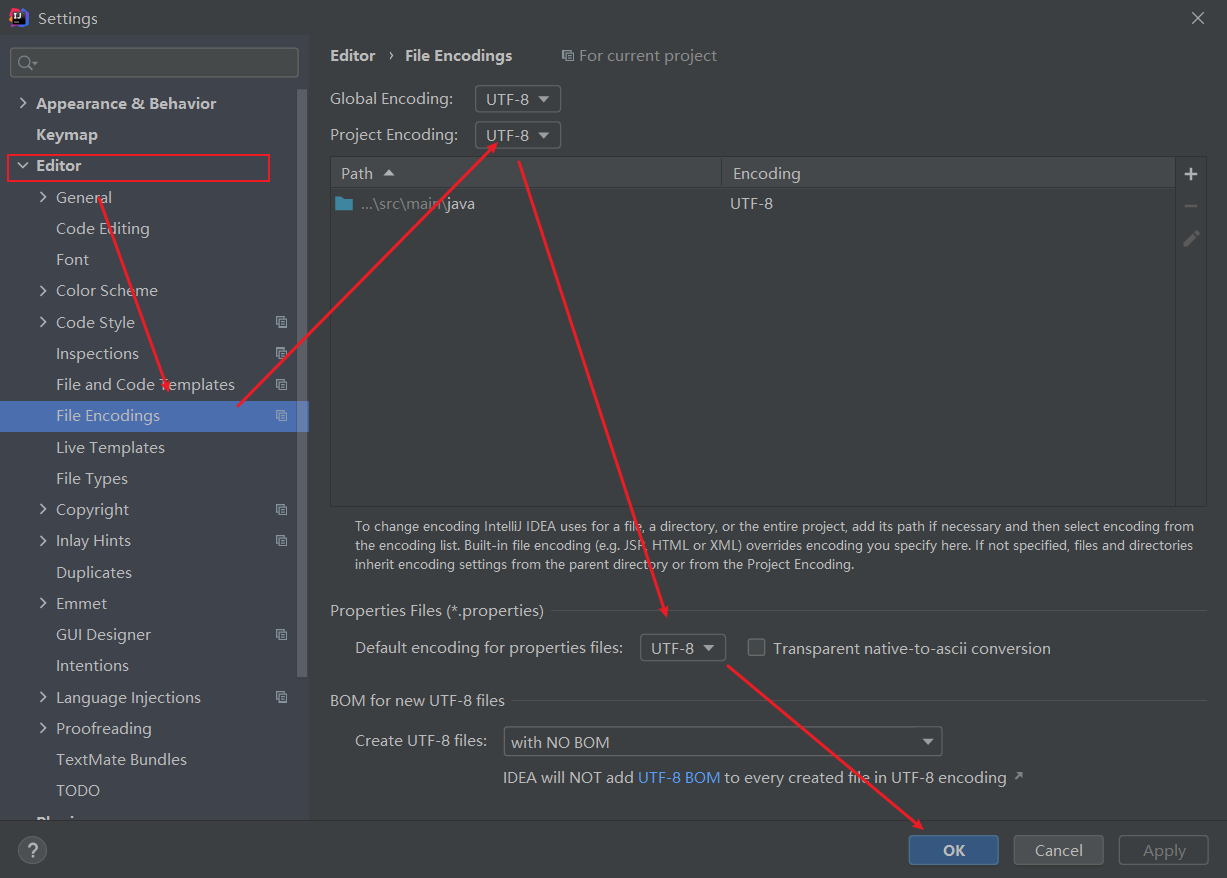
在IDEA中打开依次打开Settings…->Plugins,搜索lombok,点击install进行安装
在根包下创建class,命名为common.lang.Result,并添加以下代码
package com.fnee.ftest.common.lang;

import lombok.Data;

import java.io.Serializable;

@Data
public class Result implements Serializable {

    private int code; //200正常,非200异常
    private String msg; //返回提示信息
    private Object data; //返回数据

    public static Result success(int code, String msg, Object data) {
        Result result = new Result();
        result.setCode(code);
        result.setMsg(msg);
        result.setData(data);
        return result;
    }

    public static Result success(Object data) {
        return success(200, "操作成功", data);
    }

    public static Result fail(int code, String msg, Object data) {
        Result result = new Result();
        result.setCode(code);
        result.setMsg(msg);
        result.setData(data);
        return result;
    }

    public static Result fail(String msg, Object data) {
        return fail(400, msg, data);
    }

    public static Result fail(String msg) {
        return fail(400, msg, null);
    }
}
2.安装redis(5.0.10)
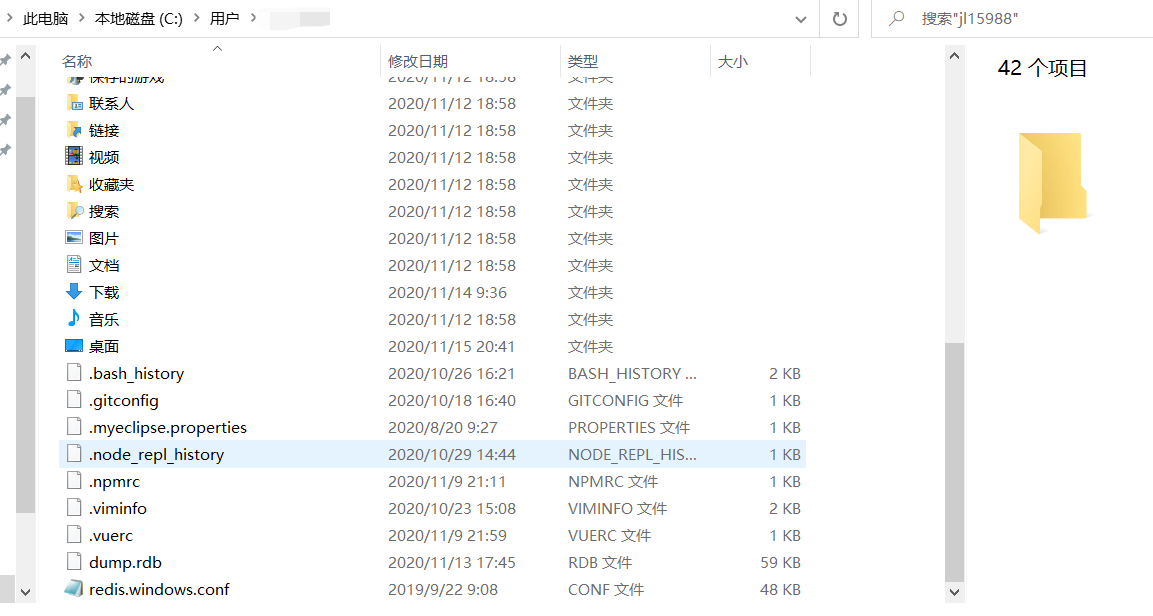
下载地址:https://github.com/tporadowski/redis/releases
下载后解压,将redis路径添加到windows环境Path中,并将redis.windows.conf复制到用户根目录下(当cmd运行时默认是该目录,可以直接进行调用)

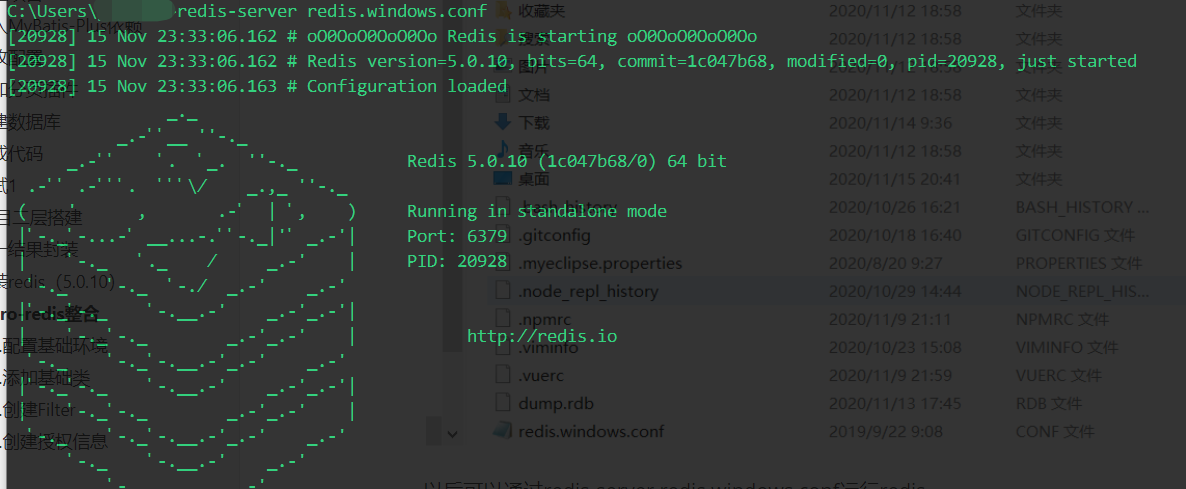
以后可以通过redis-server redis.windows.conf运行redis
3.Shiro-redis整合
官方文档:https://github.com/alexxiyang/shiro-redis/tree/master/docs
>1.配置基础环境
-
在pom.xml中添加以下依赖
<dependency> <groupId>org.crazycake</groupId> <artifactId>shiro-redis-spring-boot-starter</artifactId> <version>3.3.1</version> </dependency> <dependency> <groupId>cn.hutool</groupId> <artifactId>hutool-all</artifactId> <version>5.4.7</version> </dependency> <dependency> <groupId>io.jsonwebtoken</groupId> <artifactId>jjwt</artifactId> <version>0.9.1</version> </dependency> -
在application.yml中添加如下代码
shiro-redis: enables: true redis-manager: host: 127.0.0.1:6379 fnee: jwt: # 加密密匙,可以通过uuid生成 secret: dd1esdk5f6ed424e918csad7f5cbb643 # token有效时长,7天,单位秒 expire: 604800 header: Authorization -
在根包下创建class,命名为shiro.AccountRealm,并添加@Component注解,继承AuthorizingRealm重写doGetAuthorizationInfo,doGetAuthenticationInfo两个方法
-
在config包下创建ShiroConfig类,添加如下代码,如果遇到AccountRealm accountRealm无法注入问题,可能是由于
Unmapped Spring configuration files found.报错造成的,Ctrl+Shift+Alt+S,打开Project Structure界面,选中该项目Spring,点击加号,将该项目所有内容打钩,点击OK,如果没有作用重启软件试一试,正常应该是有两处参数错误RedisSessionDAO和RedisCacheManager,可以暂时忽略package com.fnee.ftest.shiro; import org.apache.shiro.mgt.SessionsSecurityManager; import org.apache.shiro.session.mgt.SessionManager; import org.apache.shiro.web.mgt.DefaultWebSecurityManager; import org.apache.shiro.web.session.mgt.DefaultWebSessionManager; import org.crazycake.shiro.RedisCacheManager; import org.crazycake.shiro.RedisSessionDAO; import org.springframework.context.annotation.Bean; import org.springframework.context.annotation.Configuration; @Configuration public class ShiroConfig { @Bean public SessionManager sessionManager(RedisSessionDAO redisSessionDAO) { DefaultWebSessionManager sessionManager = new DefaultWebSessionManager(); // inject redisSessionDAO sessionManager.setSessionDAO(redisSessionDAO); // other stuff... return sessionManager; } @Bean public SessionsSecurityManager securityManager(AccountRealm accountRealm, SessionManager sessionManager, RedisCacheManager redisCacheManager) { DefaultWebSecurityManager securityManager = new DefaultWebSecurityManager(accountRealm); //inject sessionManager securityManager.setSessionManager(sessionManager); // inject redisCacheManager securityManager.setCacheManager(redisCacheManager); // other stuff... return securityManager; } }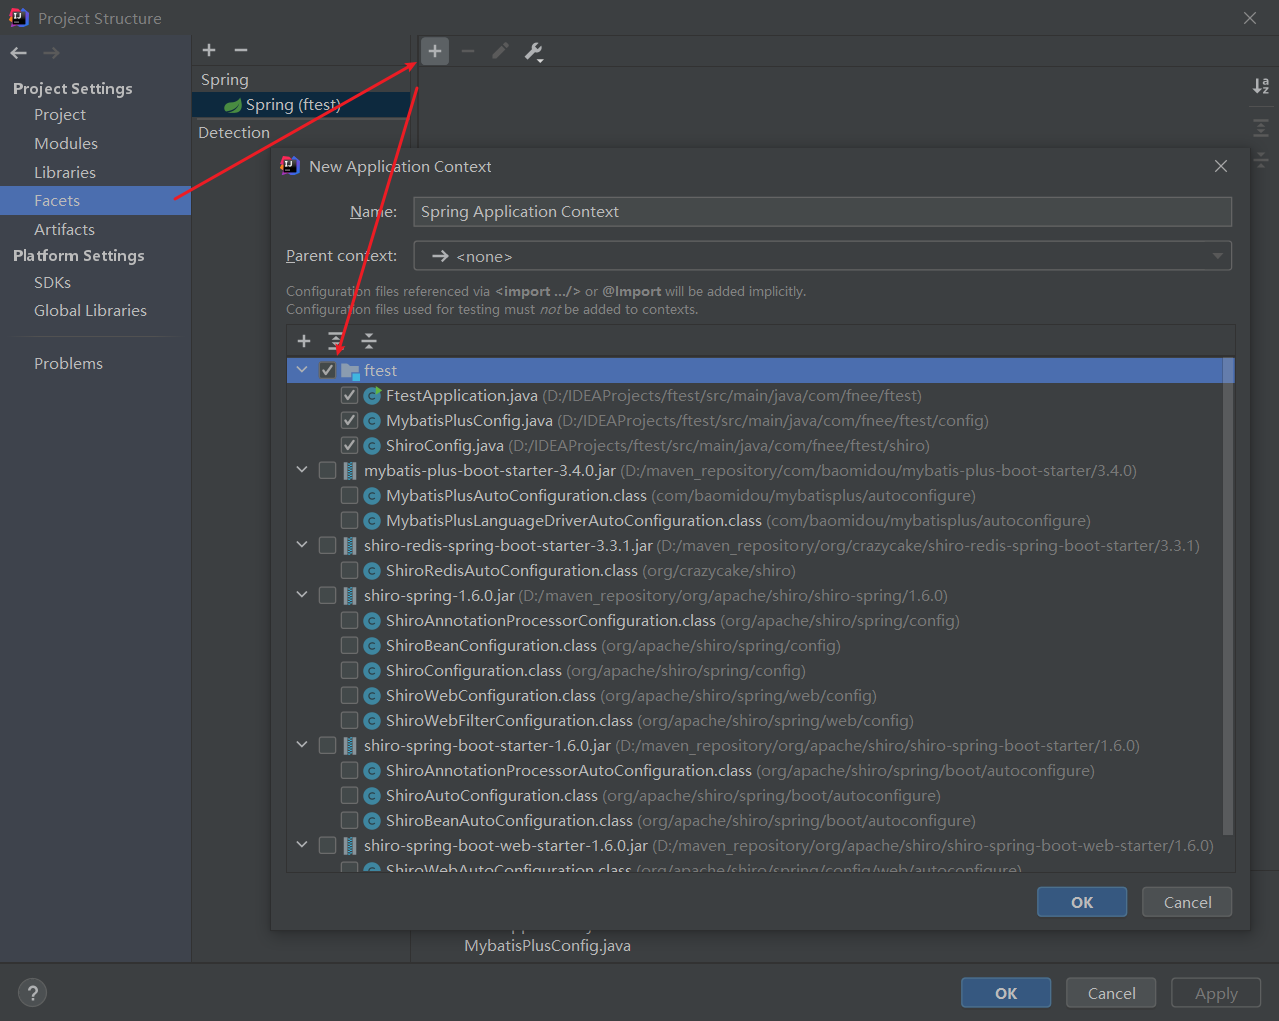
>2.添加基础类
-
在根包下创建util包,并添加以下工具类代码
package com.fnee.ftest.util; import io.jsonwebtoken.Claims; import io.jsonwebtoken.Jwts; import io.jsonwebtoken.SignatureAlgorithm; import lombok.Data; import lombok.extern.slf4j.Slf4j; import org.springframework.boot.context.properties.ConfigurationProperties; import org.springframework.stereotype.Component; import java.util.Date; @Slf4j @Data @Component @ConfigurationProperties(prefix = "fnee.jwt") public class JwtUtils { private String secret; private long expire; private String header; /** * 生成jwt token */ public String generateToken(long userId) { Date nowDate = new Date(); //过期时间 Date expireDate = new Date(nowDate.getTime() + expire * 1000); //生成加密密匙 return Jwts.builder() .setHeaderParam("typ", "JWT") .setSubject(userId + "") .setIssuedAt(nowDate) .setExpiration(expireDate) .signWith(SignatureAlgorithm.HS512, secret) .compact(); } /** * 解析token */ public Claims getClaimByToken(String token) { try { return Jwts.parser() .setSigningKey(secret) .parseClaimsJws(token) .getBody(); } catch (Exception e) { log.debug("validate is token error ", e); return null; } } /** * token是否过期 * * @return true:过期 */ public boolean isTokenExpired(Date expiration) { return expiration.before(new Date()); } } -
在shiro包下添加class,命名为JwtToken,并继承AuthenticationToken重写getPrincipal,getCredentials两个方法,最终代码如下
package com.fnee.ftest.shiro;

import org.apache.shiro.authc.AuthenticationToken;

public class JwtToken implements AuthenticationToken {

    private String token;

    public JwtToken(String token) {
        this.token = token;
    }

    @Override
    public Object getPrincipal() {
        return token;
    }

    @Override
    public Object getCredentials() {
        return token;
    }
}
>3.创建Filter
-
在shiro包下添加class,命名为JwtFilter,并继承AuthenticatingFilter重写createToken,onAccessDenied两个方法。
-
createToken方法用来生成令牌:获取用户提交的token并生成令牌来验证是否登录状态。
-
onAccessDenied方法用来登录操作:如果用户未登录,则会执行该方法,进行逻辑判断后执行登录操作。
因为我们这个项目是前后端分离的,所以不能通过session来验证登录,所以我们使用token,在请求头中添加Authorization来保存token
package com.fnee.ftest.shiro; import com.fnee.ftest.util.JwtUtils; import io.jsonwebtoken.Claims; import org.apache.shiro.authc.AuthenticationToken; import org.apache.shiro.authc.ExpiredCredentialsException; import org.apache.shiro.web.filter.authc.AuthenticatingFilter; import org.springframework.beans.factory.annotation.Autowired; import org.springframework.stereotype.Component; import org.springframework.util.StringUtils; import javax.servlet.ServletRequest; import javax.servlet.ServletResponse; import javax.servlet.http.HttpServletRequest; @Component public class JwtFilter extends AuthenticatingFilter { @Autowired JwtUtils jwtUtils; @Override protected AuthenticationToken createToken(ServletRequest servletRequest, ServletResponse servletResponse) throws Exception { //生成令牌 HttpServletRequest request = (HttpServletRequest) servletRequest; String jwt = request.getHeader("Authorization"); //获取前端传过来的token if (StringUtils.isEmpty(jwt)) { //判断是否有token,也就是判断是否已登录 return null; } return new JwtToken(jwt); } @Override protected boolean onAccessDenied(ServletRequest servletRequest, ServletResponse servletResponse) throws Exception { HttpServletRequest request = (HttpServletRequest) servletRequest; String jwt = request.getHeader("Authorization"); if (StringUtils.isEmpty(jwt)) { return true; //token为空则返回true验证不通过 } else { //校验jwt Claims claim = jwtUtils.getClaimByToken(jwt); if (claim == null || jwtUtils.isTokenExpired(claim.getExpiration())) { throw new ExpiredCredentialsException("token已失效,请重新登录"); } //执行登录 return executeLogin(servletRequest, servletResponse); } } } -
-
为了使登录失败后返回的格式符合我们的要求,所以重写onLoginFailure方法
/**
 * 重写onLoginFailure,将返回的异常格式改为Result格式
 */
@Override
protected boolean onLoginFailure(AuthenticationToken token, AuthenticationException e, ServletRequest request, ServletResponse response) {
    HttpServletResponse httpServletResponse = (HttpServletResponse) response;
    Throwable throwable = e.getCause() == null ? e : e.getCause();
    Result result = Result.fail(throwable.getMessage());
    String json = JSONUtil.toJsonStr(result);
    try {
        httpServletResponse.getWriter().print(json);
    } catch (IOException ioException) {

    }
    return false;
}
>4.创建授权信息
-
在shiro包中创建class,命名为AccountProfile,并添加如下代码
package com.fnee.ftest.shiro; import lombok.Data; import java.io.Serializable; @Data public class AccountProfile implements Serializable { //授权用户信息 private Long id; private String nick; private String username; private String avatar; private String email; } -
在AccountRealm中的doGetAuthenticationInfo方法中添加逻辑代码,最终代码:
package com.fnee.ftest.shiro; import cn.hutool.core.bean.BeanUtil; import com.fnee.ftest.entity.User; import com.fnee.ftest.service.UserService; import com.fnee.ftest.util.JwtUtils; import org.apache.shiro.authc.*; import org.apache.shiro.authz.AuthorizationInfo; import org.apache.shiro.realm.AuthorizingRealm; import org.apache.shiro.subject.PrincipalCollection; import org.springframework.beans.factory.annotation.Autowired; import org.springframework.stereotype.Component; @Component public class AccountRealm extends AuthorizingRealm { @Autowired JwtUtils jwtUtils; @Autowired UserService userService; @Override protected AuthorizationInfo doGetAuthorizationInfo(PrincipalCollection principalCollection) { return null; } @Override protected AuthenticationInfo doGetAuthenticationInfo(AuthenticationToken authenticationToken) throws AuthenticationException { //当前登录用户授权 JwtToken jwtToken = (JwtToken) authenticationToken; //通过token获取用户id String userId = jwtUtils.getClaimByToken((String) jwtToken.getCredentials()).getSubject(); User user = userService.getById(Long.valueOf(userId)); //检查用户是否存在 if (user == null) { throw new UnknownAccountException("账户不存在"); } //检查用户状态 if (user.getStatus() == -1) { throw new LockedAccountException("账户已被锁定"); } AccountProfile profile = new AccountProfile(); BeanUtil.copyProperties(user, profile); //创建并返回授权信息 return new SimpleAuthenticationInfo(profile, jwtToken.getCredentials(), getName()); } } -
在ShiroConfig中添加以下两个方法,并手动导入
import org.apache.shiro.mgt.SecurityManager;包,Filter导入javax.servlet中的Filter,并注入JwtFilter@Bean public ShiroFilterChainDefinition shiroFilterChainDefinition() { DefaultShiroFilterChainDefinition chainDefinition = new DefaultShiroFilterChainDefinition(); Map<String, String> filterMap = new LinkedHashMap<>(); filterMap.put("/**", "jwt"); chainDefinition.addPathDefinitions(filterMap); return chainDefinition; } @Bean("shiroFilterFactoryBean") public ShiroFilterFactoryBean shiroFilterFactoryBean(SecurityManager securityManager, ShiroFilterChainDefinition shiroFilterChainDefinition) { ShiroFilterFactoryBean shiroFilterFactoryBean = new ShiroFilterFactoryBean(); shiroFilterFactoryBean.setSecurityManager(securityManager); Map<String, Filter> filters = new HashMap<>(); filters.put("jwt", jwtFilter); shiroFilterFactoryBean.setFilters(filters); Map<String, String> filterMap = shiroFilterChainDefinition.getFilterChainMap(); shiroFilterFactoryBean.setFilterChainDefinitionMap(filterMap); return shiroFilterFactoryBean; }
三、全局异常处理
在common包下创建exception包,并创建class,命名为GlobalExceptionHandler,并添加如下代码
package com.fnee.ftest.common.exception;

import com.fnee.ftest.common.lang.Result;
import lombok.extern.slf4j.Slf4j;
import org.apache.shiro.ShiroException;
import org.springframework.http.HttpStatus;
import org.springframework.validation.BindingResult;
import org.springframework.validation.ObjectError;
import org.springframework.web.bind.MethodArgumentNotValidException;
import org.springframework.web.bind.annotation.ExceptionHandler;
import org.springframework.web.bind.annotation.ResponseStatus;
import org.springframework.web.bind.annotation.RestControllerAdvice;
import org.springframework.web.multipart.MaxUploadSizeExceededException;

/**
 * 全局异常处理
 */
@Slf4j
@RestControllerAdvice
public class GlobalExceptionHandler {


    @ResponseStatus(HttpStatus.UNAUTHORIZED)
    @ExceptionHandler(value = ShiroException.class)
    public Result handler(ShiroException e) {
        log.error("运行时异常:-----------------{}", e);
        return Result.fail(401,e.getMessage(),null);
    }

    @ResponseStatus(HttpStatus.BAD_REQUEST)
    @ExceptionHandler(value = MethodArgumentNotValidException.class)
    public Result handler(MethodArgumentNotValidException e) {
        log.error("实体校验异常:-----------------{}", e);
        BindingResult bindingResult = e.getBindingResult();
        ObjectError objectError = bindingResult.getAllErrors().stream().findFirst().get();
        return Result.fail(objectError.getDefaultMessage());
    }

    @ResponseStatus(HttpStatus.BAD_REQUEST)
    @ExceptionHandler(value = IllegalArgumentException.class)
    public Result handler(IllegalArgumentException e) {
        log.error("Assert异常:-----------------{}", e);
        return Result.fail(e.getMessage());
    }

    @ResponseStatus(HttpStatus.BAD_REQUEST)
    @ExceptionHandler(value = RuntimeException.class)
    public Result handler(RuntimeException e) {
        log.error("运行时异常:-----------------{}", e);
        return Result.fail(e.getMessage());
    }
}
->测试2
因为整合了redis,所以启动项目时也要启动redis
- 启动项目时如果遇到application.yml报错,是因为注释是中文,先将带有注释的代码去掉,然后修改如下配置,再将代码添加回去即可解决
- 如果热启动出现问题,可以在resources文件夹下新建文件夹,命名为META-INF,添加
spring-devtools.properties文件,并添加restart.include.shiro-redis=/shiro-[\w-\.]+jar内容
按照测试一再次测试,正常的话我们能访问到数据,再给index方法添加@RequiresAuthentication注解,再次访问结果如下

四、实体校验
后端通过Hibernate Validator来校验数据。在执行Controller之前,首先会校验数据格式,校验不通过则不会执行Controller中对应的方法,以下是常用注解
| 注释 | 验证类型 | 验证规则 |
|---|---|---|
| @AssertFalse | Boolean,boolean | 验证注解的元素值是false |
| @AssertTrue | Boolean,boolean | 验证注解的元素值是true |
| @NotNull | 任意类型 | 验证注解的元素值不是null |
| @Null | 任意类型 | 验证注解的元素值是null |
| @Min(value=值) | BigDecimal,BigInteger, byte,short, int, long,等任何Number或CharSequence(存储的是数字)子类型 | 验证注解的元素值大于等于@Min指定的value值 |
| @Max(value=值) | 和@Min要求一样 | 验证注解的元素值小于等于@Max指定的value值 |
| @DecimalMin(value=值) | 和@Min要求一样 | 验证注解的元素值大于等于@ DecimalMin指定的value值 |
| @DecimalMax(value=值) | 和@Min要求一样 | 验证注解的元素值小于等于@ DecimalMax指定的value值 |
| @Digits(integer=整数位数, fraction=小数位数) | 和@Min要求一样 | 验证注解的元素值的整数位数和小数位数上限 |
| @Size(min=下限, max=上限) | 字符串、Collection、Map、数组等 | 验证注解的元素值的在min和max(包含)指定区间之内,如字符长度、集合大小 |
| @Past | java.util.Date,java.util.Calendar;Joda Time类库的日期类型 | 验证注解的元素值(日期类型)比当前时间早 |
| @Future | 与@Past要求一样 | 验证注解的元素值(日期类型)比当前时间晚 |
| @NotBlank | CharSequence子类型 | 验证注解的元素值不为空(不为null、去除首位空格后长度为0),不同于@NotEmpty,@NotBlank只应用于字符串且在比较时会去除字符串的首位空格 |
| @Length(min=下限, max=上限) | CharSequence子类型 | 验证注解的元素值长度在min和max区间内 |
| @NotEmpty | CharSequence子类型、Collection、Map、数组 | 验证注解的元素值不为null且不为空(字符串长度不为0、集合大小不为0) |
| @Range(min=最小值, max=最大值) | BigDecimal,BigInteger,CharSequence, byte, short, int, long等原子类型和包装类型 | 验证注解的元素值在最小值和最大值之间 |
| @Email(regexp=正则表达式,flag=标志的模式) | CharSequence子类型(如String) | 验证注解的元素值是Email,也可以通过regexp和flag指定自定义的email格式 |
| @Pattern(regexp=正则表达式,flag=标志的模式) | String,任何CharSequence的子类型 | 验证注解的元素值与指定的正则表达式匹配 |
| @Valid | 任何非原子类型 | 指定递归验证关联的对象;如用户对象中有个地址对象属性,如果想在验证用户对象时一起验证地址对象的话,在地址对象上加@Valid注解即可级联验证 |
如对User类进行数据校验,可以这样写(注意包的引入)。其中@JsonFormat是用来规定格式的,当数据从后端响应给前端时,会根据规定的格式进行转化
package com.fnee.ftest.entity;

import com.baomidou.mybatisplus.annotation.TableName;
import com.baomidou.mybatisplus.annotation.IdType;
import com.baomidou.mybatisplus.annotation.TableId;
import java.time.LocalDateTime;
import java.io.Serializable;

import com.fasterxml.jackson.annotation.JsonFormat;
import lombok.Data;
import lombok.EqualsAndHashCode;

import javax.validation.constraints.Email;
import javax.validation.constraints.NotBlank;

@Data
@EqualsAndHashCode(callSuper = false)
@TableName("t_user")
public class User implements Serializable {

    private static final long serialVersionUID = 1L;

    @TableId(value = "id", type = IdType.AUTO)
    private Long id;

    @NotBlank(message = "用户名不能为空")
    private String username;

    private String avatar;

    @NotBlank(message = "昵称不能为空")
    private String nick;

    @NotBlank(message = "邮箱不能为空")
    @Email(message = "邮箱格式不正确")
    private String email;

    private String password;

    private Integer status;

    @JsonFormat(pattern = "yyy-MM-dd HH:mm:ss")
    private LocalDateTime created;

    private LocalDateTime lastLogin;
}
在UserAction中添加以下方法,@Validated注解用来校验数据格式
@PostMapping("/save")
public Result save(@Validated @RequestBody User user){
    return Result.success(user);
}
->测试3
打开Postman,输入http://localhost/user/save,选择Post并添加Body如下
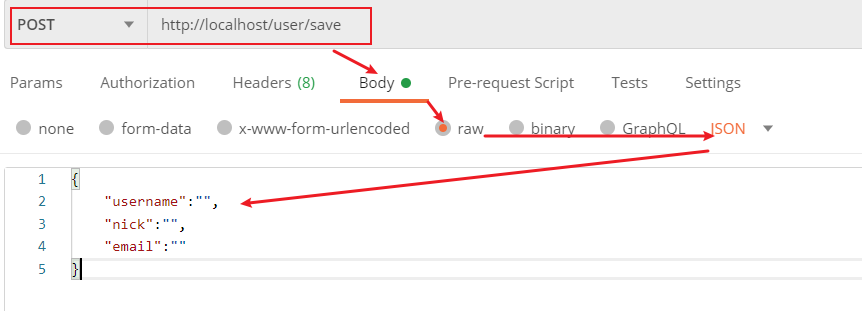
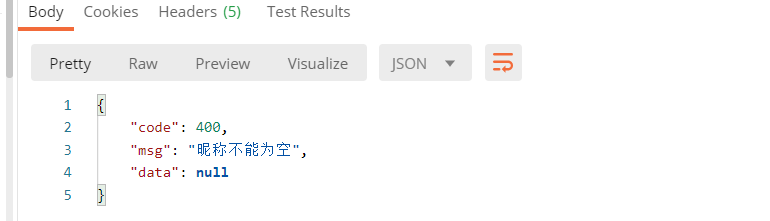
点击Send,返回数据如下(因为我们在全局异常处理中添加了用来捕获实体校验异常的方法,所以返回格式如下),其他测试请自行尝试
五、跨域问题
为了解决前后端分离出现的跨域问题,我们添加Spring配置来解决跨域问题
package com.fnee.ftest.config;

import org.springframework.context.annotation.Configuration;
import org.springframework.web.servlet.config.annotation.CorsRegistry;
import org.springframework.web.servlet.config.annotation.WebMvcConfigurer;

@Configuration
public class CorsConfig implements WebMvcConfigurer {

    @Override
    public void addCorsMappings(CorsRegistry registry) {
        registry.addMapping("/**")
                .allowedOrigins("*")
                .allowedMethods("GET", "HEAD", "POST", "PUT", "DELETE", "OPTIONS")
                .allowCredentials(true)
                .maxAge(3600)
                .allowedHeaders("*");
    }
}
以为Shiro过滤器在Controller之前进行调用,所以在JwtFilter中添加以下代码来解决跨域问题
/**
 * 解决跨域
 */
@Override
protected boolean preHandle(ServletRequest request, ServletResponse response) throws Exception {
    HttpServletRequest httpServletRequest = (HttpServletRequest) request;
    HttpServletResponse httpServletResponse = (HttpServletResponse) response;
    httpServletResponse.setHeader("Access-Control-Allow-Origin", httpServletRequest.getHeader("Origin"));
    httpServletResponse.setHeader("Access-Control-Allow-Methods", "GET,POST,OPTIONS,PUT,DELETE");
    httpServletResponse.setHeader("Access-Control-Allow-Headers", httpServletRequest.getHeader("Access-Control-Request-Headers"));
    //跨域时首先发送一个OPTIONS请求,直接给OPTIONS请求返回正常状态
    if (httpServletRequest.getMethod().equals(RequestMethod.OPTIONS.name())) {
        httpServletResponse.setStatus(HttpStatus.OK.value());
        return false;
    }
    return super.preHandle(request, response);
}
六、接口开发
1.登录
在common包下创建class,命名为dto.LoginDto和dto.LoginUser
package com.fnee.ftest.common.dto;

import lombok.Data;

import javax.validation.constraints.NotBlank;
import java.io.Serializable;

@Data
public class LoginDto implements Serializable {

    @NotBlank(message = "昵称不能为空")
    private String username;

    @NotBlank(message = "密码不能为空")
    private String password;
}
package com.fnee.ftest.common.dto;

import com.fasterxml.jackson.annotation.JsonFormat;
import lombok.Data;

import java.io.Serializable;
import java.time.LocalDateTime;

@Data
public class LoginUser implements Serializable {

    private Long id;

    private String username;

    private String nick;

    private String avatar;

    private String email;

    @JsonFormat(pattern = "yyy-MM-dd HH:mm:ss")
    private LocalDateTime created;

    private LocalDateTime lastLogin;

    private Long visit;
}
将UserAction恢复初始,并将所有Action去掉@RequestMapping,注入UserService
@Autowired
UserService userService;

@PostMapping("/login")
public Result login(@Validated @RequestBody LoginDto loginDto, HttpServletResponse response) {
    //通过前端传过来的用户名获取数据库中对应的User信息
    User user = userService.getOne(new QueryWrapper<User>().eq("username", loginDto.getUsername()));
    //判断是否有该用户信息,全局异常处理类中含有捕获Assert异常方法
    Assert.notNull(user, "用户名不存在");
    //密码对比
    if (!user.getPassword().equals(SecureUtil.md5(loginDto.getPassword()))) {
        return Result.fail("密码不正确");
    }
    //根据用户id生成token
    String jwt = jwtUtils.generateToken(user.getId());
    response.setHeader("Authorization", jwt); //将token保存到header的Authorization属性中
    //将Authorization属性设置为可公开属性,不然前端拿不到
    response.setHeader("Access-Control-Expose-Headers", "Authorization");
    LoginUser loginUser = new LoginUser();
    //复制user属性给loginUser,忽略password属性(这里是为了避免用户信息泄露)
    BeanUtils.copyProperties(user,loginUser,"password");
    return Result.success(loginUser); //返回登录后的用户信息
}
2.退出
@RequiresAuthentication
@GetMapping("/logout")
public Result logout() {
    SecurityUtils.getSubject().logout(); //将当前用户注销
    return Result.success(null);
}
3.博客列表
>1.全部
在BlogAction中添加以下代码
@Autowired
BlogService blogService;

@GetMapping("/blogs")
public Result list(@RequestParam(defaultValue = "1") Integer currentPage) {
    //创建分页实例,currentPage是第几页,10代表一页几条数据
    Page page = new Page(currentPage, 10);
    //根据page获取博客数据
    IPage pageData = blogService.page(page, new QueryWrapper<Blog>().orderByDesc("created"));
    return Result.success(pageData);
}
>2.按分类
@GetMapping("/blogs/{type}")
public Result listWithType(@PathVariable(name = "type") Long type, @RequestParam(defaultValue = "1") Integer currentPage) {
    Page page = new Page(currentPage, 10);
    //在获取博客数据时,添加eq根据属性来查询数据
    IPage pageData = blogService.page(page, new QueryWrapper<Blog>().eq("type_id", type).orderByDesc("created"));
    return Result.success(pageData);
}
>3.最热
@GetMapping("/blogs/hot")
public Result hot() {
    Page page = new Page(1, 10); //只获取第一页,10条信息
    //根据阅读量排序获取数据
    Page pageData = blogService.page(page, new QueryWrapper<Blog>().orderByDesc("visit"));
    return Result.success(pageData);
}
4.博客详情
@GetMapping("/blog/{id}")
public Result detail(@PathVariable(name = "id") Long id) {
    Blog blog = blogService.getById(id); //通过id获取博客信息
    Assert.notNull(blog, "该博客已被删除"); //判断博客信息是否为空
    Long read = blog.getVisit(); //获取阅读量
    blog.setVisit(++read); //阅读量加1并赋值
    blogService.updateById(blog); //更新博客数据
    return Result.success(blog);
}
5.添加或修改
@RequiresAuthentication
@PostMapping("/blog/edit")
public Result list(@Validated @RequestBody Blog blog) {
    Blog temp = null;
    //根据前端传过来的数据是否有id判断添加或是修改
    if (blog.getId() != null) {
        //编辑文章
        temp = blogService.getById(blog.getId());
        //只能编辑自己的文章,ShiroUtil.getProfile().getId()获取当前登录用户id
        Assert.isTrue(temp.getUserId().longValue() == ShiroUtil.getProfile().getId().longValue(), "没有权限编辑此文章");
    } else {
        //添加文章
        temp = new Blog();
        temp.setUserId(ShiroUtil.getProfile().getId());
        temp.setCreated(LocalDateTime.now());
        temp.setStatus(0);
    }
    BeanUtil.copyProperties(blog, temp, "id", "userId", "created", "status");
    blogService.saveOrUpdate(temp);
    return Result.success(null);
}
6.总阅读量
@RequiresAuthentication
@GetMapping("/blog/visits")
public Result blogVisit() {
    Long nums = 0L;
    List<Blog> list = blogService.list(new QueryWrapper<Blog>().eq("user_id", ShiroUtil.getProfile().getId()));
    for (int i = 0, len = list.size(); i < len; i++) {
        Blog blog = list.get(i);
        nums += blog.getVisit();
    }
    return Result.success(nums);
}
7.分栏列表
在TypeAction中添加以下代码
@Autowired
TypeService typeService;

@GetMapping("/type")
public Result type() {
    return Result.success(typeService.list());
}
8.分栏数量
@RequiresAuthentication
@GetMapping("/type/nums")
public Result typeNum() {
    return Result.success(typeService.count(new QueryWrapper<Type>().eq("user_id", ShiroUtil.getProfile().getId())));
}
七、源码下载
下载地址:https://download.csdn.net/download/jl15988/13183885
最后
以上就是伶俐糖豆最近收集整理的关于前后端分离后端接口开发文档 - 优化更新中的全部内容,更多相关前后端分离后端接口开发文档内容请搜索靠谱客的其他文章。


![将 arr[]={9,8,7,6,5,4,3,2,1,0} 用冒泡排序的方法排序成{0,1,2,3,4,5,6,7,8,9}](https://www.shuijiaxian.com/files_image/reation/bcimg25.png)
发表评论 取消回复