muduo库线程池实现
muduo库实现了一个线程池的功能,能够设定固定线程池的大小以及任务队列的大小;测试程序的主线程用于将任务添加到任务队列中,由线程池中的工作线程消费,其中用到了线程的mutex锁以及条件变量对线程进行同步;
线程池实现利用了bind和function的基于对象的变成方法,如果对这些不熟的话,可以先看博主之前记录的文章:C++基于对象编程与function,bind用法.
thread线程的封装
实现了Thread类,类中定义了包括线程的线程名,线程Id,以及线程创建和等待等常用函数,具体实现代码如图;
// thread.h
#ifndef THREAD_POOL_THREAD_H
#define THREAD_POOL_THREAD_H

#include <string>
#include <utility>
#include <functional>
#include <pthread.h>

namespace thread_pool {
    class Thread {
    public:
        typedef std::function<void()> ThreadFunc;

        Thread(const int &id, std::string name, ThreadFunc func)
                : id_(id),
                  threadName_(std::move(name)),
                  func_(std::move(func)),
                  start_(false),
                  join_(false) {
        }

        ~Thread() {
            if (start_ && !join_)
                pthread_detach(threadId_);
        }

        std::string getThreadName() const {
            return threadName_;
        }

        int getThreadId() const {
            return id_;
        }

        void start() {
            assert(!start_);
            start_ = true;
            pthread_create(&threadId_, nullptr, threadFunc, this);
        }

        static void *threadFunc(void *arg) {
            auto thread = static_cast<Thread *>(arg);
            thread->func_();
            return nullptr;
        }

        int join() {
            assert(start_);
            assert(!join_);
            join_ = true;
            return pthread_join(threadId_, nullptr);
        }

    private:
        pthread_t threadId_;
        int id_;
        std::string threadName_;
        ThreadFunc func_;
        bool start_;
        bool join_;
    };
}
线程同步方法的封装
muduo线程池线程之间的同步主要通过pthread_mutex_t和pthread_cond_t实现,分别类为mutex和condition。
mutex方法类似于C++ 11线程中lock_guard,实现了MutexLockGuard,RAII的方法进行加锁和解锁,这种实现需要注意考虑加锁解锁范围的考虑,设置锁范围较大容易引起效率问题。在thread_pool.c中也有体现,通过"{}"局部加解锁方式,减小加锁范围。
条件变量是要与锁结合使用的,因此condition.h方法基于mutex.h封装的类MutexLock实现;
// mutex.h
#ifndef THREAD_POOL_MUTEX_H
#define THREAD_POOL_MUTEX_H

#include <pthread.h>
#include <iostream>

// 简单封装pthread_mutex_t,用起来更加便捷
class MutexLock {
public:
    MutexLock() {
        pthread_mutex_init(&mutex_, nullptr);
    }

    ~MutexLock() {
        pthread_mutex_destroy(&mutex_);
    }

    void lock() {
        pthread_mutex_lock(&mutex_);
    }

    void unlock() {
        pthread_mutex_unlock(&mutex_);
    }

    pthread_mutex_t *getPthreadMutex() {
        return &mutex_;
    }

private:
    pthread_mutex_t mutex_;
};

// RAII的方法,只需调用MutexLockGuard,无需关注lock(),unlock(),由构造函数与析构函数完成
class MutexLockGuard {
public:
    explicit MutexLockGuard(MutexLock &mutex)
            : mutex_(mutex) {
        mutex_.lock();
    }

    ~MutexLockGuard() {
        mutex_.unlock();
    }

private:
    //这个地方一定要传引用,是必须;
    MutexLock &mutex_;
};

#endif //THREAD_POOL_MUTEX_H
// condition.h
#ifndef THREAD_POOL_CONDITION_H
#define THREAD_POOL_CONDITION_H

#include <pthread.h>
#include "mutex.h"

class Condition {
public:
    Condition(MutexLock &mutex)
            : mutex_(mutex) {
        pthread_cond_init(&cond_, nullptr);
    }

    ~Condition() {
        pthread_cond_destroy(&cond_);
    }

    void notify() {
        pthread_cond_signal(&cond_);
    }

    void notifyAll() {
        pthread_cond_broadcast(&cond_);
    }

    void wait() {
        pthread_cond_wait(&cond_, mutex_.getPthreadMutex());
    }

private:
    //需要采用&,保持线程池中mutex的一致性
    MutexLock &mutex_;
    pthread_cond_t cond_{};
};
线程池的实现
线程池中线程的管理,使用vector实现,用unique_ptr指向Thread,智能指针的使用,防止内存泄漏的出现;
任务队列采用deque实现,任务添加到队列的尾端,从队列的头部取出任务执行;
采用两个条件变量,notFull_, notEmpty_在消息队列满和空时,让进行进入等待状态;
具体的实现在代码中进行注释讲解;
// thread_pool.h
#ifndef THREAD_POOL_THREAD_POOL_H
#define THREAD_POOL_THREAD_POOL_H

#include "thread.h"
#include "condition.h"
#include <string>
#include <vector>
#include <deque>
#include <memory>

namespace thread_pool {
    class ThreadPool {
    public:
        typedef std::function<void()> Task;

        ThreadPool(std::string name = std::string("thread_pool"));

        ~ThreadPool();

        void setMaxSize(size_t num) {
            maxQueueSize_ = num;
        }

        size_t queueSize() const;

        bool isRunning() {
            return running_;
        }

        bool isFull() {
            return maxQueueSize_ <= queue_.size();
        }

        void start(int numThreads);

        void stop();

        void run(Task task);

        Task take();

    private:
        void runInThread();

        MutexLock mutex_;
		// 线程池非满条件变量
        Condition notFull_;
		// 线程池非空条件变量
        Condition notEmpty_;

        std::string name_;
		// 任务队列的最大大小
        size_t maxQueueSize_;
		// 标志线程池是否正在运行
        bool running_;
		// vector管理线程
        std::vector<std::unique_ptr<thread_pool::Thread>> threads_;
		// 任务队列
        std::deque<Task> queue_;
    };
}
#endif //THREAD_POOL_THREAD_POOL_H
#include "thread_pool.h"
#include <utility>

// C++ 11采用move方法,98就用const std::string& name
thread_pool::ThreadPool::ThreadPool(std::string name)
        : name_(std::move(name)),
          maxQueueSize_(0),
          running_(false),
          mutex_(),
          notFull_(mutex_),
          notEmpty_(mutex_) {
}

thread_pool::ThreadPool::~ThreadPool() {
    if (running_)
        stop();
}

void thread_pool::ThreadPool::start(int numThreads) {
    assert(!running_);
    running_ = true;
    for (int i = 0; i < numThreads; ++i) {
        std::string name = "thread_" + std::to_string(i);
        // emplace_back()初始化线程最大的好处就是避免了初始化线程的一次拷贝过程
        threads_.emplace_back(new thread_pool::Thread(i, name, std::bind(&ThreadPool::runInThread, this)));
        threads_[i]->start();
    }
}

void thread_pool::ThreadPool::stop() {
    assert(running_);
    {
        MutexLockGuard lock(mutex_);
        // 根据take函数的实现,running_ = false必须在notfyAll之前,否则会导致线程一直阻塞;
        running_ = false;
        // 结束时,调用notEmpty_.notifyAll(),通知所有工作线程不要阻塞在not_empty_.wait()上
        notEmpty_.notifyAll();
    }
    // 结束join所有工作线程
    for (auto &thr :threads_)
        thr->join();
}

size_t thread_pool::ThreadPool::queueSize() const {
    return maxQueueSize_;
}

void thread_pool::ThreadPool::run(thread_pool::ThreadPool::Task task) {
	// 若线程池的工作线程个数为0,线程池不起作用,由主线程执行任务;
    if (threads_.empty())
        task();
    else {
        MutexLockGuard lock(mutex_);
        // 若非空则往队列中添加任务,通知一个线程跳出notEmpty_.wait()的等待,执行任务
        while (isFull())
            notFull_.wait();
        queue_.push_back(std::move(task));
        notEmpty_.notify();
    }
}

thread_pool::ThreadPool::Task thread_pool::ThreadPool::take() {
    MutexLockGuard lock(mutex_);
    // 若队列为空,则一直阻塞在not_Empty_.wait()
    while (queue_.empty() && running_)
        notEmpty_.wait();
    Task task;
    if (!queue_.empty()) {
    	// 取任务消费完,通知主线程任务队列非空
        task = queue_.front();
        queue_.pop_front();
        if (maxQueueSize_ > 0)
            notFull_.notify();
    }
    return task;
}

void thread_pool::ThreadPool::runInThread() {
	// 线程的任务执行函数,以running_为标志,持续运行,当stop()后,跳出循环
    while (running_) {
        Task task(take());
        if (task)
            task();
    }
}
线程池代码单元测试
测试的代码在main.c函数中实现,测试的函数为简单的打印标号,测试函数实现如下:
// main.c
#include <iostream>
#include "thread.h"
#include "thread_pool.h"
#include <memory>
#include <vector>
#include <unistd.h>

void printString(const std::string &str) {
    std::cout << str << std::endl;
    usleep(100 * 100);
}

void test(int maxSize) {
    thread_pool::ThreadPool pool;
    pool.setMaxSize(maxSize);
    pool.start(5);
    for (int i = 0; i < 100; ++i) {
        std::string buf = "task" + std::to_string(i);
        pool.run(std::bind(printString, buf));
    }
    pool.stop();
    std::cout << "Done" << std::endl;
}

int main() {
    test(50);
    std::cout << "Hello, World!" << std::endl;
    return 0;
}
设置的线程池的任务队列大小为50,线程池中线程的数为5,共100个任务添加到任务队列中,由线程池消费;
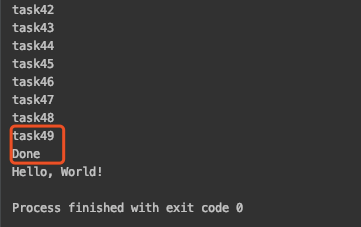
运行后发现一个问题,这样实现的线程池,总有若干任务在线程池终止时无法被消费掉,考虑的情况如下(若有不对,欢迎补充):部分线程在获取到task()任务,但并未执行,此时主线程调用线程池的stop()函数,发送notEmpty_.notifyAll()信号,但是此时线程并没有阻塞在wait()上,就导致信号通知失效,并没有消费掉残留在任务队列中的任务,这种情况在任务队列越大,线程数量越少时,越明显。
图为100个任务时的执行情况:
改进的调用方案:
测试程序采用了一个countDownLatch.h,利用这个类实现将线程池任务队列中的任务全部执行完毕,这里挺巧妙的,先看代码;
// countDownLatch.h
#ifndef THREAD_POOL_COUNTDOWNLATCH_H
#define THREAD_POOL_COUNTDOWNLATCH_H

#include "mutex.h"
#include "condition.h"

class CountDownLatch {

public:
    CountDownLatch(int count)
            : mutex_(),
              condition_(mutex_),
              count_(count) {
    }

    ~CountDownLatch() {}

    void wait() {
        MutexLockGuard lock(mutex_);
        if (count_ > 0)
            condition_.wait();
    }

    void countDown() {
        MutexLockGuard lock(mutex_);
        --count_;
        if (count_)
            condition_.notifyAll();
    }

private:
    Condition condition_;
    MutexLock mutex_;
    int count_;
};
#endif //THREAD_POOL_COUNTDOWNLATCH_H
测试程序中,利用主线程往countDownLatch中添加count_为1,将countDownLatch任务添加到线程池任务队列的最后一个,主线程阻塞在countDownLatch.wait()函数中;
//main.cpp
CountDownLatch latch(1);
pool.run(std::bind(&CountDownLatch::countDown, &latch));
latch.wait();
pool.stop();
线程池中线程只有消费完最后一个线程的时候,主线程才能进入stop()状态,保证任务队列中消息全部消费完毕,现在测试程序的执行全部正确了。
最后
以上就是健忘银耳汤最近收集整理的关于muduo网络库线程池的实现muduo库线程池实现的全部内容,更多相关muduo网络库线程池内容请搜索靠谱客的其他文章。


发表评论 取消回复