第0章 项目如何开始的
0.1 总体流程
需求调研-->需求转为需求文档-->将需求文档转为开发文档-->前端文档-->后台文档-->项目测试-->打包上线
0.2 数据服务器构建
0.2.1 技术栈
Vue+elementUI+NodeJS+MySQL
0.2.2 数据服务器准备
导入数据库数据:打开数据库服务器,新建名为 itcast 的库;
后台为我们提供了 /api-server/db/mydb.sql 数据文件,打开复制 sql 语句直接运行即可;
然后在 api-server 中执行 npm install 安装服务器所需扩展模块;
node app.js 将服务器启动起来;
0.3 接口测试
0.3.1 登录
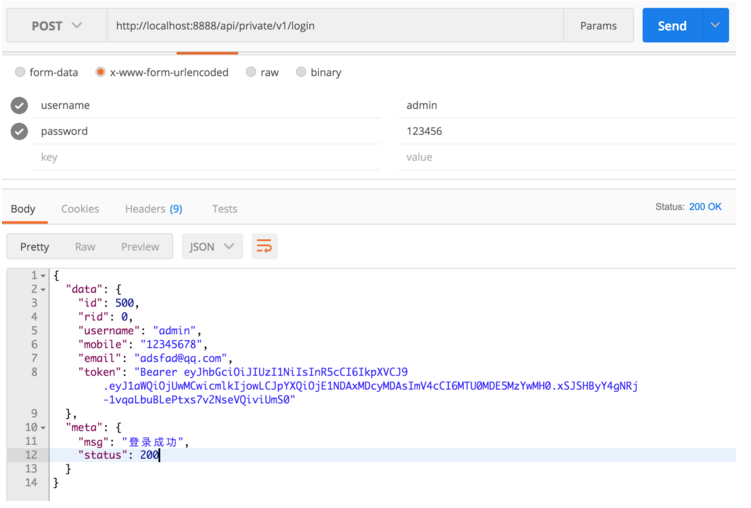
后台已经写好接口文档,根据文档中的表述,我们测试登录接口:
0.3.2 获取用户信息
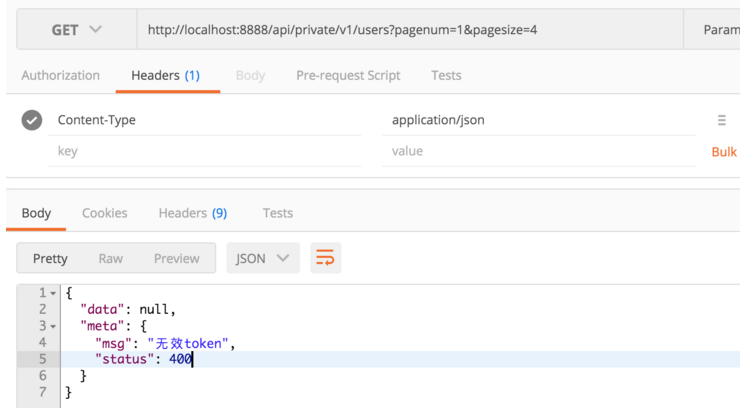
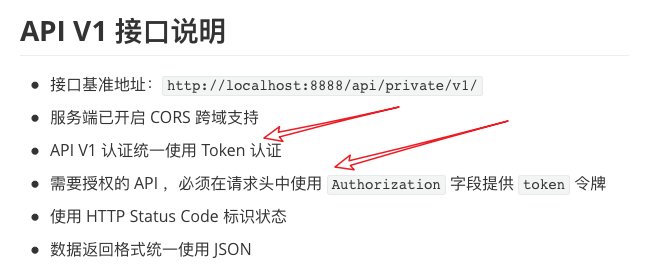
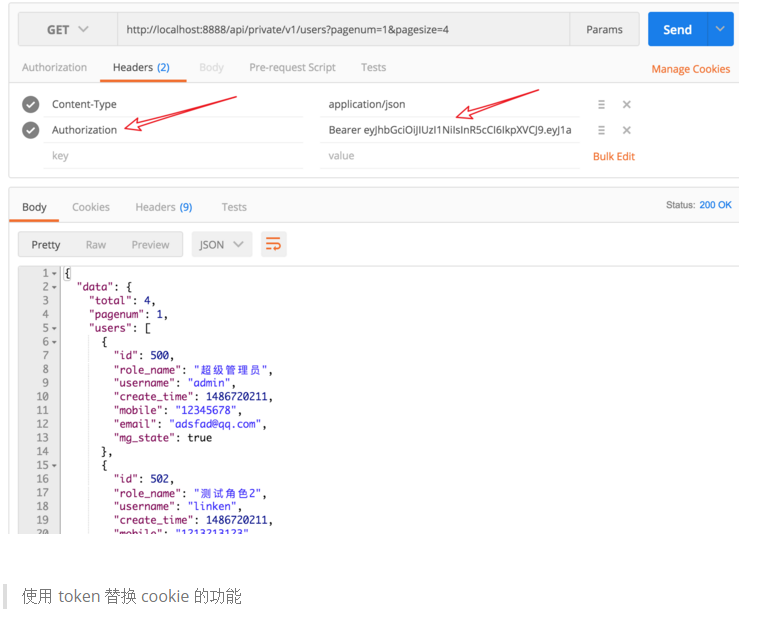
请求用户列表数据;但是,并没有返回相应的数据;
0.4 Vue项目初始化
使用 vue-cli 工具初始化项目:
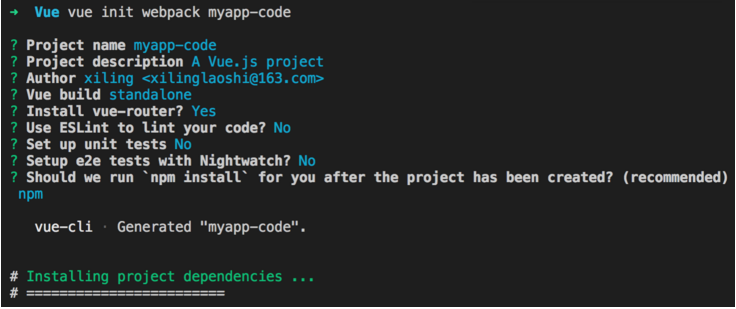
初始化成功,使用 npm run dev 启动项目;
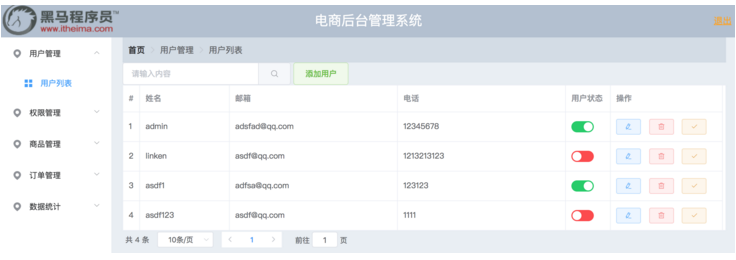
0.5 项目预览
解压 my-project(Vue项目).rar 后进入目录,使用 npm run dev 启动项目;
第1章 开始项目
1.1 添加用户登录路由组件
添加路由:myapp-code/src/router/index.js
import Vue from 'vue'
import Router from 'vue-router'
import Login from '@/components/login/login'

Vue.use(Router)

export default new Router({
  routes: [
    {
      path:'/login',
      name:'Login',
      component:Login
    }
  ]
})添加组件:`myapp-code/src/components/login/login.vue`
<template>
  <div>{{msg}}</div>
</template>

<script>
  export default{
    data(){
      return {msg:'我是登录页面'}
    }
  }
</script>
<style>
</style>
修改Vue 项目运行端口: myapp-code/config/index.js
1.2 使用 ElementUI
http://element-cn.eleme.io/#/zh-CN

修改 src/main.js 代码,全局引入 ElementUI ;
import Vue from 'vue'
import App from './App'
import router from './router'

// 引入 ElementUI
import ElementUI from 'element-ui'
import 'element-ui/lib/theme-chalk/index.css';
// 将 ElementUI 注册为 vue的全局组件
Vue.use(ElementUI);


Vue.config.productionTip = false

new Vue({
  el: '#app',
  router,
  components: { App },
  template: '<App/>'
})
在我们登录页面中尝试一下:` src/components/login/login.vue`
<template>
  <div>
    <el-button type="success">成功按钮</el-button>
    <el-button type="info">信息按钮</el-button>
    <el-button type="warning">警告按钮</el-button>
    <el-button type="danger">危险按钮</el-button>
  </div>
</template>
1.3 搭建登录页面
把公共样式写到 src/assets/css/style.css : Form 表单
html,
body {
  height: 100%;
}

body {
  margin: 0;
  padding: 0;
}
然后在 src/main.js 加载公共样式:
// 代码略...

// 引入我们的公共样式
import './assets/css/style.css'

// 代码略...
为了让登陆组件的背景色撑满,所以我们需要让他们的父盒子 div#app 高度设置为 100%。
所以我们在 src/App.vue :
<style>
#app {
  height: 100%;
}
</style>
接下来我们开始调整 src/components/login/login.vue 组件样式:
-
注意:这里遵循一个原则,不要直接去使用 Element 组件自带的类名
-
如果你想为 Element 组件添加自定义样式,那么建议你给它加你自己的类名来控制
<template>
<div class="login-wrap">
  <el-form ref="form" :label-position="labelPosition" :model="form" label-width="80px" class="login-from" >
    <h2>用户登录</h2>
    <el-form-item  label="用户名">
    <el-input v-model="form.name"></el-input>
  </el-form-item>
  <el-form-item label-position="top" label="密码">
    <el-input v-model="form.pwd" ></el-input>
  </el-form-item>
  <el-form-item>
    <el-button type="primary" @click="onSubmit" class="login-btn" >登录</el-button>
  </el-form-item>
  </el-form>
  </div>
</template>

<script>
export default {
  data() {
    return {
      labelPosition:'top',
      form: {
        name: "",
        pwd: ""
      }
    };
  },
  methods:{
    onSubmit(){}
  }
};
</script>
<style>
.login-wrap {
background-color: #324152;
height: 100%;
display: flex;
justify-content: center;
align-items: center;
}
.login-wrap .login-from {
background-color: #fff;
width: 400px;
padding: 30px;
border-radius: 5px;
}
.login-wrap .login-from .login-btn {
width: 100%;
}
</style>1.4 完成登录功能
1.4.1 封装axios
vue 插件语法: https://cn.vuejs.org/v2/guide/plugins.html
Axios : https://www.kancloud.cn/yunye/axios/234845
npm install axios ,将 axios 进行模块化封装,以 Vue 插件的方式,全局引入:
将插件的封装写入 src/assets/js/myaxios.js
// 引入axios
import Axios from 'axios';
// 自定义插件对象
var myaxios = {};
myaxios.install = function(vue){
  // 设置axios请求的URL,此后axios发送的请求全部执行本地址
  var axios_obj = Axios.create({
    baseURL:'http://localhost:8888/api/private/v1/'
  })
  // 将设置好的axios对象赋值给Vue实例的原型
  // 之后可以在Vue中直接只用 this.$myHttp 使用axios发送请求
  vue.prototype.$myHttp = axios_obj;
}
// 将插件以 模块 方式导出
export default myaxios;
在 main.js 引入axios插件,并注册为全局插件
// 导入 myaxios 模块
import myaxios from '@/assets/js/myaxios.js'
Vue.use(myaxios) // 注册使用 axios 插件
1.4.2 完成登录功能
发送post请求
export default {
  data() {
    return {
      labelPosition:'top',
      form: {
        username: "",
        password: ""
      }
    };
  },
  methods:{
    // 修改组件中绑定的按钮名称为 onLogin
    onLogin(){
      // 使用axios 发送post 请求,传入data中的form数据
      this.$myHttp.post('login',this.form)
      .then(backdata=>{ // 异步执行成功后
        console.log(backdata);
      });
    }
  }
};继续修改代码,完成登录逻辑:
vue-router编程式导航: https://router.vuejs.org/zh/guide/essentials/navigation.html
onLogin(){
    // 使用axios 发送post 请求,传入data中的form数据
    this.$myHttp.post('login',this.form)
        .then(backdata=>{ // 异步执行成功后
        //console.log(backdata.data);
        // 结构赋值,获取返回的数据
        var {data,meta}  = backdata.data;
        // 判断数据状态
        if(meta.status == 200){
            alert('登录成功');
            // 使用vue-router编程式导航跳转到home
            this.$router.push('home');
        }
    });
}
修改提示弹窗
var { data, meta } = backdata.data;
// 判断数据状态
if (meta.status == 200) {
    this.$message({
        message: "恭喜你,登录成功",
        type: "success"
    });
    // 使用vue-router编程式导航跳转到home
    this.$router.push("home");
}else{
    this.$message.error('错了哦');
}
1.4.3 表单验证
Form 组件提供了表单验证的功能,只需要通过 rules 属性传入约定的验证规则,并将 Form-Item 的 prop 属性设置为需校验的字段名即可。
data() {
    return {
      labelPosition: "top",
      form: {
        username: "",
        password: ""
      },
      // 与 el-form 中的 :rules="rules"  对应
      rules: {
        //与 el-form-item 中的 prop="username" 对应
        username: [
          // 验证规则  是否必须        提示信息            触发时机
          { required: true, message: "请输入用户名", trigger: "blur" }
        ],
        password: [
          { required: true, message: "请输入密码", trigger: "blur" },
          { min: 3, max: 5, message: "长度在 3 到 5 个字符", trigger: "blur" }
        ]
      }
    };
  },
1.4.4 阻止数据提交
onLogin() {
    // 因为要获取form表单的节点对象,
    // 所以 el-form 中要加入 ref="ruleForm"
    this.$refs.ruleForm.validate(valid => {
        // elementUI 会将 validate 方法加入到节点对象,
        // 在提交是,如果表单的验证未通过,会将错误信息传入回调函数
        if (!valid) {
            // 如果有表单错误信息,则无反应
            this.$message.error("输入有误");
            return;
        }
        // 使用axios 发送post 请求,传入data中的form数据
        this.$myHttp.post("login", this.form).then(backdata => {
            // 结构赋值,获取返回的数据
            var { data, meta } = backdata.data;
            // 判断数据状态
            if (meta.status == 200) {
                this.$message({
                    message: "恭喜你,登录成功",
                    type: "success"
                });
                // 使用vue-router编程式导航跳转到home
                this.$router.push("home");
            } else {
                this.$message.error("错了哦");
            }
        });
    });
}
1.5 首页
1.5.1 添加路由及页面布局
修改登录成功后逻辑,使用路由名称表示进行跳转:
// 使用vue-router编程式导航跳转到home
this.$router.push({name:"home"});
导入组件,添加路由 `src/router/index.js`
import Home from '@/components/home/home'
 ……
{
    path:'/',
    name:'home',
    component:Home
}添加一个home组件`src/components/home/home.vue`
<template>
  <div>{{msg}}</div>
</template>

<script>
export default {
  data(){
    return{
      msg:'we'
    }
  }
}
</script>修改一个home组件src/components/home/home.vue ` Container 布局容器`
<template>
<el-container class="height100">
    <el-header>Header</el-header>
    <el-container>
        <el-aside width="200px">Aside</el-aside>
        <el-main>Main</el-main>
    </el-container>
</el-container>
</template>
.height100{
    height: 100%;
}
.el-header {
    background-color: #B3C0D1;
    color: #333;
    text-align: center;
    line-height: 60px;
}
.el-aside {
    background-color: #D3DCE6;
    color: #333;
    text-align: center;
    line-height: 200px;
}
.el-main {
    background-color: #E9EEF3;
    color: #333;
    text-align: center;
    line-height: 160px;
}
1.5.2 头部样式
/src/components/home/home.vue
Layout 布局
<el-header>
    <el-row>
        <el-col :span="6">
            <div class="grid-content bg-purple">
                <img src="/static/logo.png" alt="">
            </div>
        </el-col>
        <el-col :span="12"><div class="grid-content bg-purple-light">电商后台管理系统</div></el-col>
        <el-col :span="6"><div class="grid-content bg-purple"><el-button type="warning">退出</el-button></div></el-col>
    </el-row>
</el-header>


……
// 标题文本样式
.bg-purple-light {
  font-size: 25px;
  color: white;
}
1.5.3 左侧样式
/src/components/home/home.vue
NavMenu 导航菜单 Icon 图标
 <el-container>
    <el-aside width="200px">
      <!--
        el-menu 侧边导航栏组件
			unique-opened="true" 只保持一个导航开启
            router="true" 开启导航路由
        el-submenu 导航栏的顶级项
        template 导航栏中需要展示的内容
            i 图标
            span 文字
        el-menu-item-group 次级导航组 内容与导航的组标识 可直接删除
        el-menu-item  导航栏选项

          index属性 控制收起展开+路由标识:
              在el-menu中加入router=“true”属性;
              index="1-1" 点击时路由跳转到1-1 ;
      -->
      <el-menu
        :unique-opened="true"
        :router="true"
        default-active="2"
        class="el-menu-vertical-demo"
        @open="handleOpen"
        @close="handleClose">
        <el-submenu index="1" >
          <template slot="title">
            <i class="el-icon-location"></i>
            <span>用户管理</span>
          </template>
          <el-menu-item index="1-1">
            <i class="el-icon-menu"></i>
            用户列表
          </el-menu-item>
        </el-submenu>

        <el-submenu index="2" >
          <template slot="title">
            <i class="el-icon-location"></i>
            <span>权限管理</span>
          </template>
          <el-menu-item index="2-1">
            <i class="el-icon-menu"></i>
            角色列表
          </el-menu-item>
          <el-menu-item index="2-2">
            <i class="el-icon-menu"></i>
            权限列表
          </el-menu-item>
        </el-submenu>

      </el-menu>
    </el-aside>
    <el-main>Main</el-main>
  </el-container>
我们发现,大部分组件,在浏览器渲染后,都会在标签内部自动添加一个标签名为名字的 class 属性 ,我们可以利用这个属性,设置样式:
.el-menu{
  width: 200px;
  height: 100%
}

.el-submenu{
    text-align: left;
}
1.5.4 右侧内容
添加组件内容 /src/components/home/home.vue
<el-main>
    <!-- 路由组件 -->
    <router-view></router-view>
</el-main>添加组件:`src/components/index.vue`
<template>
  <p>我是首页内容</p>
</template>

<script>
export default {

}
</script>

<style>

</style>添加路由:`/src/router/index.js`
{
    path:'/index',
    name:'index',
    component:Index
}
注意: 我们希望index.vue 组件的内容,展示到home组件的 <router-view></router-view>中
知识补充:
此时,我们需要借助嵌套路由: https://router.vuejs.org/zh/guide/essentials/nested-routes.html
嵌套路由(子路由的基本用法):
<script src="./vue.js"></script>
<script src="./vue-router.js"></script>
<div id="app">
    <router-view></router-view>
</div>
<script>
    // 1:定义路由组件
    var login = {
        template: `
            <div>
                <h2>我是登录页面</h2>
                <li><router-link to="/zi">子路由</router-link></li>
                <!--路由组件中继续使用路由组件-->
                <router-view></router-view>
            </div>
            `
    }
    var zi = {
        template: '<h4>我是嵌套路由的组件</h4>'
    }
    // 2:获取路由对象
    var router = new VueRouter({
        // 定义路由规则
        routes: [
            {
                name: 'login',
                path: "/login",
                component: login,
                // 路由中的 children 属性,定义嵌套路由(子路由)
                children: [
                    { name: 'zi', path: "/zi", component: zi }
                ]
            },
        ]
    })

    var app = new Vue({
        el: '#app',
        router
    })
</script>
*再谈 代码加载流程 *
(main.js->template: '<App/>')替换 (index.html->div#app);

(index.html-><App/>) --> (components: { App })

( components: { App }) --> (import App from './App' -> src/App.vue)

(App.vue -> <router-view/> -> 路由组件) --> (main.js-> router)
========此项决定了页面展示那个组件内容 ========

({path: '/',name: 'HelloWorld', component: HelloWorld }) --> (import HelloWorld from '@/components/HelloWorld')

(src/components/HelloWorld.vue) --> <router-view/>
因此,我们需要让 index 成为 home 的子路由组件 `src/router/index.js`
  routes: [
    {
      path:'/login',
      name:'Login',
      component:Login
    },
    {
      path:'/',
      name:'home',
      component:Home,
      // 添加子路由
      children:[
        {path:'index',name:'index',component:Index}
      ]
    },
  ]
登录完成后,跳转到 home-->index `src/components/login/login.vue`
if (meta.status == 200) {
    this.$message({
        message: "恭喜你,登录成功",
        type: "success"
    });
    // 使用vue-router编程式导航跳转到home->index
    this.$router.push({name:"index"});
}
1.6 验证首页登录
src/components/login/login.vue
if (meta.status == 200) {
    this.$message({
        message: "恭喜你,登录成功",
        type: "success"
    });

    // 登录成功后,将token信息保存到 localStorage
    window.localStorage.setItem('token',data.token);

    // 使用vue-router编程式导航跳转到home->index
    this.$router.push({name:"index"});
}
在 src/components/home/home.vue 验证登录
export default {
  // 使用生命周期的钩子函数,判断token
  mounted() {
    // 获取token
    var token = window.localStorage.getItem("token");
    if (!token) {
      // 错误提示
      this.$message.error("请登录");
      // 跳转到登录页面
      this.$router.push({ name: "Login" });
    }
  },

  data() {
    return {
      msg: "we"
    };
  }
};
1.7 用户退出
绑定点击事件
<el-col :span="6">
    <div class="grid-content bg-purple">
    <el-button @click="loginOut" type="warning">退出</el-button>
    </div>
</el-col>
methods:{
    loginOut(){
        // 清楚token
        window.localStorage.removeItem('token')
        // 退出提示
        this.$message({
            message: "您已经退出,继续操作请重新登录",
            type: "success"
        });
        // 页面路由跳转
        this.$router.push({ name: "Login" });
    }
}
第2章 用户管理
2.1 路由及组件
/src/components/home/home.vue
 <el-menu-item index="users">
     <i class="el-icon-menu"></i>
     用户列表
</el-menu-item>
src/router/index.js
import Users from '@/components/users/users'

……

children:[
    {path:'index',name:'index',component:Index},
    {path:'users',name:'users',component:Users}
]
src/components/users/users.vue
<template>
  <div>展示用户列表表格</div>
</template>

<script>
export default {

}
</script>

<style>

</style>
2.2 面包屑导航及搜索框
src/components/users/users.vue Card 卡片 Breadcrumb 面包屑 Input 输入框 Button 按钮
<template>
<div>
  <!-- 面包鞋 -->
  <el-card>
  <el-breadcrumb separator-class="el-icon-arrow-right">
    <el-breadcrumb-item :to="{ path: '/index' }">首页</el-breadcrumb-item>
    <el-breadcrumb-item>用户管理</el-breadcrumb-item>
    <el-breadcrumb-item>用户列表</el-breadcrumb-item>
  </el-breadcrumb>
</el-card>

</div>
</template>
……
</el-card>
<el-row>
<el-col :span="6" class="sou">
<el-input placeholder="请输入内容" v-model="input5" class="input-with-select">
<el-button slot="append" icon="el-icon-search"></el-button>
</el-input>
</el-col>
<el-col :span="1" class="sou">
<el-button type="success" plain>添加用户</el-button>
</el-col>
</el-row>
</div>
……
<script>
export default {
data(){
// 不想看到报错
return{input5:''}
}
};
</script>
<style>
.sou{
line-height:30px
}
</style>2.3 展示用户列表
2.3.4 组件展示
src/components/users/users.vue Table 表格->自定义索引
<!-- 表格 自定义索引 -->
<el-table
    :data="tableData"
    style="width: 100% ;">
    <el-table-column
      type="index"
      :index="indexMethod">
    </el-table-column>
    <el-table-column
      prop="date"
      label="日期"
      width="180">
    </el-table-column>
    <el-table-column
      prop="name"
      label="姓名"
      width="180">
    </el-table-column>
  </el-table>

</div>
</template>

<script>
export default {
  data() {
    return {
      input5:'',
      tableData: [
        {
          date: "2016-05-03",
          name: "王小虎"
        }
      ]
    };
  }
};
</script>
<style>
.sou {
  line-height: 30px;
}

.el-main{
  line-height:30px;
}
</style>
2.3.5 获取数据
出登录接口,其他接口发送http请求,必须携带token值
Axios : https://www.kancloud.cn/yunye/axios/234845 ---> 请求配置
data() {
    return {
        input5:'',// 不想看到报错
        // 设置页码及条数
        pagenum:1,
        pagesize:5,
        tableData: []
    };
},
// 利用钩子函数,获取数据
mounted() {
    // 获取token
    let token = window.localStorage.getItem('token');
    // 通过配置选项发送请求
    // 携带token
    this.$myHttp({
        // 设置链接地址 es6新语法
        url:`users?pagenum=${this.pagenum}&pagesize=${this.pagesize}`,
        method:'get',
        // 配置token
        headers: {'Authorization': token}
    }).then(res=>{
        // 修改数据  展示页面
        this.tableData = res.data.data.users;
    })
},
修改组件参数,展示数据:
<el-table-column prop="username" label="姓名" > </el-table-column>
2.3.6 操作按钮
Button 按钮 Table 表格->自定义列模板
<el-table-column label="操作"  width="210">
      <template slot-scope="scope">
        <el-button type="primary" icon="el-icon-edit" size="mini"  plain></el-button>
        <el-button type="primary" icon="el-icon-check" size="mini"  plain></el-button>
        <el-button type="primary" icon="el-icon-delete" size="mini"  plain></el-button>
      </template>
    </el-table-column>
表格中加入按钮等元素时,需要使用 template 进行包裹:
<el-table-column label="用户状态" width="210">
      <template slot-scope="scope">
        <el-switch
                   v-model="value2"
                   active-color="#13ce66"
                   inactive-color="#ff4949">
          </el-switch>
      </template>
</el-table-column>
2.3.7 状态显示
而在template 标签中有一个 slot-scope="scope" 属性,scope 的值就是本列中所有数据的值,参考: Table 表格->固定列
<el-table-column label="用户状态" width="210">
      <template slot-scope="scope">
        <!-- 利用scope 中的值,争取显示用户状态 -->
        <el-switch v-model="scope.row.mg_state" active-color="#13ce66"  inactive-color="#ff4949"></el-switch>
        <!-- 测试事件,查看 scope 数据 -->
        <el-button type="primary" size="mini" @click="showScope(scope)">显示scope</el-button>
      </template>
    </el-table-column>
methods:{
// 测试 方法 显示scope
showScope(scope){
console.log(scope);
}
},2.3.8 分页展示
Pagination 分页->附加功能
  <!-- 分页 -->
  <!--
      current-page  当前页码数
      page-sizes  显示条数选项
      page-size 当前每页条数
  -->
  <el-pagination
      @size-change="handleSizeChange"
      @current-change="handleCurrentChange"
      :current-page="pagenum"
      :page-sizes="[2, 20, 40]"
      :page-size="pagesize"
      layout="total, sizes, prev, pager, next, jumper"
      :total="total">
    </el-pagination>
</div>
</template>

……
<script>
   ……
data() {
    return {
      input5:'',// 不想看到报错

      pagenum:1, //设置页码
      pagesize:2, // 设置页条数
      total:0,  //显示总条数

      tableData: []
    };
  },
      ……
      ……
     	// 获取总条数 修改数据展示
        this.total = res.data.data.total;
但点击页码时,会触发 size-change 事件
<script>
export default {
  data() {
    return {
      input5: "", // 不想看到报错
      pagenum: 1, //设置页码
      pagesize: 2, // 设置页条数
      total: 0, //显示总条数
      tableData: []
    };
  },

  methods: {
    // 获取用户数据
    getUserData() {
      // 获取token
      let token = window.localStorage.getItem("token");
      // 通过配置选项发送请求
      // 携带token
      this.$myHttp({
        // 设置链接地址 es6新语法
        url: `users?pagenum=${this.pagenum}&pagesize=${this.pagesize}`,
        method: "get",
        // 配置token
        headers: { Authorization: token }
      }).then(res => {
        // 修改数据  展示页面
        this.tableData = res.data.data.users;
        // 获取总条数 修改数据展示
        this.total = res.data.data.total;
      });
    },

    // 点击页码触发
    handleCurrentChange(pages) {
        // console.log(pages);
        // 修改data数据,重新发送请求
        this.pagenum = pages;
        this.getUserData();
    },
    // 改变显示条数时触发
    handleSizeChange(numbers){
      this.pagesize = numbers;
      this.getUserData();
    }
  },

  // 利用钩子函数,获取数据
  mounted() {
    this.getUserData();
  }
};
</script>
2.4 模糊搜索
请求地址中加入 query 请求参数,获取条件结果
<el-input placeholder="请输入内容" v-model="search" class="input-with-select">
      <el-button slot="append"
                 @click="searchUsers"
       icon="el-icon-search"></el-button>
</el-input>

……

<script>
data() {
    return {
      search: "", // 搜索关键字
    };
  },

      // 请求地址中加入关键字
      url: `users?pagenum=${this.pagenum}&pagesize=${this.pagesize}&query=${this.search}`,


      // 点击搜索事件
      searchUsers(){
          this.getUserData();
      }
  </script>
2.5 切换用户状态
<!-- 利用scope 中的值,争取显示用户状态 -->
<!-- 组件自带change事件 -->
<el-switch v-model="scope.row.mg_state" @change="change(scope)" active-color="#13ce66"  inactive-color="#ff4949"></el-switch>
// Switch 开关 组件自带事件
change(scope){
// 接受本条全部信息
// console.log(scope)
let id = scope.row.id; // 获取id
var state = scope.row.mg_state; // 获取修改后的状态
// 请求接口
this.$myHttp.put(`users/${id}/state/${state}`)
.then(res=>{
// 修改失败,将状态改为原始值
if(!res.data.data){
this.tableData[scope.$index].mg_state = !state;
this.$message.error("修改失败");
}
})
}修改失败是因为没有token:
// Switch 开关 组件自带事件
change(scope){
    // 接受本条全部信息
    // console.log(scope)
    let id = scope.row.id; // 获取id
    var state = scope.row.mg_state; // 获取修改后的状态
    // 请求接口
    // 需要使用配置参数请求,设置token
    this.$myHttp({
        url:`users/${id}/state/${state}`,
        method:'put',
        headers: { Authorization: window.localStorage.getItem("token") }
    })
        .then(res=>{
        // 修改失败,将状态改为原始值
        if(!res.data.data){
            this.tableData[scope.$index].mg_state = !state;
            this.$message.error("修改失败");
        }
    })
}
2.6 删除用户
MessageBox 弹框->确认消息
// 组件中绑定点击按钮
<el-button type="primary" icon="el-icon-delete" size="mini" @click="deleteUser(scope.row.id)" plain></el-button>


// 删除用户
deleteUser(id) {
    //   this.$myHttp({
    //     url: `users/${id}`,
    //     method: "delete",
    //     headers: { Authorization: window.localStorage.getItem("token") }
    //   }).then(res => {
    //     this.getUserData();
    //     this.$message({
    //       message: "删除成功",
    //       type: "success"
    //     });
    //   });
    this.$confirm("此操作将永久删除该用户, 是否继续?", "提示", {
        confirmButtonText: "确定",
        cancelButtonText: "取消",
        type: "warning"
    })
        .then(() => {
        this.$myHttp({
            url: `users/${id}`,
            method: "delete",
            headers: { Authorization: window.localStorage.getItem("token") }
        }).then(res => {
            this.getUserData();
            this.$message({
                message: "删除成功",
                type: "success"
            });
        });
    })
        .catch(() => {
        this.$message({
            type: "info",
            message: "已取消删除"
        });
    });
}
2.7 添加用户
Dialog对话框->自定义内容->打开嵌套表单的 Dialog Form 表单
表单弹窗:
<el-col :span="1" class="sou">
  <!-- 绑定按钮点击事件 直接将 dialogFormVisible值设置为true显示窗口  -->
  <el-button type="success" @click="dialogFormVisible = true" >添加用户</el-button>
  <!--
    :visible.sync属性 控制窗口显示隐藏
    -->
  <el-dialog title="收货地址" :visible.sync="dialogFormVisible">
    <el-form :model="form">
      <el-form-item label="活动名称" :label-width="formLabelWidth">
        <el-input v-model="form.name" autocomplete="off"></el-input>
      </el-form-item>
    </el-form>
    <div slot="footer" class="dialog-footer">
      <!-- 点击取消或确定修改dialogFormVisible=false关闭窗口 -->
      <el-button @click="dialogFormVisible = false">取 消</el-button>
      <el-button type="primary" @click="dialogFormVisible = false">确 定</el-button>
    </div>
  </el-dialog>

  </el-col>
</el-row>
修改表单
<el-col :span="1" class="sou">
  <!-- 绑定按钮点击事件 直接将 dialogFormVisible值设置为true显示窗口  -->
  <el-button type="success" @click="dialogFormVisible = true" >添加用户</el-button>
  <!--
    :visible.sync属性 控制窗口显示隐藏
    -->
  <el-dialog title="添加用户" :visible.sync="dialogFormVisible">
    <el-form :model="form">
      <el-form-item label="姓名" label-width="90px">
        <el-input v-model="form.username" ></el-input>
      </el-form-item>
      <el-form-item label="密码" label-width="90px">
        <el-input v-model="form.password" ></el-input>
      </el-form-item>
      <el-form-item label="邮箱" label-width="90px">
        <el-input v-model="form.email" ></el-input>
      </el-form-item>
      <el-form-item label="电话" label-width="90px">
        <el-input v-model="form.mobile" ></el-input>
      </el-form-item>
    </el-form>
    <div slot="footer" class="dialog-footer">
      <!-- 点击取消或确定修改dialogFormVisible=false关闭窗口 -->
      <el-button @click="dialogFormVisible = false">取 消</el-button>
       <!-- 修改点击事件,在数据入库成功后关闭窗口 -->
      <el-button type="primary" @click="addUser">确 定</el-button>
    </div>
  </el-dialog>
</el-col>
添加数据及方法
data() {
    return {
      dialogFormVisible: false,
      form: {
        username: '',
        password:'',
        email:'',
        mobile:''

      },

……

methods 方法

 // 添加用户
    addUser(){
      this.$myHttp({
        url:'users',
        method:'post',
        // post数据提交
        data:this.form,
        headers: { Authorization: window.localStorage.getItem("token") }
      }).then(res=>{
          let {data} = res;
          if(data.meta.status == 201){
              // 将数据更新到页面
              this.tableData.push(data.data);
              this.$message({message: "添加用户成功",type: "success"});
              // 关闭窗口
              this.dialogFormVisible = false
          }
      })
    },
2.8 修改用户信息
绑定表单事件,传入 scope.row 以显示现有用户数据,做表单读入展示
<template slot-scope="scope">
        <el-button type="primary" icon="el-icon-edit" size="mini" @click="editUserShow(scope.row)" plain></el-button>
        <el-button type="primary" icon="el-icon-check" size="mini"  plain></el-button>
        <el-button type="primary" icon="el-icon-delete" size="mini" @click="deleteUser(scope.row.id)" plain></el-button>
      </template>
添加修改用户信息的弹窗,并在弹窗表单中展示用户信息
<!-- 修改用户弹窗 -->
<el-dialog title="添加用户" :visible.sync="editUser">
    <el-form :model="edit">
        <el-form-item label="姓名" label-width="90px">
            <el-input disabled v-model="edit.username" ></el-input>
        </el-form-item>
        <el-form-item label="邮箱" label-width="90px">
            <el-input v-model="edit.email" ></el-input>
        </el-form-item>
        <el-form-item label="电话" label-width="90px">
            <el-input v-model="edit.mobile" ></el-input>
        </el-form-item>
    </el-form>
    <div slot="footer" class="dialog-footer">
        <!-- 点击取消或确定修改dialogFormVisible=false关闭窗口 -->
        <el-button @click="editUser = false">取 消</el-button>
        <el-button type="primary" @click="editUserPut">确 定</el-button>
    </div>
</el-dialog>
// 弹窗并显示用户数据 用于修改表单
editUserShow(users){
this.editUser = true; // 弹窗
this.edit = users; // 直接使用表单数据
},
// 修改用户信息 入库
editUserPut(){
var id = this.edit.id;
var email = this.edit.email;
var mobile = this.edit.mobile;
this.$myHttp({
url: `users/${id}`,
method: "put",
data:{email,mobile},
headers: { Authorization: window.localStorage.getItem("token") }
}).then(res=>{
// console.log(res);
if(res.data.meta.status == 200){
this.editUser = false; // 关闭窗口
this.getUserData(); // 重新获取数据
this.$message({message: "修改用户成功",type: "success"});
}
})
}2.9 修改用户角色
Select 选择器->基础用法 下拉框
<!-- 分配角色弹窗 -->
<el-dialog title="分配角色" :visible.sync="showRole">
    <el-form :model="role">
        <el-form-item label="当前用户" label-width="90px">
            <el-input disabled v-model="role.username" ></el-input>
        </el-form-item>
        <el-form-item label="活动区域">
            <el-select v-model="roleId"  placeholder="请选择活动区域">
                <el-option
                           v-for="item in roleList"
                           :key="item.key"
                           :label="item.roleName"
                           :value="item.id">
                </el-option>
            </el-select>
        </el-form-item>
    </el-form>
    <div slot="footer" class="dialog-footer">
        {{roleId}}
        <!-- 点击取消或确定修改dialogFormVisible=false关闭窗口 -->
        <el-button @click="showRole = false">取 消</el-button>
        <el-button type="primary" @click="roleUserPut">确 定</el-button>
    </div>
</el-dialog>
弹窗后,获取全部角色遍历到 el-option ,获取用户id及修改后的角色,请求接口即可;
第3章 权限管理
3.1 权限列表
添加路由及组件文件
import Rights from '@/components/rights/rights'

{path:'rights',name:'rights',component:Rights}
<template>
<div>
<el-table
height="850"
ref="singleTable"
:data="tableData"
highlight-current-row
style="width: 100%">
<el-table-column
type="index"
width="50">
</el-table-column>
<el-table-column
property="authName"
label="权限名称"
width="120">
</el-table-column>
<el-table-column
property="path"
label="路径"
width="120">
</el-table-column>
<el-table-column property="一级" label="层级">
</el-table-column>
</el-table>
</div>
</template>
<script>
export default {
data(){
return {
tableData:[]
}
},
mounted() {
this.getlist();
},
methods:{
getlist(){
this.$myHttp({
url:'rights/list',
method:'get',
headers: { Authorization: window.localStorage.getItem("token") }
}).then(backs=>{
// console.log(backs);
this.tableData = backs.data.data;
})
}
}
}
</script>
<style>
.el-main {
line-height: 30px;
}
</style>只要在el-table元素中定义了height=500属性,即可实现固定表头的表格,而不需要额外的代码。
修改层级展示
<el-table-column  property="level"  label="层级">
    <template slot-scope="scope">
        <span v-if="scope.row.level==='0'">一级</span>
        <span v-else-if="scope.row.level==='1'">二级</span>
        <span v-if="scope.row.level==='2'">三级</span>
    </template>
</el-table-column>
3.2 角色列表
添加路由及组件
import Roles from '@/components/roles/roles'

{path:'roles',name:'roles',component:Roles},
<template>
  <el-table :data="tableData5"  style="width: 100%">

    <!-- 折叠内容 -->
    <el-table-column type="expand">
      <template slot-scope="props">
        <el-form label-position="left" inline class="demo-table-expand">
          <el-form-item label="商品名称">
            <span>{{ props.row.name }}</span>
          </el-form-item>
          <el-form-item label="所属店铺">
            <span>{{ props.row.shop }}</span>
          </el-form-item>
        </el-form>
      </template>
    </el-table-column>


    <!-- 表头及折叠按钮 -->
    <el-table-column
      label="角色名称"
      prop="id">
    </el-table-column>
    <el-table-column
      label="角色描述"
      prop="name">
    </el-table-column>
    <el-table-column
      label="操作"
      prop="desc">
    </el-table-column>

  </el-table>
</template>

<script>
  export default {
    data() {
      return {
        tableData5: [{
          id: '12987122',
          name: '好滋好味鸡蛋仔',
          category: '江浙小吃、小吃零食',
          desc: '荷兰优质淡奶,奶香浓而不腻',
          address: '上海市普陀区真北路',
          shop: '王小虎夫妻店',
          shopId: '10333'
        }, {
          id: '12987123',
          name: '好滋好味鸡蛋仔',
          category: '江浙小吃、小吃零食',
          desc: '荷兰优质淡奶,奶香浓而不腻',
          address: '上海市普陀区真北路',
          shop: '王小虎夫妻店',
          shopId: '10333'
        }]
      }
    }
  }
</script>

<style>
  .demo-table-expand {
    font-size: 0;
  }
  .demo-table-expand label {
    width: 90px;
    color: #99a9bf;
  }
  .demo-table-expand .el-form-item {
    margin-right: 0;
    margin-bottom: 0;
    width: 50%;
  }
  .el-main{
    line-height:20px;
  }
</style>
<!-- 表头及折叠按钮 -->
<el-table-column
label="角色名称"
prop="roleName">
</el-table-column>
<el-table-column
label="角色描述"
prop="roleDesc">
</el-table-column>
<el-table-column
label="操作"
prop="desc">
<template slot-scope="scope">
<el-button type="primary" icon="el-icon-edit" size="mini" circle></el-button>
<el-button type="success" icon="el-icon-check" size="mini" circle></el-button>
</template>
</el-table-column> data() {
return {
roleList: []
};
},
mounted() {
this.getrolelist();
},
methods: {
getrolelist() {
this.$myHttp({
url: "roles",
method: "get"
}).then(back => {
this.roleList = back.data.data;
});
}
}Tag 标签->可移除标签
<!-- 折叠内容 -->
<el-table-column type="expand">
    <template slot-scope="props">
	<el-tag closable>可移除</el-tag>
    </template>
</el-table-column>分析角色数据,children 为上级角色中的子级角色;
<!-- 折叠内容 -->
<el-table-column type="expand">
    <template slot-scope="scope">
	{{scope.row.children}}
	<!-- <el-tag closable>{{scope.row.children}} </el-tag> -->
    </template>
</el-table-column>
<!-- 折叠内容 -->
    <el-table-column type="expand">
      <template slot-scope="scope">
        <!-- Layout 布局 -->
        <el-row>
          <!-- 一级区域 -->
          <el-col :span="6">
            <!-- 一级内容展示 -->
            <el-tag closable>{{scope.row.children[1].authName}} </el-tag> >
          </el-col>

          <el-col :span="18">
            <!-- 二级区域 -->
            <el-row>
              <el-col :span="6">
                  <!-- 二级内容 -->
                  <el-tag closable type="success">{{scope.row.children[0].children[0].authName}} </el-tag> >
              </el-col>
              <el-col :span="18">
                  <!-- 三级内容 -->
                  <el-tag closable type="warning">{{scope.row.children[1].children[0].children[0].authName}}</el-tag>
                  <el-tag closable type="warning">{{scope.row.children[1].children[0].children[1].authName}}</el-tag>
                  <el-tag closable type="warning">{{scope.row.children[1].children[0].children[2].authName}}</el-tag>
              </el-col>
            </el-row>
          </el-col>
        </el-row>
      </template>
    </el-table-column>
循环遍历所有层级角色
  <!-- 折叠内容 -->
    <el-table-column type="expand">
      <template slot-scope="scope">
        <!-- Layout 布局 -->
        <el-row class="rowmargin" v-for="item1 in scope.row.children" :key="item1.id">
          <!-- 一级区域 -->
          <el-col :span="6">
            <!-- 一级内容展示 -->
            <el-tag closable>{{item1.authName}} </el-tag> >
          </el-col>

          <el-col :span="18">
            <!-- 二级区域 -->
            <el-row  v-for="item2 in item1.children" :key="item2.id">
              <el-col :span="6">
                  <!-- 二级内容 -->
                  <el-tag closable type="success">{{item2.authName}} </el-tag> >
              </el-col>
              <el-col :span="18">
                  <!-- 三级内容 -->
                  <el-tag v-for="item3 in item2.children" :key="item3.id" closable type="warning">{{item3.authName}} </el-tag>
              </el-col>
            </el-row>
          </el-col>
        </el-row>

		<!-- 判断没有权限 -->
	    <el-row v-if="scope.row.children.length==0">
          <template><el-tag type="danger">木有权限</el-tag></template>
        </el-row>

      </template>
    </el-table-column>


……

.el-tag{
  margin-top: 10px;
  margin-right:5px;
}
<style>
3.3 删除角色权限
绑定close事件
页面元素删除
<!-- 三级内容 -->
<el-tag @close="closeTag(item2,key3)"  v-for="(item3,key3) in item2.children" :key="item3.id" closable type="warning">
{{item3.authName}}
</el-tag>
// 删除角色权限
closeTag(item,key){
// 数组引用传递,直接删除即可
// console.log(item,key)
item.children.splice(key,1);
}服务器删除
<el-col :span="18">
<!-- 三级内容 -->
<el-tag @close="closeTag(item2,key3,scope.row.id,item3.id)"  v-for="(item3,key3) in item2.children" :key="item3.id" closable type="warning">{{item3.authName}} </el-tag>
</el-col>
// 删除角色权限
closeTag(item,key,roleId,rightId){
// item 要删除元素所在父级数组
// key 要删除元素所在父级数组下标
item.children.splice(key,1);
// roleid 角色ID,rightId权限ID
// console.log(roleId,rightId);
this.$myHttp({
url:`roles/${roleId}/rights/${rightId}`,
method:'delete'
}).then(back=>{
let {meta} = back.data;
// console.log(meta);
if(meta.status == 200){
this.$message({message:meta.msg,type:'success'});
}
})
}3.4 修改角色权限
展示面板:
<template slot-scope="scope">
            <el-button type="primary" icon="el-icon-edit" size="mini" circle></el-button>
            <el-button type="success" icon="el-icon-check" size="mini" @click="rightsShow" circle></el-button>
        </template>
<!-- 修改角色授权面板 -->
<el-dialog title="修改角色权限" :visible.sync="isrightsShow">
<div slot="footer" class="dialog-footer">
<el-tree show-checkbox="true" :data="rightsList" :props="defaultProps" ></el-tree>
<!-- 点击取消或确定修改dialogFormVisible=false关闭窗口 -->
<el-button @click="isrightsShow = false">取 消</el-button>
<el-button type="primary" @click="rightsPut">确 定</el-button>
</div>
</el-dialog>return {
// 所有权限列表
rightsList:[],
// 设置展示内容
defaultProps: {
children: 'children',
label: 'authName'
},// 展示修改角色权限面板
rightsShow() {
// 获取所有角色权限
this.$myHttp({
url:'rights/tree',
method:'get'
}).then(back=>{
let {data,meta} = back.data;
this.rightsList= data;
})
this.isrightsShow = true;
},选中角色拥有的权限:
在点击按钮式,将所有角色的所有信息传入展示面板事件中:
<template slot-scope="scope">
    <el-button type="primary" icon="el-icon-edit" size="mini" circle></el-button>
    <el-button @click="rightsShow(scope.row)" type="success" icon="el-icon-check" size="mini" circle></el-button>
</template>
<!-- 修改角色授权面板 -->
<el-dialog title="修改角色权限" :visible.sync="isrightsShow">
<div slot="footer" class="dialog-footer">
<!--
default-expand-all 默认展开所有节点
node-key="id" 将id设置为节点的唯一主键
:default-checked-keys=[] 被选中主键的数组
:props="defaultProps" 设置显示的内容
show-checkbox 节点可被选中
-->
<el-tree
default-expand-all
node-key="id"
:default-checked-keys="defaultChecked"
show-checkbox
:data="rightsList"
:props="defaultProps" ></el-tree>
<!-- 点击取消或确定修改dialogFormVisible=false关闭窗口 -->
<el-button @click="isrightsShow = false">取 消</el-button>
<el-button type="primary" @click="rightsPut">确 定</el-button>
</div>
</el-dialog>data() {
return {
// 所有权限列表
rightsList: [],
// 设置展示内容
defaultProps: {
children: "children",
label: "authName"
},
// 默认选中的节点数组
defaultChecked: [],
// 控制角色权限面板
isrightsShow: false,
// 所有角色数据列表
roleList: []
};
},
……
// 展示修改角色权限面板
rightsShow(row) {
// 获取所有角色权限
this.$myHttp({
url: "rights/tree",
method: "get"
}).then(back => {
let { data, meta } = back.data;
// 显示所有权限
this.rightsList = data;
});
// 遍历row,获取当前角色选中的所有权限,写入数组
this.defaultChecked = [];
// 在遍历赋值前,先清空数据,以免受其他数据影响
var rr = row.children;
rr.forEach(item1 => {
item1.children.forEach(item2=>{
item2.children.forEach(item3=>{
// 只获取第三季选中即可
this.defaultChecked.push(item3.id);
})
});
});
console.log(this.defaultChecked);
// 控制显示窗口
this.isrightsShow = true;
},提交数据入库:
    // 提交修改角色权限
    rightsPut() {
      // 在树形控件 中添加 ref="tree" 的属性,在此使用
      // elUI 中提供两个方法getCheckedKeys、getHalfCheckedKeys
      // 获取已选中的节点key
      var arr1 = this.$refs.tree.getCheckedKeys();
      var arr2 = this.$refs.tree.getHalfCheckedKeys();
      // concat() 合并两个数组的元素
      // join() 将数组的值以逗号隔开转为字符串
      var checkedKeys = arr1.concat(arr2).join();
      this.$myHttp({
        // 点击打开窗口是,保存角色id,在此获取使用
        url:`roles/${this.roleId}/rights`,
        method:'post',
        data:{rids:checkedKeys}
      }).then(back=>{
        let {data,meta} = back.data;
        if(meta.status == 200){
          this.isrightsShow = false; // 关闭窗口
          this.getrolelist(); // 刷新数据
          this.$message({message:meta.msg,type:'success'}); // 提示成功
        }
      })
    },
3.5 权限限制
对角色分配了权限后,我们并没有做限制,其实接口文档中左侧菜单权限 已经提供了相应的接口:
src/components/home/home.vue
<el-menu
        unique-opened
        :router="true"
        class="el-menu-vertical-demo"
        >
    <el-submenu
                v-for="item in menusList"
                :key="item.id"
                :index="item.id.toString()" >
            <template slot="title">
            <i class="el-icon-location"></i>
            <span>{{item.authName}} {{item.id}}</span>
            </template>
        <el-menu-item
                      v-for="item2 in item.children"
                      :key="item2.id"
                      :index="item2.path">
            <i class="el-icon-menu"></i>
            {{item2.authName}}  {{item2.path}}
        </el-menu-item>
    </el-submenu>
</el-menu>

<script>
export default {
  // 使用生命周期的钩子函数,判断token
  mounted() {
    // 获取token
    var token = window.localStorage.getItem("token");
    if (!token) {
      // 错误提示
      this.$message.error("请登录");
      // 跳转到登录页面
      this.$router.push({ name: "Login" });
    }else{
      // 登录后,获取左侧菜单权限
      this.$myHttp({
        url:'menus',
        method:'get',
      }).then(back=>{
        let {data,meta} = back.data;
        if(meta.status == 200){
          console.log(data);
          this.menusList = data
        }
      })
    }

  },

  data() {
    return {
      menusList:[],
      msg: "we"
    };
  },
  methods:{
    loginOut(){
      window.localStorage.removeItem('token')
      this.$message({
              message: "您已经退出,继续操作请重新登录",
              type: "success"
            });
      this.$router.push({ name: "Login" });
    }
  }
};
</script>
3.6 导航守卫
导航守卫: https://router.vuejs.org/zh/guide/advanced/navigation-guards.html
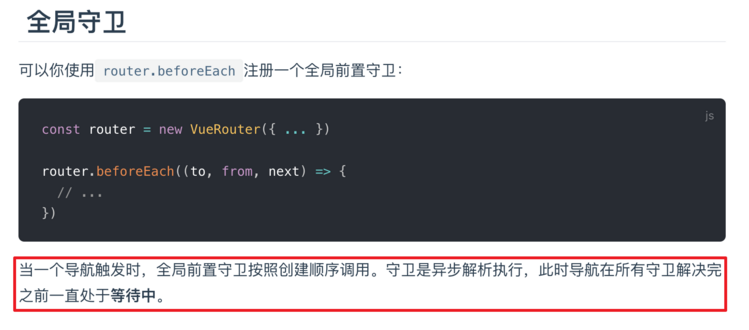
var router = new Router({……})

// 配置路由的导航守卫
router.beforeEach((to, from, next) => {
  // 如果访问登录的路由地址,放过
  if (to.name === 'Login') {
    next();
  } else {
    // 如果请求的不是登录页面,验证token
    // 1. 获取本地存储中的token
    const token = localStorage.getItem('token');
    if (!token) {
      // 2. 如果没有token,跳转到登录
      next({
        name: 'Login'
      });
    } else {
      // 3. 如果有token,继续往下执行
      next();
    }
  }
});

export default router;
项目打包及加载优化
打包命令:npm run build
打包完成后,直接将dist文件夹内容复制到服务器根目录即可;

我们的项目是很多组件组成的页面,但是,每次发送请求不管请求的是哪个路由的那个组件,很明显的都会将所有内容一次性全部加载出来,影响网站加载速度;如果我们可以在用户请求不同路由时,根据请求加载不同的页面,就会很大程度上提高页面的加载速度;
路由懒加载: https://router.vuejs.org/zh/guide/advanced/lazy-loading.html
路由懒加载的工作就是在打包时,将路由文件分离出来,在请求时,需要哪个路由,再去请求相关文件;
用法:将路由引入的组件分别打包到不同的 js 文件;

打包完成后,很明显的在 JS 文件夹中多了一个js文件;
然后我们可以将所有的组件全部改为路由懒加载模式:
const Login = () => import('@/components/login/login');
const Home = () => import('@/components/home/home');
const UserList = () => import('@/components/userlist/user-list');
const RoleList = () => import('@/components/rolelist/role-list');
const RightsList = () => import('@/components/rightslist/rights-list');
const GoodsList = () => import('@/components/goodslist/goods-list');
const GoodsCategories = () => import('@/components/goodscategories/goods-categories');
const GoodsAdd = () => import('@/components/goodsadd/goods-add');
const Report = () => import('@/components/report/report');
const Order = () => import('@/components/orders/orders');
const Params = () => import('@/components/params/params');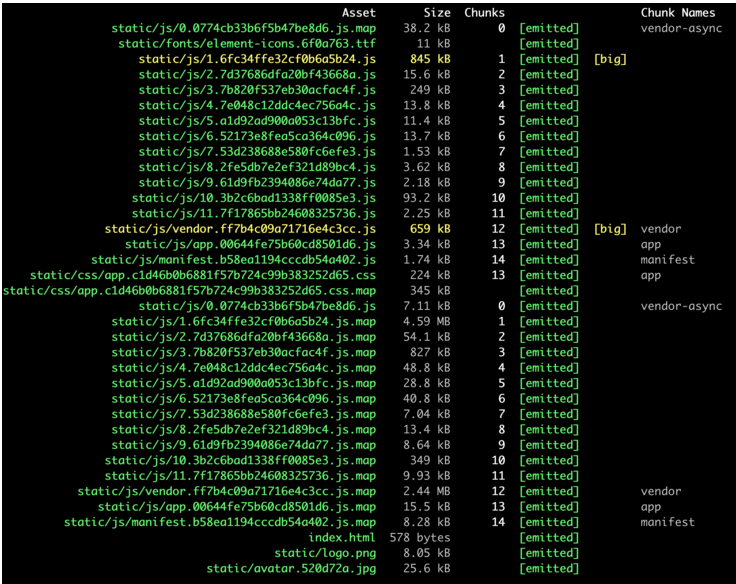
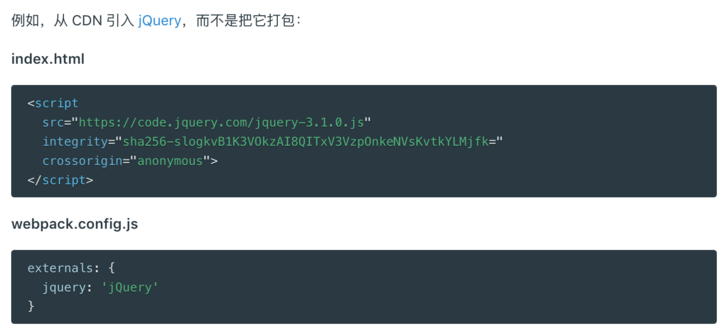
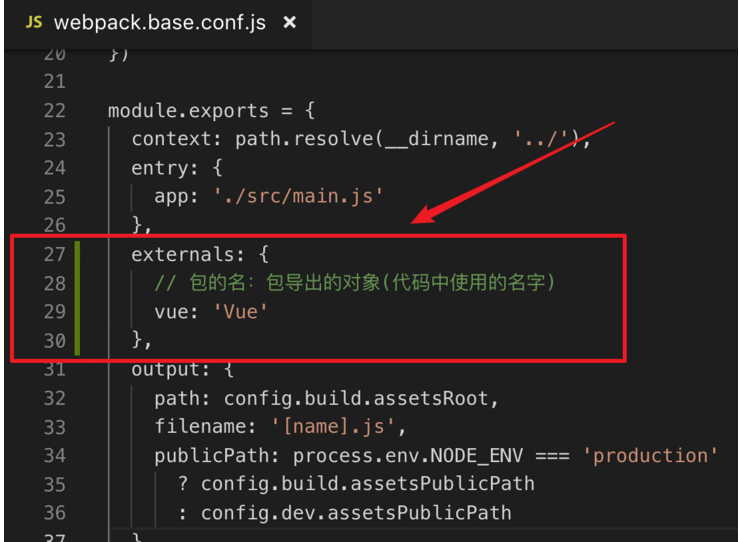
但这是不够的,我们知道,很多组件都是可以用 CDN 加载的;
1:找到 cdn 地址,直接在index.html 中加入地址,注意,cdn 引入版本要和项目中的版本保持一致;
 <body>
    <div id="app">
    </div>
    <script src="https://cdn.bootcss.com/vue/2.5.2/vue.min.js"></script>
    <!-- built files will be auto injected -->
  </body>
2:修改 webpack 配置文件 https://www.webpackjs.com/configuration/externals/

最后
以上就是正直摩托最近收集整理的关于PHP_Vue前后端分离项目(6)的全部内容,更多相关PHP_Vue前后端分离项目(6)内容请搜索靠谱客的其他文章。


![《数据结构》课程设计任务书[2023-01-24]《数据结构》课程设计任务书[2023-01-24]源码](https://www.shuijiaxian.com/files_image/reation/bcimg11.png)
发表评论 取消回复