准备工作
搭建项目和一些基础的封装准备
# vue3+ts项目搭建和封装(上篇)
# vue3+ts项目搭建和封装(下篇)
搭建页面
我是用了vue3+element-plus来搭建的项目,所以登陆也是用了element-plus的el-form组件
页面骨架部分
<template>
  <div class="login-wrapper">
      <div class="modal">
          <el-form :model="user" status-icon :rules="rules" ref="userForm">
              <div class="title">火星</div>
              <el-form-item prop="username">
                  <el-input type='text' prefix-icon="el-icon-user" v-model="user.username" />
              </el-form-item>
              <el-form-item prop="password">
                  <el-input type='password' prefix-icon="el-icon-view" v-model="user.password" />
              </el-form-item>
              <el-form-item>
                  <el-button type="primary" class="btn-login" @click="login">登录</el-button>
              </el-form-item>
          </el-form>
      </div>
  </div>
</template>
model是绑定的用户输入参数, rules是输入的规则, ref是绑定的dom对象
页面css部分
<style lang="scss">
.login-wrapper{
  display: flex;
  justify-content: center;
  align-items: center;
  background-color: #f9fcff;
  width: 100vw;
  height: 100vh;
  .modal{
    width: 500px;
    padding: 50px;
    background-color: #fff;
    border-radius: 4px;
    box-shadow: 0 0 10px 5px #ddd;
    .title{
      font-size: 50px;
      line-height: 1.5;
      text-align: center;
      margin-bottom: 30px;
    }
    .btn-login{
      width: 100%;
    }
  }
}
</style>
css是用的sass写法。
js部分
<script>
export default {
  name: 'login',
  data() {
    return {
        user: {
          username: 'admin',
          password: 'admin'
        },
        rules: {
            /**
             * required: 是否输入
             * message: 提示信息
             * trigger:当失去锚点的时候,触发
             **/
          username: [
            { required: true, message: '请输入用户名', trigger: 'blur' }
          ],
          password: [
            { required: true, message: '请输入密码', trigger: 'blur' }
          ]
        }
    }
  },
  methods: {
      login() {
          this.$refs.userForm.validate(( valid ) => {
              // 当输入完成的时候,确定都输入有值
              if(valid) {
                this.$api.login(this.user).then(r => {
                    console.log(r)
                }).catch(e => {
                    console.log(e)
                })
              } else {
                return false
              }
          })
      }
  },
}
</script>
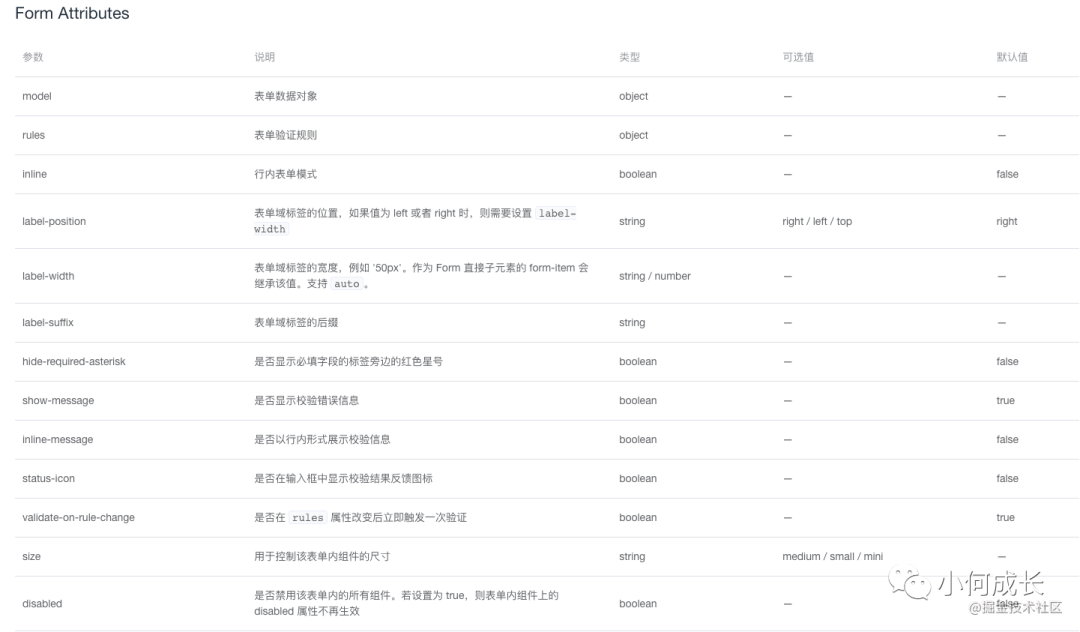
el-form文档说明
至此,前端login页面基本完成,然后就是把页面挂载到router上面
挂载路由
import { createRouter, createWebHashHistory } from 'vue-router'
import Home from '@/components/Home.vue'

const routes = [
    { name: 'login', path: '/login', meta: { title: '登录' }, component: () => import('@/views/Login.vue') }
]

const router = createRouter({
    history: createWebHashHistory(),
    routes
})

export default router
页面组成部分

最后
公众号:小何成长,佛系更文,都是自己曾经踩过的坑或者是学到的东西
有兴趣的小伙伴欢迎关注我哦,我是:
何小玍。大家一起进步鸭
最后
以上就是灵巧音响最近收集整理的关于前端:vue3+ts,后端:koa2+jwt,实现登陆功能(前端部分)的全部内容,更多相关前端:vue3+ts内容请搜索靠谱客的其他文章。
本图文内容来源于网友提供,作为学习参考使用,或来自网络收集整理,版权属于原作者所有。


发表评论 取消回复