一、死数据:
1.定义需要的数据:
<template>
  <div class="xtx-pagination">
      {{pager.btnArr}}
    <a href="javascript:;" class="disabled">上一页</a>
    <span>...</span>
    <a href="javascript:;">3</a>
    <a href="javascript:;">4</a>
    <a href="javascript:;" class="active">5</a>
    <a href="javascript:;">6</a>
    <a href="javascript:;">7</a>
    <span>...</span>
    <a href="javascript:;">下一页</a>
  </div>
</template>
<script>
import { computed, ref } from "vue";
export default {
  name: "XtxPagination",
  setup() {
    //  需要数据:
    // 1.按钮个数 5个
    const count = 5;
    // 2.当前显示的页码
    const myCurrentPage = ref(1);
    // 3.总页数 = 总条数 / 每页的条数  向上取整
    const myTotal = ref(100);
    const myPageSize = ref(10);
    // 其他数据(总页数 起始按钮 结束按钮 按钮数组) 都依赖上面四条数据
    const pager = computed(() => {
      // 总页数
      const pageCount = Math.ceil(myTotal.value / myPageSize.value);
      //按钮个数和当前页码 ====> 起始按钮 结束按钮 按钮数组
      //   1.理想情况下:
      const offset = Math.floor(count / 2);
      let start = myCurrentPage.value - offset;
      let end = start + count - 1;
      // 2.如果其实页码小于1 需要处理
      if (start < 1) {
        start = 1;
        end = start + count - 1 > pageCount ? pageCount : start + count - 1;
      }
      // 3.如果结束页码大于总页数
      if (end > pageCount) {
        end = pageCount;
        start = end - count + 1 < 1 ? 1 : end - count + 1;
      }
      const btnArr = [];
      for (let i = start; i <= end ; i++) {
        btnArr.push(i);
      }
      return { pageCount, btnArr, start, end };
    });

    return { myCurrentPage, pager };
  },
};
</script>
<style scoped lang="less">
.xtx-pagination {
  display: flex;
  justify-content: center;
  padding: 30px;
  > a {
    display: inline-block;
    padding: 5px 10px;
    border: 1px solid #e4e4e4;
    border-radius: 4px;
    margin-right: 10px;
    &:hover {
      color: @xtxColor;
    }
    &.active {
      background: @xtxColor;
      color: #fff;
      border-color: @xtxColor;
    }
    &.disabled {
      cursor: not-allowed;
      opacity: 0.4;
      &:hover {
        color: #333;
      }
    }
  }
  > span {
    margin-right: 10px;
  }
}
</style>
相应结果:

2.渲染及其切换
<template>
  <div class="xtx-pagination">
    <a @click="myCurrentPage = myCurrentPage - 1" href="javascript:;" v-if='myCurrentPage > 1' >上一页</a>
    <a  href="javascript:;" v-else class="disabled">上一页</a>
    <span v-if="pager.start > 1">...</span>
    <a @click=" myCurrentPage = i" href="javascript:;" v-for="i in pager.btnArr" :key="i" :class="{active: i === myCurrentPage}" >{{i}}</a>
    <span v-if='pager.end < pager.pageCount'>...</span>
    <a @click="myCurrentPage = myCurrentPage + 1" href="javascript:;" v-if="myCurrentPage < pager.pageCount">下一页</a>
    <a href="javascript:;" v-else class="disabled">下一页</a>
  </div>
</template>
相应结果:

二、数据通信及其使用
1.外部需要传入数据(父组件使用时需要传入的数据)
通过父组件传入的数据,影响组件的渲染,达到自己想要的形式。
当props中的数据变化时,需要将原本组件内的数据相应更新,影响组件的渲染 (监听)
父组件传数据
<template>
<XtxPagination
    :total='total'
    :page-size='reqParams.pageSize'
:current-page='reqParams.page' />
</template>
子组件接受数据
  props:{
    // 总条数
      total:{
          type:Number,
          default:100
      },
    // 每页的条数
    pageSize:{
        type:Number,
        default:10
    },
    // 当前显示的页码
    currentPage:{
        type:Number,
        default:1
    }
  },
子组件:(将原本组件内的数据相应更新)
    // 监听props的变化 更新组件内的数据
    watch(props,()=>{
        myTotal.value = props.total
        myPageSize.value = props.pageSize
        myCurrentPage.value = props.currentPage
    },{immediate:true})
2.监听点击事件,将现在点击的页码通知父组件
子组件:
    <template>
  <div class="xtx-pagination">
    <a @click="changePager(myCurrentPage - 1)" href="javascript:;" v-if='myCurrentPage > 1' >上一页</a>
    <a  href="javascript:;" v-else class="disabled">上一页</a>
    <span v-if="pager.start > 1">...</span>
    <a @click="changePager(i)" href="javascript:;" v-for="i in pager.btnArr" :key="i" :class="{active: i === myCurrentPage}" >{{i}}</a>
    <span v-if='pager.end < pager.pageCount'>...</span>
    <a @click="changePager(myCurrentPage + 1)" href="javascript:;" v-if="myCurrentPage < pager.pageCount">下一页</a>
    <a href="javascript:;" v-else class="disabled">下一页</a>
  </div>
</template>
// 切换分页的函数
    const changePager = (page)=>{
        myCurrentPage.value = page
        // 将现在的页码通知父组件
        emit('current-page',page)
    }
给子组件绑定自定义事件current-change à触发父组件的函数changePagerFn
父组件:
<XtxPagination
    :total='total'
    :page-size='reqParams.pageSize'
    :current-page='reqParams.page'
    @current-change='changePagerFn'
    />
因为监听着reqParams
    watch(reqParams,()=>{
      findGoodsCommentList(goods.value.id, reqParams).then(data=>{
        commentList.value = data.result.items
        // console.log(data.result.items);
        total.value = data.result.counts
      })
    },{immediate:true})
所以reqParams.page = newPage 就会重新发请求
  // 实现分页切换 分页组件传递的 newPage当前页码
  const changePagerFn = (newPage)=>{
    // 导致watch 监听到reqParams变化 重新发用newPage请求
    reqParams.page = newPage
  }
![]()
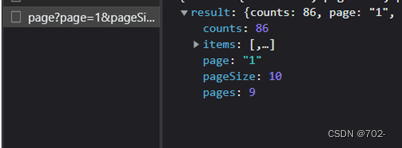
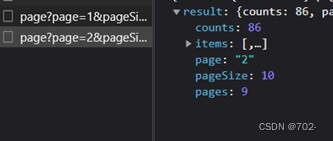
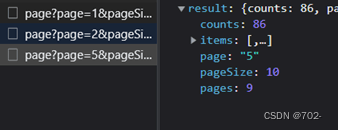
请求结果:
 page:1
 page:2
page:5
结果展示:

全部代码连接:【封装分页组件---自定义分页器】_702-的博客-CSDN博客
最后
以上就是昏睡篮球最近收集整理的关于【分页组件 ------VUE封装一个统一的分页组件】的全部内容,更多相关【分页组件内容请搜索靠谱客的其他文章。
本图文内容来源于网友提供,作为学习参考使用,或来自网络收集整理,版权属于原作者所有。


发表评论 取消回复