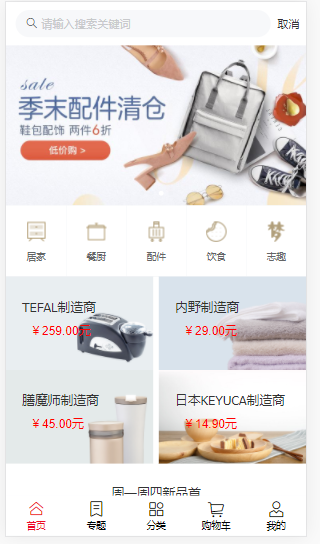
文章目录
- 一、专题页
- 1. 效果图
- 2. 专题api
- 2.Topic.vue 组件
- 3. 专题源码
- 二、分类页
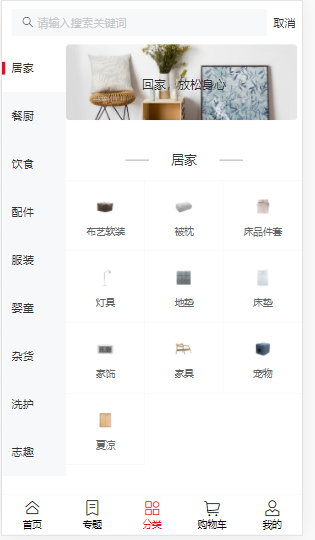
- 2.1. 效果图
- 2.2. 分类api
- 2.3. Category.vue 组件
- 三、购物车页
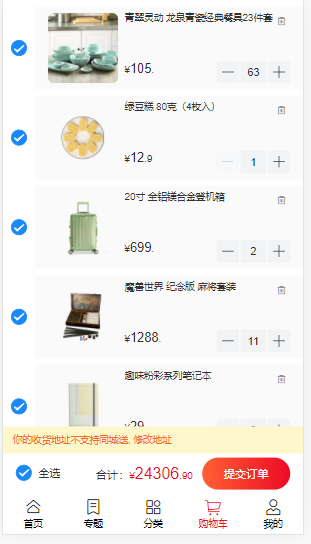
- 3.1. 效果图
- 3.2. 购物车api
- 3.3. 购物车页面
- 四、我的页
- 4.1. 效果图
- 4.2. 定义api
- 4.3. User.vue
- 五、路由守卫和异常处理
- 5.1. 编写路由守卫
- 5.2. 异常处理
技术选型
| 组件 | 版本 | 说明 |
|---|---|---|
| vue | ^2.6.11 | 数据处理框架 |
| vue-router | ^3.5.3 | 动态路由 |
| vant | ^2.12.37 | 移动端UI |
| axios | ^0.24.0 | 前后端交互 |
| amfe-flexible | ^2.2.1 | Rem 布局适配 |
| postcss-pxtorem | ^5.1.1 | Rem 布局适配 |
| less | ^4.1.2 | css编译 |
| less-loader | ^5.0.0 | css编译 |
| vue/cli | ~4.5.0 | 项目脚手架 |
vue-cli + vant+ less +axios 开发
一、专题页
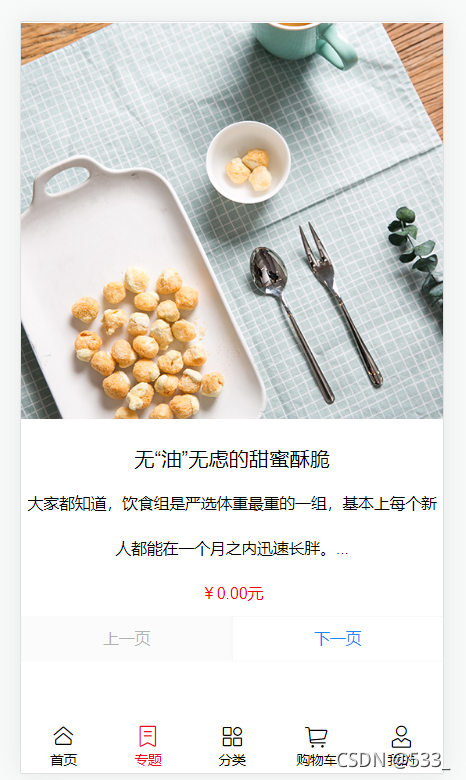
1. 效果图
2. 专题api
在http.js文件中定义接口请求
//5. 专题页 Topic
//专题请求
export function GetTopicApi(params) {
    return instance({
        url: '/topic/list',
        method: 'get',
        params
    })
}
2.Topic.vue 组件
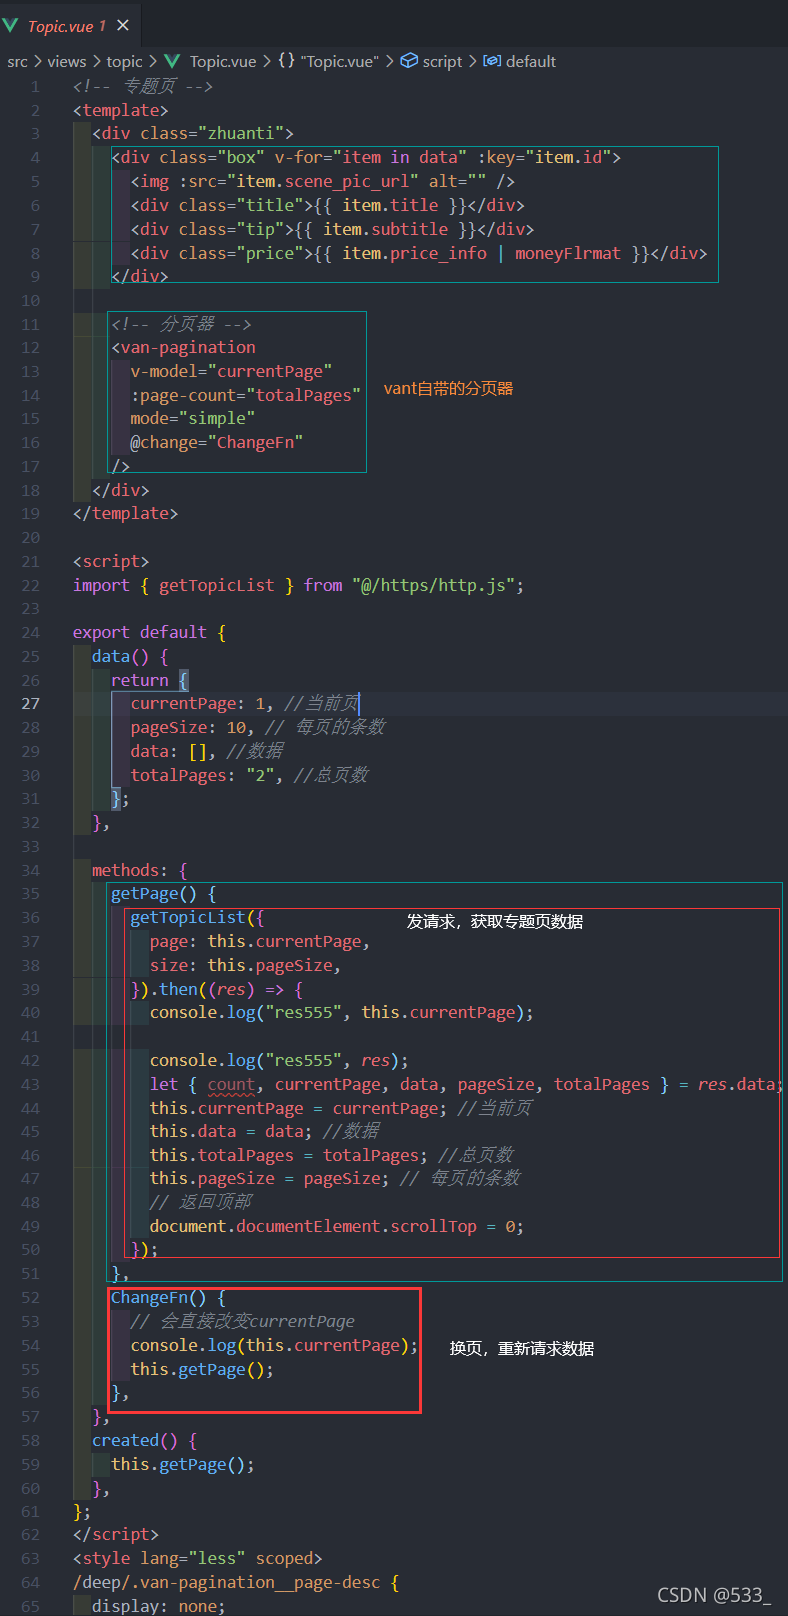
3. 专题源码
<!-- 专题页 -->
<template>
  <div class="zhuanti">
    <div class="box" v-for="item in data" :key="item.id">
      <img :src="item.scene_pic_url" alt="" />
      <div class="title">{{ item.title }}</div>
      <div class="tip">{{ item.subtitle }}</div>
      <div class="price">{{ item.price_info | moneyFlrmat }}</div>
    </div>

    <!-- 分页器 -->
    <van-pagination
      v-model="currentPage"
      :page-count="totalPages"
      mode="simple"
      @change="ChangeFn"
    />
  </div>
</template>

<script>
import { getTopicList } from "@/https/http.js";

export default {
  data() {
    return {
      currentPage: 1, //当前页
      pageSize: 10, // 每页的条数
      data: [], //数据
      totalPages: "2", //总页数
    };
  },

  methods: {
    getPage() {
      getTopicList({
        page: this.currentPage,
        size: this.pageSize,
      }).then((res) => {
        console.log("res555", this.currentPage);

        console.log("res555", res);
        let { count, currentPage, data, pageSize, totalPages } = res.data;
        this.currentPage = currentPage; //当前页
        this.data = data; //数据
        this.totalPages = totalPages; //总页数
        this.pageSize = pageSize; // 每页的条数
        // 返回顶部
        document.documentElement.scrollTop = 0;
      });
    },
    ChangeFn() {
      // 会直接改变currentPage
      console.log(this.currentPage);
      this.getPage();
    },
  },
  created() {
    this.getPage();
  },
};
</script>
<style lang="less" scoped>
/deep/.van-pagination__page-desc {
  display: none;
}
.zhuanti {
  padding-bottom: 100px;
  box-sizing: border-box;
  .box {
    width: 100%;
    font-size: 14px;
    line-height: 40px;
    text-align: center;
    img {
      width: 100%;
    }
    .title {
      font-size: 18px;
    }
    .price {
      color: red;
    }
  }
}
</style>
二、分类页
2.1. 效果图
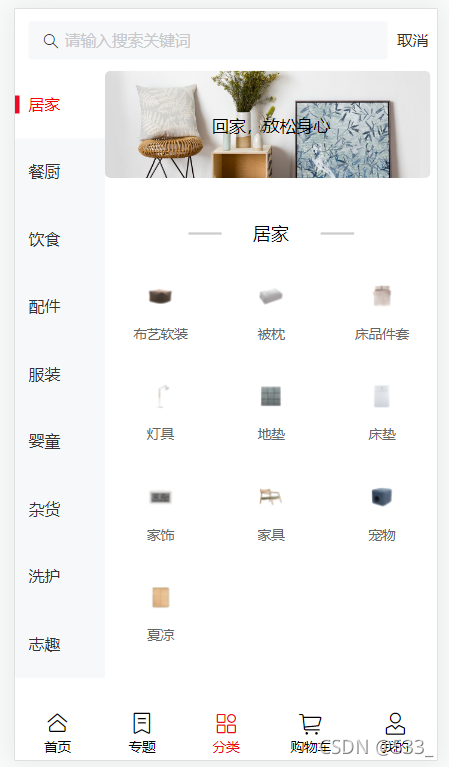
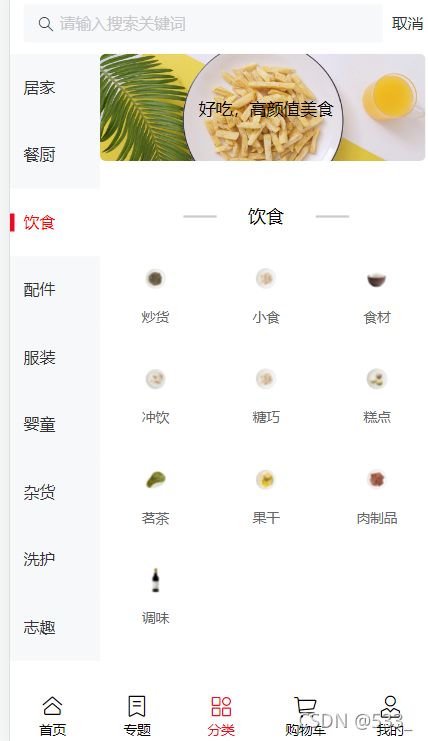
点击左侧导航,更换数据
2.2. 分类api
在http.js 文件中,定义接口请求
//6. 分类页 Category
// 全部分类数据接口
export function GetChannelDataApi(params) {
    return instance({
        url: '/catalog/index',
        method: 'get',
        params
    })
}
// 获取当前分类数据
export function GetFenleiDataApi(params) {
    return instance({
        url: '/catalog/current',
        method: 'get',
        params
    })
}
2.3. Category.vue 组件
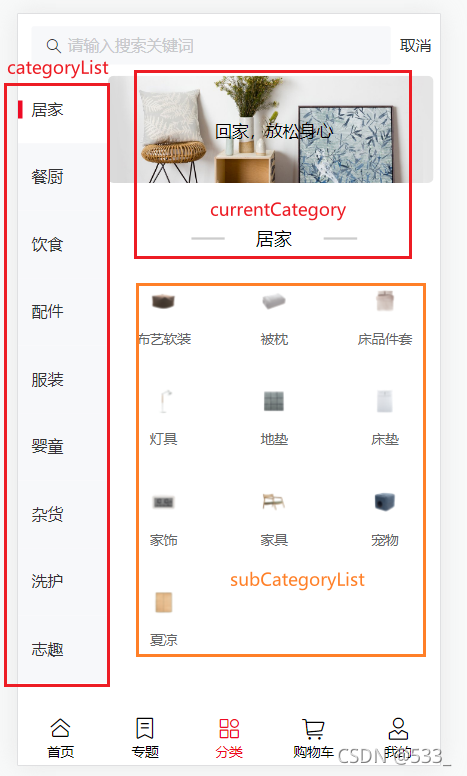

<!-- 分类页 -->
<template>
  <div class="category-box">
    <!--搜索框 -->
    <van-search v-model="value" show-action placeholder="请输入搜索关键词" />

    <div class="fenlei">
      <!-- 左侧导航 -->
      <van-sidebar v-model="activeKey" @change="onChange">
        <van-sidebar-item
          :title="item.name"
          v-for="item in categoryList"
          :key="item.id"
        />
      </van-sidebar>

      <!-- 右侧主体 -->
      <main>
        <!-- 上方图片 -->
        <div class="pic-area">
          <img :src="currentCategory.banner_url" alt="" />
          <p class="desc">{{ currentCategory.front_desc }}</p>
        </div>

        <!-- 标题 -->
        <div class="mytitle">
          <span></span>
          <h3>{{ currentCategory.name }}</h3>
        </div>

        <!-- 图文混排 -->
        <van-grid :column-num="3" >
          <van-grid-item
            v-for="item in subCategoryList"
            :key="item.id"
            :icon="item.wap_banner_url"
            :text="item.name"
          />
        </van-grid>
      </main>
    </div>
  </div>
</template>

<script>
import { GetChannelDataApi, GetFenleiDataApi } from "@/https/http";

export default {
  data() {
    return {
      activeKey: 0,
      value: "",
      categoryList: [], //导航数据
      currentCategory: {}, //选中的类别数据,
      currentId: "0",
      subCategoryList:[]  //子类数组
    };
  },
  methods: {
    // 左侧导航被点击(index为选中的类别的索引值),更换类别
    onChange(index) {
      this.activeKey = index;
      this.currentCategory =this.categoryList[this.activeKey]
      this.currentId = this.categoryList[this.activeKey].id;  //选中的类别的id
      // 获取当前分类数据
      this.GetCurrentCategory()
    },

    // 获取全部分类数据
    GetcategoryList() {
      GetChannelDataApi().then((res) => {
        // console.log("res1", res);
        this.categoryList = res.data.categoryList;  //左侧导航数据

        //选中的类别的id,默认第一个类别被选中
        this.currentId = this.categoryList[0].id;
        // 当前显示的类别数据,图片和标题使用
        this.currentCategory = res.data.currentCategory;

        //当前显示的类别数据 图文混排区域使用
        this.subCategoryList = res.data.currentCategory.subCategoryList;
      });
    },

    // 获取当前分类数据
    GetCurrentCategory() {
      GetFenleiDataApi({ id: this.currentId }).then((res) => {
        // console.log("res12", res);
        // 当前显示的类别数据,图片和标题使用
        this.currentCategory = res.data.currentCategory;

        //当前显示的类别数据 图文混排区域使用
        this.subCategoryList = res.data.currentCategory.subCategoryList;
      });
    },
  },

  created() {
    this.GetcategoryList();  // 获取全部分类数据
  }
};
</script>
<style scoped lang="less">
/* @import url(); 引入css类 */
.fenlei {
  display: flex;
  main {
    flex: 1;

    .pic-area {
      text-align: center;
      position: relative;
      height: 100px;
      font-size: 15px;
      img {
        width: 98%;
        border-radius: 5px;
        display: block;
      }
      .desc {
        position: absolute;
        left: 50%;
        top: 50%;
        transform: translate(-50%, -50%);
      }
    }
    .mytitle {
      text-align: center;
      font-size: 16px;
      margin-top: 20px;
      position: relative;
      height: 50px;
      span {
        width: 50%;
        height: 2px;
        background-color: #ccc;
        display: inline-block;
        position: absolute;
        left: 50%;
        top: 50%;
        transform: translate(-50%, -50%);
      }
      h3 {
        width: 30%;
        background-color: #fff;
        position: absolute;
        left: 50%;
        top: 50%;
        transform: translate(-50%, -50%);
      }
    }

  }
}
</style>
三、购物车页
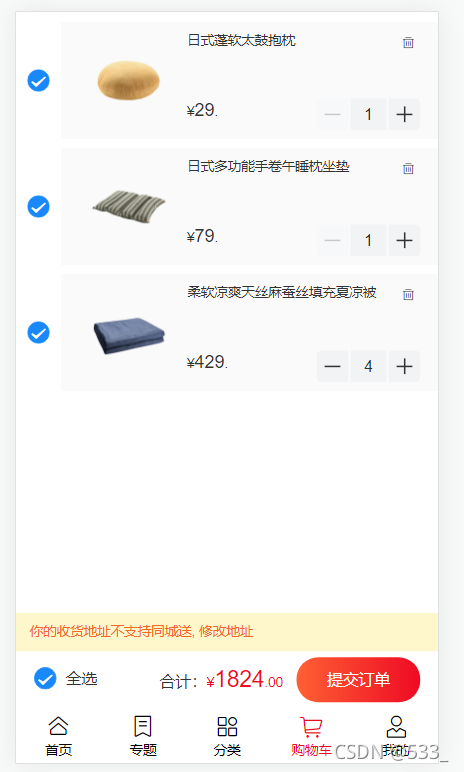
3.1. 效果图
3.2. 购物车api
在http.js 文件中定义接口
//7.购物车页 Cart
// 购物车列表
export function GetCartData(params) {
    return instance({
        url: '/cart/index',
        method: 'get',
        params
    })
}
3.3. 购物车页面
Cart.vue

在views/cart目录下,.Cart.vue新建 组件,代码如下:
<!-- 购物车页 -->
<template>
    <div class="cart-box">
        <div v-for="item in cartList" :key="item.id" class="cart-item">

            <!-- 每个商品前的按钮 -->
            <van-checkbox
                :name="item"
                @click="onchxClickFn(item)"
                class="checkbox-btn"
                v-model="item.checked"
            ></van-checkbox>

            <!-- 商品信息 -->
            <van-card :price="item.retail_price" :thumb="item.list_pic_url">
                <template #num>
                    <van-stepper
                        v-model="item.number"
                        @change="onChange(item.number, item.id)"
                    />
                </template>

                <!-- 自定义标题,删除按钮 -->
                <template #title>
                    <span>{{ item.goods_name }}</span>
                    <van-icon
                        name="delete-o"
                        class="delete-icon"
                        @click="onDelete(item)"
                    />
                </template>
            </van-card>
        </div>
        <!-- 按钮 -->

        <!-- 下方结算 -->
        <!-- vant显示的数字不对,9999元会显示成99.99元,所以需要乘以100 -->
        <van-submit-bar
            :price="checkedGoodsAmount * 100"
            button-text="提交订单"
            @submit="onSubmit"
        >
            <van-checkbox @click="onClickCheckAll" v-model="checkedAll">全选</van-checkbox>

            <template #tip>
                你的收货地址不支持同城送,
                <span @click="onClickEditAddress">修改地址</span>
            </template>

        </van-submit-bar>
    </div>
</template>

<script>
import {
    GetCartData, UpdateCartData, DeleteCartData,
    ToggleCartCheckedData, DeleteCartData2
} from "@/https/http";

export default {
    name: "cart",
    data() {
        return {
            cartList: [], //商品总列表
            cartTotal: {}, //购物车数据
            // price: 0,
            goodsId: '',
            number: '',
            productId: '',
            id_: '',
            isChecked: '1',
            // productIdsList:[],
            productIds: '',
            checkedGoodsAmount: 0,  //选中的商品的总金额
            checkedAll: 0,
        };
    },

    methods: {
        // 获取数据
        getData() {
            // 发送请求,获取当前购物车的数据
            GetCartData().then((res) => {
                console.log(11111, res);
                this.cartList = res.data.cartList; //商品总列表
                this.cartTotal = res.data.cartTotal;  //购物车数据

                 //选中的商品的总金额
                this.checkedGoodsAmount = res.data.cartTotal.checkedGoodsAmount

                // 如果有选中的商品
                if (this.cartTotal.checkedGoodsCount > 0) {
                    // 选中的商品数量===购物车内的所有商品总数量 时候,全选按钮就会被选中
                    if (this.cartTotal.checkedGoodsCount == this.cartTotal.goodsCount) {
                        this.checkedAll = true
                    } else {  //不相等的时候,全选按钮就不会被选中
                        this.checkedAll = false
                    }
                } else { // 如果没有选中的商品,全选按钮就不会被选中
                    this.checkedAll = false
                }

            });
        },

        // 删除单个商品的时候,发送删除商品的请求
        onDelete(item) {
            DeleteCartData2({ productIds: item.product_id.toString() }).then((res) => {
                if (res.errno === 0) {
                    this.getData()  //重新请求购物车商品数据,渲染
                }
            })
        },

        //  按下商品+1或者-1按钮, 购物车商品数量变化 ,onChange会接收变化的商品id
        onChange(value, id_) {
            this.cartList.forEach(item => {
                // 找出对应的goods_id,number
                if (item.id === id_) {
                    this.id_ = id_
                    this.goodsId = item.goods_id
                    this.number = item.number
                    this.productId = item.product_id
                }
            })
            // 发请求
            this.updateCartData()
        },

        // 购物车商品步进器功能接口  按下商品+1或者-1按钮,
        updateCartData() {
             // 直接发送更新数据请求,将当前的商品数量带着
            UpdateCartData({
                goodsId: this.goodsId, id: this.id_,
                number: this.number, productId: this.productId
            }).then((res) => {
                console.log(999, res);
                if (res.errno === 0) {
                    this.getData() //重新请求购物车商品数据,渲染
                }
            })
        },

        // 点击商品单选按钮,切换购物车商品选中状态,发送请求
        onchxClickFn(item) {
            this.isChecked = item.checked ? '1' : '0'
            this.productIds = item.product_id.toString()
            this.toggleCartCheckedData()
        },

        // 切换购物车商品选中状态,发送请求
        toggleCartCheckedData() {
            console.log(this.isChecked);
            ToggleCartCheckedData({
                isChecked: this.isChecked,
                productIds: this.productIds
            }).then((res) => {
                console.log(667, res);
                if (res.errno === 0) {
                    this.getData() //重新请求购物车商品数据,渲染
                }
            })
        },

        // 点击全选,切换购物车商品选中状态,发送请求
        onClickCheckAll() {
            this.isChecked = this.checkedAll ? '1' : '0'
            let productIdAllList = []

            this.cartList.forEach((item) => {
                productIdAllList.push(item.product_id.toString())
            })
            this.productIds = productIdAllList.join(',')
            this.toggleCartCheckedData()
        },

        // 提交
        onSubmit() { },
        // 编辑地址
        onClickEditAddress() { },
    },
    created() {
        this.getData();
    },
};
</script>
<style scoped lang="less">
/deep/.van-checkbox__label {
    flex: 1;
}
/deep/.van-checkbox {
    margin-bottom: 2px;
}
/deep/.van-submit-bar {
    bottom: 50px;
}
.cart-box {
    padding-bottom: 150px;
    box-sizing: border-box;
    .van-card {
        position: relative;
    }
    .delete-icon {
        position: absolute;
        top: 5px;
        right: 5px;
    }
    .cart-item {
        position: relative;
        padding-left: 40px;
        .checkbox-btn {
            position: absolute;
            left: 20px;
            top: 50%;
            transform: translate(-50%, -50%);
        }
    }
}
</style>
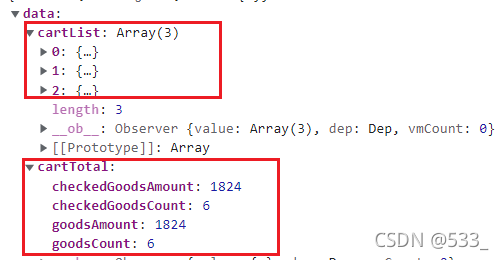
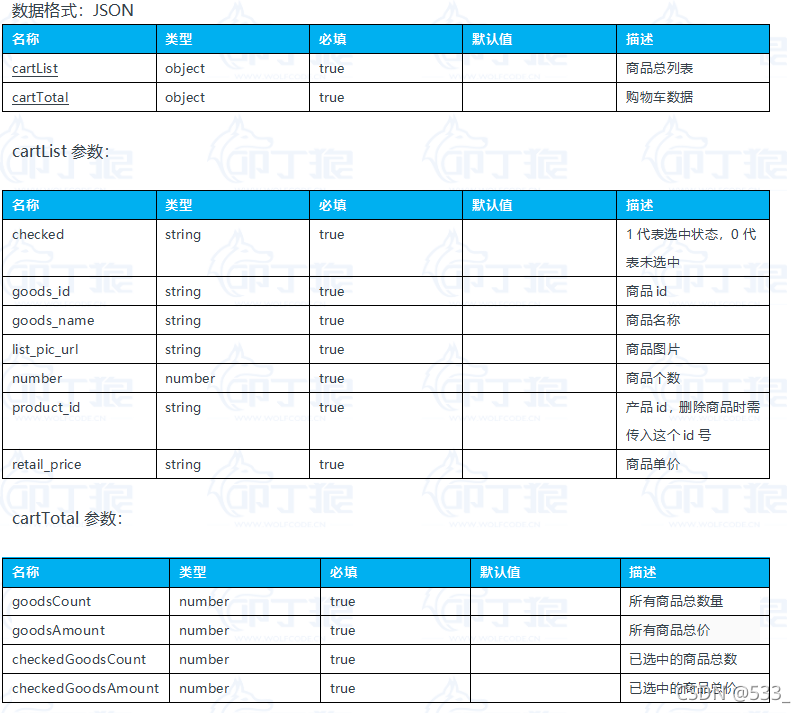
发送获取购物车数据列表时的响应数据
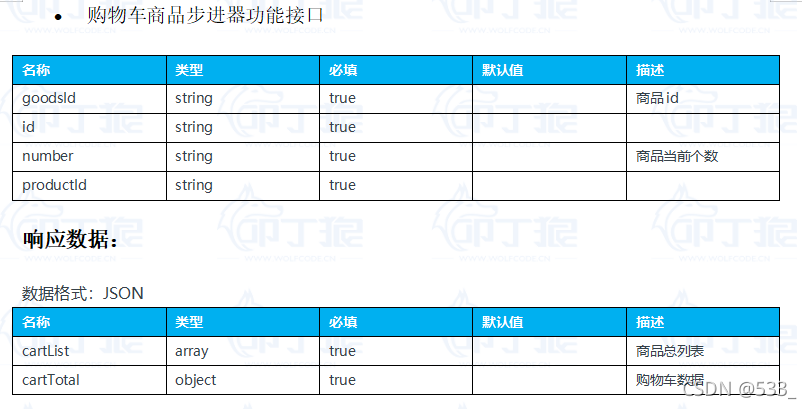
购物车商品步进器功能接口
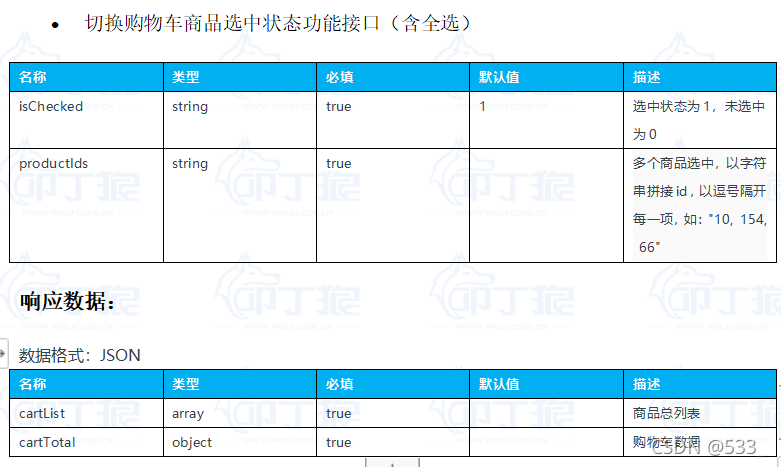
切换购物车商品选中状态功能接口(含全选)响应数据
四、我的页
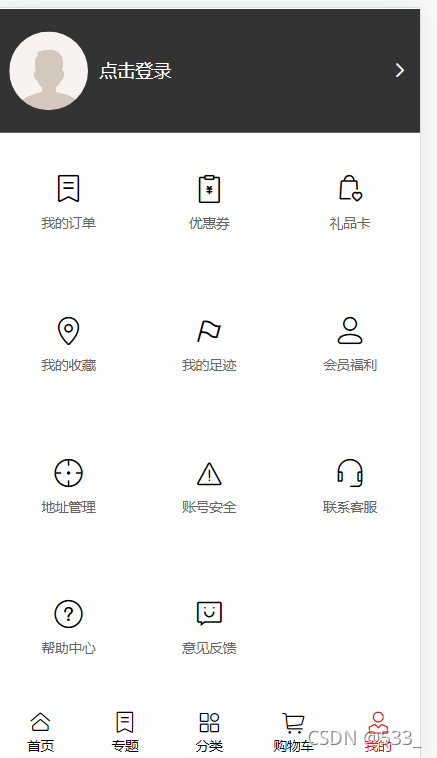
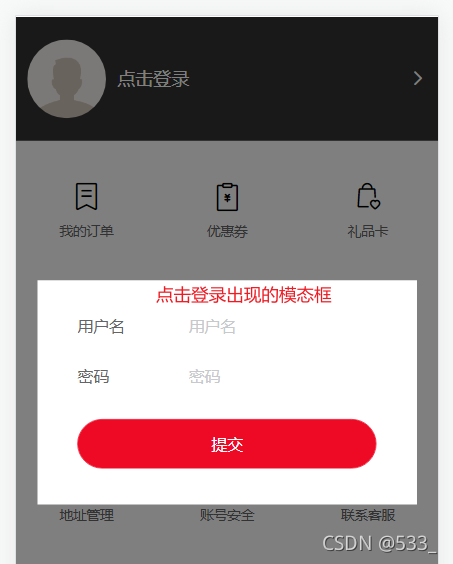
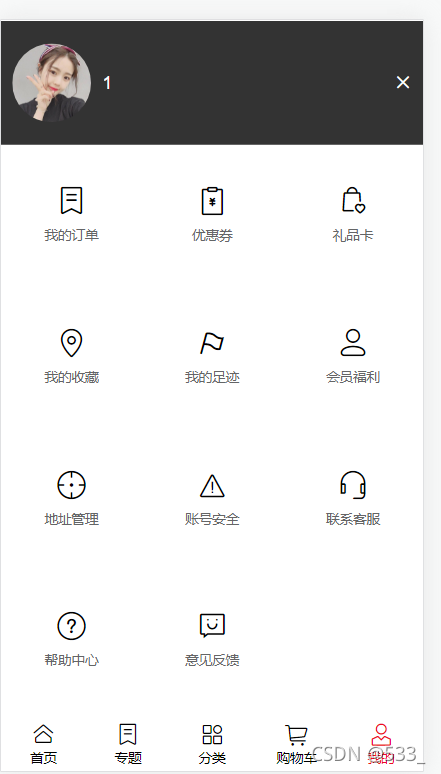
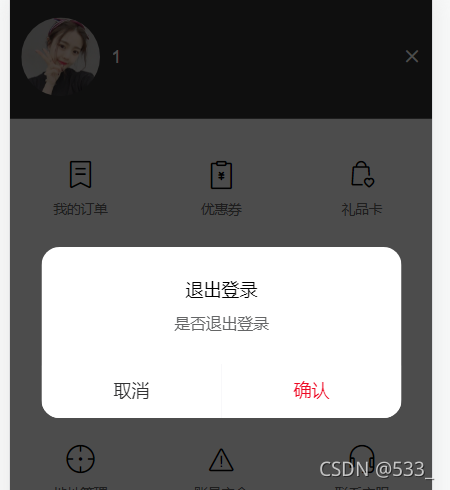
4.1. 效果图
4.2. 定义api
在http.js文件中定义接口请求
//登陆
export function GoLogin(params) {
    return instance({
        url: '/auth/loginByWeb',
        method: 'post',
        data: params
    })
}
4.3. User.vue

在views/user 目录下,新建User.vue 组件,代码如下:
<!-- 我的 -->
<template>
  <div class="user-box">
    <div class="user-top">
      <img :src="avatarSrc" alt="" />
      <!-- 如果登陆了,就显示用户名,否则显示立即登录 -->
      <h3 v-if="ifLogined">{{ username }}</h3>
      <!-- 点击登录,显示模态框 -->
      <h3 @click="ljdl" v-else>点击登录</h3>
      <van-icon :name="ifLogined ? 'cross' : 'arrow'" @click="loginout" />
    </div>

    <!-- 九宫格部分 -->
    <van-grid :column-num="3">
      <van-grid-item
        v-for="item in gridArr"
        :key="item.id"
        :icon="item.icon"
        :text="item.type"
      />
    </van-grid>

    <!-- 模态框 -->
    <div class="modal" v-if="ifShowModal">
      <div class="modal-bg" @click="ifShowModal = false"></div>
      <div class="modal-content">
        <van-form @submit="onSubmit">
          <van-field
            v-model="username"
            name="用户名"
            label="用户名"
            placeholder="用户名"
            :rules="[{ required: true, message: '请填写用户名' }]"
          />
          <van-field
            v-model="pwd"
            type="password"
            name="密码"
            label="密码"
            placeholder="密码"
            :rules="[{ required: true, message: '请填写密码' }]"
          />
          <div style="margin: 16px">
            <van-button round block type="danger" native-type="submit"
              >提交</van-button
            >
          </div>
        </van-form>
      </div>
    </div>
  </div>
</template>

<script>
// 引入登录接口
import { GoLogin } from "@/https/http";
import headImg from "@/assets/images/touxiang.png";  //默认头像

export default {
  name: "user",
  data() {
    return {
      username: "",
      pwd: "",
      avatarSrc: headImg,  //头像
      ifLogined: false, // 登录状态
      ifShowModal: false, // 是否显示模态框
      gridArr: [
        // grid数组
        { id: 0, icon: "label-o", type: "我的订单" },
        { id: 1, icon: "bill-o", type: "优惠券" },
        { id: 2, icon: "goods-collect-o", type: "礼品卡" },
        { id: 3, icon: "location-o", type: "我的收藏" },
        { id: 4, icon: "flag-o", type: "我的足迹" },
        { id: 5, icon: "contact", type: "会员福利" },
        { id: 6, icon: "aim", type: "地址管理" },
        { id: 7, icon: "warn-o", type: "账号安全" },
        { id: 8, icon: "service-o", type: "联系客服" },
        { id: 9, icon: "question-o", type: "帮助中心" },
        { id: 10, icon: "smile-comment-o", type: "意见反馈" },
      ],
    };
  },
  created() {
    // 登陆前先看本人是否登陆过
    let user = JSON.parse(localStorage.getItem("userInfo"));
    // 用户名存在
    if (user) {
      this.username = user.username;  //用户名
      this.avatarSrc = user.avatar; //头像
      this.ifLogined = true; // 显示用户名
    }
  },
  methods: {
    // 点击立即登录,显示登录模态框
    ljdl() {
      this.ifShowModal = true;
    },

    // 提交用户名,密码信息
    onSubmit() {
      this.getloginData(); //发送数据请求
    },

    // 发送数据请求:登录注册
    getloginData() {
      GoLogin({ username: this.username, pwd: this.pwd }).then((res) => {
        console.log(res);
        if (res.errno === 0) {
          console.log("登录成功");
          this.$toast.success("登录成功");
          localStorage.setItem("token", res.data.token);
          localStorage.setItem("userInfo", JSON.stringify(res.data.userInfo));
          this.ifShowModal = false; //不显示模态框
          this.ifLogined = true; // 显示用户名
          this.avatarSrc = res.data.userInfo.avatar; //头像
          this.username = res.data.userInfo.username;
        }
      });
    },
    // 退出登录
    loginout() {
      // 登录了
      if (this.ifLogined) {
        this.$dialog
          .confirm({
            title: "退出登录",
            message: "是否退出登录",
          })
          .then(() => {
            // on confirm
            this.ifLogined = false; // 不显示用户名
            this.avatarSrc = headImg; //头像
            // 清除token
            localStorage.removeItem("token");
            localStorage.removeItem("userInfo");
            // 刷新当前页
            this.$router.go(0);
            // 刷新当前页
            this.$router.go(0);
          })
          .catch(() => {
            // on cancel
          });
      }
    },
  },
};
</script>
<style lang="less" scoped>
.van-grid-item {
  padding: 20px;
}
.user-box {
  .user-top {
    display: flex;
    align-items: center;
    font-size: 16px;
    padding: 20px 10px;
    box-sizing: border-box;
    background-color: #333;
    color: white;
    img {
      width: 70px;
      height: 70px;
      margin-right: 10px;
      border-radius: 50%;
    }
    h3 {
      flex: 1;
    }
  }
  .modal {
    width: 100%;
    height: 100%;
    position: fixed; //position: fixed让height:100%起作用
    left: 0;
    top: 0;
    .modal-bg {
      width: 100%;
      height: 100%;
      background-color: rgba(0, 0, 0, 0.5);
    }
    .modal-content {
      width: 90%;
      height: 200px;
      box-sizing: border-box;
      // height: 200px;
      background-color: #fff;
      padding: 20px;
      position: absolute;
      left: 50%;
      top: 50%;
      transform: translate(-50%, -50%);
      z-index: 100;
    }
  }
}
</style>
五、路由守卫和异常处理
在router 目录下的index.js 文件中,设置路由前置守卫,代码如下,用来判断购物车页面只能在用户登录的情况下才能查看。
5.1. 编写路由守卫
// 路由前置守卫
router.beforeEach((to, from, next) => {
    // 有token就表示已经登录
    // 想要进入购物车页面,必须有登录标识token
    // console.log('to:', to)
    // console.log('from:', from)
    let token = localStorage.getItem('token')
    if (to.path == '/cart') {
        // 此时必须要有token
        if (token) {
            next(); // next()去到to所对应的路由界面
        } else {
            Vue.prototype.$toast('请先登录');
            // 定时器
            setTimeout(() => {
                next("/user");  // 强制去到"/user"所对应的路由界面
            }, 1000);
        }
    } else {
        // 如果不是去往购物车的路由,则直接通过守卫,去到to所对应的路由界面
        next()
    }
})
5.2. 异常处理
解决刷新页面,底部tabbar显示错题。
  computed:{
    active:{
      get(){
        console.log(this.$route.path)
        const path = this.$route.path
        switch(path){
          case '/home':return 0;
          case '/topic':return 1;
          case '/category':return 2;
          case '/cart':return 3;
          case '/user':return 4;
          default:return 0
        }
      },
      set(){
      }
    }
  }
2.编程式导航在跳转到与当前地址一致的URL时会报错,但这个报错不影响功能:
// 该段代码不需要记,理解即可
const originalPush = VueRouter.prototype.push;
VueRouter.prototype.push = function push(location) {
    return originalPush.call(this, location).catch((err) => err);
};
3.用户页引入头像
直接在标签中引入相对路径图片地址,图片不显示,需要使用如下模块式引入方式。
// import 方式
import headImg from "../assets/touxiang.png";

// require 方式
let headImg = require("../assets/touxiang.png")
项目优化—路由懒加载
当打包构建应用时,JavaScript 包会变得非常大,影响页面加载。如果我们能把不同路由对应的组件分割成不同的代码块,然后当路由被访问的时候才加载对应组件,这样就更加高效了。
 {
     path: '/home',//首页
     name: 'Home',
     component: () => import('@/views/Home'),
     meta: { // 用来判断该组件对应的页面是否显示底部tabbar
     	isShowTabbar: true
     }
 },
最后
以上就是彩色帅哥最近收集整理的关于vue+vant 移动端H5 商城项目_04的全部内容,更多相关vue+vant内容请搜索靠谱客的其他文章。
本图文内容来源于网友提供,作为学习参考使用,或来自网络收集整理,版权属于原作者所有。


发表评论 取消回复