文章目录
- 1-1 展示封装的组件
- 1-1-1 父组件
- 1-1-2 子组件 uploadPic
- 1-2 Element el-upload上传组件详解
- 1-2-1 基本用法
- 1-2-2 上传文件数量
- 1-2-3 上传格式及大小限制
- 1-2-4 上传过程中的各种钩子
- 1-2-5 显示已上传文件列表
- 1-2-6 上传时提交数据
- 1-2-6 选取和上传分开处理
业务上有需求是前端上传 jpg/png/gif 格式, 并且 尺寸为 150px * 150px,300px
*300px,428*428px 的图片
- 同时在上传的同时需要携带用户的个人信息以及其他额外信息
因此在 element-upload 基础之上
- 实现这个需求需要在上传前检查图片的大小,格式以及尺寸
- 如何上传也成为一个问题
- 使用组件的 action 上传方式, body属性传递参数
- 限制格式,加了一句:accept=“image/jpg,image/jpeg,image/png”
1-1 展示封装的组件
1-1-1 父组件
              <uploadPic form-label="上传大图片" :before-load="beforeLargeUpload" :dialog-pic-visible="dialogPicVisible" :picture-large-dim="ruleForm.pictureLarge" :upload-data="uploadLargeData" @changePicUrl="changePicUrl" />
              <uploadPic form-label="上传小图片" :before-load="beforeSmallUpload" :dialog-pic-visible="dialogPicVisible" :picture-large-dim="ruleForm.pictureSmall" :upload-data="uploadLargeData" @changePicUrl="changePicUrlSmall" />


<script>
data(){
	return{
		      dialogPicVisible: false,
	}
},
methods: {
   // 上传图片接收参数
    // 大图片
    changePicUrl(resUrl) {
      this.ruleForm.pictureLarge = resUrl
    },
    // 中间图片
    changePicUrlMedium(resUrl) {
      this.ruleForm.pictureMedium = resUrl
    },
    // 小图片
    changePicUrlSmall(resUrl) {
      this.ruleForm.pictureSmall = resUrl
    },


	 // 上传大图片
    beforeLargeUpload(file) {
      // const isJPG = file.type === 'image/jpeg'
      const isLt2M = file.size / 1024 / 1024 < 2

      let is80x56 = true
      const reader = new FileReader()
      reader.readAsDataURL(file)
      reader.onload = (theFile) => {
        const image = new Image()
        image.src = theFile.target.result
        image.onload = () => {
          const { width, height } = image
          if ((width !== 482) || (height !== 482)) {
            this.$message.error(`图片尺寸${width}*${height},请上传482*482 px 的图片!`)
            is80x56 = false
            return
          }
        }
      }

      if (!isLt2M) {
        this.$message.error('上传头像图片大小不能超过 2MB!')
      }
      return new Promise((resolve, reject) => {
        (isLt2M && is80x56).catch(err => {
          return err
        })
      })
    },
    // 上传中图片
    // 上传小图片
    beforeMediumUpload(file) {
      const isLt2M = file.size / 1024 / 1024 < 2

      let is300 = true
      const reader = new FileReader()
      reader.readAsDataURL(file)
      reader.onload = (theFile) => {
        const image = new Image()
        image.src = theFile.target.result
        image.onload = () => {
          const { width, height } = image
          if (width !== 150 && height !== 150) {
            this.$message.error(`图片尺寸${width}*${height},请上传 300*300 px 以下的图片!`)
            is300 = false
          }
        }
      }

      if (!isLt2M) {
        this.$message.error('上传头像图片大小不能超过 2MB!')
      }
      return new Promise((resolve, reject) => {
        (isLt2M && is300).catch(err => {
          return err
        })
      })
    },

}
</script>
1-1-2 子组件 uploadPic
<template>
  <div>
    <el-form-item :label="formLabel">
      <div style="display:flex; justify-content:space-between;">
        <el-input v-model="pictureLargeDim" placeholder="请点击上传按钮" :disabled="true" />
        <el-button type="primary" @click="dialogPicVisible = true">上传</el-button>
      </div>
      <el-dialog :title="formLabel" :visible.sync="dialogPicVisible">
        <el-upload
          class="upload-demo"
          :limit="1"
          accept="image/jpeg,image/gif,image/png"
          drag
          action="/config/upload"
          :data="uploadData"
          :before-upload="beforeLoad"
          :on-success="handleAvatarSuccess"
          :on-exceed="handleExceed"
        >
          <i class="el-icon-upload" />
          <div class="el-upload__text">将文件拖到此处,或<em>点击上传</em></div>
          <div slot="tip" class="el-upload__tip">只能上传jpg/png/gif文件,且不超过2MB</div>
        </el-upload>
      </el-dialog>
    </el-form-item>
  </div>
</template>

<script>
export default {
  props: {
    pictureLargeDim: {
      type: String,
      required: true
    },
    uploadData: {
      type: Object,
      required: true
    },
    formLabel: {
      type: String,
      required: true
    },
    // 判断是大小中图片上传
    beforeLoad: {
      type: Function,
      required: true
    }
  },
  data() {
    return {
      dialogPicVisible: false
    }
  },
  methods: {
    handleAvatarSuccess(res) {
    //   this.ruleForm.pictureLarge = res.url
      this.$emit('changePicUrl', res.url)
      this.dialogPicVisible = false
      this.$message.success('上传成功')
    },
    handleExceed() {
      this.$message.warning('仅上传一张图片,删除之前的图片再进行之后的操作')
    }
  }
}
</script>
1-2 Element el-upload上传组件详解
upload上传是前端开发很常用的一个功能,在Vue开发中常用的Element组件库也提供了非常好用的upload组件。
1-2-1 基本用法
代码:
<el-upload :action="uploadActionUrl">
    <el-button size="small" type="primary">点击上传</el-button>
</el-upload>
- :action是执行上传动作的后台接口,el-button是触发上传的按钮。
1-2-2 上传文件数量
-
- 首先设置是否可以同时选中多个文件上传,这个也是
<input type='file'>的属性,添加multiple即可 - 另外el-upload组件提供了
:limit属性来设置最多可以上传的文件数量,超出此数量后选择的文件是不会被上传的。:on-exceed绑定的方法则是处理超出数量后的动作。代码如下:
<el-upload :action="uploadActionUrl" multiple :limit="3" :on-exceed="handleExceed"> <el-button size="small" type="primary">点击上传</el-button> </el-upload> - 首先设置是否可以同时选中多个文件上传,这个也是
1-2-3 上传格式及大小限制
- 如果需要限制上传文件的格式,需要添加
accept属性,这个是直接使用<input type='file'>一样的属性了- accept属性的值可以是
accept="image/gif, image/jpeg, text/plain, application/pdf"等等 - 文件格式的提示,则可以使用slot。代码如下:
<el-upload :action="uploadActionUrl" accept="image/jpeg,image/gif,image/png" multiple :limit="3" :on-exceed="handleExceed"> <el-button size="small" type="primary">点击上传</el-button> <div slot="tip" class="el-upload__tip">请上传图片格式文件</div> </el-upload> - accept属性的值可以是
- 注意这里只是选择文件时限制格式,其实用户还是可以点选“所有文件”选项,上传其他格式。如果需要在在上传时再次校验,择需要在
:before-upload这个钩子绑定相应的方法来校验,代码如下:
<el-upload
    :action="uploadActionUrl"
    accept="image/jpeg,image/gif,image/png"
    :before-upload="onBeforeUpload"
    multiple
    :limit="3"
    :on-exceed="handleExceed">
    <el-button size="small" type="primary">点击上传</el-button>
    <div slot="tip" class="el-upload__tip">请上传图片格式文件</div>
</el-upload>
...
    onBeforeUpload(file)
    {
      const isIMAGE = file.type === 'image/jpeg'||'image/gif'||'image/png';
      const isLt1M = file.size / 1024 / 1024 < 1;

      if (!isIMAGE) {
        this.$message.error('上传文件只能是图片格式!');
      }
      if (!isLt1M) {
        this.$message.error('上传文件大小不能超过 1MB!');
      }
      return isIMAGE && isLt1M;
    }
- 这里在限制文件格式的同时,也做了文件大小的校验。
1-2-4 上传过程中的各种钩子
1-2-5 显示已上传文件列表
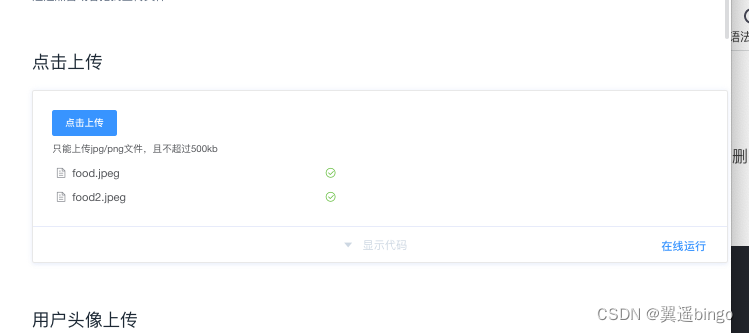
- 这个功能可以说很强大了,可以很清晰的显示已上传的文件列表,并且可以方便的删除,以便上传新的文件。
代码:
<el-upload
    :action="uploadActionUrl"
    accept="image/jpeg,image/gif,image/png"
    multiple
    :limit="3"
    :on-exceed="handleExceed"
    :on-error="uploadError"
    :on-success="uploadSuccess"
    :on-remove="onRemoveTxt"
    :before-upload="onBeforeUpload"
    :file-list="files">
    <el-button size="small" type="primary">点击上传</el-button>
    <div slot="tip" class="el-upload__tip">请上传图片格式文件</div>
</el-upload>
- 实现方法就是
:file-list="files"这个属性的添加,其中files是绑定的数组对象,初始为空。
1-2-6 上传时提交数据
- 上传文件同时需要提交数据给后台接口,这时就要用到:data属性。
<el-upload
    :action="uploadActionUrl"
    accept="image/jpeg,image/gif,image/png"
    multiple
    :limit="3"
    :data="uploadData"
    :on-exceed="handleExceed"
    :on-error="uploadError"
    :on-success="uploadSuccess"
    :on-remove="onRemoveTxt"
    :before-upload="onBeforeUpload"
    :file-list="files">
    <el-button size="small" type="primary">点击上传</el-button>
    <div slot="tip" class="el-upload__tip">请上传图片格式文件</div>
</el-upload>
...
uploadData: {
    dataType: "0",
    oldFilePath:""
}
1-2-6 选取和上传分开处理
- 有时我们需要把选取和上传分开处理,比如上传图片,先选取文件提交到前端,图片处理后再把base64内容提交到后台。
<el-upload
  action=""
  accept="image/jpeg,image/gif,image/png"
  :on-change="onUploadChange"
  :auto-upload="false"
  :show-file-list="false">
    <el-button slot="trigger" size="small" type="primary">选取</el-button>
    <el-button style="margin-left: 10px;" size="small" type="success" @click="submitUpload">上传</el-button>
</el-upload>
...
  submitUpload()
  {
    console.log("submit")
  },
  onUploadChange(file)
  {
    const isIMAGE = (file.raw.type === 'image/jpeg' || file.raw.type === 'image/png'|| file.raw.type === 'image/gif');
    const isLt1M = file.size / 1024 / 1024 < 1;

    if (!isIMAGE) {
      this.$message.error('上传文件只能是图片格式!');
      return false;
    }
    if (!isLt1M) {
      this.$message.error('上传文件大小不能超过 1MB!');
      return false;
    }
    var reader = new FileReader();
    reader.readAsDataURL(file.raw);
    reader.onload = function(e){
        console.log(this.result)//图片的base64数据
    }
  }

参考文章:https://blog.csdn.net/qq_41800366/article/details/113309320
- https://blog.csdn.net/qq_58340302/article/details/125939912
最后
以上就是重要黑裤最近收集整理的关于【图片上传记录三】element-ui组件详解与封装(自定义上传、限制文件大小、格式以及图片尺寸)的全部内容,更多相关【图片上传记录三】element-ui组件详解与封装(自定义上传、限制文件大小、格式以及图片尺寸)内容请搜索靠谱客的其他文章。
本图文内容来源于网友提供,作为学习参考使用,或来自网络收集整理,版权属于原作者所有。


发表评论 取消回复