我是靠谱客的博主 忐忑毛豆,这篇文章主要介绍Vue3.2 + ts + vben admin + ant design 的Card二次封装声明:Vue3.2 + ts + vben admin +ant design 这些都有在继续往下看哈 ----单页面使用的效果 就是一个页面有效果 上代码正经的封装使用·················来了效果图展示,现在分享给大家,希望可以做个参考。
首先你得有vben admin 的代码 可以去官网拉取 ,然后在开始更改
声明:Vue3.2 + ts + vben admin +ant design 这些都有在继续往下看哈 ----
没有可以看看借鉴一下
------------------------------------------------------------------------------------------------------------------------------
单页面使用的效果 就是一个页面有效果
背景描述:
- Card里边保留了原有的功能,
- 增加了拖拽功能,
- 增加了父子传值功能,
- 还添加了Card的显隐功能(点击显示),
- 以及更改了原有的关闭按钮功能(点击关闭),
功能概括:
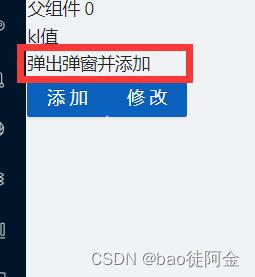
1,可以点击 { 弹出弹框添加 } 弹出 Card框 进行随意拖动,点击{ 关闭 } 关闭弹框 回到父页面。
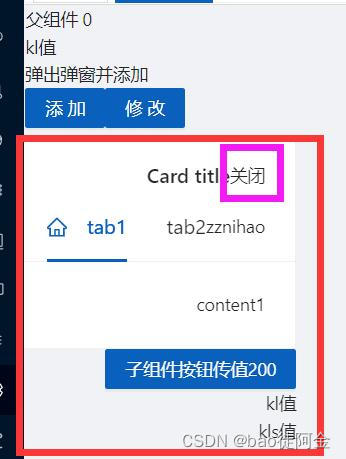
- 因为实现了父子相传,可以在子页面定义数据以及方法,然后通过emit和按钮进行传值,方法需要在父组件重新定义。
上代码
父页面代码
<template>
<div>
{{ parentValue }}
<br>
{{ kl }}
<br>
<Button type="primary" @click="isShow = true">弹出弹窗并添加</Button>
<Button type="primary" @click="onParentClick()">添加</Button>
<Button type="primary" @click="kls()">修改</Button>
<!-- 子组件 -->
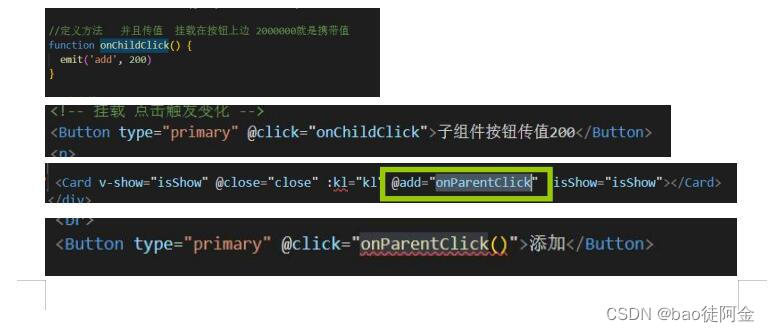
<Card v-show="isShow" @close="close" :kl="kl" @add="onParentClick" :isShow="isShow"></Card>
<!--
v-show="isShow" 控制Card显隐
@close="close" 删除方法
:kl="kl" 父给子传值
@add="onParentClick" 子给父传递方法
:isShow="isShow" 父给子传递显隐
-->
</div>
</template>
<script setup lang='ts'>
import { Button } from '/@/components/Button';
import Card from '../dept/Card.vue'
import { ref } from 'vue'
import { any } from 'vue-types'
//定义初始值 父给子传值
const kl = ref<String>('kl值')
// 定义初始值
const parentValue = ref(0)
// 定义方法
function onParentClick(childValue: number) {
//进行一个三元判断 父页面加1 子页面加200(子页面定义200了)
childValue ? (parentValue.value += childValue) : parentValue.value++
// 点击添加 每次加一
// childValue = parentValue.value++
}
// 定义显隐
const isShow = ref<boolean>(false)
// 删除按钮
function close(value: any) {
// console.log(value);
isShow.value = value
}
// 修改值
function kls(value: any) {
value = '修改值11111'
kl.value = value
}
</script>
<style>
</style>子页面代码
<template>
  <div v-move class="box" >
    <Card style="width: 100%" title="Card title" :tab-list="customTab" :active-tab-key="key"
      @tabChange="key => onTabChange(key, 'key')" >

      <template #customRender="item">
        <span>
          <home-outlined />
          {{ item.key }}
        </span>
      </template>
      <template #extra>
        <span class="close" @click="close">关闭</span>
      </template>
      {{ contentList[key] }}
    </Card>
    <!-- 挂载 点击触发变化 -->
    <Button type="primary" @click="onChildClick">子传值200</Button>
    <p>{{ kl }}</p>
  </div>
</template>

<script setup lang='ts'>
import Card from "ant-design-vue/lib/card/Card";
import { Directive, ref } from "vue";
import { HomeOutlined } from '@ant-design/icons-vue';
import { any, string } from "vue-types";
import { Button } from '/@/components/Button';
// 传递值 赋值
const emit = defineEmits(["key", "noTitleKey", 'add', 'onTabChange', "vMove", 'close'])

//定义方法   并且传值  挂载在按钮上边 200就是携带值
function onChildClick() {
  emit('add', 200)
}

// 定义传值关闭按钮
function close() {
  emit('close', false)
}

// 接收
const props: any = defineProps({
  // 父传子  接收值
  kl: {
    type: string,
    default: "boolean"
  },

})

const customTab: any = [
  {
    key: 'tab1',
    slots: {
      tab: 'customRender',
    },
  },
  {
    key: 'tab2',
    tab: 'tab2',
  },
];
const contentList: any = {
  tab1: 'content1',
  tab2: 'content2',
};

const key = ref<String>('tab1');
const noTitleKey = ref<String>('app');

const onTabChange: any = (value: any, type: any) => {
  console.log(value, type);
  if (type === 'key') {
    key.value = value;
  } else if (type === 'noTitleKey') {
    noTitleKey.value = value;
  }
  emit('onTabChange', onTabChange)

};

// 定义 x轴 和 y轴 的一些基本值  {初始化}
let positionX = ref<number>(1110)
// console.log(positionX,'ajsaja')
let positionY = ref<number>(0)

// 定义 VMove VMove定义的是方法 {移动的基本逻辑}
const vMove: Directive = {
  mounted(el: HTMLElement) {
    // let moveEl = el.firstElementChild as HTMLElement;
    // 进行赋值
    let moveEl = el as HTMLElement
    // 定义物体移动位置 距离
    const mouseDown = (e: MouseEvent) => {
      //鼠标点击物体那一刻相对于物体左侧边框的距离=点击时的位置相对于浏览器最左边的距离-物体左边框相对于浏览器最左边的距离
      // console.log(e.clientX, e.clientY, "-----起始", el.offsetLeft);
      // clientX:当鼠标事件发生时, 鼠标相对于浏览器(这里说的是浏览器的有效区域)X轴的位置;
      // clientY:当鼠标事件发生时,鼠标相对于浏览器(这里说的是浏览器的有效区域)y轴的位置;
      // screenX:当鼠标事件发生时,鼠标相对于显示器屏幕x轴的位置;
      // screenY:当鼠标事件发生时,鼠标相对于显示器屏幕y轴的位置;
      // offsetX:当鼠标事件发生时,鼠标相对于事件源x轴的位置
      // offsetY:当鼠标事件发生时,鼠标相对于事件源y轴的位置
      // offsetLeft : 向左偏移,严格来说他是内边距 物体到边界的距离
      // offsetTop  : 向上偏移,严格来说他是内边距 物体到边界的距离

      // x y是浏览器的宽度减去 用移动的位置
      let X = e.clientX - el.offsetLeft;
      let Y = e.clientY - el.offsetTop;
      // console.log(X,'kkk')

      // 获取拖拽位置
      const move = (e: MouseEvent) => {
        // 获取拖拽元素的位置
        let left = e.clientX - X;
        let top = e.clientY - Y;
        // console.log(left,'kkk')

        //positionX.value 就是移动的位置   {在进行赋值}
        positionX.value = left
        positionY.value = top
        // console.log(positionX.value,'kkk')
        // console.log(positionX,'kkk22')

        // clientWidth  客户端宽度    el.offsetWidth 偏移宽度
        // 进行判断
        if (left <= 0) {
          left = 0
        } else if (left >= document.documentElement.clientWidth - el.offsetWidth) {
          left = document.documentElement.clientWidth - el.offsetWidth
        }

        if (top <= 0) {
          top = 0
        } else if (top >= document.documentElement.clientHeight - el.offsetHeight) {
          top = document.documentElement.clientHeight - el.offsetHeight
        }

        el.style.left = left + "px";
        el.style.top = top + "px";
      };
      // addEventListener   添加事件侦听器  监听mousemove move
      document.addEventListener("mousemove", move);
      //清除 mousemove移动事件
      document.addEventListener("mouseup", () => {
        document.removeEventListener("mousemove", move);
      });
    };
    // addEventListener   添加事件侦听器  监听"mousedown", mouseDown
    moveEl.addEventListener("mousedown", mouseDown);
  },

}

// 暴露方法
defineExpose({
  onTabChange,
  vMove,
  key,
  noTitleKey,
  positionX,
  positionY,
  onChildClick
});
</script>
<style lang='less' scoped>
.box {
  position: fixed;
  // width: 400px;
}
</style>
-----------------------------------------------------------------------------------------------------------------------------
正经的封装使用·················来了
VCard 二次封装Card组件
功能:添加移动效果,保留基本属性 添加删除效果
上代码
子组件
       {{{VCard组件}}}

<template>
  <div v-move class="box" >
    <Card class="box-card" v-bind="$attrs" v-on="$listeners">
      <template #extra>
        <p class="close" @click="close">关闭</p>
      </template>
      <template #[slotName] v-for="(slot, slotName) in $slots">
        <slot :name="slotName" />
      </template>
    </Card>
  </div>
</template>
<script setup lang='ts'>
import Card from "ant-design-vue/lib/card/Card";
import { Directive, ref } from "vue";
import { any } from "vue-types";
function defineOptions(_arg0: { name: string; }) {
}
defineOptions({
  name: 'VCard',
});
// 传递值 赋值
const emit = defineEmits(['close'])

// 接收
const props: any = defineProps({})

// 定义传值关闭按钮
const isShow = ref<boolean>(false)

// 定义传值关闭按钮
function close() {
  emit('close', false)
}

let positionX = ref<number>(1110)
let positionY = ref<number>(0)
const vMove: Directive = {
  mounted(el: HTMLElement) {
    let moveEl = el as HTMLElement
    const mouseDown = (e: MouseEvent) => {

      let X = e.clientX - el.offsetLeft;
      let Y = e.clientY - el.offsetTop;

      const move = (e: MouseEvent) => {
        let left = e.clientX - X;
        let top = e.clientY - Y;
        positionX.value = left
        positionY.value = top

        if (left <= 0) {
          left = 0
        } else if (left >= document.documentElement.clientWidth - el.offsetWidth) {
          left = document.documentElement.clientWidth - el.offsetWidth
        }

        if (top <= 0) {
          top = 0
        } else if (top >= document.documentElement.clientHeight - el.offsetHeight) {
          top = document.documentElement.clientHeight - el.offsetHeight
        }

        el.style.left = left + "px";
        el.style.top = top + "px";
      };
      document.addEventListener("mousemove", move);
      document.addEventListener("mouseup", () => {
        document.removeEventListener("mousemove", move);
      });
    };
    moveEl.addEventListener("mousedown", mouseDown);
  },

}

// 暴露方法
defineExpose({
  vMove,

});
</script>
<style lang='less' scoped>
.box,
.box-card {
  position: fixed;
  width: 300px;
  height: 300px;
}
</style>
父组件
<template>
<div>
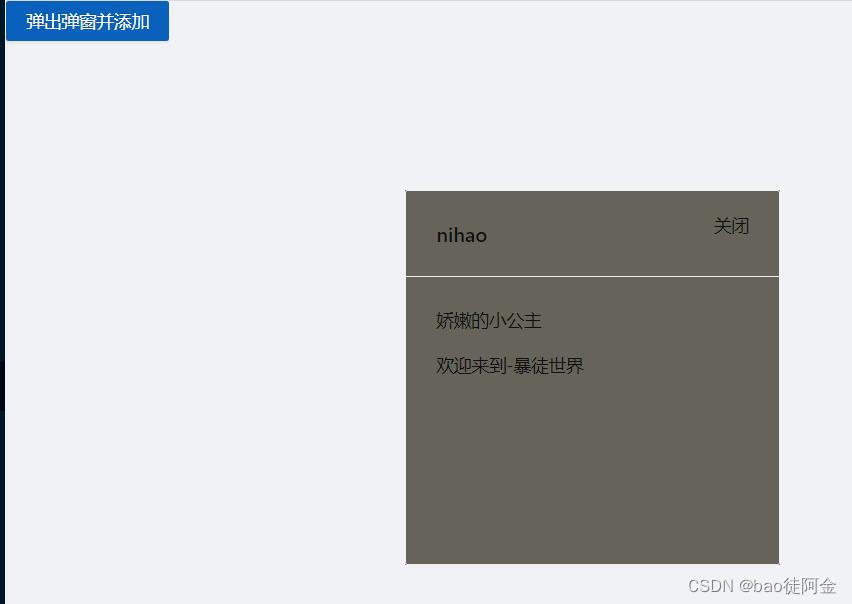
<Button type="primary" @click="isShow = true">弹出弹窗并添加</Button>
<VCard
class="klkl"
title="nihao"
v-show="isShow"
:isShow="isShow"
@close="close"
>
<p>娇嫩的小公主</p>
欢迎来到-{{ kl }}
</VCard>
</div>
</template>
<script setup lang='ts'>
import VCard from '/@/views/demo/system/dept/VCard.vue'
import { Button } from '/@/components/Button';
import { ref } from 'vue'
function defineOptions(_arg0: { name: string; }) {
}
defineOptions({
name: 'index',
});
// 删除按钮
function close(value: any) {
isShow.value = value
}
const kl = ref('暴徒世界')
// 显示状态
const isShow = ref<boolean>(false)
</script>
<style>
.klkl{
background-color: rgb(102, 100, 90);
width: 200px;
height: 200px;
}
</style>效果图展示

不足求指教 ~~~~~~
最后
以上就是忐忑毛豆最近收集整理的关于Vue3.2 + ts + vben admin + ant design 的Card二次封装声明:Vue3.2 + ts + vben admin +ant design 这些都有在继续往下看哈 ----单页面使用的效果 就是一个页面有效果 上代码正经的封装使用·················来了效果图展示的全部内容,更多相关Vue3.2内容请搜索靠谱客的其他文章。
本图文内容来源于网友提供,作为学习参考使用,或来自网络收集整理,版权属于原作者所有。


发表评论 取消回复