文章目录
- 1.MobileNetV2的介绍
- 2.MobileNetV2的结构
- 1)Inverted Residuals
- 2)Linear Bottlenecks
- 3.MobileNetV2的性能统计
- 4.MobileNetV2的pytorch实现
1.MobileNetV2的介绍
MobileNet v2网络是由google团队在2018年提出的,相比MobileNet V1网络,准确率更高,模型更小。
网络中的亮点 :
- Inverted Residuals (倒残差结构 )
- Linear Bottlenecks(结构的最后一层采用线性层)
2.MobileNetV2的结构
1)Inverted Residuals
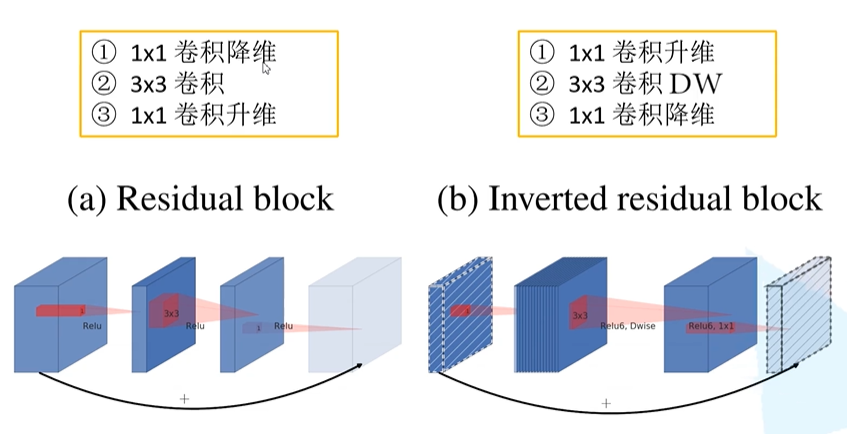
在之前的ResNet残差结构是先用1x1的卷积降维,再升维的操作。而在MobileNetV2中,是先升维,在降维的操作。
所以对于ResNet残差结构是两头大,中间小。而对于MobileNetV2结构是中间大,两头小的结构。
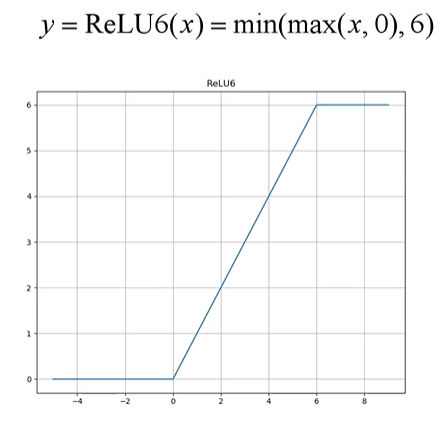
其中,在MobileNet结构中,采用了新的激活函数:ReLU6
2)Linear Bottlenecks
针对倒残差结构中,最后一层的卷积层,采用了线性的激活函数,而不是ReLU激活函数。
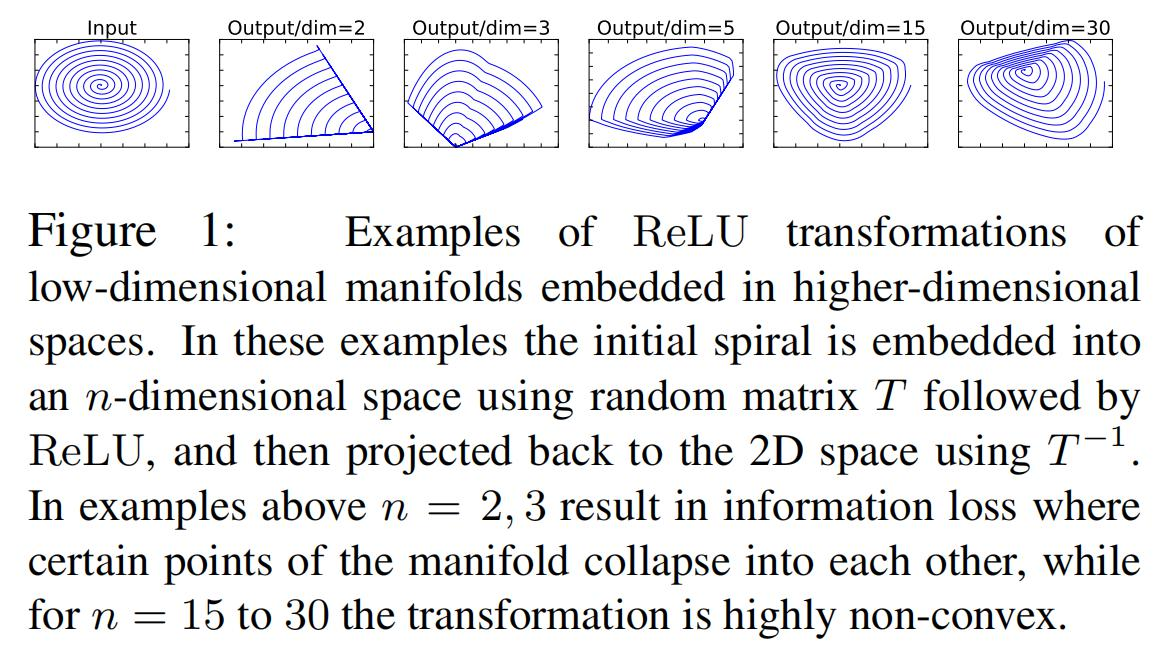
一个解释是,ReLU激活函数对于低维的信息可能会造成比较大的瞬损失,而对于高维的特征信息造成的损失很小。而且由于倒残差结构是两头小中间大,所以输出的是一个低维的特征信息。所以使用一个线性的激活函数避免特征损失。
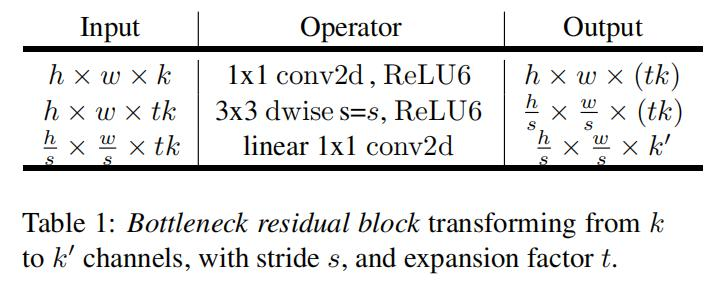
结构如下所示:
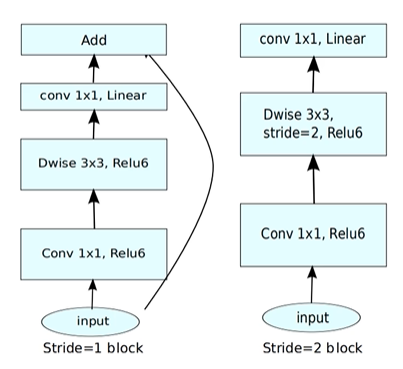
ps:当stride=1且 输入特征矩阵与输出特征矩阵shape 相同时才有shortcut连接
shape的变化:其中的k是扩充因子
3.MobileNetV2的性能统计
- Classification分类任务
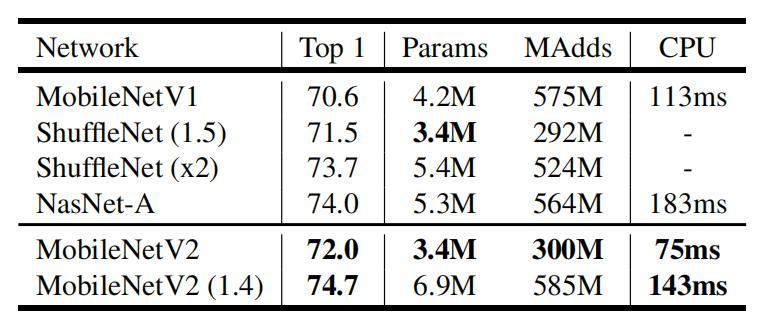
其中MobileNetV2(1.4)中的1.4代表的是倍率因子也就是α,其中α是控制卷积层卷积核个数的超参数,β是控制输入图像的大小
可以看见,在CPU上分类一张图片主需要花75ms,基本上达到了实时性的要求。
- Object Detection目标检测任务
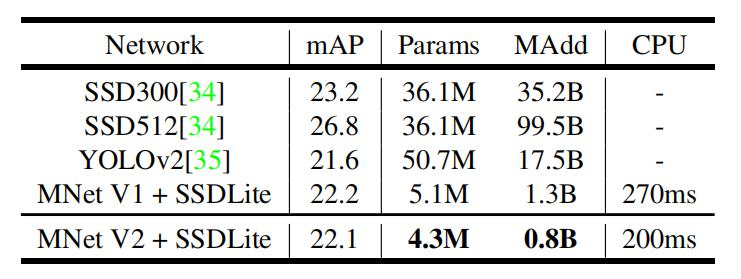
可以看见,MobileNetV2的提出,已经基本上可以实现在移动设备或者是嵌入式设备来跑深度学习的模型了。将研究与日常生活结合了起来。
4.MobileNetV2的pytorch实现
MobileNetV2的网络结构
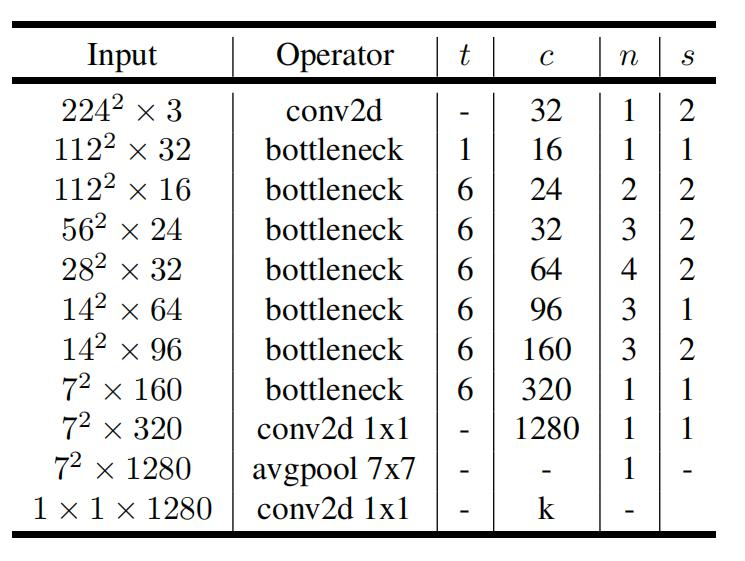
其中:
- t是扩展因子,第一层1x1卷积层中卷积核的扩展倍率
- c是输出特征矩阵深度channel
- n是bottleneck的重复次数
- s是步距( 针对第一层,其他为1 ,与ResNet的类似,通过第一层的步长改变尺寸变化)
参考代码
import torch
import torch.nn as nn
import torchvision

# 分类个数
num_class = 5

# DW卷积
def Conv3x3BNReLU(in_channels,out_channels,stride,groups):
    return nn.Sequential(
            # stride=2 wh减半,stride=1 wh不变
            nn.Conv2d(in_channels=in_channels, out_channels=out_channels, kernel_size=3, stride=stride, padding=1, groups=groups),
            nn.BatchNorm2d(out_channels),
            nn.ReLU6(inplace=True)
        )

# PW卷积
def Conv1x1BNReLU(in_channels,out_channels):
    return nn.Sequential(
            nn.Conv2d(in_channels=in_channels, out_channels=out_channels, kernel_size=1, stride=1),
            nn.BatchNorm2d(out_channels),
            nn.ReLU6(inplace=True)
        )

# # PW卷积(Linear) 没有使用激活函数
def Conv1x1BN(in_channels,out_channels):
    return nn.Sequential(
            nn.Conv2d(in_channels=in_channels, out_channels=out_channels, kernel_size=1, stride=1),
            nn.BatchNorm2d(out_channels)
        )

class InvertedResidual(nn.Module):
    # t = expansion_factor,也就是扩展因子,文章中取6
    def __init__(self, in_channels, out_channels, expansion_factor, stride):
        super(InvertedResidual, self).__init__()
        self.stride = stride
        self.in_channels = in_channels
        self.out_channels = out_channels
        mid_channels = (in_channels * expansion_factor)
        # print("expansion_factor:", expansion_factor)
        # print("mid_channels:",mid_channels)

        # 先1x1卷积升维,再1x1卷积降维
        self.bottleneck = nn.Sequential(
            # 升维操作: 扩充维度是 in_channels * expansion_factor (6倍)
            Conv1x1BNReLU(in_channels, mid_channels),
            # DW卷积,降低参数量
            Conv3x3BNReLU(mid_channels, mid_channels, stride, groups=mid_channels),
            # 降维操作: 降维度 in_channels * expansion_factor(6倍) 降维到指定 out_channels 维度
            Conv1x1BN(mid_channels, out_channels)
        )

        # 第一种: stride=1 才有shortcut 此方法让原本不相同的channels相同
        if self.stride == 1:
            self.shortcut = Conv1x1BN(in_channels, out_channels)

        # 第二种: stride=1 切 in_channels=out_channels 才有 shortcut
        # if self.stride == 1 and in_channels == out_channels:
        #     self.shortcut = ()

    def forward(self, x):
        out = self.bottleneck(x)
        # 第一种:
        out = (out+self.shortcut(x)) if self.stride==1 else out
        # 第二种:
        # out = (out + x) if self.stride == 1 and self.in_channels == self.out_channels else out
        return out

class MobileNetV2(nn.Module):
    # num_class为分类个数, t为扩充因子
    def __init__(self, num_classes=num_class, t=6):
        super(MobileNetV2,self).__init__()

        # 3 -> 32 groups=1 不是组卷积 单纯的卷积操作
        self.first_conv = Conv3x3BNReLU(3,32,2,groups=1)

        # 32 -> 16 stride=1 wh不变
        self.layer1 = self.make_layer(in_channels=32, out_channels=16, stride=1, factor=1, block_num=1)
        # 16 -> 24 stride=2 wh减半
        self.layer2 = self.make_layer(in_channels=16, out_channels=24, stride=2, factor=t, block_num=2)
        # 24 -> 32 stride=2 wh减半
        self.layer3 = self.make_layer(in_channels=24, out_channels=32, stride=2, factor=t, block_num=3)
        # 32 -> 64 stride=2 wh减半
        self.layer4 = self.make_layer(in_channels=32, out_channels=64, stride=2, factor=t, block_num=4)
        # 64 -> 96 stride=1 wh不变
        self.layer5 = self.make_layer(in_channels=64, out_channels=96, stride=1, factor=t, block_num=3)
        # 96 -> 160 stride=2 wh减半
        self.layer6 = self.make_layer(in_channels=96, out_channels=160, stride=2, factor=t, block_num=3)
        # 160 -> 320 stride=1 wh不变
        self.layer7 = self.make_layer(in_channels=160, out_channels=320, stride=1, factor=t, block_num=1)
        # 320 -> 1280 单纯的升维操作
        self.last_conv = Conv1x1BNReLU(320,1280)

        self.avgpool = nn.AvgPool2d(kernel_size=7,stride=1)
        self.dropout = nn.Dropout(p=0.2)
        self.linear = nn.Linear(in_features=1280,out_features=num_classes)
        self.init_params()

    def make_layer(self, in_channels, out_channels, stride, factor, block_num):
        layers = []
        # 与ResNet类似,每层Bottleneck单独处理,指定stride。此层外的stride均为1
        layers.append(InvertedResidual(in_channels, out_channels, factor, stride))
        # 这些叠加层stride均为1,in_channels = out_channels, 其中 block_num-1 为重复次数
        for i in range(1, block_num):
            layers.append(InvertedResidual(out_channels, out_channels, factor, 1))
        return nn.Sequential(*layers)

    # 初始化权重操作
    def init_params(self):
        for m in self.modules():
            if isinstance(m, nn.Conv2d):
                nn.init.kaiming_normal_(m.weight)
                nn.init.constant_(m.bias, 0)
            elif isinstance(m, nn.Linear) or isinstance(m, nn.BatchNorm2d):
                nn.init.constant_(m.weight, 1)
                nn.init.constant_(m.bias, 0)

    def forward(self, x):
        x = self.first_conv(x)  # torch.Size([1, 32, 112, 112])
        x = self.layer1(x)      # torch.Size([1, 16, 112, 112])
        x = self.layer2(x)      # torch.Size([1, 24, 56, 56])
        x = self.layer3(x)      # torch.Size([1, 32, 28, 28])
        x = self.layer4(x)      # torch.Size([1, 64, 14, 14])
        x = self.layer5(x)      # torch.Size([1, 96, 14, 14])
        x = self.layer6(x)      # torch.Size([1, 160, 7, 7])
        x = self.layer7(x)      # torch.Size([1, 320, 7, 7])
        x = self.last_conv(x)   # torch.Size([1, 1280, 7, 7])
        x = self.avgpool(x)     # torch.Size([1, 1280, 1, 1])
        x = x.view(x.size(0),-1)    # torch.Size([1, 1280])
        x = self.dropout(x)
        x = self.linear(x)      # torch.Size([1, 5])
        return x


if __name__=='__main__':
    model = MobileNetV2()
    # model = torchvision.models.MobileNetV2()
    # print(model)

    input = torch.randn(1, 3, 224, 224)
    out = model(input)
    print(out.shape)
参考:
https://www.bilibili.com/video/BV1yE411p7L7
最后
以上就是仁爱背包最近收集整理的关于轻量级网络——MobileNetV2的全部内容,更多相关轻量级网络——MobileNetV2内容请搜索靠谱客的其他文章。


发表评论 取消回复