TensorFlow Object Detection API 上提供了使用SSD部署到TFLite运行上去的方法, 可是这套API封装太死板, 如果你要自己实现了一套SSD的训练算法,应该怎么才能部署到TFLite上呢?
首先,抛开后处理的部分,你的SSD模型(无论是VGG-SSD和Mobilenet-SSD), 你最终的模型的输出是对class_predictions和bbox_predictions; 并且是encoded的
Encoding的方式:
class_predictions: M个Feature Layer, Feature Layer的大小(宽高)视网络结构而定; 每个Feature Layer有Num_Anchor_Depth_of_this_layer x Num_classes个channels
box_predictions: M个Feature Layer; 每个Feature Layer有Num_Anchor_Depth_of_this_layer x 4个channes 这4个channel分别代表dy,dx,h,w, 即bbox中心距离anchor中心坐标的偏移量和宽高
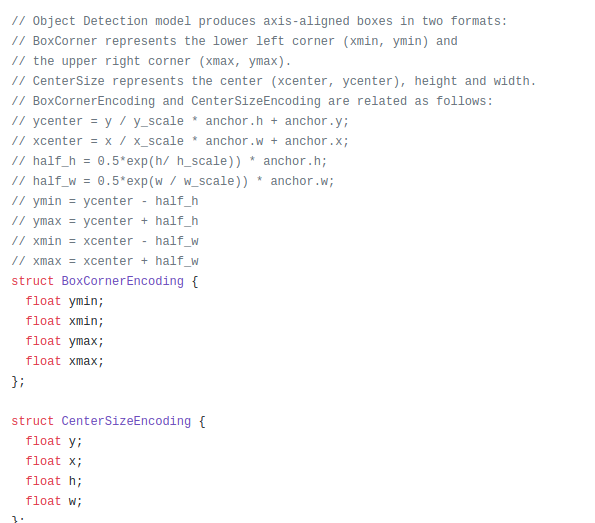
注:通常,为了平衡loss之间的大小, 不会直接编码dy,dx,w,h的原始值,而是dy/anchor_h*scale0, dx/anchor_w*scale0, log(h/anchor_h)*scale1, log(w/anchor_w)*scale1, 也就是偏移量的绝对值除anchor宽高得到相对值,然后再乘上一个scale, 经验值 scale0取5,scale1取10; 对于h,w是对得到相对值后先取log再乘以scale, h/anchor_h的范围在1附近, 取log后可以转换到0附近;所以在解码的时候需要做对应相反的变换;
在后面TFLite_Detection_PostProcess的Op实现里就有这么一段:
然后我们需要的是做的是decode出来对每个class的confidence和location的预测值
后处理
在Object Detection API的 export_tflite_ssd_graph_lib.py文件中,你可以看到,它区别与直接freeze pb的操作就在于最后替换了后处理的部分;
frozen_graph_def = exporter.freeze_graph_with_def_protos(
input_graph_def=tf.get_default_graph().as_graph_def(),
input_saver_def=input_saver_def,
input_checkpoint=checkpoint_to_use,
output_node_names=','.join([
'raw_outputs/box_encodings', 'raw_outputs/class_predictions',
'anchors'
]),
restore_op_name='save/restore_all',
filename_tensor_name='save/Const:0',
clear_devices=True,
output_graph='',
initializer_nodes='')
# Add new operation to do post processing in a custom op (TF Lite only)
if add_postprocessing_op:
transformed_graph_def = append_postprocessing_op(
frozen_graph_def, max_detections, max_classes_per_detection,
nms_score_threshold, nms_iou_threshold, num_classes, scale_values)
else:
# Return frozen without adding post-processing custom op
transformed_graph_def = frozen_graph_def
后处理的部分,其实看代码也很简单,就是增加了一个叫TFLite_Detection_PostProcess的node,用于解码和非极大抑制. 这个node的输入就是上面提到的box_predictions和class_predictions, 还有anchors的编码; 用这个node的目的只TFLite并不支持tf.contrib.image.non_max_surpression操作
Reshape过程:
这里需要明确,TFLite_Detection_PostProcess 这个op对raw_outputs/box_encodings, raw_outputs/class_predictions, anchors的Shape是有一个定制要求的
raw_outputs/box_encodings.shape=[1, num_anchors,4]
raw_outputs/class_predictions.shape=[1, num_anchors,num_classes+1]
anchors.shape=[1,num_anchors,4]
这里需要注意:1, 这三个都必须是3维的Tensor; 2.raw_outputs/class_predictions.shape的最后一个维度是包含background的classes, 也就是是num_classes+1; TFLite_Detection_PostProcess还有一个参数num_classes, 这个参数值是不包含background的, 所以也就导致TFLite_Detection_PostProcess的输出的class index是从0计数的;
with tf.variable_scope('raw_outputs'):
cls_pred = [tf.reshape(pred, [-1, num_classes]) for pred in cls_pred]
location_pred = [tf.reshape(pred, [-1, 4]) for pred in location_pred]
cls_pred = tf.concat(cls_pred, axis=0)
location_pred = tf.expand_dims(tf.concat(location_pred, axis=0),0, name='box_encodings')
cls_pred=tf.nn.softmax(cls_pred)
tf.identity(tf.expand_dims(cls_pred,0), name='class_predictions')
这段代码就是用来reshape成要求的输入的, 需要注意的是对class_prediction需要做依次softmax或者sigmoid, 具体选择哪种取决于你是否允许一个anchor对应多个类;
对于anchors, 这其实是一constant的值:
num_anchors = anchor_cy.get_shape().as_list()
with tf.Session() as sess:
y_out, x_out, h_out, w_out = sess.run([anchor_cy, anchor_cx, anchor_h, anchor_w])
encoded_anchors = tf.constant(
np.transpose(np.stack((y_out, x_out, h_out, w_out))),
dtype=tf.float32,
shape=[num_anchors[0], 4])
注意: 之前我使用tf.stack合成这个值的时候发现,TFLite只支持axis=0的时候的tf.stack, 否则就会转换是吧
导出pb
添加完后处理,既可以导出一个带有后处理功能的pb文件了; 如果你不添加后处理,把它放在CPU上后续去做,其实也可以省去不少麻烦;
binary_graph = os.path.join(output_dir, 'tflite_graph.pb')
with tf.gfile.GFile(binary_graph, 'wb') as f:
f.write(transformed_graph_def.SerializeToString())
txt_graph = os.path.join(output_dir, 'tflite_graph.pbtxt')
with tf.gfile.GFile(txt_graph, 'w') as f:
f.write(str(transformed_graph_def))
注意: 导出的pb如果包含后处理, 是没办法用正常的TF执行的,必须转成tflite执行
导出tflite
bazel run --config=opt tensorflow/contrib/lite/toco:toco --
--input_file=$OUTPUT_DIR/tflite_graph.pb
--output_file=$OUTPUT_DIR/detect.tflite
--input_shapes=1,300,300,3
--input_arrays=normalized_input_image_tensor
--output_arrays='TFLite_Detection_PostProcess','TFLite_Detection_PostProcess:1','TFLite_Detection_PostProcess:2','TFLite_Detection_PostProcess:3'
--inference_type=QUANTIZED_UINT8
--mean_values=128
--std_values=128
--change_concat_input_ranges=false
--allow_custom_ops
or
bazel run -c opt tensorflow/lite/toco:toco --
--input_file=$OUTPUT_DIR/tflite_graph.pb
--output_file=$OUTPUT_DIR/detect.tflite
--input_shapes=1,300,300,3
--input_arrays=normalized_input_image_tensor
--output_arrays='TFLite_Detection_PostProcess','TFLite_Detection_PostProcess:1','TFLite_Detection_PostProcess:2','TFLite_Detection_PostProcess:3'
--inference_type=FLOAT
--allow_custom_ops
导出的过程中,可能遇到Converting unsupported operation: TFLite_Detection_PostProcess 这个提示, 正常如果是TF在1.10以上就忽略这个提示好了
然后你可以先用python的程序加载这个tflite去测试一下
注意: 这时候会发现一个问题, TFLite_Detection_PostProcess的NMS操作是忽略类标签的,如果你设置max_classes_per_detection=1; 但是如果你设置成>1的值, 会发现它吧background的标签也算进来了, 导致出来很多误检测的bbox;
部署Android
然后,你可以尝试部署到Android上, 在不使用NNAPI的时候正常,但是如果是NNAPI就需要自己实现相关操作了,否则会crash掉
最后
以上就是大胆白昼最近收集整理的关于 如何部署自己的SSD检测模型到Android TFLite上 的全部内容,更多相关 内容请搜索靠谱客的其他文章。
本图文内容来源于网友提供,作为学习参考使用,或来自网络收集整理,版权属于原作者所有。


发表评论 取消回复