第3章 HBase Shell操作
3.1 基本操作
1.进入HBase客户端命令行
[lxl@hadoop102 hbase]$ bin/hbase shell
2.查看帮助命令
hbase(main):001:0> help
3.查看当前数据库中有哪些表
hbase(main):001:0> list
TABLE
0 row(s) in 0.2530 seconds
=> []
3.2 表的操作
1.创建表
hbase(main):003:0> create 'student','info'
0 row(s) in 1.3670 seconds
=> Hbase::Table - student
2.插入数据到表
hbase(main):003:0> put 'student','1001','info:sex','male'
hbase(main):004:0> put 'student','1001','info:age','18'
hbase(main):005:0> put 'student','1002','info:name','Janna'
hbase(main):006:0> put 'student','1002','info:sex','female'
hbase(main):007:0> put 'student','1002','info:age','20'
3.扫描查看表数据
hbase(main):010:0>
scan 'student'
ROW
COLUMN+CELL
1001
column=info:name, timestamp=1560293882038, value=xiannv
1001
column=info:sex, timestamp=1560293938473, value=female
1002
column=info:name, timestamp=1560293958558, value=xiantong
1002
column=info:sex, timestamp=1560293983958, value=male
hbase(main):014:0> scan 'student',{STARTROW=>'1001',STOPROW=>'1003'}
ROW
COLUMN+CELL
1001
column=info:name, timestamp=1560293882038, value=xiannv
1001
column=info:sex, timestamp=1560293938473, value=female
1002
column=info:name, timestamp=1560293958558, value=xiantong
1002
column=info:sex, timestamp=1560293983958, value=male
hbase(main):015:0> scan 'student',{STARTROW => '1001'}
ROW
COLUMN+CELL
1001
column=info:name, timestamp=1560293882038, value=xiannv
1001
column=info:sex, timestamp=1560293938473, value=female
1002
column=info:name, timestamp=1560293958558, value=xiantong
1002
column=info:sex, timestamp=1560293983958, value=male
1003
column=info:sex, timestamp=1560294341536, value=male
4.查看表结构
hbase(main):016:0> describe 'student'
Table student is ENABLED
student
COLUMN FAMILIES DESCRIPTION
{NAME => 'info', BLOOMFILTER => 'ROW', VERSIONS => '1', IN_MEMORY => 'false', KEEP_DELETED_CELLS => 'FALSE', DATA_BLOCK_ENCODING => 'NONE', TTL => 'FOREVER', COMPRESSION => 'NONE', MIN_VERSIONS => '0', BLOCKCA
CHE => 'true', BLOCKSIZE => '65536', REPLICATION_SCOPE => '0'}
5.更新指定字段的数据
hbase(main):012:0> put 'student','1001','info:name','Nick'
hbase(main):013:0> put 'student','1001','info:age','100'
6.查看“指定行”或“指定列族:列”的数据
hbase(main):011:0> get 'student','1001'
COLUMN
CELL
info:name
timestamp=1560293882038, value=xiannv
info:sex
timestamp=1560293938473, value=female
hbase(main):012:0> get 'student','1001','info:name'
COLUMN
CELL
info:name
timestamp=1560293882038, value=xiannv
7.统计表数据行数
hbase(main):021:0> count 'student'
8.删除数据
删除某rowkey的全部数据:
hbase(main):016:0> deleteall 'student','1001'
删除某rowkey的某一列数据:
hbase(main):017:0> delete 'student','1002','info:sex'
9.清空表数据
hbase(main):018:0> truncate 'student'
提示:清空表的操作顺序为先disable,然后再truncate。
10.删除表
首先需要先让该表为disable状态:
hbase(main):019:0> disable 'student'
然后才能drop这个表:
hbase(main):020:0> drop 'student'
提示:如果直接drop表,会报错:ERROR: Table student is enabled. Disable it first.
11.变更表信息
将info列族中的数据存放3个版本:
hbase(main):022:0> alter 'student',{NAME=>'info',VERSIONS=>3}
hbase(main):022:0> get 'student','1001',{COLUMN=>'info:name',VERSIONS=>3}
操作:
hbase(main):018:0> alter 'student', {NAME=>'info',VERSIONS=>3}
Updating all regions with the new schema...
1/1 regions updated.
Done.
0 row(s) in 1.9710 seconds
hbase(main):019:0> describe 'student'
Table student is ENABLED
student
COLUMN FAMILIES DESCRIPTION
{NAME => 'info', BLOOMFILTER => 'ROW', VERSIONS => '3', IN_MEMORY => 'false', KEEP_DELETED_CELLS => 'FALSE', DATA_BLOCK_ENCODING => 'NONE', TTL => 'FOREVER', COMPRESSION => 'NONE', MIN_VERSIONS => '0', BLOCKCA
CHE => 'true', BLOCKSIZE => '65536', REPLICATION_SCOPE => '0'}
1 row(s) in 0.0150 seconds
hbase(main):020:0> put 'student','1001','info:name','guangshen'
0 row(s) in 0.0080 seconds
hbase(main):021:0> get 'student','1001','info:name'
COLUMN
CELL
info:name
timestamp=1560295375184, value=guangshen
1 row(s) in 0.0170 seconds
hbase(main):022:0> get 'student','1001',{COLUMN=>'info:name',VERSIONS=>3}
COLUMN
CELL
info:name
timestamp=1560295375184, value=guangshen
info:name
timestamp=1560293882038, value=xiannv
1 row(s) in 0.0480 seconds
hbase(main):023:0> put 'student','1001','info:name','chunlei'
0 row(s) in 0.0080 seconds
hbase(main):024:0> get 'student','1001',{COLUMN=>'info:name',VERSIONS=>3}
COLUMN
CELL
info:name
timestamp=1560295467589, value=chunlei
info:name
timestamp=1560295375184, value=guangshen
info:name
timestamp=1560293882038, value=xiannv
1 row(s) in 0.0090 seconds
hbase(main):025:0> put 'student','1001','info:name','wangjun'
0 row(s) in 0.0080 seconds
hbase(main):026:0> get 'student','1001',{COLUMN=>'info:name',VERSIONS=>3}
COLUMN
CELL
info:name
timestamp=1560295506023, value=wangjun
info:name
timestamp=1560295467589, value=chunlei
info:name
timestamp=1560295375184, value=guangshen
1 row(s) in 0.0080 seconds
第4章 HBase数据结构
4.1 RowKey
与nosql数据库们一样,RowKey是用来检索记录的主键。访问HBASE table中的行,只有三种方式:
1.通过单个RowKey访问
2.通过RowKey的range(正则)
3.全表扫描
RowKey行键 (RowKey)可以是任意字符串(最大长度是64KB,实际应用中长度一般为 10-100bytes),在HBASE内部,
RowKey保存为字节数组。存储时,数据按照RowKey的字典序(byte order)排序存储。设计RowKey时,要充分排序存储这个特性,将经常一起读取的行存储放到一起。(位置相关性)
4.2 Column Family
列族:HBASE表中的每个列,都归属于某个列族。列族是表的schema的一部 分(而列不是),必须在使用表之前定义。列名都以列族作为前缀。例如 courses:history,courses:math都属于courses 这个列族。
4.3 Cell
由{rowkey, column Family:columu, version} 唯一确定的单元。cell中的数据是没有类型的,全部是字节码形式存贮。
关键字:无类型、字节码
4.4 Time Stamp
HBASE 中通过rowkey和columns确定的为一个存贮单元称为cell。每个 cell都保存 着同一份数据的多个版本。版本通过时间戳来索引。时间戳的类型是 64位整型。时间戳可以由HBASE(在数据写入时自动 )赋值,此时时间戳是精确到毫秒 的当前系统时间。时间戳也可以由客户显式赋值。如果应用程序要避免数据版 本冲突,就必须自己生成具有唯一性的时间戳。每个 cell中,不同版本的数据按照时间倒序排序,即最新的数据排在最前面。
为了避免数据存在过多版本造成的的管理 (包括存贮和索引)负担,HBASE提供 了两种数据版本回收方式。一是保存数据的最后n个版本,二是保存最近一段 时间内的版本(比如最近七天)。用户可以针对每个列族进行设置。
4.5 命名空间
命名空间的结构:

1) Table:表,所有的表都是命名空间的成员,即表必属于某个命名空间,如果没有指定,则在default默认的命名空间中。
2) RegionServer group:一个命名空间包含了默认的RegionServer Group。
3) Permission:权限,命名空间能够让我们来定义访问控制列表ACL(Access Control List)。例如,创建表,读取表,删除,更新等等操作。
4) Quota:限额,可以强制一个命名空间可包含的region的数量。
查看命名空间:
hbase(main):003:0> list_namespace
创建命名空间:
hbase(main):004:0> create_namespace 'bigdata'
将表创建在自定义的命名空间中:
hbase(main):006:0> create 'bigdata:student','info'
查看自定义命名空间中的表:
hbase(main):007:0> list
TABLE
bigdata:student
student
2 row(s) in 0.0080 seconds
=> ["bigdata:student", "student"]
删除命名空间:(首先你得先删除命名空间中的表,否则会报错!)
hbase(main):008:0> drop_namespace 'bigdata'
第5章 HBase原理
5.1 读流程
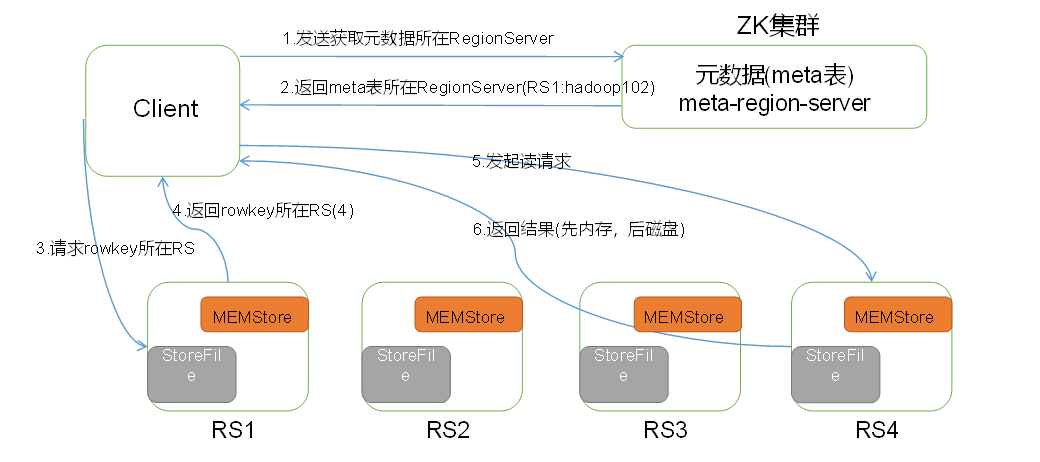
HBase读数据流程如图3所示

图3所示 HBase读数据流程
1)Client先访问zookeeper,从meta表读取region的位置,然后读取meta表中的数据。meta中又存储了用户表的region信息;
2)根据namespace、表名和rowkey在meta表中找到对应的region信息;
3)找到这个region对应的regionserver;
4)查找对应的region;
5)先从MemStore找数据,如果没有,再到BlockCache里面读;
6)BlockCache还没有,再到StoreFile上读(为了读取的效率);
7)如果是从StoreFile里面读取的数据,不是直接返回给客户端,而是先写入BlockCache,再返回给客户端。
在端口(http://hadoop102:16010/table.jsp?name=hbase:meta)中查看meta表所在的位置:

链接zookeeper,查看meta的存储位置:
[lxl@hadoop102 zookeeper-3.4.10]$ bin/zkCli.sh
[zk: localhost:2181(CONNECTED) 2] get /hbase/meta-region-server
?regionserver:16020??O?[PBUF
hadoop102?}????-
cZxid = 0x500000030
ctime = Wed Jun 12 05:10:12 CST 2019
mZxid = 0x500000030
mtime = Wed Jun 12 05:10:12 CST 2019
pZxid = 0x500000030
cversion = 0
dataVersion = 0
aclVersion = 0
ephemeralOwner = 0x0
dataLength = 62
numChildren = 0
在hbase中查看meta存储的信息:
hbase(main):009:0> scan 'hbase:meta'
ROW
COLUMN+CELL
bigdata:student,,1560298961661.c1d09e4ba7ff05adb8388 column=info:regioninfo, timestamp=1560298962242, value={ENCODED => c1d09e4ba7ff05adb8388529a48d992c, NAME => 'bigdata:student,,1560298961661.c1d09e4ba7ff05
529a48d992c.
adb8388529a48d992c.', STARTKEY => '', ENDKEY => ''}

bigdata:student,,1560298961661.c1d09e4ba7ff05adb8388 column=info:seqnumDuringOpen, timestamp=1560298962242, value=x00x00x00x00x00x00x00x02
529a48d992c.
bigdata:student,,1560298961661.c1d09e4ba7ff05adb8388 column=info:server, timestamp=1560298962242, value=hadoop102:16020
529a48d992c.
bigdata:student,,1560298961661.c1d09e4ba7ff05adb8388 column=info:serverstartcode, timestamp=1560298962242, value=1560287383451
529a48d992c.
hbase:namespace,,1560287388965.d8793997d53ec389eefa4 column=info:regioninfo, timestamp=1560288011539, value={ENCODED => d8793997d53ec389eefa4efbce8b00df, NAME => 'hbase:namespace,,1560287388965.d8793997d53ec3
efbce8b00df.
89eefa4efbce8b00df.', STARTKEY => '', ENDKEY => ''}

hbase:namespace,,1560287388965.d8793997d53ec389eefa4 column=info:seqnumDuringOpen, timestamp=1560288011539, value=x00x00x00x00x00x00x00x0B
efbce8b00df.
hbase:namespace,,1560287388965.d8793997d53ec389eefa4 column=info:server, timestamp=1560288011539, value=hadoop104:16020
efbce8b00df.
hbase:namespace,,1560287388965.d8793997d53ec389eefa4 column=info:serverstartcode, timestamp=1560288011539, value=1560287762200
efbce8b00df.
student,,1560298560640.cff5643f1df6fb44a31c72894f6cd column=info:regioninfo, timestamp=1560298584595, value={ENCODED => cff5643f1df6fb44a31c72894f6cdeb9, NAME => 'student,,1560298560640.cff5643f1df6fb44a31c72
eb9.
894f6cdeb9.', STARTKEY => '', ENDKEY => ''}

student,,1560298560640.cff5643f1df6fb44a31c72894f6cd column=info:seqnumDuringOpen, timestamp=1560298584595, value=x00x00x00x00x00x00x00x02
eb9.
student,,1560298560640.cff5643f1df6fb44a31c72894f6cd column=info:server, timestamp=1560298584595, value=hadoop103:16020
eb9.
student,,1560298560640.cff5643f1df6fb44a31c72894f6cd column=info:serverstartcode, timestamp=1560298584595, value=1560287489969
在端口中查看表的存储位置:


读数据微观流程

5.2 写流程
Hbase写流程如图2所示

图2 HBase写数据流程
1)Client向HregionServer发送写请求;
2)HregionServer将数据写到HLog(write ahead log)。为了数据的持久化和恢复;
3)HregionServer将数据写到内存(MemStore);
4)反馈Client写成功。
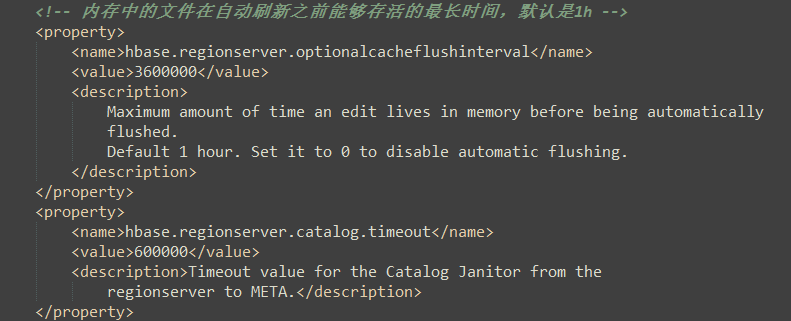
5.3 数据Flush过程
1)当MemStore数据达到阈值(默认是128M,老版本是64M),将数据刷到硬盘,将内存中的数据删除,同时删除HLog中的历史数据;
2)并将数据存储到HDFS中;
3)在HLog中做标记点。
hbase-default.xml:(hbase默认配置文件)


5.4 数据合并过程
1)当数据块达到4块,Hmaster触发合并操作,Region将数据块加载到本地,进行合并;
2)当合并的数据超过256M,进行拆分,将拆分后的Region分配给不同的HregionServer管理;
3)当HregionServer宕机后,将HregionServer上的hlog拆分,然后分配给不同的HregionServer加载,修改.META.;
4)注意:HLog会同步到HDFS。
hbase-default.xml:(hbase默认配置文件)


转载于:https://www.cnblogs.com/LXL616/p/11007322.html
最后
以上就是高贵小甜瓜最近收集整理的关于HBase-Shell-数据结构-原理第3章 HBase Shell操作第4章 HBase数据结构第5章 HBase原理的全部内容,更多相关HBase-Shell-数据结构-原理第3章内容请搜索靠谱客的其他文章。


发表评论 取消回复