转载
目录
引言
多进程方案
Graph Store
Distributed Sampler
后话
引言
本文为GNN教程的DGL框架之大规模分布式训练,前面的文章中我们介绍了图神经网络框架DGL如何利用采样的技术缩小计算图的规模来通过mini-batch的方式训练模型,当图特别大的时候,非常多的batches需要被计算,因此运算时间又成了问题,一个容易想到解决方案是采用并行计算的技术,很多worker同时采样,计算并且更新梯度。这篇博文重点介绍DGL的并行计算框架。
多进程方案
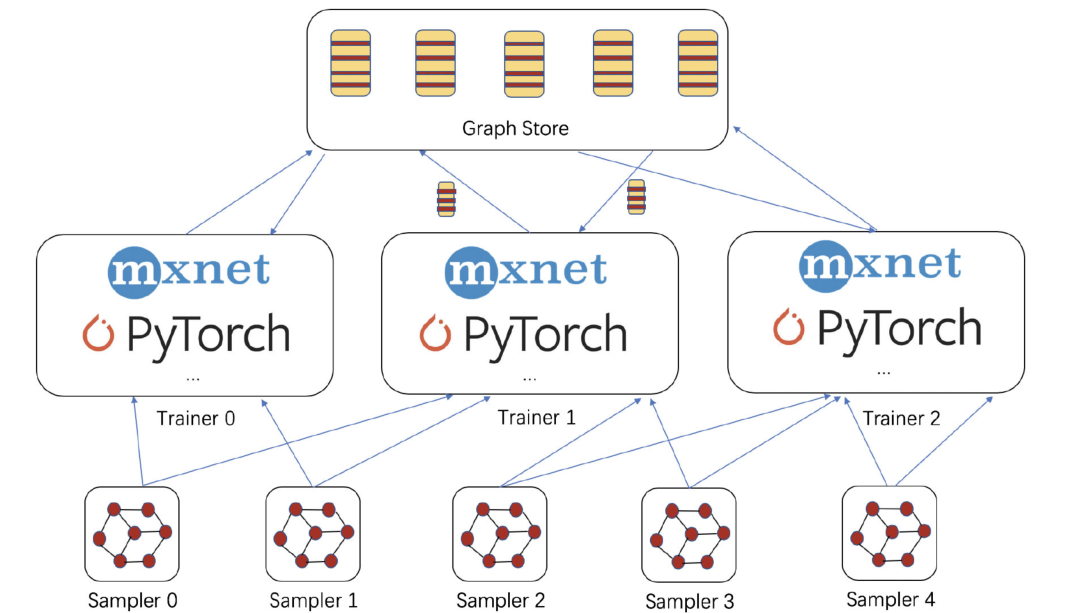
概括而言,目前DGL(version 0.3)采用的是多进程的并行方案,分布式的方案正在开发中。见下图,DGL的并行计算框架分为两个主要部分:Graph Store和Sampler
-
Sampler被用来从大图中构建许多计算子图(NodeFlow),DGL能够自动得在多个设备上并行运行多个Sampler的实例。 -
Graph Store存储了大图的embedding信息和结构信息,到目前为止,DGL提供了内存共享式的Graph Store,以用来支持多进程,多GPU的并行训练。DGL未来还将提供分布式的Graph Store,以支持超大规模的图训练。
下面来分别介绍它们。

Graph Store
graph store 包含两个部分,server和client,其中server需要作为守护进程(daemon)在训练之前运行起来。比如如下脚本启动了一个graph store server 和 4个worker,并且载入了reddit数据集:
python3 run_store_server.py --dataset reddit --num-workers 4
在训练过程中,这4个worker将会和client交互以取得训练样本。用户需要做的仅仅是编写训练部分的代码。首先需要创建一个client对象连接到对应的server。下面的脚本中用shared_memory初始化store_type表明client连接的是一个内存共享式的server。
g = dgl.contrib.graph_store.create_graph_from_store("reddit", store_type="shared_mem")


g.update_all(fn.copy_src(src='features', out='m'),
             fn.sum(msg='m', out='preprocess'),
             lambda node : {'preprocess': node.data['preprocess'] * node.data['norm']})
初看这段代码和矩阵计算没有任何关系啊,其实这段代码要从语义上理解,在语义上![]() 表示邻接矩阵和特征矩阵的乘法,即对于每个节点的特征跟新为邻居特征的和。那么再看上面这段代码就容易了,
表示邻接矩阵和特征矩阵的乘法,即对于每个节点的特征跟新为邻居特征的和。那么再看上面这段代码就容易了,copy_src将节点特征取出来,并发送出去, sum接受到来自邻居的特征并求和,求和结果再发给节点,最后节点自身进行一下renormalize。
update_all在graph store中是分布式进行的,每个trainer都会分派到一部分节点进行更新。
节点和边的数据现在全部存储在graph store中,因此访问他们不再像以前那样用 g.ndata/g.edata那样简单,因为这两个方法会读取整个节点和边的数据,而这些数据在graph store中并不存在(他们可能是分开存储的),因此用户只能通过g.nodes[node_ids].data[embed_name]来访问特定节点的Embedding数据。(注意:这种读数据的方式是通用的,并不是graph store特有的,g.ndata即是g.nodes[:].data的缩写)。
为了高效地初始化节点和边tensor,DGL提供了init_ndata和init_edata这两种方法。这两种方法都会讲初始化的命令发送到graph store server上,由server来代理初始化工作,下面展示了一个例子:
for i in range(n_layers):
    g.init_ndata('h_{}'.format(i), (features.shape[0], args.n_hidden), 'float32')
    g.init_ndata('agg_h_{}'.format(i), (features.shape[0], args.n_hidden), 'float32')
其中h_i存储i层节点Embedding,agg_h_i存储i节点邻居Embedding的聚集后的结果。
初始化节点数据之后,我们可以通过control-variate sampling的方法来训练GCN),这个方法在之前的博文中介绍过
for nf in NeighborSampler(g, batch_size, num_neighbors,
                          neighbor_type='in', num_hops=L-1,
                          seed_nodes=labeled_nodes):
    for i in range(nf.num_blocks):
        # aggregate history on the original graph
        g.pull(nf.layer_parent_nid(i+1),
               fn.copy_src(src='h_{}'.format(i), out='m'),
               lambda node: {'agg_h_{}'.format(i): node.data['m'].mean(axis=1)})
    # We need to copy data in the NodeFlow to the right context.
    nf.copy_from_parent(ctx=right_context)
    nf.apply_layer(0, lambda node : {'h' : layer(node.data['preprocess'])})
    h = nf.layers[0].data['h']

    for i in range(nf.num_blocks):
        prev_h = nf.layers[i].data['h_{}'.format(i)]
        # compute delta_h, the difference of the current activation and the history
        nf.layers[i].data['delta_h'] = h - prev_h
        # refresh the old history
        nf.layers[i].data['h_{}'.format(i)] = h.detach()
        # aggregate the delta_h
        nf.block_compute(i,
                         fn.copy_src(src='delta_h', out='m'),
                         lambda node: {'delta_h': node.data['m'].mean(axis=1)})
        delta_h = nf.layers[i + 1].data['delta_h']
        agg_h = nf.layers[i + 1].data['agg_h_{}'.format(i)]
        # control variate estimator
        nf.layers[i + 1].data['h'] = delta_h + agg_h
        nf.apply_layer(i + 1, lambda node : {'h' : layer(node.data['h'])})
        h = nf.layers[i + 1].data['h']
    # update history
    nf.copy_to_parent()
和原来代码稍有不同的是,这里right_context表示数据在哪个设备上,通过将数据调度到正确的设备上,我们就可以完成多设备的分布式训练。
Distributed Sampler
因为我们有多个设备可以进行并行计算(比如说多GPU,多CPU),那么需要不断地给每个设备提供nodeflow(计算子图实例)。DGL采用的做法是分出一部分设备专门负责采样,将采样作为服务提供给计算设备,计算设备只负责在采样后的子图上进行计算。DGL支持同时在多个设备上运行多个采样程序,每个采样程序都可以将采样结果发到计算设备上。
一个分布式采样的示例可以这样写,首先,在训练之前用户需要创建一个分布式SamplerReceiver对象:
sampler = dgl.contrib.sampling.SamplerReceiver(graph, ip_addr, num_sampler)
SamplerReceiver`类用来从其他设备上接收采样出来的子图,这个API的三个参数分别为`parent_graph`, `ip_address`, 和`number_of_samplers
然后,用户只需要在单机版的训练代码中改变一行:
for nf in sampler:
    for i in range(nf.num_blocks):
        # aggregate history on the original graph
        g.pull(nf.layer_parent_nid(i+1),
               fn.copy_src(src='h_{}'.format(i), out='m'),
               lambda node: {'agg_h_{}'.format(i): node.data['m'].mean(axis=1)})

...
其中,代码for nf in sampler用来代替原单机采样代码:
for nf in NeighborSampler(g, batch_size, num_neighbors,
                          neighbor_type='in', num_hops=L-1,
                          seed_nodes=labeled_nodes):
其他所有的部分都可以保持不变。
因此,额外的开发工作主要是要编写运行在采样设备上的采样逻辑。对于邻居采样来说,开发者只需要拷贝单机采样的代码就可以了:
sender = dgl.contrib.sampling.SamplerSender(trainer_address)

...

for n in num_epoch:
    for nf in dgl.contrib.sampling.NeighborSampler(graph, batch_size, num_neighbors,
                                                       neighbor_type='in',
                                                       shuffle=shuffle,
                                                       num_workers=num_workers,
                                                       num_hops=num_hops,
                                                       add_self_loop=add_self_loop,
                                                       seed_nodes=seed_nodes):
        sender.send(nf, trainer_id)
    # tell trainer I have finished current epoch
    sender.signal(trainer_id)
后话
本篇博文重点介绍了DGL的并行计算框架,其主要由采样层-计算层-存储层三层构建而来,采样和计算分布在不同的机器上,可以并行执行。通过这种方式,在存储充足的情况下,DGL可以处理数以亿计节点和边的大图。
最后
以上就是寒冷母鸡最近收集整理的关于GNN教程:大规模分布式训练的全部内容,更多相关GNN教程内容请搜索靠谱客的其他文章。


发表评论 取消回复