引言
其实,一个 CPU 的设计中,各个子模块都是比较基本的、比较简单的,只是组合起来的一个整体架构会比较复杂而已,无论是时序路径,还是数据通路和控制通路,这里,主要详细介绍整个微架构的子模块。
一、PC 取指、PC 分支、指令跳转与二级堆栈
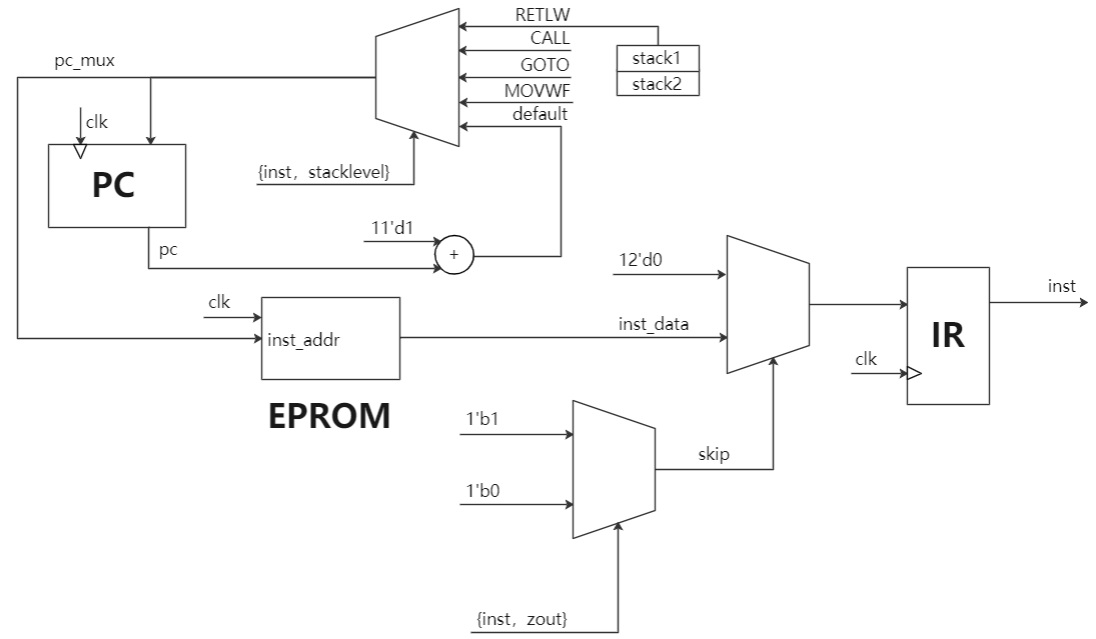
PC 取指主要是 PC 值作为地址,在程序存储器(EPROM)中读取指令数据,并发送给指令寄存器 IR。通常情况下,都是逐一读出的,也就是说 PC 值在下一个时钟(流水时钟)自动加一,来读取下一地址所在的指令(当然,PC 的修改量取决于指令字长和编址方式)。然而,有时候会出现程序分支、程序跳转之类的,使得程序需要执行另一个区域所在的指令,于是就出现了 PC 分支。
1.1、对于 PC 分支 Branch,通常分为以下几种情况:
- RETLW:返回,将堆栈 stack1 或 stack2 赋值给 PC;
- CALL :调用,将 status[6:5],1'b0,inst[7:0] 赋值给 PC;
- GOTO:跳转,将 status[6:5],inst[8:0] 赋值给 PC;
- MOVWF:MOVWF PCL,将 pc[10:8],dbus 赋值给 PC;(另外,还有 ADDWF 和 BSF,这里不加以实现);
- DEFAULT:PC <- PC + 1。
1.2、对于指令跳转,能够使指令 Jump 的指令有 GOTO、CALL、RETLW、BTFSC、BTFSS、DECFSZ、INCFSZ。
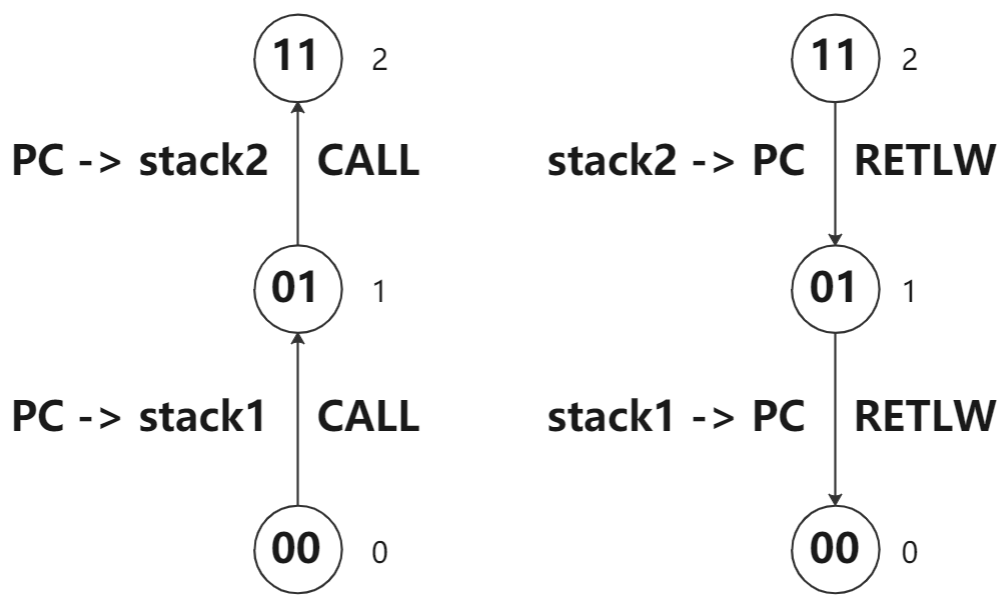
1.3、对于 stacklevel 的调用与返回,使用了状态机,如下。圆圈里的代表 stacklevel,右边的数字代表已经调用的子程序层数。
-
当执行 CALL 指令的时候,进行压栈操作 push,PC 赋值给堆栈,同时改变 stacklevel 的状态;
-
当执行 RETLW 指令的时候,进行弹出操作 pop,堆栈返回给 PC,同时改变 stacklevel 的状态。
详细的电路模块和 Verilog 代码如下:
always @(posedge clk) begin
   if (!rst_n)
      pc <= RESET_VECTOR;
   else
      pc <= pc_mux;
end

always @(inst or stacklevel or status or stack1 or stack2 or pc or dbus) begin
   casex ({inst, stacklevel})
      14'b1000_????_????_11: pc_mux = stack2;           // RETLW
      14'b1000_????_????_01: pc_mux = stack1;           // RETLW
      14'b1001_????_????_??: pc_mux = {status[6:5], 1'b0, inst[7:0]}; // CALL
      14'b101?_????_????_??: pc_mux = {status[6:5],       inst[8:0]}; // GOTO
      14'b00?0_0010_0010_??: pc_mux = {pc[10:8], dbus}; // MOVWF PCL
      default:
         pc_mux = pc + 11'd1;
   endcase
end

always @(posedge clk) begin
   if (!rst_n) begin
      stack1 <= 11'd0;
      stack2 <= 11'd0;
   end
   else begin
      // CALL Instruction
      if (inst[11:8] == 4'b1001) begin
         case (stacklevel)
            2'b00: stack1 <= pc;
            2'b01: stack2 <= pc;
          default: begin
                   stack1 <= 11'd0;
                   stack2 <= 11'd0;
                   end
         endcase
      end
   end
end

always @(posedge clk) begin
   if (!rst_n)
      stacklevel <= 2'b00;
   else begin
      casex ({inst, stacklevel})
         // CALL Instruction
         14'b1001_????_????_00: stacklevel <= 2'b01;  // Record 1st CALL
         14'b1001_????_????_01: stacklevel <= 2'b11;  // Record 2nd CALL
         14'b1001_????_????_11: stacklevel <= 2'b11;  // Ignore
         // RETLW Instruction
         14'b1000_????_????_11: stacklevel <= 2'b01;  // Go back to 1 CALL in progress
         14'b1000_????_????_01: stacklevel <= 2'b00;  // Go back to no CALL in progress
         14'b1000_????_????_00: stacklevel <= 2'b00;  // Ignore
         default:
            stacklevel <= stacklevel;
      endcase
   end
end

always @(posedge clk) begin
   if(!rst_n)
      inst <= 12'h000;
   else begin
      if(skip == 1'b1)
         inst <= 12'b000000000000; // FORCE NOP
      else
         inst <= inst_data;
   end
end

always @(inst or aluz) begin
   casex ({inst, aluz})
      13'b10??_????_????_?: skip = 1'b1; // A GOTO, CALL or RETLW instructions
      13'b0110_????_????_1: skip = 1'b1; // BTFSC instruction  and aluz == 1
      13'b0111_????_????_0: skip = 1'b1; // BTFSS instruction  and aluz == 0
      13'b0010_11??_????_1: skip = 1'b1; // DECFSZ instruction and aluz == 1
      13'b0011_11??_????_1: skip = 1'b1; // INCFSZ instruction and aluz == 1
                   default: skip = 1'b0;
   endcase
end
二、指令译码
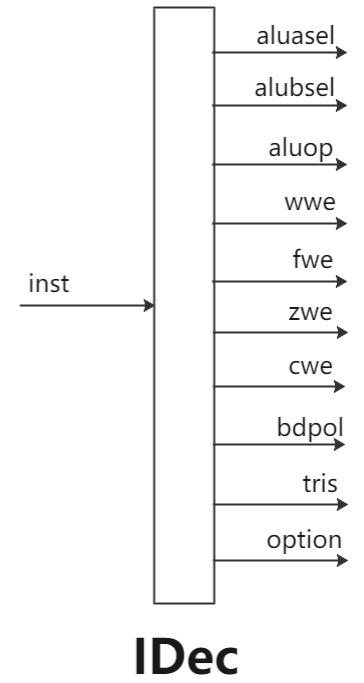
主要是通过组合逻辑硬件电路(Look Up Table 的形式)来实现该指令译码,针对指令提供关键的控制、状态信号,具体译码方式参考如下代码。
aluasel、alubsel:主要是对 ALU 模块的操作数进行选择,操作数一般来自 W 寄存器、F 文件寄存器和指令立即数;
aluop:主要是对 ALU 模块的操作进行选择,如加、减、与、或、非、异或、左移、右移、半字节交换;
wwe、fwe:主要是 W 和 F 寄存器的写使能;
zwe、cwe:主要是对 STATUS 寄存器的 Z 和 C 状态位的写使能;
bdpol:与面向位操作类指令有关;
tris:控制 I/O 的输入输出状态(无);
option:OPTION 寄存器(无)。
详细的电路模块和 Verilog 代码如下:
module IDec (
	inst,
	aluasel,
	alubsel,
	aluop,
	wwe,
	fwe,
	zwe,
	cwe,
	bdpol,
	option,
	tris
);

input  [11:0]	inst;
output [1:0]	aluasel;
output [1:0]	alubsel;
output [3:0]	aluop;
output			wwe;
output			fwe;
output			zwe;
output			cwe;
output			bdpol;
output			option;
output			tris;

reg [14:0] decodes;

assign {aluasel,	// Select source for ALU A input. 00=W, 01=SBUS, 10=K, 11=BD
		alubsel,	// Select source for ALU B input. 00=W, 01=SBUS, 10=K, 11="1"
		aluop,		// ALU Operation (see comments above for these codes)
		wwe,		// W register Write Enable
		fwe,		// File Register Write Enable
		zwe,		// Status register Z bit update
		cwe,		// Status register Z bit update
		bdpol,		// Polarity on bit decode vector (0=no inversion, 1=invert)
		tris,		// Instruction is an TRIS instruction
		option		// Instruction is an OPTION instruction
	} = decodes;

always @(inst) begin
	casex (inst)
		// *** Byte-Oriented File Register Operations
		//
		//                                 A  A  ALU  W F Z C B T O
		//                                 L  L   O   W W W W D R P
		//                                 U  U   P   E E E E P I T
		//                                 A  B               O S
		//                                                    L
		12'b0000_0000_0000: decodes = 15'b00_00_0000_0_0_0_0_0_0_0; // NOP
		12'b0000_001X_XXXX: decodes = 15'b00_00_0010_0_1_0_0_0_0_0; // MOVWF
		12'b0000_0100_0000: decodes = 15'b00_00_0011_1_0_1_0_0_0_0; // CLRW
		12'b0000_011X_XXXX: decodes = 15'b00_00_0011_0_1_1_0_0_0_0; // CLRF
		12'b0000_100X_XXXX: decodes = 15'b01_00_1000_1_0_1_1_0_0_0; // SUBWF (d=0)
		12'b0000_101X_XXXX: decodes = 15'b01_00_1000_0_1_1_1_0_0_0; // SUBWF (d=1)
		12'b0000_110X_XXXX: decodes = 15'b01_11_1000_1_0_1_0_0_0_0; // DECF  (d=0)
		12'b0000_111X_XXXX: decodes = 15'b01_11_1000_0_1_1_0_0_0_0; // DECF  (d=1)
		12'b0001_000X_XXXX: decodes = 15'b00_01_0010_1_0_1_0_0_0_0; // IORWF (d=0)
		12'b0001_001X_XXXX: decodes = 15'b00_01_0010_0_1_1_0_0_0_0; // IORWF (d=1)
		12'b0001_010X_XXXX: decodes = 15'b00_01_0001_1_0_1_0_0_0_0; // ANDWF (d=0)
		12'b0001_011X_XXXX: decodes = 15'b00_01_0001_0_1_1_0_0_0_0; // ANDWF (d=1)
		12'b0001_100X_XXXX: decodes = 15'b00_01_0011_1_0_1_0_0_0_0; // XORWF (d=0)
		12'b0001_101X_XXXX: decodes = 15'b00_01_0011_0_1_1_0_0_0_0; // XORWF (d=1)
		12'b0001_110X_XXXX: decodes = 15'b00_01_0000_1_0_1_1_0_0_0; // ADDWF (d=0)
		12'b0001_111X_XXXX: decodes = 15'b00_01_0000_0_1_1_1_0_0_0; // ADDWF (d=1)
		12'b0010_000X_XXXX: decodes = 15'b01_01_0010_1_0_1_0_0_0_0; // MOVF  (d=0)
		12'b0010_001X_XXXX: decodes = 15'b01_01_0010_0_1_1_0_0_0_0; // MOVF  (d=1)
		12'b0010_010X_XXXX: decodes = 15'b01_01_0100_1_0_1_0_0_0_0; // COMF  (d=0)
		12'b0010_011X_XXXX: decodes = 15'b01_01_0100_0_1_1_0_0_0_0; // COMF  (d=1)
		12'b0010_100X_XXXX: decodes = 15'b01_11_0000_1_0_1_0_0_0_0; // INCF  (d=0)
		12'b0010_101X_XXXX: decodes = 15'b01_11_0000_0_1_1_0_0_0_0; // INCF  (d=1)
		12'b0010_110X_XXXX: decodes = 15'b01_11_1000_1_0_0_0_0_0_0; // DECFSZ(d=0)
		12'b0010_111X_XXXX: decodes = 15'b01_11_1000_0_1_0_0_0_0_0; // DECFSZ(d=1)
		12'b0011_000X_XXXX: decodes = 15'b01_01_0101_1_0_0_1_0_0_0; // RRF   (d=0)
		12'b0011_001X_XXXX: decodes = 15'b01_01_0101_0_1_0_1_0_0_0; // RRF   (d=1)
		12'b0011_010X_XXXX: decodes = 15'b01_01_0110_1_0_0_1_0_0_0; // RLF   (d=0)
		12'b0011_011X_XXXX: decodes = 15'b01_01_0110_0_1_0_1_0_0_0; // RLF   (d=1)
		12'b0011_100X_XXXX: decodes = 15'b01_01_0111_1_0_0_0_0_0_0; // SWAPF (d=0)
		12'b0011_101X_XXXX: decodes = 15'b01_01_0111_0_1_0_0_0_0_0; // SWAPF (d=1)
		12'b0011_110X_XXXX: decodes = 15'b01_11_0000_1_0_0_0_0_0_0; // INCFSZ(d=0)
		12'b0011_111X_XXXX: decodes = 15'b01_11_0000_0_1_0_0_0_0_0; // INCFSZ(d=1)

		// *** Bit-Oriented File Register Operations
		12'b0100_XXXX_XXXX: decodes = 15'b11_01_0001_0_1_0_0_1_0_0; // BCF
		12'b0101_XXXX_XXXX: decodes = 15'b11_01_0010_0_1_0_0_0_0_0; // BSF
		12'b0110_XXXX_XXXX: decodes = 15'b11_01_0001_0_0_0_0_0_0_0; // BTFSC
		12'b0111_XXXX_XXXX: decodes = 15'b11_01_0001_0_0_0_0_0_0_0; // BTFSS

		// *** Literal and Control Operations
		12'b0000_0000_0010: decodes = 15'b00_00_0010_0_1_0_0_0_0_1; // OPTION
		12'b0000_0000_0011: decodes = 15'b00_00_0000_0_0_0_0_0_0_0; // SLEEP
		12'b0000_0000_0100: decodes = 15'b00_00_0000_0_0_0_0_0_0_0; // CLRWDT
		12'b0000_0000_0101: decodes = 15'b00_00_0010_0_1_0_0_0_1_0; // TRIS 5
		12'b0000_0000_0110: decodes = 15'b00_00_0010_0_1_0_0_0_1_0; // TRIS 6
		12'b0000_0000_0111: decodes = 15'b00_00_0010_0_1_0_0_0_1_0; // TRIS 7

		12'b1000_XXXX_XXXX: decodes = 15'b10_10_0010_1_0_0_0_0_0_0; // RETLW
		12'b1001_XXXX_XXXX: decodes = 15'b10_10_0010_0_0_0_0_0_0_0; // CALL
		12'b101X_XXXX_XXXX: decodes = 15'b10_10_0010_0_0_0_0_0_0_0; // GOTO
		12'b1100_XXXX_XXXX: decodes = 15'b10_10_0010_1_0_0_0_0_0_0; // MOVLW
		12'b1101_XXXX_XXXX: decodes = 15'b00_10_0010_1_0_1_0_0_0_0; // IORLW
		12'b1110_XXXX_XXXX: decodes = 15'b00_10_0001_1_0_1_0_0_0_0; // ANDLW
		12'b1111_XXXX_XXXX: decodes = 15'b00_10_0011_1_0_1_0_0_0_0; // XORLW
				   default: decodes = 15'b00_00_0000_0_0_0_0_0_0_0;
	endcase
end

endmodule
三、指令执行
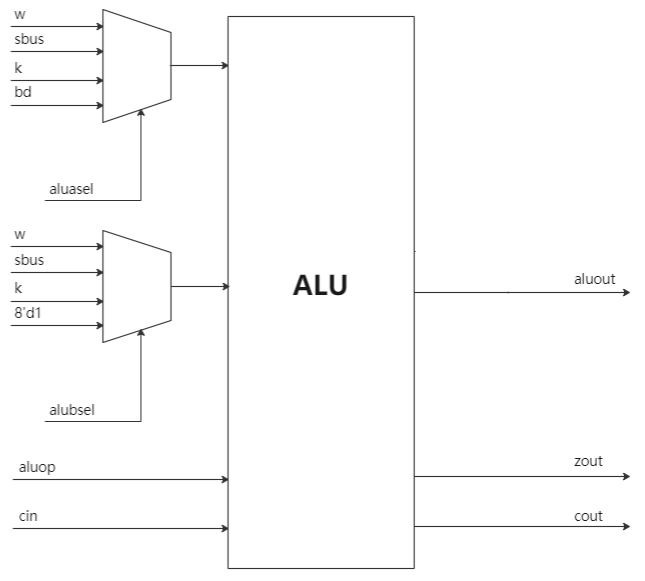
该 ALU 模块基本上是能够执行所有的指令操作的,可能不是最优的,但是却是完备的。
alua、alub:操作数,通过选择操作数,如 W 寄存器、F 寄存器 sbus、常数 K、位操作数 bd、以及常数 1,来进行对应指令的数据操作;
aluop:操作码,有加、减、与、或、非、异或、左移、右移、半字节交换九种算术逻辑操作;
cin:作为右移操作 RRF 的低位;
aluout:运算结果,作为 ALU 模块的输出,输出到数据总线中,并最终选择是否保存在 W 寄存器还是 F 寄存器中;如 aluout -> W or aluout -> dbus -> regfilein --> regfileout ...> sbus;
zout、cout:标志位,ALU 操作可能引起的状态位的改变。
详细的电路模块和 Verilog 代码如下:
module ALU(
   alua,
   alub,
   aluop,
   cin,
   aluout,
   zout,
   cout
);

input [7:0] alua;
input [7:0] alub;
input [3:0] aluop;
input       cin;
output reg [7:0] aluout;
output reg zout;
output reg cout;
reg addercout;

parameter ALUOP_ADD  = 4'b0000;
parameter ALUOP_SUB  = 4'b1000;
parameter ALUOP_AND  = 4'b0001;
parameter ALUOP_OR   = 4'b0010;
parameter ALUOP_XOR  = 4'b0011;
parameter ALUOP_COM  = 4'b0100;
parameter ALUOP_ROR  = 4'b0101;
parameter ALUOP_ROL  = 4'b0110;
parameter ALUOP_SWAP = 4'b0111;

always @(alua or alub or cin or aluop) begin
   case (aluop)
      ALUOP_ADD:  {addercout,  aluout}  = alua + alub;
      ALUOP_SUB:  {addercout,  aluout}  = alua - alub;
      ALUOP_AND:  {addercout,  aluout}  = {1'b0, alua & alub};
      ALUOP_OR:   {addercout,  aluout}  = {1'b0, alua | alub};
      ALUOP_XOR:  {addercout,  aluout}  = {1'b0, alua ^ alub};
      ALUOP_COM:  {addercout,  aluout}  = {1'b0, ~alua};
      ALUOP_ROR:  {addercout,  aluout}  = {alua[0], cin, alua[7:1]};
      ALUOP_ROL:  {addercout,  aluout}  = {alua[7], alua[6:0], cin};
      ALUOP_SWAP: {addercout,  aluout}  = {1'b0, alua[3:0], alua[7:4]};
      default:    {addercout,  aluout}  = {1'b0, 8'h00};
   endcase
end

always @(aluout)
   zout = (aluout == 8'h00);

always @(addercout or aluop)
   if(aluop == ALUOP_SUB)
      cout = ~addercout;
   else
      cout =  addercout;

endmodule

always @(aluasel or w or sbus or k or bd) begin
   case (aluasel)
      2'b00: alua = w;
      2'b01: alua = sbus;
      2'b10: alua = k;
      2'b11: alua = bd;
   endcase
end
always @(alubsel or w or sbus or k) begin
   case (alubsel)
      2'b00: alub = w;
      2'b01: alub = sbus;
      2'b10: alub = k;
      2'b11: alub = 8'b00000001;
   endcase
end
四、直接访存、间接访存、相对访存
直接访存就是指令中存在着寄存器或者存储器的地址;
间接访存就是通过访问寄存器,然后寄存器中存在着寄存器或者存储器的地址;例如 INDF Register,是一个全局寄存器,在所有的 Bank 中都有映射,而无需考虑 Bank 的设定,它本身不代表地址,而是代表间接地址所指向的单元;
相对访存就是页面访存,通过扩展页,来提高存储的容量,通过对页地址进行选择(在 STATUS 的 PA1 和 PA0 中),作为 PC 值高位,来实现访存的一种方式。
通过对指令地址的判定,输出对应的控制信号,选择对应的寄存器进行读写。
详细的电路模块和 Verilog 代码如下:
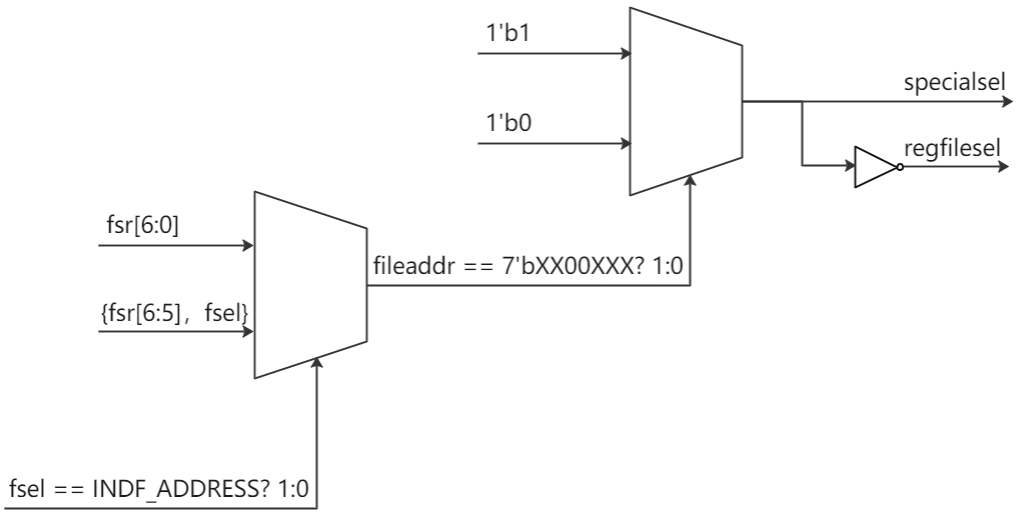
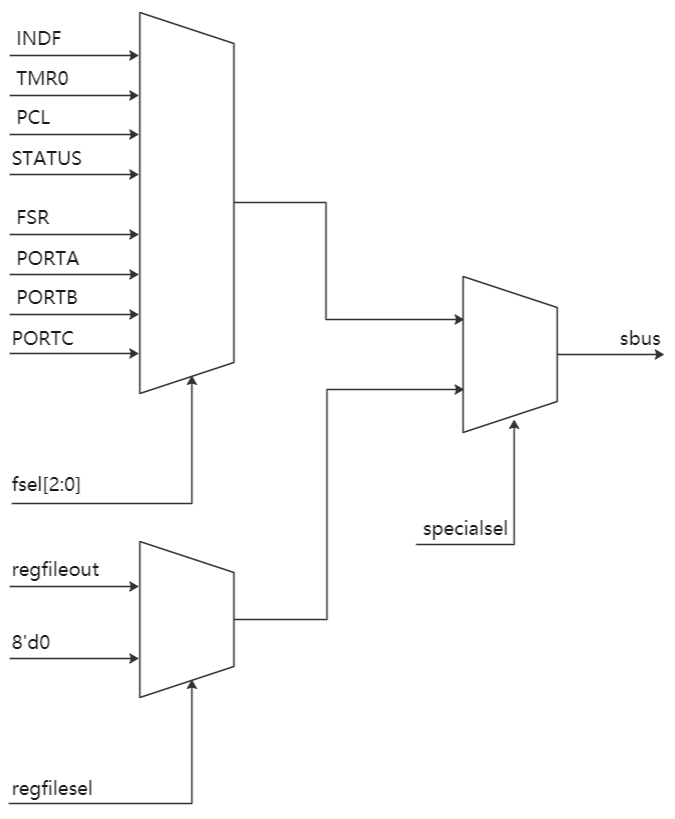
always @(fsel or fsr) begin
   if (fsel == INDF_ADDRESS)
      fileaddr = fsr[6:0]; // Indirect
   else
      fileaddr = {fsr[6:5], fsel}; // Direct
end

always @(fileaddr) begin
   casex (fileaddr)
      7'bXX00XXX: begin
            specialsel	= 1'b1;
            regfilesel	= 1'b0;
      end
      default: begin
            specialsel	= 1'b0;
            regfilesel	= 1'b1;
      end
   endcase
end

always @(*) begin
   if(specialsel) begin
      case (fsel[2:0])
         3'h0:	sbus = fsr;
         3'h1:	sbus = tmr0;
         3'h2:	sbus = pc[7:0];
         3'h3:	sbus = status;
         3'h4:	sbus = fsr;
         3'h5:	sbus = porta; // PORTA is an input-only port
         3'h6:	sbus = portb; // PORTB is an output-only port
         3'h7:	sbus = portc; // PORTC is an output-only port
      endcase
   end
   else begin
         if(regfilesel)
            sbus = regfileout;
         else
            sbus = 8'h00;
   end
end
五、F 寄存器和 W 寄存器
F 寄存器分为特殊寄存器和通用寄存器,特殊寄存器是作为一个单独的寄存器进行存放,和 W 寄存器一样,通用寄存器是以 RAM 的形式存在。它们的读写延时为写入数据需要一个时钟,读出数据不需要时钟。
关键的电路模块和 Verilog 代码如下:
`define DEBUG_SHOWREADS
`define DEBUG_SHOWWRITES

module regs(clk, rst_n, we, re, bank, location, din, dout);

input		clk;
input		rst_n;
input		we;
input		re;
input  [1:0]	bank;
input  [4:0]	location;
input  [7:0]	din;
output [7:0]	dout;

reg [6:0]	final_address;

dram dram (
   .clk		(clk),
   .address	(final_address),
   .we		(we),
   .din		(din),
   .dout	   (dout)
);

always @(bank or location) begin
   casex ({bank, location})
      7'b00_01XXX: final_address = {4'b0000, location[2:0]};
      7'b01_01XXX: final_address = {4'b0000, location[2:0]};
      7'b10_01XXX: final_address = {4'b0000, location[2:0]};
      7'b11_01XXX: final_address = {4'b0000, location[2:0]};
      // Bank #0
      7'b00_10XXX: final_address = {4'b0001, location[2:0]};
      7'b00_11XXX: final_address = {4'b0010, location[2:0]};
      // Bank #1
      7'b01_10XXX: final_address = {4'b0011, location[2:0]};
      7'b01_11XXX: final_address = {4'b0100, location[2:0]};
      // Bank #2
      7'b10_10XXX: final_address = {4'b0101, location[2:0]};
      7'b10_11XXX: final_address = {4'b0110, location[2:0]};
      // Bank #3
      7'b11_10XXX: final_address = {4'b0111, location[2:0]};
      7'b11_11XXX: final_address = {4'b1000, location[2:0]};
      default:     final_address = {4'b0000, location[2:0]};
   endcase
end
endmodule

module dram (
   clk,
   address,
   we,
   din,
   dout
);

input		 clk;
input  [6:0] address;
input		 we;
input  [7:0] din;
output [7:0] dout;

parameter word_depth = 72;

reg [7:0] mem [0:word_depth-1];

assign dout = mem[address];

always @(posedge clk)
	if (we)
		mem[address] <= din;

endmodule
最近比较忙,时间比较赶,关键模块差不多就是这些,当然还是存储映射、特殊寄存器的写入、TMR0 预分频、测试程序的编写之类的,就没给出,整个工程的下载链接。
希望大家能够通过学习较为简单的 RISC CPU 设计,来提高自己的 FPGA 设计水准,那么本文的目的也就达到了~
六、关于工程
关注“新芯设计”公众号,发送 RISC CPU 即可获取。
最后
以上就是敏感雪糕最近收集整理的关于基于 FPGA 的 RISC CPU 设计(2)详细的模块设计思路及其 Verilog 代码的全部内容,更多相关基于内容请搜索靠谱客的其他文章。


发表评论 取消回复