前端实现路由的方式主要有两种:hash模式和history模式、前端路由的本质为url改变页面不刷新、达到视图数据改变的结果。
1.hash模式:
window对象的location属性值里的 hash属性可以拿到hash值:window.location.hash。
window对象的全局方法hashchange()可以监听到hash值得变化。
主要基于这个原理来实现hash模式的前端路由。
实例代码1:
 <body>
       <li><a href="#/home">home</li>
       <li><a href="#/about">about</a></li>

         <div class="routerView">hash变化显示的值:</div>
    <script>
      //监听hash值的变化
          window.addEventListener('hashchange',()=>{
            hashChange()

          })
         function hashChange(){
            //打印hash值
           console.log(window.location.hash);
           switch(window.location.hash){
               case '#/home':
                 document.querySelector('.routerView').innerHTML='home'
                 break;
               case  '#/about':
                  document.querySelector('.routerView').innerHTML='about'
                  default: '默认值'
             }
         }


    </script>
  </body>
实例2 锚点跳转
a可以跳转到任意指定了id的标签,以及指定name的a标签:
 <body>
       <li><a href="#/home">home</li>
       <li><a href="#/about">about</a></li>
       <div  id ="/home" style="width: 500px; height: 500px; border: 1px solid red; margin-top: 800px;">
          点击a标签home跳转到这里
       </div>
         <a href="/name" name="/about"> 点击about跳转到这里</a>
    <script>
      //监听hash的变化
        window.addEventListener('hashchange',()=>{
          console.log(window.location.hash);
        })
    </script>
  </body>
2.history模式
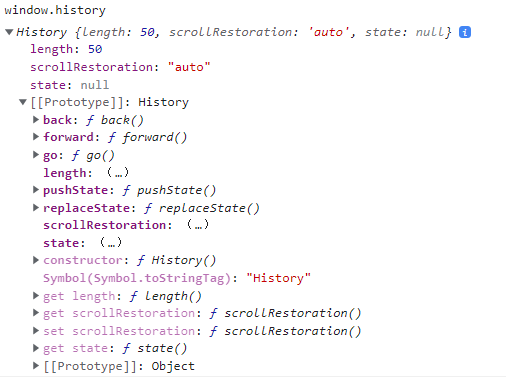
首先我们得了解history这个全局对象自身的方法:
 在上图可以看出:
history.length:这个属性值主要表示历史栈的记录长度。
window.history.scrollRestoration:利用浏览器特性回到上一个页面滚动位置.
两个属性值: auto 滚动 manual 不滚动。
在其原型对象上可以看到一些方法:
back(): 当前栈中回退一个记录
forward():当前栈中前进一个记录
go()可以指定参数:go(1)表示前进一个,-1表示后退一个
pushState和replaceState主要可以让我们自己往历史栈里面添加记录。
history.pushState(stateObj,title,url):向当前历史记录插入一个状态值对象stateObj,并在网址后面添 加url,title无实际意义.
-history.replaceState(stateObj,title,url):修改history对象的当前记录。
poptate:仅当浏览器动作出现时(前进、后退)才触发,pushState和replaceState方法并不会触发该事件,其回调函数参数event的state属性指向当前历史记录的state对象。
   <body>
    <button id="A">添加历史记录</button>
    <button id="B">替换当前的记录</button>
    <script>
      //向当前的历史栈中添加一条历史记录
      document.querySelector('#A').addEventListener('click',()=>{
            window.history.pushState({a:21},'title','/A')

      })
      //替换当前的记录。
      document.querySelector('#B').addEventListener('click',(e)=>{
        window.history.replaceState({a:41},'title', '/B')
      })
      //当后退或者前进触发该事件
      window.addEventListener('popstate',(e)=>{
        console.log(e);
      })
    </script>
  </body>
```javascript
实例2
 <body>
    <ul>
      <li><a href="/home">home</a></li>
      <li><a href="/about">about</a></li>
      <div id="routeView">路由变化显示的值:</div>
    </ul>
    <script>
      window.addEventListener("DOMContentLoaded", onLoad);
      // 监听路由变化
      window.addEventListener("popstate", onPopState);
      // 路由视图
      function onLoad() {
        onPopState();
        // 拦截 <a> 标签点击事件默认行为, 点击时使用 pushState 修改 URL并更新手动 UI,从而实现点击链接更新 URL 和 UI 的效果。
        var linkList = document.querySelectorAll("a[href]");
        linkList.forEach((el) =>
          el.addEventListener("click", function (e) {
            console.log(window.location);
            console.log(window.history);
            e.preventDefault();
            // window.history.pushState(null, null, el.getAttribute("href"));
            window.history.pushState({a:21},'title',el.getAttribute('href'))
            onPopState();
          })
        );
      }
      // 路由变化时,根据路由渲染对应 UI
      function onPopState() {
        switch (window.location.pathname) {
          case "/home":
            document.querySelector("#routeView").innerHTML = "home";
            return;
          case "/about":
            document.querySelector("#routeView").innerHTML = "about";
            return;
          default:
            return;
        }
      }
    </script>
  </body>
以上就是前端路由的两种模式,至于在vue,react 框架中的路由封装基本原理都是基于这两个模式、但是它们在路由中又封装了动画等一系列的东西、显得比较复杂。
最后
以上就是心灵美煎蛋最近收集整理的关于前端实现路由的两种方式的全部内容,更多相关前端实现路由内容请搜索靠谱客的其他文章。


发表评论 取消回复