文章目录
- 【目标】
- 【代码】
- 【接口】
- 【参数】
- 【练习画小人脸】
- 【参考】
【目标】
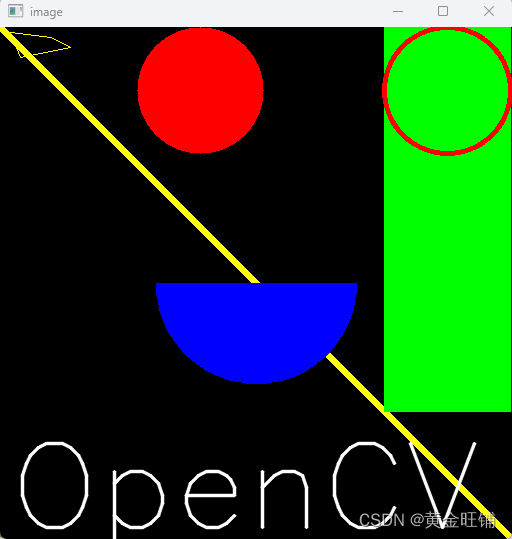
- 学习用OpenCV画不同几何形状的图像
- 画直线
- 画圆
- 画矩形
- 画椭圆
- 画多边形
- 写文字
【代码】

# 导入库
import numpy as np
import cv2

# 创建一个黑的画布
img = np.zeros((512, 512, 3), np.uint8)

# 画一条直线(对角线),5px的粗度, 黄色
# cv2.line( img, (0, 0), (511, 511), (0, 255, 255), 5)
cv2.line(img=img, pt1=(0, 0), pt2=(511, 511), color=(0, 255, 255), thickness=5)

# 画一个矩形,顶点1为 (384, 0), 顶点2为(510, 384), 颜色为绿色, thickness如果为-1, 则是填充, 否则为边框的粗细
# cv2.rectangle(img, (384, 0), (510, 128), (0, 255, 0), 3)
cv2.rectangle(img=img, pt1=(384, 0), pt2=(510, 384), color=(0, 255, 0), thickness=-1)

# 画一个圆形
# cv2.circle(img, (447, 63), 63, (0, 0, 255), -1)
cv2.circle(img=img, center=(447, 63), radius=63, color=(0, 0, 255), thickness=4)
cv2.circle(img=img, center=(200, 63), radius=63,
        color=(0, 0, 255), thickness=-1)

# 画一个椭圆
# cv2.ellipse(img, (256, 256), (100, 50), 0, 0, 180, 255, -1)
cv2.ellipse(img=img, center=(256, 256), axes=(100, 100), angle=0,
            startAngle=0, endAngle=180, color=(255, 0, 0), thickness=-1)

# 画一个多边形
pts = np.array([[10, 5], [20, 30], [70, 20], [50, 10]], np.int32)
pts = pts.reshape((-1,1,2))
cv2.polylines(img=img, pts=[pts], isClosed=True, color=(0,255,255))

# 在图像上写文字
font = cv2.FONT_HERSHEY_SIMPLEX
cv2.putText(img, 'OpenCV', (10, 500), font, 4, (255, 255, 255), 2, cv2.LINE_AA)

cv2.imshow("image", img)
cv2.waitKey(0)
cv2.destroyWindow("image")
【接口】
// # 绘制一个点到另一个点的箭头线段
void cv::arrowedLine	(	InputOutputArray  image,
Point 	pt1,
Point 	pt2,
const Scalar & 	color,
int 	thickness = 1,
int 	line_type = 8,
int 	shift = 0,
double 	tipLength = 0.1
);

// # 绘制一个圆
void cv::circle	(	InputOutputArray  image,
Point  center,
int 	radius,
const Scalar & 	color,
int 	thickness = 1,
int 	lineType = LINE_8,
int 	shift = 0
);

// # 根据图像矩形裁剪线条
bool cv::clipLine	(	Size  imageSize,
Point & 	pt1,
Point & 	pt2
);

// # 根据图像矩形裁剪线条
bool cv::clipLine	(	Size2l  imageSize,
Point2l & 	pt1,
Point2l & 	pt2
);

// # 根据图像矩形裁剪线条
bool cv::clipLine	(	Rect  imageRect,
Point & 	pt1,
Point & 	pt2
);

// # 绘制轮廓
void cv::drawContours	(	InputOutputArray  image,
InputArrayOfArrays 	contours,
int 	contourIdx,
const Scalar & 	color,
int 	thickness = 1,
int 	lineType = LINE_8,
InputArray 	hierarchy = noArray(),
int 	maxLevel = INT_MAX,
Point 	offset = Point()
);

// # 在图像预置位绘制标记
void cv::drawMarker	(	InputOutputArray  image,
Point 	position,
const Scalar & 	color,
int 	markerType = MARKER_CROSS,
int 	markerSize = 20,
int 	thickness = 1,
int 	line_type = 8
);

// # 绘制椭圆弧或扇区
void cv::ellipse	(	InputOutputArray  image,
Point  center,
Size 	axes,
double 	angle,
double 	startAngle,
double 	endAngle,
const Scalar & 	color,
int 	thickness = 1,
int 	lineType = LINE_8,
int 	shift = 0
);

// # 绘制椭圆弧或扇区
void cv::ellipse	(	InputOutputArray  image,
const RotatedRect & 	box,
const Scalar & 	color,
int 	thickness = 1,
int 	lineType = LINE_8
);

// # 用多段线近似椭圆弧
void cv::ellipse2Poly	(	Point  center,
Size 	axes,
int 	angle,
int 	arcStart,
int 	arcEnd,
int 	delta,
std::vector< Point > & 	pts
);

// # 填充凸多边形
void cv::ellipse2Poly	(	Point2d  center,
Size2d 	axes,
int 	angle,
int 	arcStart,
int 	arcEnd,
int 	delta,
std::vector< Point2d > & 	pts
);

// # 填充凸多边形
void cv::fillConvexPoly	(	InputOutputArray  image,
InputArray 	points,
const Scalar & 	color,
int 	lineType = LINE_8,
int 	shift = 0
);

// # 填充凸多边形
void cv::fillConvexPoly	(	InputOutputArray  image,
const Point * 	pts,
int 	npts,
const Scalar & 	color,
int 	lineType = LINE_8,
int 	shift = 0
);

// # 填充一个或多个多边形限定的区域
void cv::fillPoly	(	InputOutputArray  image,
InputArrayOfArrays 	pts,
const Scalar & 	color,
int 	lineType = LINE_8,
int 	shift = 0,
Point 	offset = Point()
);

// # 填充一个或多个多边形限定的区域
void cv::fillPoly	(	InputOutputArray  image,
const Point ** 	pts,
const int * 	npts,
int 	ncontours,
const Scalar & 	color,
int 	lineType = LINE_8,
int 	shift = 0,
Point 	offset = Point()
);

// # 绘制两点线段
void cv::line	(	InputOutputArray  image,
Point 	pt1,
Point 	pt2,
const Scalar & 	color,
int 	thickness = 1,
int 	lineType = LINE_8,
int 	shift = 0
);

// # 绘制多条多边形曲线
void cv::polylines	(	InputOutputArray  image,
InputArrayOfArrays 	pts,
bool 	isClosed,
const Scalar & 	color,
int 	thickness = 1,
int 	lineType = LINE_8,
int 	shift = 0
);

// # 绘制多条多边形曲线
void cv::polylines	(	InputOutputArray  image,
const Point *const * 	pts,
const int * 	npts,
int 	ncontours,
bool 	isClosed,
const Scalar & 	color,
int 	thickness = 1,
int 	lineType = LINE_8,
int 	shift = 0
);

// # 绘制文本
void cv::putText	(	InputOutputArray  image,
const String & 	text,
Point 	org,
int 	fontFace,
double 	fontScale,
Scalar 	color,
int 	thickness = 1,
int 	lineType = LINE_8,
bool 	bottomLeftOrigin = false
);

// # 绘制矩形
void cv::rectangle	(	InputOutputArray  image,
Point 	pt1,
Point 	pt2,
const Scalar & 	color,
int 	thickness = 1,
int 	lineType = LINE_8,
int 	shift = 0
);

// # 绘制矩形
void cv::rectangle	(	InputOutputArray  image,
Rect 	rec,
const Scalar & 	color,
int 	thickness = 1,
int 	lineType = LINE_8,
int 	shift = 0
);
# 绘制一个点到另一个点的箭头线段
cv2.arrowedLine( image, pt1, pt2, color[, thickness[, line_type[, shift[, tipLength]]]] ) -> image

# 绘制一个圆
cv2.circle( image, center, radius, color[, thickness[, lineType[, shift]]] ) -> image

# 根据图像矩形裁剪线条
cv2.clipLine( imageRect, pt1, pt2 ) ->	retval, pt1, pt2

# 绘制轮廓
cv2.drawContours( image, contours, contourIdx, color[, thickness[, lineType[, hierarchy[, maxLevel[, offset]]]]] ) -> image

# 在图像预置位绘制标记
cv2.drawMarker( image, position, color[, markerType[, markerSize[, thickness[, line_type]]]] ) -> image

# 绘制椭圆弧或扇区
cv2.ellipse( image, center, axes, angle, startAngle, endAngle, color[, thickness[, lineType[, shift]]] ) -> image

# 绘制椭圆弧或扇区
cv2.ellipse( image, box, color[, thickness[, lineType]] ) -> image

# 用多段线近似椭圆弧
cv2.ellipse2Poly( center, axes, angle, arcStart, arcEnd, delta ) ->	pts

# 填充凸多边形
cv2.fillConvexPoly( image, points, color[, lineType[, shift]] ) -> image

# 填充一个或多个多边形限定的区域
cv2.fillPoly( image, pts, color[, lineType[, shift[, offset]]] ) -> image

# 绘制两点线段
cv2.line( image, pt1, pt2, color[, thickness[, lineType[, shift]]] ) -> image

# 绘制多条多边形曲线
cv2.polylines( image, pts, isClosed, color[, thickness[, lineType[, shift]]] ) -> image

# 绘制文本
cv2.putText( image, text, org, fontFace, fontScale, color[, thickness[, lineType[, bottomLeftOrigin]]] ) -> image

# 绘制矩形
cv2.rectangle( image, pt1, pt2, color[, thickness[, lineType[, shift]]] ) -> image

# 绘制矩形
cv2.rectangle( image, rec, color[, thickness[, lineType[, shift]]] ) -> image
【参数】
- img: 图像
- pt1: 起始点
- pt2: 终点
- color: 颜色
- thickness: 粗细, -1 表示填充
- lineType: 线型
- shift: 偏移量
- tipLength: 箭头的长度
- center: (椭)圆心、弧的中心
- radius: 半径
- imgSize: 图像尺寸
- position: 十字准线所在的点
- markerType: marker类型参考下表
- markerSize: marker的长度(默认为20)
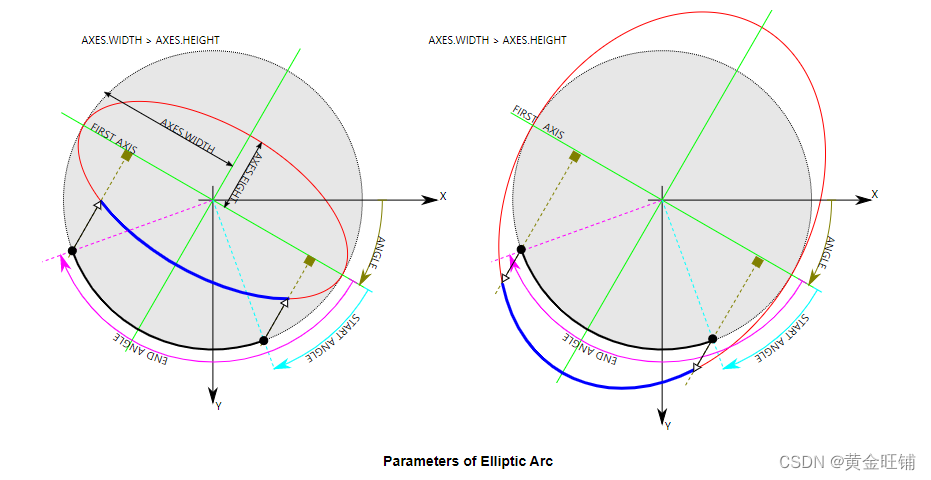
- axes: 主轴尺寸的一半
- angle: 椭圆旋转角度
- startAngle: 开始角度
- endAngle: 结束角度
- box: 通过旋转矩形绘制椭圆
- arcStart: 弧的开始角度
- arcEnd: 弧的结束角度
- delta: 多段线顶点之间的角度,定义了精度
- pts: polyline的顶点
- points: Polygon的顶点
字体类型
| 字体类型 | 说明 |
|---|---|
| FONT_HERSHEY_SIMPLEX Python: cv2.FONT_HERSHEY_SIMPLEX | normal size sans-serif font |
| FONT_HERSHEY_PLAIN Python: cv2.FONT_HERSHEY_PLAIN | small size sans-serif font |
| FONT_HERSHEY_DUPLEX Python: cv2.FONT_HERSHEY_DUPLEX | normal size sans-serif font (more complex than FONT_HERSHEY_SIMPLEX) |
| FONT_HERSHEY_COMPLEX Python: cv2.FONT_HERSHEY_COMPLEX | normal size serif font |
| FONT_HERSHEY_TRIPLEX Python: cv2.FONT_HERSHEY_TRIPLEX | normal size serif font (more complex than FONT_HERSHEY_COMPLEX) |
| FONT_HERSHEY_COMPLEX_SMALL Python: cv2.FONT_HERSHEY_COMPLEX_SMALL | smaller version of FONT_HERSHEY_COMPLEX |
| FONT_HERSHEY_SCRIPT_SIMPLEX Python: cv2.FONT_HERSHEY_SCRIPT_SIMPLEX | hand-writing style font |
| FONT_HERSHEY_SCRIPT_COMPLEX Python: cv2.FONT_HERSHEY_SCRIPT_COMPLEX | more complex variant of FONT_HERSHEY_SCRIPT_SIMPLEX |
| FONT_ITALIC Python: cv2.FONT_ITALIC | flag for italic font |
线的类型
| 线的类型 | 说明 |
|---|---|
| FILLED Python: cv2.FILLED | |
| LINE_4 Python: cv2.LINE_4 | 4 连通邻域 |
| LINE_8 Python: cv2.LINE_8 | 8 连通邻域 |
| LINE_AA Python: cv2.LINE_AA | 抗锯齿线 |
标记类型
| 标记类型 | 说明 |
|---|---|
| MARKER_CROSS Python: cv2.MARKER_CROSS | A crosshair marker shape. |
| MARKER_TILTED_CROSS Python: cv2.MARKER_TILTED_CROSS | A 45 degree tilted crosshair marker shape. |
| MARKER_STAR Python: cv2.MARKER_STAR | A star marker shape, combination of cross and tilted cross. |
| MARKER_DIAMOND Python: cv2.MARKER_DIAMOND | A diamond marker shape. |
| MARKER_SQUARE Python: cv2.MARKER_SQUARE | A square marker shape. |
| MARKER_TRIANGLE_UP Python: cv2.MARKER_TRIANGLE_UP | An upwards pointing triangle marker shape. |
| MARKER_TRIANGLE_DOWN Python: cv2.MARKER_TRIANGLE_DOWN | A downwards pointing triangle marker shape. |

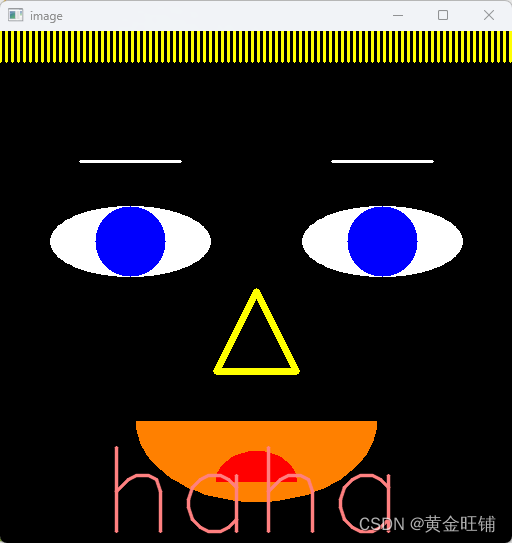
【练习画小人脸】

# 导入库
import numpy as np
import cv2

imagewidth = 512
imageheight = 512

# 创建一个黑的画布
img = np.zeros((imageheight, imagewidth, 3), np.uint8)

################################################################################
# 头发长度
hairLen = 30
# 头发稀有程度
hairSparse = 6
xstep = list(range(0, 512, hairSparse))
# 画头发
for x in xstep:
    pt1 = (x, 0)
    pt2 = (x, hairLen)
    cv2.line(img=img, pt1=pt1, pt2=pt2, color=(0, 255, 255), thickness=2)

################################################################################
# 画眉毛
# 眉毛的长度
eyebrowLen = 100
# 眉毛的粗细
eyebrowThickness = 5
# 眉毛距离边界
eyebrowDis2 = 80
# 眉毛距离头发
eyebrowDis2Hair = 100
# 眉毛距离头顶距离
eyebrowDis2Top = hairLen + eyebrowDis2Hair
# 眉毛的颜色
eybrowColor = (255, 255, 255)
# 左眉毛
pt1 = (eyebrowDis2, eyebrowDis2Top)
pt2 = (eyebrowDis2 + eyebrowLen, eyebrowDis2Top)
cv2.line(img=img, pt1=pt1, pt2=pt2, color=eybrowColor, thickness=2)
# 右眉毛
pt1 = (imagewidth - eyebrowDis2, eyebrowDis2Top)
pt2 = (imagewidth - eyebrowDis2 - eyebrowLen, eyebrowDis2Top)
cv2.line(img=img, pt1=pt1, pt2=pt2, color=eybrowColor, thickness=2)

################################################################################
# 画眼睛
# 眼睛与眉毛距离
eyeDis2brow = 80
# 眼睛中心距离头顶距离
eyeDis2Top = eyeDis2brow + eyebrowDis2Top
# 眼睛距离
eyeLeftCenterX = (eyebrowDis2 * 2 + eyebrowLen) // 2
# 眼睛宽度
eyeWidth = 80
# 眼睛高度
eyeHeigh = 35
# white
eyeColor = (255, 255, 255)
# 眼珠颜色
eyeballsColor = (255, 0, 0)
eyeLeftCenter = (eyeLeftCenterX, eyeDis2Top)
cv2.ellipse(img=img, center=eyeLeftCenter, axes=(eyeWidth, eyeHeigh), angle=0,
            startAngle=0, endAngle=360, color=eyeColor, thickness=-1)
cv2.circle(img=img, center=eyeLeftCenter, radius=35,
        color=eyeballsColor, thickness=-1)
eyeRightCenter = (imagewidth-eyeLeftCenterX, eyeDis2Top)
cv2.ellipse(img=img, center=eyeRightCenter, axes=(eyeWidth, eyeHeigh), angle=0,
            startAngle=0, endAngle=360, color=eyeColor, thickness=-1)
cv2.circle(img=img, center=eyeRightCenter, radius=35,
        color=eyeballsColor, thickness=-1)

################################################################################
# 画鼻子
# 鼻子中心
noseCenterX = imagewidth // 2
# 鼻子宽度
noseWidth = 80
# 鼻子距离头顶距离
noseDis2Top = eyeDis2Top + 50
# 鼻子高度
noseHeight = 80
# 鼻子底部到头顶距离
noseBottom2HeadTop = noseDis2Top + noseHeight
# 鼻子颜色
noseColor = (0, 255, 255)
pt1 = [noseCenterX, noseDis2Top]
pt2 = [noseCenterX - (noseWidth//2), noseBottom2HeadTop]
pt3 = [noseCenterX + (noseWidth//2), noseBottom2HeadTop]
pts = np.array([pt1, pt2, pt3], np.int32)
pts = pts.reshape((-1, 1, 2))
cv2.polylines(img=img, pts=[pts], isClosed=True, color=noseColor, thickness=5)

################################################################################
# 画嘴巴
# 嘴巴到鼻子的距离
mouthDis2Nose = 50
# 嘴巴到顶部距离
mouthDis2Top = noseBottom2HeadTop + mouthDis2Nose
# 嘴巴宽度
mouthWidth = 120
# 嘴巴高度
mouthHeight = 80
# 嘴巴颜色
mouthColor = (0, 128, 255)
# 嘴巴中心
mouthCenterX = imagewidth // 2
mouthCenter = (mouthCenterX, mouthDis2Top)
cv2.ellipse(img=img, center=mouthCenter, axes=(mouthWidth, mouthHeight), angle=0,
        startAngle=0, endAngle=180, color=mouthColor, thickness=-1)

# 画舌头
tongueDis2Top = mouthDis2Top + 60
tongueCenter = (mouthCenterX, tongueDis2Top)
tongueWidth = 40
tongueHeight = 30
tongueColor=(0, 0, 255)
cv2.ellipse(img=img, center=tongueCenter, axes=(tongueWidth, tongueHeight), angle=0,
        startAngle=180, endAngle=360, color=tongueColor, thickness=-1)


# 在图像上写文字
font = cv2.FONT_HERSHEY_SIMPLEX
cv2.putText(img, 'haha', (100, 500), font, 4, (128, 128, 255), 2, cv2.LINE_AA)
cv2.imshow("image", img)
cv2.waitKey(0)
cv2.destroyWindow("image")
【参考】
- https://docs.opencv2.org/4.5.5/dc/da5/tutorial_py_drawing_functions.html
最后
以上就是发嗲烤鸡最近收集整理的关于【OpenCV-Python】教程:1-3 画图【目标】的全部内容,更多相关【OpenCV-Python】教程:1-3内容请搜索靠谱客的其他文章。
本图文内容来源于网友提供,作为学习参考使用,或来自网络收集整理,版权属于原作者所有。


发表评论 取消回复