目录
- 一、全志V3s简介
- 板子介绍
- 二、简介
- 1、永远的嵌入式Linux四大件
- 2、因为选择的存储方式而做的妥协
- 3、因为芯片公司的原因而需要熟悉的知识
- 4、用于nor flash的分区配置
- 三、编译Uboot
- 1、下载uboot源码
- 2、配置Flash支持型号
- 3、配置uboot默认环境变量
- (1)环境命令解析:
- (2)启动参数解析
- 4、安装uboot编译工具
- 5、编译uboot
- (1)图形化配置uboot
- (2)配置编译设置
- (3)编译uboot
- 四、编译Linux内核
- 1、获得Linux内核源码
- 2、内核选项配置
- 3、修改设备树文件
- 4、编译内核
- 五、准备烧录文件
- 0、将根文件系统生成jffs2.img
- (1)安装jffs2文件系统制作工具
- (2)生成jffs2.img--JFFS2格式的文件系统
- 1、打包二进制bin文件包:flashimg.bin
- (1)16M nor flash打包脚本
- (2)32M nor flash打包脚本
- (3)打包
- 六、烧写镜像
- 1、安装sunxi flash烧写工具
- 2、全志芯片的USB下载模式:fel模式
- 3、sunxi-fel的操作
- 单独烧录各个部分
- 最后
- 总结一下流程
一、全志V3s简介
SPI Flash 系统编译
板子介绍
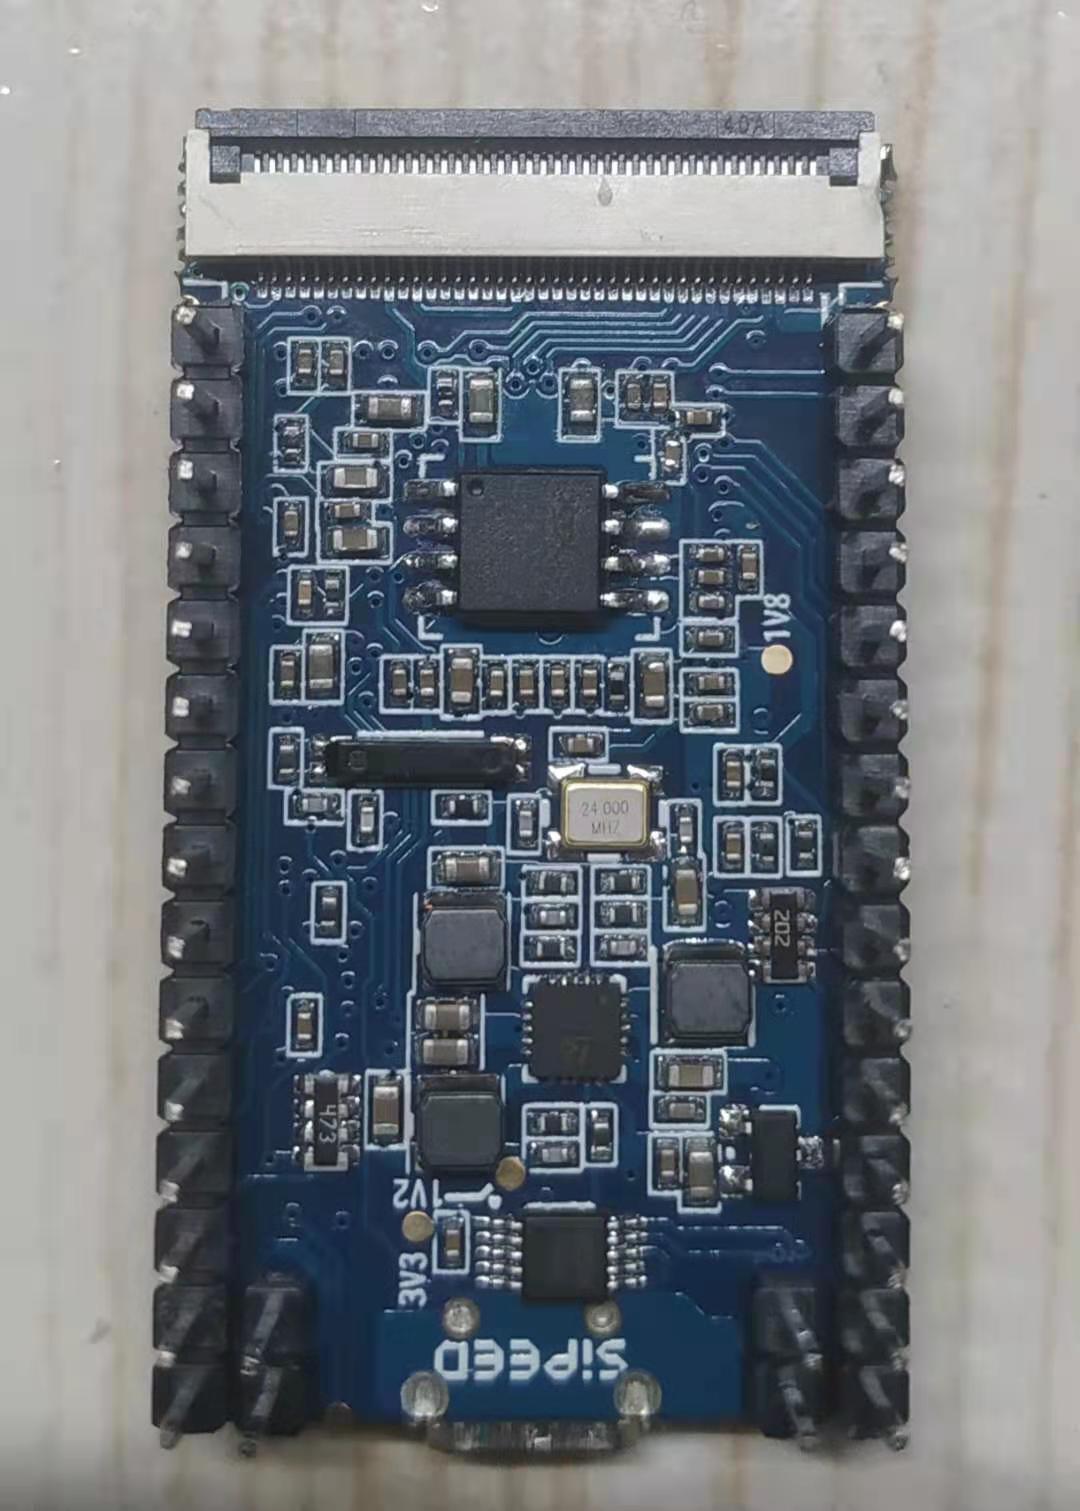
上图使用的是荔枝派 zero 上面焊接了一个 芯天下的Nor Flash型号为:XT25F128B也就是16MByte。
二、简介
1、永远的嵌入式Linux四大件
作为需要运行Linux系统的板子,不管怎么折腾,跑不掉的是几个大件:
- Uboot文件
- Linux Kernel文件
- dtb文件
- 根文件系统文件
就这些!
2、因为选择的存储方式而做的妥协
另外还需要知道的知识就是在这里的特殊的存储介质:nor flash,为此需要配置:
- 配置uboot支持nor flash
- 配置Linux kernel支持nor flash
- 在设备树中添加nor flash的设备节点
- 由于nor flash的特殊性需要选择JFFS2格式的文件系统
3、因为芯片公司的原因而需要熟悉的知识
剩下就是各个芯片公司的特殊设置(爱好):
- 启动方式的差别
- 烧录方式的差别
- 运行方式的差别
- 奇葩的某种运行模式
4、用于nor flash的分区配置
如上图使用的是:XT25F128B,也就是16MByte NOR Flash作为启动介质,规划分区如下:
| 分区序号 | 分区大小 | 分区描述 | 地址空间及分区名 |
|---|---|---|---|
| mtd0 | 1MB | spl+uboot | 0x0000000-0x0100000 : “uboot” |
| mtd1 | 64KB | dtb文件 | 0x0100000-0x0110000: “dtb” |
| mtd2 | 4MB | linux内核 | 0x0110000-0x0510000 : “kernel” |
| mtd3 | 10MiB 960KiB | 根文件系统 | 0x0510000-0x1000000 : “rootfs” |

三、编译Uboot
由于目前Uboot环境变量固定存放在1MB位置之内,所有留给uboot的空间固定到flash前1MB的位置不变。
每个分区的大小必须是擦除块大小的整数倍,XT25F128B的擦除块大小是64KB。
1、下载uboot源码
下载包含spi驱动的体验版本uboot,该驱动目前尚未合并到主线
git clone -b v3s-spi-experimental https://github.com/Lichee-Pi/u-boot.git
2、配置Flash支持型号
执行 make ARCH=arm menuconfig 打开uboot菜单配置,进入到 Device Drivers ‣ SPI Flash Support
注意看一下自己flash的厂家名称,例如选上Macronix SPI flash support用来支持测试用的flash:XT25F128B。
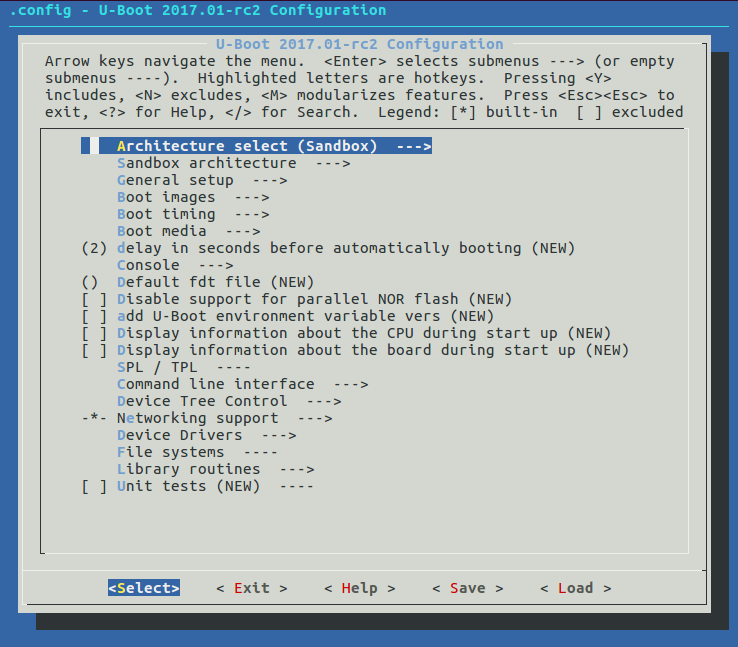
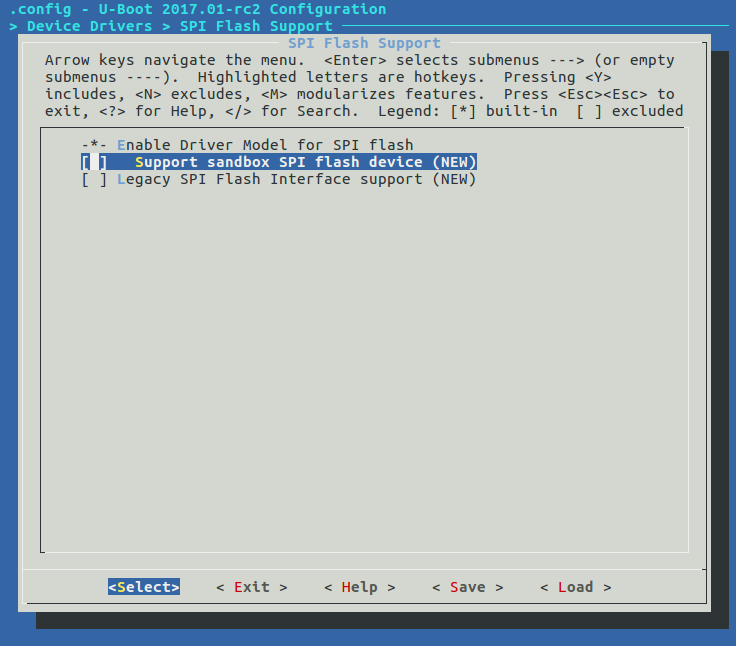
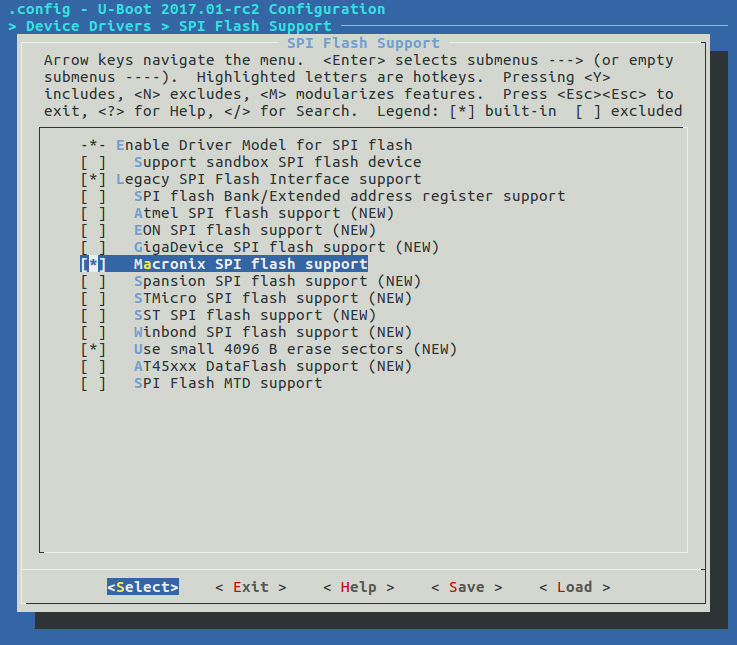
由于XT25F128B这个品牌并没有在上面,所以就使用Macronix 这个牌子试一下。
如果使用的是16MB以上的flash,需要勾选flash bank支持选项,否则最多只能读到16MB: CONFIG_SPI_FLASH_BAR
3、配置uboot默认环境变量
在文件 include/configs/sun8i.h 中添加默认bootcmd和bootargs的环境变量设置,注意添加的位置在“ #include <configs/sunxi-common.h> ”的前边。
源码:vim include/configs/sun8i.h
/*
 * (C) Copyright 2014 Chen-Yu Tsai <wens@csie.org>
 *
 * Configuration settings for the Allwinner A23 (sun8i) CPU
 *
 * SPDX-License-Identifier: GPL-2.0+
 */

#ifndef __CONFIG_H
#define __CONFIG_H

/*
 * A23 specific configuration
 */

#ifdef CONFIG_USB_EHCI
#define CONFIG_USB_EHCI_SUNXI
#endif

#ifdef CONFIG_MACH_SUN8I_H3
    #define CONFIG_SUNXI_USB_PHYS   4
#elif defined CONFIG_MACH_SUN8I_A83T
    #define CONFIG_SUNXI_USB_PHYS   3
#elif defined CONFIG_MACH_SUN8I_V3S
    #define CONFIG_SUNXI_USB_PHYS   1
#else
    #define CONFIG_SUNXI_USB_PHYS   2
#endif

/*
 * Include common sunxi configuration where most the settings are
 */
#include <configs/sunxi-common.h>

#endif /* __CONFIG_H */
添加:
#define CONFIG_BOOTCOMMAND   "sf probe 0; "
                             "sf read 0x41800000 0x100000 0x10000; "
                             "sf read 0x41000000 0x110000 0x400000; "
                             "bootz 0x41000000 - 0x41800000"

 #define CONFIG_BOOTARGS      "console=ttyS0,115200 earlyprintk panic=5 rootwait "
                             "mtdparts=spi32766.0:1M(uboot)ro,64k(dtb)ro,4M(kernel)ro,-(rootfs) root=31:03 rw rootfstype=jffs2"
修改后:注意添加的位置在“ #include <configs/sunxi-common.h> ”的前边。
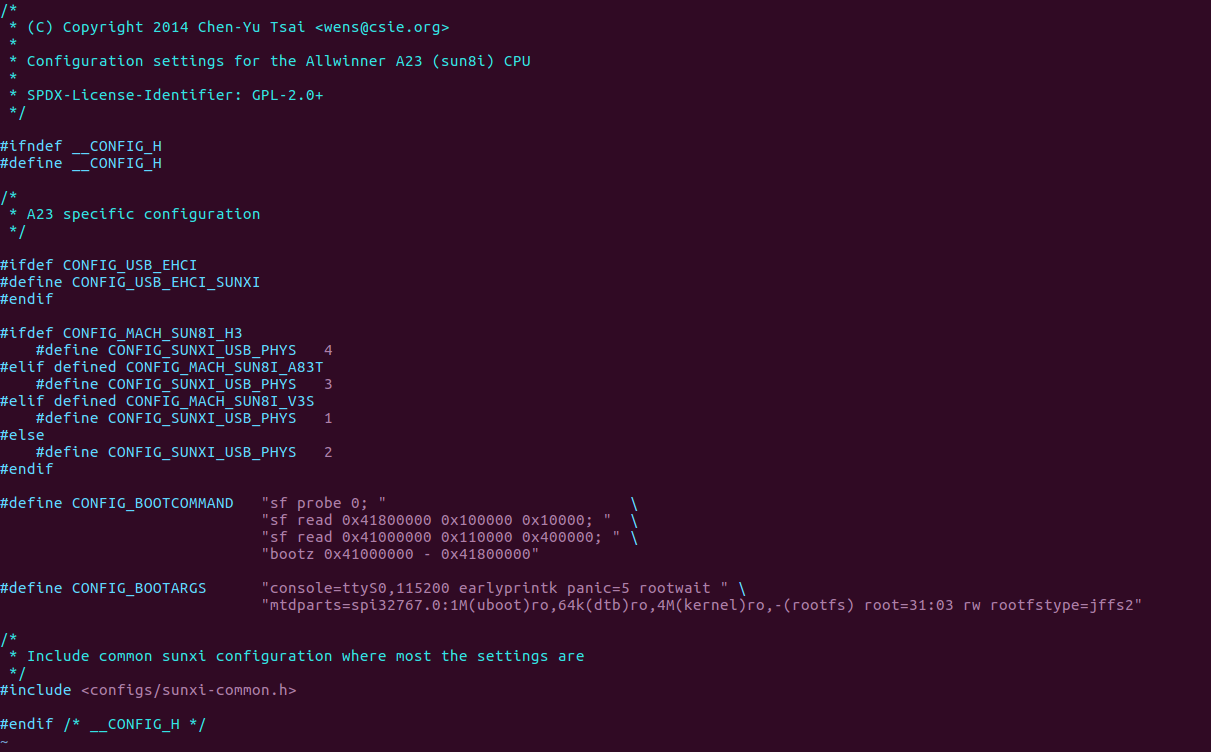
(1)环境命令解析:
-
sf probe 0;//初始化Flash设备(CS拉低) -
sf read 0x41800000 0x100000 0x10000;//从flash0x100000(1MB)位置读取dtb放到内存0x41800000偏移处。 //如果是bsp的bin,则是0x41d00000 -
sf read 0x41000000 0x110000 0x400000;//从flash0x110000(1MB+64KB)位置读取dtb放到内存0x41000000偏移处。 -
bootz 0x41000000 (内核地址)- 0x41800000(dtb地址)启动内核
(2)启动参数解析
-
console=ttyS0,115200 earlyprintk panic=5 rootwait//在串口0上输出信息 -
mtdparts=spi32766.0:1M(uboot)ro,64k(dtb)ro,4M(kernel)ro,-(rootfs) root=31:03 rw rootfstype=jffs2//spi32766.0是设备名,后面是分区大小,名字,读写属性。 -
root=31:03表示根文件系统是mtd3;jffs2格式
4、安装uboot编译工具
- 交叉编译器:
gcc-linaro-6.3.1-2017.05-x86_64_arm-linux-gnueabihf - dtc编译器:
device-tree-compiler
安装交叉编译器
wget https://releases.linaro.org/components/toolchain/binaries/latest/arm-linux-gnueabihf/gcc-linaro-6.3.1-2017.05-x86_64_arm-linux-gnueabihf.tar.xz
tar xvf gcc-linaro-6.3.1-2017.05-x86_64_arm-linux-gnueabihf.tar.xz
mv gcc-linaro-6.3.1-2017.05-x86_64_arm-linux-gnueabihf /opt/
vim /etc/bash.bashrc
# add: PATH="$PATH:/opt/gcc-linaro-6.3.1-2017.05-x86_64_arm-linux-gnueabihf/bin"
source /etc/bash.bashrc
arm-linux-gnueabihf-gcc -v
安装dtc编译器:
liefyuan@ubuntu:~/allwinner/v3s/u-boot$ sudo apt-get install device-tree-compiler
[sudo] liefyuan 的密码:
正在读取软件包列表... 完成
正在分析软件包的依赖关系树
正在读取状态信息... 完成
下列软件包是自动安装的并且现在不需要了:
  linux-headers-4.15.0-112 linux-headers-4.15.0-112-generic linux-headers-4.15.0-118 linux-headers-4.15.0-118-generic
  linux-headers-4.15.0-120 linux-headers-4.15.0-120-generic linux-headers-4.15.0-45 linux-headers-4.15.0-45-generic
  linux-image-4.15.0-112-generic linux-image-4.15.0-118-generic linux-image-4.15.0-120-generic linux-image-4.15.0-45-generic
  linux-modules-4.15.0-112-generic linux-modules-4.15.0-118-generic linux-modules-4.15.0-120-generic linux-modules-4.15.0-45-generic
  linux-modules-extra-4.15.0-112-generic linux-modules-extra-4.15.0-118-generic linux-modules-extra-4.15.0-120-generic
  linux-modules-extra-4.15.0-45-generic
使用'sudo apt autoremove'来卸载它(它们)。
下列【新】软件包将被安装:
  device-tree-compiler
升级了 0 个软件包,新安装了 1 个软件包,要卸载 0 个软件包,有 134 个软件包未被升级。
需要下载 356 kB 的归档。
解压缩后会消耗 522 kB 的额外空间。
获取:1 http://us.archive.ubuntu.com/ubuntu xenial/main amd64 device-tree-compiler amd64 1.4.0+dfsg-2 [356 kB]
已下载 356 kB,耗时 2秒 (127 kB/s)
正在选中未选择的软件包 device-tree-compiler。
(正在读取数据库 ... 系统当前共安装有 364901 个文件和目录。)
正准备解包 .../device-tree-compiler_1.4.0+dfsg-2_amd64.deb  ...
正在解包 device-tree-compiler (1.4.0+dfsg-2) ...
正在处理用于 doc-base (0.10.7) 的触发器 ...
Processing 2 added doc-base files...
正在处理用于 man-db (2.7.5-1) 的触发器 ...
正在设置 device-tree-compiler (1.4.0+dfsg-2) ...
5、编译uboot
- 图形化配置uboot:
make ARCH=arm menuconfig - 配置编译文件(我的屏幕是5寸):
make ARCH=arm CROSS_COMPILE=arm-linux-gnueabihf- LicheePi_Zero_800x480LCD_defconfig- 其他选项:
make ARCH=arm CROSS_COMPILE=arm-linux-gnueabihf- LicheePi_Zero480x272LCD_defconfig - 其他选项:
make ARCH=arm CROSS_COMPILE=arm-linux-gnueabihf- LicheePi_Zero_defconfig
- 其他选项:
- 编译:
time make ARCH=arm CROSS_COMPILE=arm-linux-gnueabihf- 2>&1 | tee build.log
会在目录下生成 u-boot-sunxi-with-spl.bin
(1)图形化配置uboot
参考上面:配置Flash支持型号
(2)配置编译设置
liefyuan@ubuntu:~/allwinner/v3s/u-boot$ make ARCH=arm CROSS_COMPILE=arm-linux-gnueabihf- LicheePi_Zero_800x480LCD_defconfig
  HOSTCC  scripts/basic/fixdep
  HOSTCC  scripts/kconfig/conf.o
  HOSTCC  scripts/kconfig/zconf.tab.o
  HOSTLD  scripts/kconfig/conf
#
# configuration written to .config
#
(3)编译uboot
liefyuan@ubuntu:~/allwinner/v3s/u-boot$ time make ARCH=arm CROSS_COMPILE=arm-linux-gnueabihf- 2>&1 | tee build.log
scripts/kconfig/conf  --silentoldconfig Kconfig
  CHK     include/config.h
  CFG     u-boot.cfg
  GEN     include/autoconf.mk
  GEN     include/autoconf.mk.dep
  CFG     spl/u-boot.cfg
  GEN     spl/include/autoconf.mk
  CHK     include/config/uboot.release
  CHK     include/generated/version_autogenerated.h
  CHK     include/generated/timestamp_autogenerated.h
  UPD     include/generated/timestamp_autogenerated.h
  CC      lib/asm-offsets.s
  CHK     include/generated/generic-asm-offsets.h
  CC      arch/arm/lib/asm-offsets.s
  CHK     include/generated/asm-offsets.h
  ...
  LD      spl/drivers/built-in.o
  LD      spl/dts/built-in.o
  LD      spl/fs/built-in.o
  LDS     spl/u-boot-spl.lds
  LD      spl/u-boot-spl
  OBJCOPY spl/u-boot-spl-nodtb.bin
  COPY    spl/u-boot-spl.bin
  MKSUNXI spl/sunxi-spl.bin
  OBJCOPY u-boot-nodtb.bin
  CAT     u-boot-dtb.bin
  COPY    u-boot.bin
  MKIMAGE u-boot.img
  COPY    u-boot.dtb
  BINMAN  u-boot-sunxi-with-spl.bin
  OBJCOPY u-boot.srec
  SYM     u-boot.sym
  MKIMAGE u-boot-dtb.img
./scripts/check-config.sh u-boot.cfg
	./scripts/config_whitelist.txt . 1>&2

real	0m21.078s
user	0m18.389s
sys	0m3.741s
编译成功!
会在目录下生成 u-boot-sunxi-with-spl.bin
liefyuan@ubuntu:~/allwinner/v3s/u-boot$ ll
总用量 6840
drwxrwxr-x  24 liefyuan liefyuan    4096 Feb  6 12:07 ./
drwxrwxr-x   4 liefyuan liefyuan    4096 Feb  5 23:35 ../
drwxrwxr-x   2 liefyuan liefyuan    4096 Feb  5 23:47 api/
drwxrwxr-x  18 liefyuan liefyuan    4096 Feb  5 23:47 arch/
drwxrwxr-x 223 liefyuan liefyuan    4096 Feb  5 23:47 board/
-rw-rw-r--   1 liefyuan liefyuan   18009 Feb  6 12:07 build.log
-rw-rw-r--   1 liefyuan liefyuan     610 Feb  5 23:47 .checkpatch.conf
drwxrwxr-x   4 liefyuan liefyuan   12288 Feb  6 12:07 cmd/
drwxrwxr-x   5 liefyuan liefyuan   12288 Feb  6 12:07 common/
-rw-rw-r--   1 liefyuan liefyuan   19589 Feb  6 12:07 .config
-rw-rw-r--   1 liefyuan liefyuan    2260 Feb  5 23:47 config.mk
-rw-rw-r--   1 liefyuan liefyuan   19513 Feb  6 11:52 .config.old
drwxrwxr-x   2 liefyuan liefyuan   69632 Feb  5 23:47 configs/
drwxrwxr-x   2 liefyuan liefyuan    4096 Feb  6 12:07 disk/
drwxrwxr-x   9 liefyuan liefyuan   12288 Feb  5 23:47 doc/
drwxrwxr-x  51 liefyuan liefyuan    4096 Feb  6 12:07 drivers/
drwxrwxr-x   2 liefyuan liefyuan    4096 Feb  6 12:07 dts/
drwxrwxr-x   4 liefyuan liefyuan    4096 Feb  5 23:47 examples/
drwxrwxr-x  12 liefyuan liefyuan    4096 Feb  6 12:07 fs/
drwxrwxr-x   8 liefyuan liefyuan    4096 Feb  5 23:47 .git/
-rw-rw-r--   1 liefyuan liefyuan     825 Feb  5 23:47 .gitignore
drwxrwxr-x  31 liefyuan liefyuan   12288 Feb  6 12:07 include/
-rw-rw-r--   1 liefyuan liefyuan    1863 Feb  5 23:47 Kbuild
-rw-rw-r--   1 liefyuan liefyuan   11544 Feb  5 23:47 Kconfig
drwxrwxr-x  12 liefyuan liefyuan    4096 Feb  6 12:07 lib/
drwxrwxr-x   2 liefyuan liefyuan    4096 Feb  5 23:47 Licenses/
-rw-rw-r--   1 liefyuan liefyuan    1323 Feb  5 23:47 .mailmap
-rw-rw-r--   1 liefyuan liefyuan   11770 Feb  5 23:47 MAINTAINERS
-rw-rw-r--   1 liefyuan liefyuan   53473 Feb  5 23:47 Makefile
drwxrwxr-x   2 liefyuan liefyuan    4096 Feb  6 12:07 net/
drwxrwxr-x   6 liefyuan liefyuan    4096 Feb  5 23:47 post/
-rw-rw-r--   1 liefyuan liefyuan  223798 Feb  5 23:47 README
drwxrwxr-x   5 liefyuan liefyuan    4096 Feb  5 23:47 scripts/
-rw-rw-r--   1 liefyuan liefyuan      17 Feb  5 23:47 snapshot.commit
drwxrwxr-x  12 liefyuan liefyuan    4096 Feb  6 12:07 spl/
-rw-rw-r--   1 liefyuan liefyuan   56079 Feb  6 12:07 System.map
drwxrwxr-x  10 liefyuan liefyuan    4096 Feb  6 12:07 test/
drwxrwxr-x  16 liefyuan liefyuan    4096 Feb  6 12:07 tools/
-rw-rw-r--   1 liefyuan liefyuan    9716 Feb  5 23:47 .travis.yml
-rwxrwxr-x   1 liefyuan liefyuan 2278009 Feb  6 12:07 u-boot*
-rw-rw-r--   1 liefyuan liefyuan  386498 Feb  6 12:07 u-boot.bin
-rw-rw-r--   1 liefyuan liefyuan      47 Feb  6 12:07 .u-boot.bin.cmd
-rw-rw-r--   1 liefyuan liefyuan   10321 Feb  6 12:07 u-boot.cfg
-rw-rw-r--   1 liefyuan liefyuan    6092 Feb  6 12:07 u-boot.cfg.configs
-rw-rw-r--   1 liefyuan liefyuan    1389 Feb  6 12:07 .u-boot.cmd
-rw-rw-r--   1 liefyuan liefyuan    7210 Feb  6 12:07 u-boot.dtb
-rw-rw-r--   1 liefyuan liefyuan  386498 Feb  6 12:07 u-boot-dtb.bin
-rw-rw-r--   1 liefyuan liefyuan      71 Feb  6 12:07 .u-boot-dtb.bin.cmd
-rw-rw-r--   1 liefyuan liefyuan  386562 Feb  6 12:07 u-boot-dtb.img
-rw-rw-r--   1 liefyuan liefyuan     196 Feb  6 12:07 .u-boot-dtb.img.cmd
-rw-rw-r--   1 liefyuan liefyuan  386562 Feb  6 12:07 u-boot.img
-rw-rw-r--   1 liefyuan liefyuan     188 Feb  6 12:07 .u-boot.img.cmd
-rw-rw-r--   1 liefyuan liefyuan    1673 Feb  6 12:07 u-boot.lds
-rw-rw-r--   1 liefyuan liefyuan   13291 Feb  6 12:07 .u-boot.lds.cmd
-rw-rw-r--   1 liefyuan liefyuan  424286 Feb  6 12:07 u-boot.map
-rw-rw-r--   1 liefyuan liefyuan  379288 Feb  6 12:07 u-boot-nodtb.bin
-rw-rw-r--   1 liefyuan liefyuan     258 Feb  6 12:07 .u-boot-nodtb.bin.cmd
-rw-rw-r--   1 liefyuan liefyuan 1137954 Feb  6 12:07 u-boot.srec
-rw-rw-r--   1 liefyuan liefyuan     245 Feb  6 12:07 .u-boot.srec.cmd
-rw-rw-r--   1 liefyuan liefyuan  419330 Feb  6 12:07 u-boot-sunxi-with-spl.bin
-rw-rw-r--   1 liefyuan liefyuan     114 Feb  6 12:07 .u-boot-sunxi-with-spl.bin.cmd
-rw-rw-r--   1 liefyuan liefyuan  112561 Feb  6 12:07 u-boot.sym
-rw-rw-r--   1 liefyuan liefyuan      69 Feb  6 12:07 .u-boot.sym.cmd
四、编译Linux内核
一般的流程为:
- 安装好交叉编译环境(和Uboot)
- 下载好内核源码
- 修改内核编译配置文件
- 修改设备树文件
- 编译内核文件和设备树文件
1、获得Linux内核源码
linux内核基于github上的版本https://github.com/Lichee-Pi/linux.git,分支为最新的zero-4.13.y
(默认是zero-4.10.y分支):
git clone https://github.com/Lichee-Pi/linux.git
liefyuan@ubuntu:~/allwinner/v3s$ git clone https://github.com/Lichee-Pi/linux.git
正克隆到 'linux'...
remote: Enumerating objects: 6883668, done.
remote: Total 6883668 (delta 0), reused 0 (delta 0), pack-reused 6883668
接收对象中: 100% (6883668/6883668), 2.54 GiB | 1.07 MiB/s, 完成.
处理 delta 中: 100% (5696573/5696573), 完成.
检查连接... 完成。
正在检出文件: 100% (57213/57213), 完成.
下载得有点慢!
2、内核选项配置
执行 make ARCH=arm menuconfig 打开内核菜单配置,
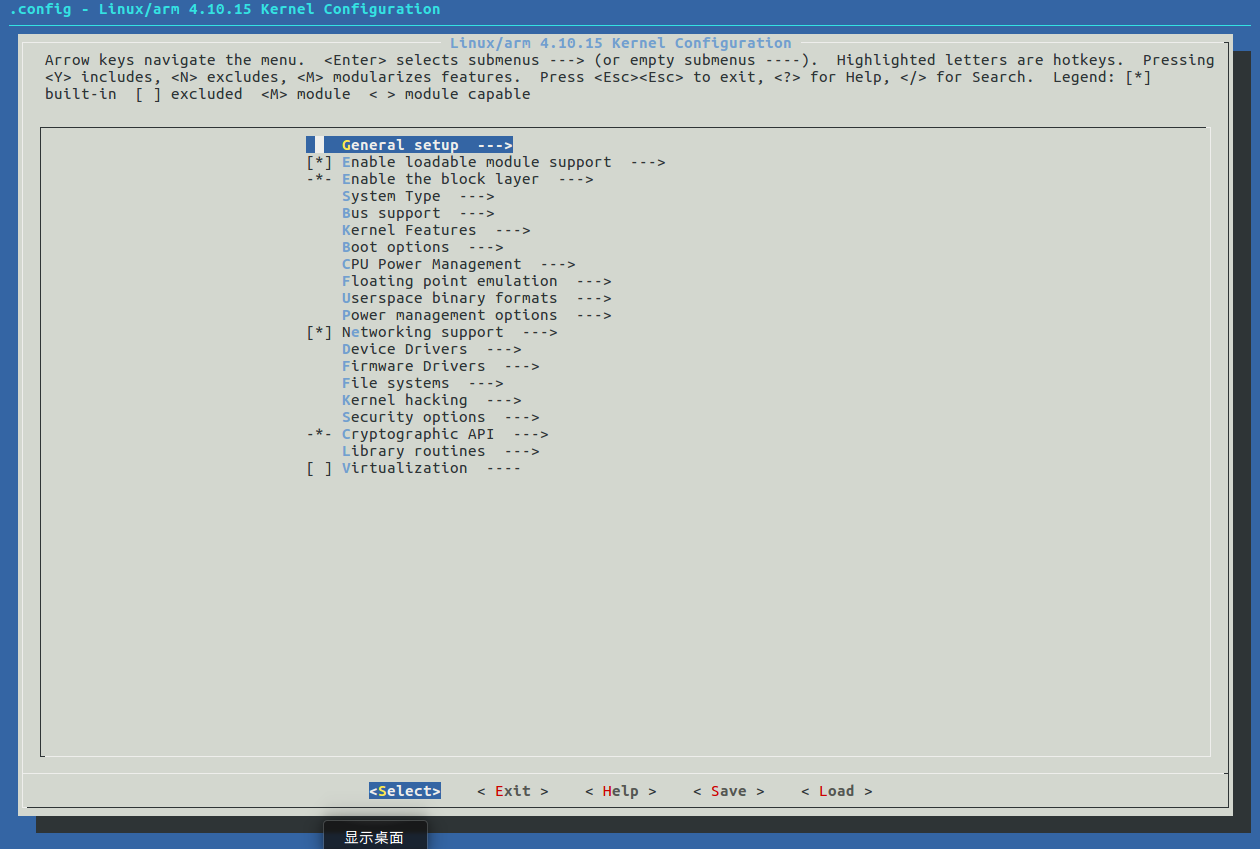
进入到 Device Drivers ‣ Memory Technology Device (MTD) support ,
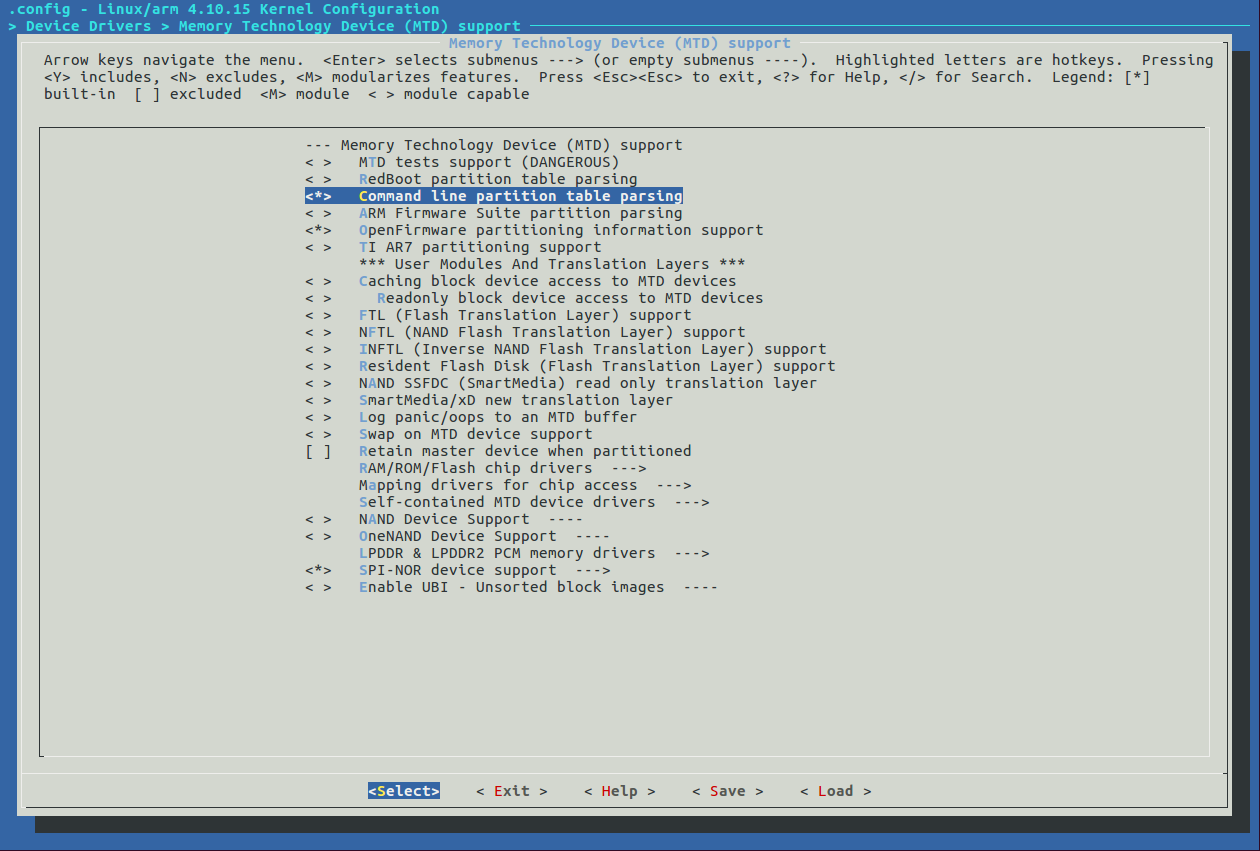
确保选择上mtd的<*> Command line partition table parsing 支持,该项目用来解析uboot传递过来的flash分区信息;以及SPI-NOR 设备的支持。
添加对jffs2文件系统的支持,路径在 File systems ‣ Miscellaneous filesystems ‣ Journalling Flash File System v2 (JFFS2) support如下:
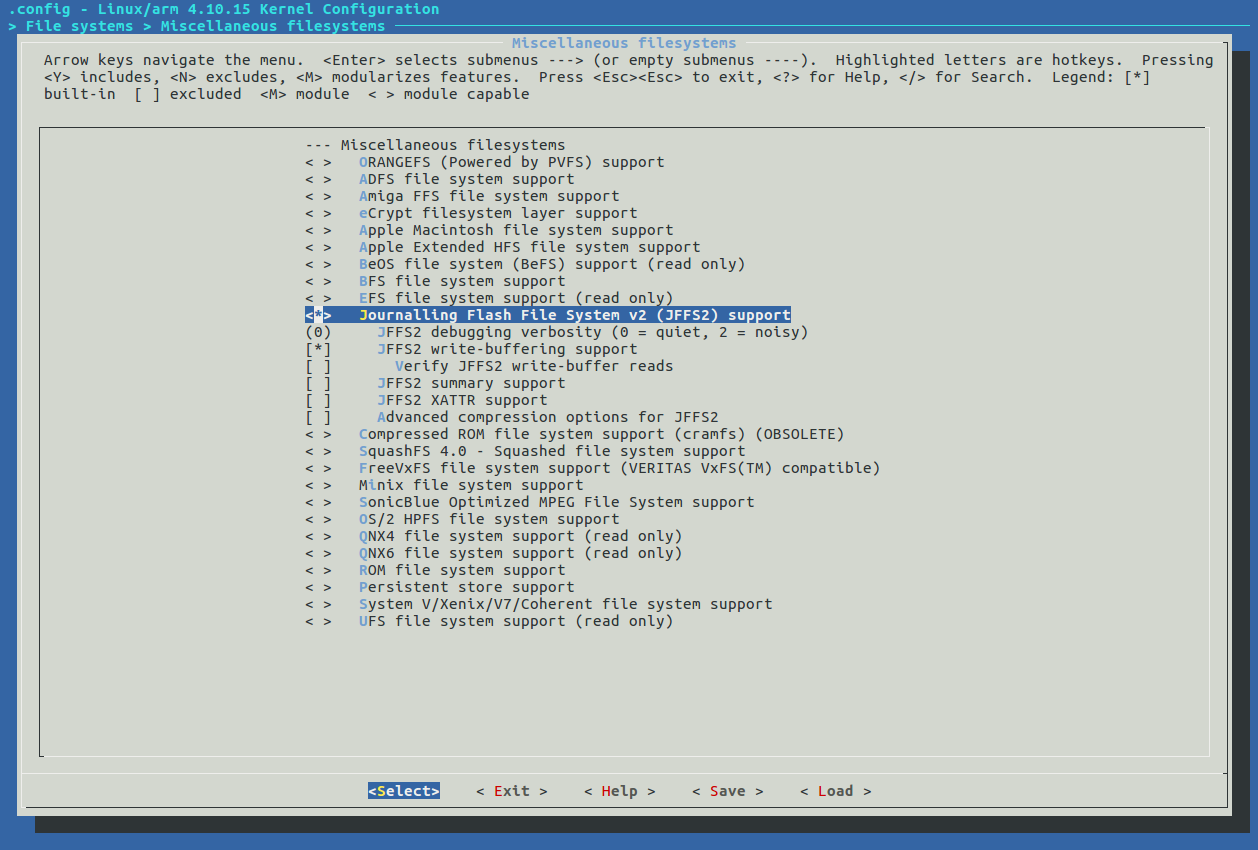
3、修改设备树文件
修改dts配置添加spi flash节点
vi arch/arm/boot/dts/sun8i-v3s-licheepi-zero.dts
源文件:sun8i-v3s-licheepi-zero.dts
/*
pi节点配置: Copyright (C) 2016 Icenowy Zheng <icenowy@aosc.xyz>
*
* This file is dual-licensed: you can use it either under the terms
* of the GPL or the X11 license, at your option. Note that this dual
* licensing only applies to this file, and not this project as a
* whole.
*
* a) This file is free software; you can redistribute it and/or
* modify it under the terms of the GNU General Public License as
* published by the Free Software Foundation; either version 2 of the
* License, or (at your option) any later version.
*
* This file is distributed in the hope that it will be useful,
* but WITHOUT ANY WARRANTY; without even the implied warranty of
* MERCHANTABILITY or FITNESS FOR A PARTICULAR PURPOSE. See the
* GNU General Public License for more details.
*
* Or, alternatively,
*
* b) Permission is hereby granted, free of charge, to any person
* obtaining a copy of this software and associated documentation
* files (the "Software"), to deal in the Software without
* restriction, including without limitation the rights to use,
* copy, modify, merge, publish, distribute, sublicense, and/or
* sell copies of the Software, and to permit persons to whom the
* Software is furnished to do so, subject to the following
* conditions:
*
* The above copyright notice and this permission notice shall be
* included in all copies or substantial portions of the Software.
*
* THE SOFTWARE IS PROVIDED "AS IS", WITHOUT WARRANTY OF ANY KIND,
* EXPRESS OR IMPLIED, INCLUDING BUT NOT LIMITED TO THE WARRANTIES
* OF MERCHANTABILITY, FITNESS FOR A PARTICULAR PURPOSE AND
* NONINFRINGEMENT. IN NO EVENT SHALL THE AUTHORS OR COPYRIGHT
* HOLDERS BE LIABLE FOR ANY CLAIM, DAMAGES OR OTHER LIABILITY,
* WHETHER IN AN ACTION OF CONTRACT, TORT OR OTHERWISE, ARISING
* FROM, OUT OF OR IN CONNECTION WITH THE SOFTWARE OR THE USE OR
* OTHER DEALINGS IN THE SOFTWARE.
*/
/dts-v1/;
#include "sun8i-v3s.dtsi"
#include "sunxi-common-regulators.dtsi"
/ {
model = "Lichee Pi Zero";
compatible = "licheepi,licheepi-zero", "allwinner,sun8i-v3s";
aliases {
serial0 = &uart0;
};
chosen {
stdout-path = "serial0:115200n8";
};
};
&mmc0 {
pinctrl-0 = <&mmc0_pins_a>;
pinctrl-names = "default";
broken-cd;
bus-width = <4>;
vmmc-supply = <®_vcc3v3>;
status = "okay";
};
&i2c0 {
status = "okay";
ns2009: ns2009@48 {
compatible = "nsiway,ns2009";
reg = <0x48>;
};
};
&uart0 {
pinctrl-0 = <&uart0_pins_a>;
pinctrl-names = "default";
status = "okay";
};
&usb_otg {
dr_mode = "otg";
status = "okay";
};
&usbphy {
usb0_id_det-gpio = <&pio 5 6 GPIO_ACTIVE_HIGH>;
status = "okay";
};
添加spi节点配置:
&spi0 {
        status ="okay";

        xt25f128b:xt25f128b@0 {
                compatible = "jedec,spi-nor";
                reg = <0x0>;
                spi-max-frequency = <50000000>;
                #address-cells = <1>;
                #size-cells = <1>;
        };

};
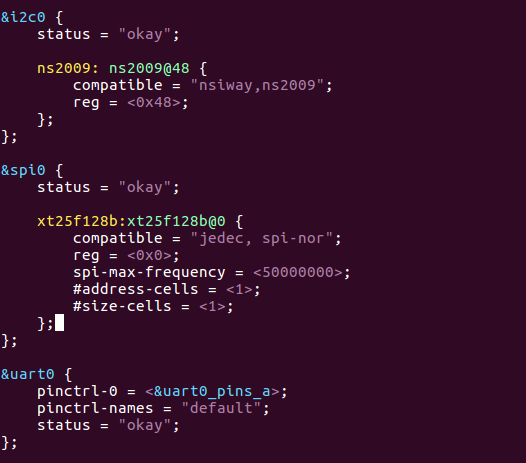
这里的flash型号需要在下表之中,否则将无法识别:(注意容量也一定要对应)
static const struct spi_device_id m25p_ids[] = {
        /*
        * Allow non-DT platform devices to bind to the "spi-nor" modalias, and
        * hack around the fact that the SPI core does not provide uevent
        * matching for .of_match_table
        */
        {"spi-nor"},

        /*
        * Entries not used in DTs that should be safe to drop after replacing
        * them with "spi-nor" in platform data.
        */
        {"s25sl064a"},  {"w25x16"},     {"m25p10"},     {"m25px64"},

        /*
        * Entries that were used in DTs without "jedec,spi-nor" fallback and
        * should be kept for backward compatibility.
        */
        {"at25df321a"}, {"at25df641"},  {"at26df081a"},
        {"mx25l4005a"}, {"mx25l1606e"}, {"mx25l6405d"}, {"mx25l12805d"},
        {"mx25l25635e"},{"mx66l51235l"},
        {"n25q064"},    {"n25q128a11"}, {"n25q128a13"}, {"n25q512a"},
        {"s25fl256s1"}, {"s25fl512s"},  {"s25sl12801"}, {"s25fl008k"},
        {"s25fl064k"},
        {"sst25vf040b"},{"sst25vf016b"},{"sst25vf032b"},{"sst25wf040"},
        {"m25p40"},     {"m25p80"},     {"m25p16"},     {"m25p32"},
        {"m25p64"},     {"m25p128"},
        {"w25x80"},     {"w25x32"},     {"w25q32"},     {"w25q32dw"},
        {"w25q80bl"},   {"w25q128"},    {"w25q256"},

        /* Flashes that can't be detected using JEDEC */
        {"m25p05-nonjedec"},    {"m25p10-nonjedec"},    {"m25p20-nonjedec"},
        {"m25p40-nonjedec"},    {"m25p80-nonjedec"},    {"m25p16-nonjedec"},
        {"m25p32-nonjedec"},    {"m25p64-nonjedec"},    {"m25p128-nonjedec"},

        /* Everspin MRAMs (non-JEDEC) */
        { "mr25h256" }, /* 256 Kib, 40 MHz */
        { "mr25h10" },  /*   1 Mib, 40 MHz */
        { "mr25h40" },  /*   4 Mib, 40 MHz */

        { },
};
4、编译内核
退出菜单配置并编译内核和dts
make ARCH=arm licheepi_zero_defconfig
血的教训!,上面那句不要运行,否则你前面图形化配置的参数就都清零了!!!!!2021年5月24日01:45:13
make ARCH=arm CROSS_COMPILE=arm-linux-gnueabihf- -j16

make ARCH=arm CROSS_COMPILE=arm-linux-gnueabihf- dtbs
编译内核成功之后会显示如下信息:Kernel: arch/arm/boot/zImage is ready
  SHIPPED arch/arm/boot/compressed/fdt_ro.c
  SHIPPED arch/arm/boot/compressed/fdt_wip.c
  SHIPPED arch/arm/boot/compressed/fdt.c
  CC      arch/arm/boot/compressed/atags_to_fdt.o
  SHIPPED arch/arm/boot/compressed/lib1funcs.S
  LD [M]  drivers/video/backlight/lcd.ko
  SHIPPED arch/arm/boot/compressed/ashldi3.S
  LD [M]  crypto/echainiv.ko
  SHIPPED arch/arm/boot/compressed/bswapsdi2.S
  AS      arch/arm/boot/compressed/hyp-stub.o
  CC      arch/arm/boot/compressed/fdt_rw.o
  CC      arch/arm/boot/compressed/fdt_ro.o
  CC      arch/arm/boot/compressed/fdt_wip.o
  CC      arch/arm/boot/compressed/fdt.o
  AS      arch/arm/boot/compressed/lib1funcs.o
  AS      arch/arm/boot/compressed/ashldi3.o
  AS      arch/arm/boot/compressed/bswapsdi2.o
  AS      arch/arm/boot/compressed/piggy.o
  LD      arch/arm/boot/compressed/vmlinux
  OBJCOPY arch/arm/boot/zImage
  Kernel: arch/arm/boot/zImage is ready
编译设备树文件
liefyuan@ubuntu:~/allwinner/v3s/linux$ make ARCH=arm CROSS_COMPILE=arm-linux-gnueabihf- dtbs
  CHK     include/config/kernel.release
  CHK     include/generated/uapi/linux/version.h
  CHK     include/generated/utsrelease.h
  CHK     include/generated/bounds.h
  CHK     include/generated/timeconst.h
  CHK     include/generated/asm-offsets.h
  CALL    scripts/checksyscalls.sh
  DTC     arch/arm/boot/dts/sun8i-v3s-licheepi-zero.dtb
  DTC     arch/arm/boot/dts/sun8i-v3s-licheepi-zero-dock.dtb
编译完成后,
- zImage在
arch/arm/boot/ - dtb文件在
arch/arm/boot/dts/
五、准备烧录文件
0、将根文件系统生成jffs2.img
使用使用各种文件系统生成工具生成的文件系统文件一般都类似是:rootfs.tar.gz的压缩包文件,这个是无法没有办法适应nor flash的需要使用转换的工具软件转成类似jffs2.img的文件。
(1)安装jffs2文件系统制作工具
sudo apt-get install mtd-utils
(2)生成jffs2.img–JFFS2格式的文件系统
目标文件:rootfs-brmin.tar.gz
先将rootfs-brmin.tar.gz解压出来
tar xzvf rootfs-brmin.tar.gz
使用命令生成:
这里使用的是16M的flash所以-p后面需要填的值即文件系统的空间为:16M-1M-64K-4M=0xAF 0000
mkfs.jffs2 -s 0x100 -e 0x10000 -p 0xAF0000 -d rootfs-brmin/ -o jffs2.img
-s页大小0x100 即:256Byte (这句可以不写 2021年5月24日01:45:43)-e块大小0x10000 即:64KByte (这句可以不写 2021年5月24日01:45:54)-p十六进制表示输出的文件大小即文件系统的大小-d要做成img的源文件夹- jffs2分区总空间0xAF0000 即:10MB 又 960KB
- jffs2.img是生成的文件系统镜像。
运行以后,本目录下就出现了一个jffs2.img文件,
-rw-r--r-- 1 liefyuan liefyuan 3080192 Feb 7 00:17 jffs2.img
1、打包二进制bin文件包:flashimg.bin
- 第一步: 生成一个空文件名字为
flashimg.bin,大小是32MB或者是16MB - 第二步: 将uboot添加到文件开头
- 第三步: 将dtb放到1M偏移处
- 第四步: 将kernel放到1M+64K偏移处
- 第五步: 将rootfs放到1M+64K+4M偏移处
偏移大小是seek,单位是KB。
执行完毕后生成镜像文件 flashimg.bin
将所有的东西放到一起打包如下:
liefyuan@ubuntu:~/allwinner/v3s/version0.1$ ll
总用量 7156
drwxrwxr-x 2 liefyuan liefyuan    4096 Feb  7 00:30 ./
drwxr-xr-x 7 liefyuan liefyuan    4096 Feb  7 00:30 ../
-rw-r--r-- 1 liefyuan liefyuan 3080192 Feb  7 00:17 jffs2.img
-rw-rw-r-- 1 liefyuan liefyuan    8711 Feb  6 15:02 sun8i-v3s-licheepi-zero.dtb
-rw-rw-r-- 1 liefyuan liefyuan  419330 Feb  6 12:07 u-boot-sunxi-with-spl.bin
-rwxrwxr-x 1 liefyuan liefyuan 3802040 Feb  6 15:03 zImage*
(1)16M nor flash打包脚本
以16M 大小flash镜像打包脚本为例:
#!/bin/sh
dd if=/dev/zero of=flashimg.bin bs=1M count=16 &&
dd if=$YOUR_UBOOT_FILE of=flashimg.bin bs=1K conv=notrunc &&
dd if=$YOUR_DTB_FILE of=flashimg.bin bs=1K seek=1024  conv=notrunc &&
dd if=$YOUR_KERNEL_FILE of=flashimg.bin bs=1K seek=1088  conv=notrunc &&
mkdir rootfs
tar -xzvf $YOUR_ROOTFS_FILE -C ./rootfs &&
cp -r $YOUR_MOD_FILE  rootfs/lib/modules/ &&
# 为根文件系统制作jffs2镜像包
# --pad参数指定 jffs2大小
# 由此计算得到 0x1000000(16M)-0x10000(64K)-0x100000(1M)-0x400000(4M)=0xAF0000
mkfs.jffs2 -s 0x100 -e 0x10000 --pad=0xAF0000 -d rootfs/ -o jffs2.img &&
dd if=jffs2.img of=$YOUR_IMG_FILE  bs=1K seek=5184  conv=notrunc &&
(16M就用这个!使用的!)修改一下(上一步已经生成了jffs2.img):
#!/bin/sh
dd if=/dev/zero of=flashimg.bin bs=1M count=16
dd if=u-boot-sunxi-with-spl.bin of=flashimg.bin bs=1K conv=notrunc
dd if=sun8i-v3s-licheepi-zero.dtb of=flashimg.bin bs=1K seek=1024  conv=notrunc
dd if=zImage of=flashimg.bin bs=1K seek=1088  conv=notrunc
dd if=jffs2.img of=flashimg.bin  bs=1K seek=5184  conv=notrunc
(2)32M nor flash打包脚本
#!/bin/sh
dd if=/dev/zero of=flashimg.bin bs=1M count=$1
dd if=u-boot-sunxi-with-spl-$2.bin of=flashimg.bin bs=1K conv=notrunc
dd if=sun8i-v3s-licheepi-zero-$2.dtb of=flashimg.bin bs=1K seek=1024  conv=notrunc
dd if=zImage of=flashimg.bin bs=1K seek=1088  conv=notrunc
dd if=jffs2.img of=flashimg.bin  bs=1K seek=5184  conv=notrunc
(3)打包
pakage.sh
#!/bin/sh
dd if=/dev/zero of=flashimg.bin bs=1M count=16
dd if=u-boot-sunxi-with-spl.bin of=flashimg.bin bs=1K conv=notrunc
dd if=sun8i-v3s-licheepi-zero.dtb of=flashimg.bin bs=1K seek=1024  conv=notrunc
dd if=zImage of=flashimg.bin bs=1K seek=1088  conv=notrunc
dd if=jffs2.img of=flashimg.bin  bs=1K seek=5184  conv=notrunc
运行打包脚本:
liefyuan@ubuntu:~/allwinner/v3s/version0.1$ chmod 777 pakage.sh
liefyuan@ubuntu:~/allwinner/v3s/version0.1$ ./pakage.sh
记录了16+0 的读入
记录了16+0 的写出
16777216 bytes (17 MB, 16 MiB) copied, 0.00791897 s, 2.1 GB/s
记录了409+1 的读入
记录了409+1 的写出
419330 bytes (419 kB, 410 KiB) copied, 0.000480938 s, 872 MB/s
记录了8+1 的读入
记录了8+1 的写出
8711 bytes (8.7 kB, 8.5 KiB) copied, 0.00011538 s, 75.5 MB/s
记录了3712+1 的读入
记录了3712+1 的写出
3802040 bytes (3.8 MB, 3.6 MiB) copied, 0.00356593 s, 1.1 GB/s
记录了3008+0 的读入
记录了3008+0 的写出
3080192 bytes (3.1 MB, 2.9 MiB) copied, 0.00280064 s, 1.1 GB/s
可以看到打包好的文件已经出来了:flashimg.bin数据大小正好是16MByte!
liefyuan@ubuntu:~/allwinner/v3s/version0.1$ ll
总用量 23544
drwxrwxr-x 2 liefyuan liefyuan     4096 Feb  7 00:35 ./
drwxr-xr-x 7 liefyuan liefyuan     4096 Feb  7 00:30 ../
-rw-rw-r-- 1 liefyuan liefyuan 16777216 Feb  7 00:35 flashimg.bin
-rw-r--r-- 1 liefyuan liefyuan  3080192 Feb  7 00:17 jffs2.img
-rwxrwxrwx 1 liefyuan liefyuan      327 Feb  7 00:33 pakage.sh*
-rw-rw-r-- 1 liefyuan liefyuan     8711 Feb  6 15:02 sun8i-v3s-licheepi-zero.dtb
-rw-rw-r-- 1 liefyuan liefyuan   419330 Feb  6 12:07 u-boot-sunxi-with-spl.bin
-rwxrwxr-x 1 liefyuan liefyuan  3802040 Feb  6 15:03 zImage*
六、烧写镜像
1、安装sunxi flash烧写工具
clone代码
git clone -b spi-rebase https://github.com/Icenowy/sunxi-tools.git
进入工具目录执行 make && sudo make install
如果出现:fel_lib.c:26:20: fatal error: libusb.h: No such file or directory,那需要安装libusb:
sudo apt-get install libusb-1.0-0-dev
然后再安装就好了:
liefyuan@ubuntu:~/sunxi-tools$ make && sudo make install
cc -std=c99 -Wall -Wextra -Wno-unused-result -D_POSIX_C_SOURCE=200112L -D_BSD_SOURCE -D_DEFAULT_SOURCE -Iinclude/  `pkg-config --cflags libusb-1.0`  -o sunxi-fel fel.c progress.c soc_info.c fel_lib.c fel-spiflash.c  `pkg-config --libs libusb-1.0`
cc -std=c99 -Wall -Wextra -Wno-unused-result -D_POSIX_C_SOURCE=200112L -D_BSD_SOURCE -D_DEFAULT_SOURCE -Iinclude/  -c -o nand-part-main.o nand-part-main.c
cc -std=c99 -Wall -Wextra -Wno-unused-result -D_POSIX_C_SOURCE=200112L -D_BSD_SOURCE -D_DEFAULT_SOURCE -Iinclude/  -c -o nand-part-a10.o nand-part.c -D A10
cc -std=c99 -Wall -Wextra -Wno-unused-result -D_POSIX_C_SOURCE=200112L -D_BSD_SOURCE -D_DEFAULT_SOURCE -Iinclude/  -c -o nand-part-a20.o nand-part.c -D A20
cc  -o sunxi-nand-part nand-part-main.o nand-part-a10.o nand-part-a20.o
cc -std=c99 -Wall -Wextra -Wno-unused-result -D_POSIX_C_SOURCE=200112L -D_BSD_SOURCE -D_DEFAULT_SOURCE -Iinclude/   -o sunxi-pio pio.c
ln -nsf sunxi-fexc bin2fex
ln -nsf sunxi-fexc fex2bin
install -d /usr/local/bin
+ install -m0755 sunxi-fexc /usr/local/bin/sunxi-fexc
+ install -m0755 sunxi-bootinfo /usr/local/bin/sunxi-bootinfo
+ install -m0755 sunxi-fel /usr/local/bin/sunxi-fel
+ install -m0755 sunxi-nand-part /usr/local/bin/sunxi-nand-part
+ install -m0755 sunxi-pio /usr/local/bin/sunxi-pio
+ ln -nfs sunxi-fexc /usr/local/bin/bin2fex
+ ln -nfs sunxi-fexc /usr/local/bin/fex2bin
2、全志芯片的USB下载模式:fel模式
全志芯片的启动很有特点的,有一个usb下载模式称为fel模式:
- TF卡和spi flash 同时没有可启动镜像
- 也就是说你不插卡,且焊接的是新的或者没有有效镜像的spi flash,那就上电自动进入fel下载模式。
- TF卡中有进入fel模式的特殊固件 fel-sdboot.sunxi
- 如果你的spi flash已经有了启动镜像,那么需要在TF卡中烧入一个sunxi提供的 启动工具 ( dd if=fel-sdboot.sunxi of=/dev/mmcblk0 bs=1024 seek=8 ), 那么插入该TF卡启动会进入fel模式;
- 上电时SPI_MISO拉低到地
- 该引脚为boot引脚,上电时出于低电平即会进入fel下载模式。
满足上面三个条件就可以进入fel模式了
3、sunxi-fel的操作
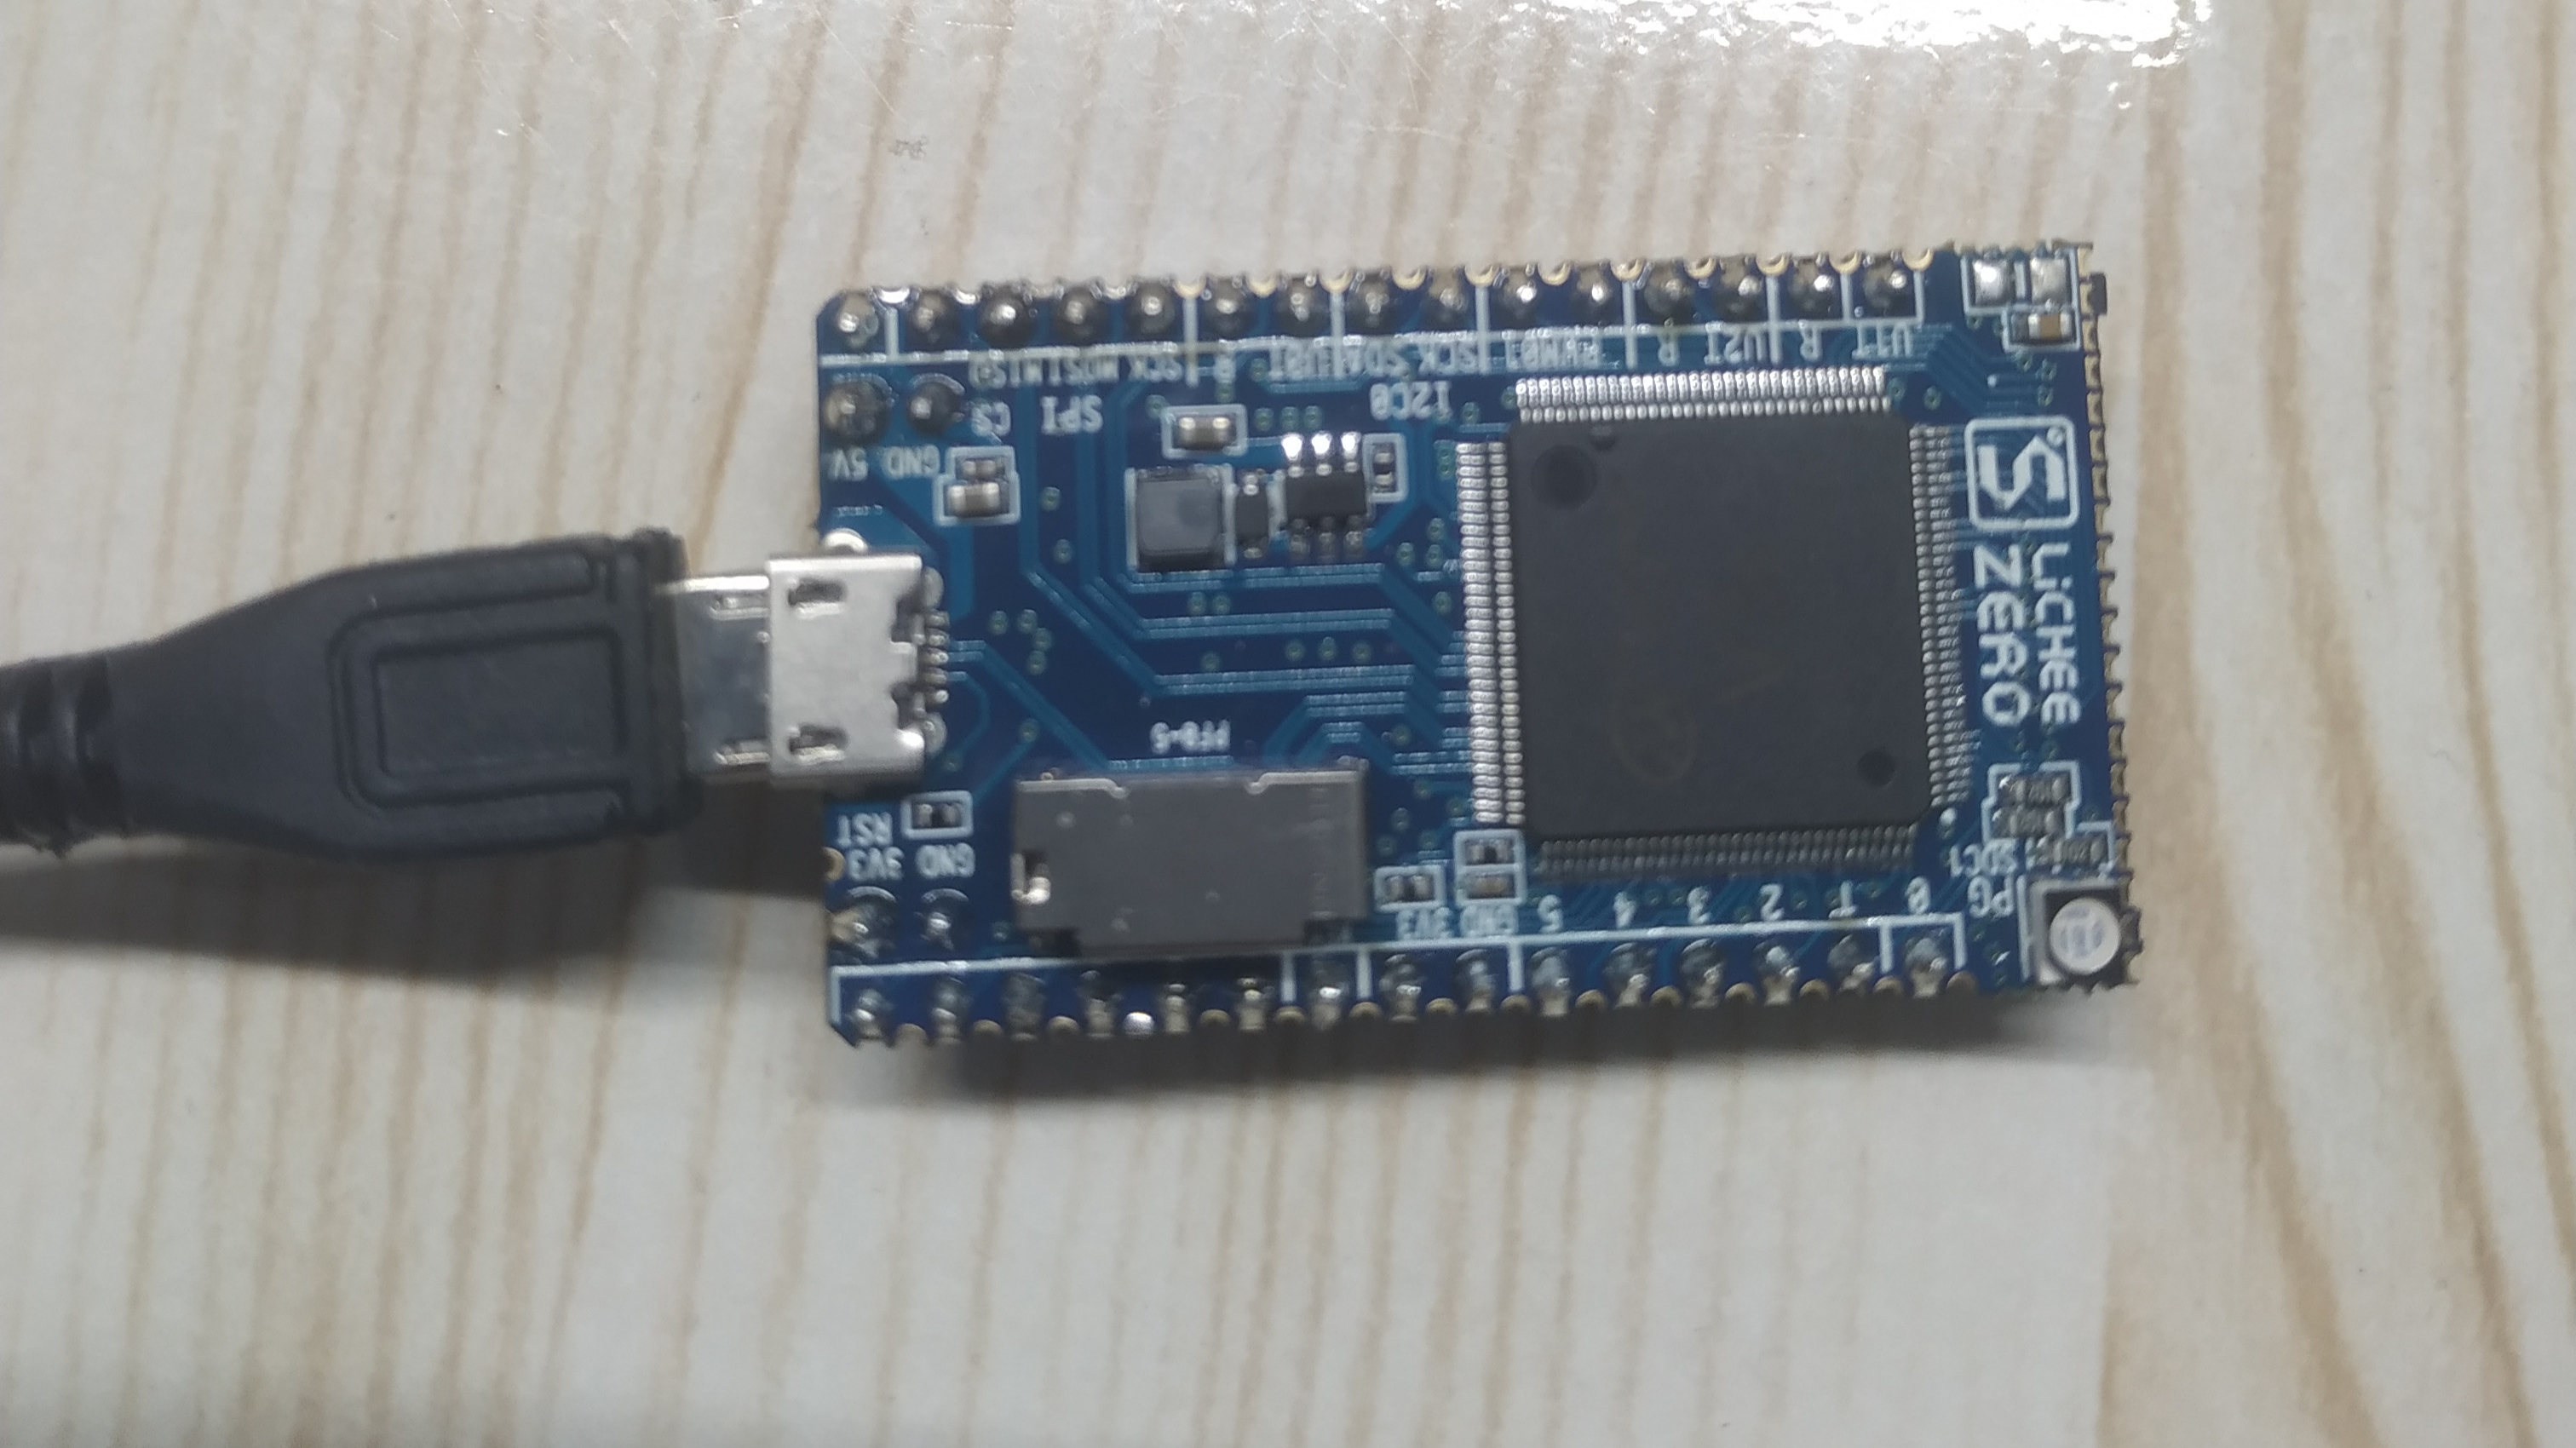
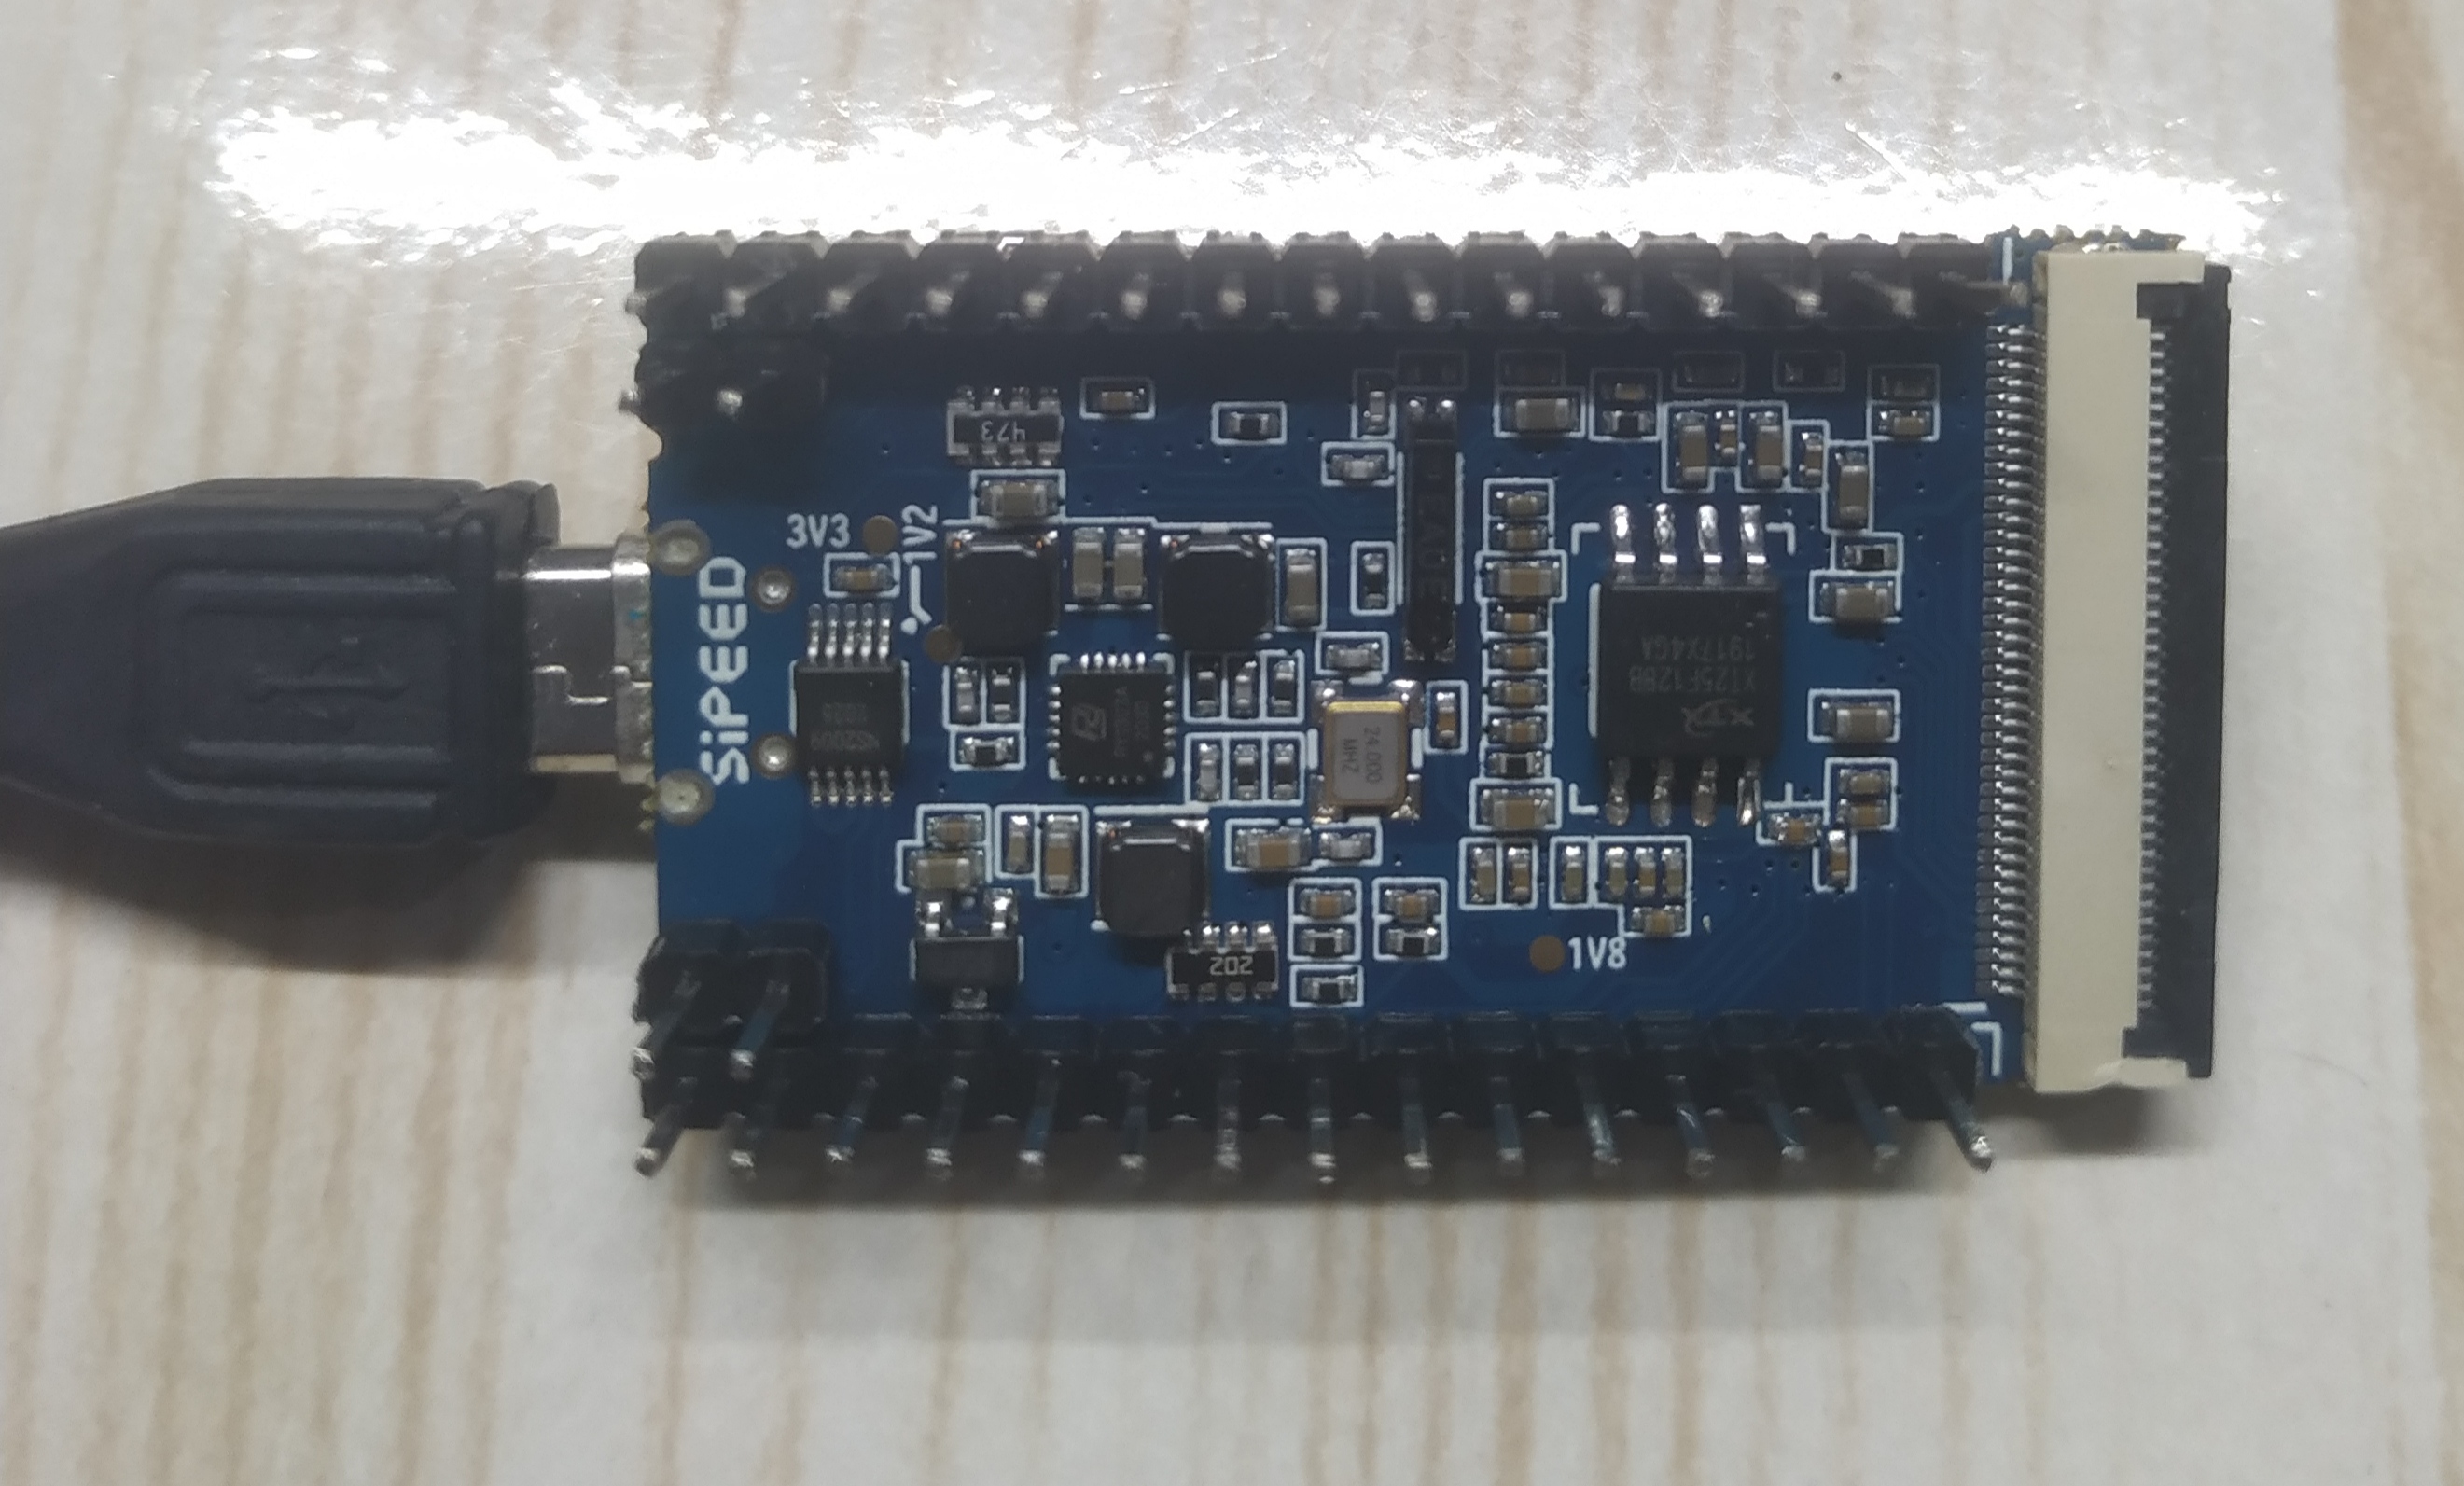
进入fel模式后使用USB数据线连接PC和zero开发板,即可进行操作。
sudo sunxi-fel version              #查看连接的cpu信息
AWUSBFEX soc=00001681(V3s) 00000001 ver=0001 44 08 scratchpad=00007e00 00000000 00000000
sudo sunxi-fel spiflash-info        #显示flash信息
Manufacturer: Unknown (C2h), model: 20h, size: 33554432 bytes.
插上电USB,选择连接到虚拟机,然后就可以在命令行里面操作了,我的实际操作:
liefyuan@ubuntu:~/allwinner/v3s/version0.1$ sudo sunxi-fel version
AWUSBFEX soc=00001681(V3s) 00000001 ver=0001 44 08 scratchpad=00007e00 00000000 00000000
liefyuan@ubuntu:~/allwinner/v3s/version0.1$ sudo sunxi-fel spiflash-info
Manufacturer: Unknown (0Bh), model: 40h, size: 16777216 bytes.
烧录过程可以直接烧录到RAM中去执行
sudo sunxi-fel -p write 0x40000000 xboot.bin
sudo sunxi-fel exec 0x40000000
执行如下命令烧入我们前边制作好的镜像文件
sudo sunxi-fel -p spiflash-write 0 flashimg.bin
# -p 显示进度条
#   spiflash-info                   Retrieves basic information
#   spiflash-hex[dump] addr length  Dumps SPI flash region in hex
#   spiflash-read addr length file  Write SPI flash contents into file
#   spiflash-write addr file        Store file contents into SPI flash
实际操作:
liefyuan@ubuntu:~/allwinner/v3s/version0.1$ sudo sunxi-fel -p spiflash-write 0 flashimg.bin
100% [================================================] 16777 kB,   82.3 kB/s
在虚拟机的命令行里面烧录还是很方便的,有点像单片机的更新程序。
单独烧录各个部分
当然也是可以单独烧录的:
| 分区序号 | 分区大小 | 分区描述 | 地址空间及分区名 |
|---|---|---|---|
| mtd0 | 1MB | spl+uboot | 0x0000000-0x0100000 : “uboot” |
| mtd1 | 64KB | dtb文件 | 0x0100000-0x0110000: “dtb” |
| mtd2 | 4MB | linux内核 | 0x0110000-0x0510000 : “kernel” |
| mtd3 | 10MiB 960KiB | 根文件系统 | 0x0510000-0x1000000 : “rootfs” |
sudo sunxi-fel -p spiflash-write 0x0 u-boot-sunxi-with-spl.bin
sudo sunxi-fel -p spiflash-write 0x100000 sun8i-v3s-licheepi-zero-dock.dtb
sudo sunxi-fel -p spiflash-write 0x110000 zImage
sudo sunxi-fel -p spiflash-write 0x510000 jffs2.img
最后
 串口信息没有打印,但是屏幕是驱动了的。
总结一下流程
附录:sunxi-fel帮助说明
sunxi-fel v1.4.1-87-g78a7566

Usage: sunxi-fel [options] command arguments... [command...]
    -h, --help                      Print this usage summary and exit
    -v, --verbose                   Verbose logging
    -p, --progress                  "write" transfers show a progress bar
    -l, --list                      Enumerate all (USB) FEL devices and exit
    -d, --dev bus:devnum            Use specific USB bus and device number
        --sid SID                   Select device by SID key (exact match)

    spl file                        Load and execute U-Boot SPL
        If file additionally contains a main U-Boot binary
        (u-boot-sunxi-with-spl.bin), this command also transfers that
        to memory (default address from image), but won't execute it.

    uboot file-with-spl             like "spl", but actually starts U-Boot
        U-Boot execution will take place when the fel utility exits.
        This allows combining "uboot" with further "write" commands
        (to transfer other files needed for the boot).

    hex[dump] address length        Dumps memory region in hex
    dump address length             Binary memory dump
    exe[cute] address               Call function address
    reset64 address                 RMR request for AArch64 warm boot
    memmove dest source size        Copy <size> bytes within device memory
    readl address                   Read 32-bit value from device memory
    writel address value            Write 32-bit value to device memory
    read address length file        Write memory contents into file
    write address file              Store file contents into memory
    write-with-progress addr file   "write" with progress bar
    write-with-gauge addr file      Output progress for "dialog --gauge"
    write-with-xgauge addr file     Extended gauge output (updates prompt)
    multi[write] # addr file ...    "write-with-progress" multiple files,
                    sharing a common progress status
    multi[write]-with-gauge ...     like their "write-with-*" counterpart,
    multi[write]-with-xgauge ...      but following the 'multi' syntax:
                    <#> addr file [addr file [...]]
    echo-gauge "some text"          Update prompt/caption for gauge output
    ver[sion]                       Show BROM version
    sid                             Retrieve and output 128-bit SID key
    clear address length            Clear memory
    fill address length value       Fill memory
    spiflash-info                   Retrieves basic information
    spiflash-hex[dump] addr length  Dumps SPI flash region in hex
    spiflash-read addr length file  Write SPI flash contents into file
    spiflash-write addr file        Store file contents into SPI flash
最后
以上就是勤恳摩托最近收集整理的关于嵌入式Linux--全志V3s--NOR Flash的使用(一)一、全志V3s简介二、简介三、编译Uboot四、编译Linux内核五、准备烧录文件六、烧写镜像最后的全部内容,更多相关嵌入式Linux--全志V3s--NOR内容请搜索靠谱客的其他文章。


发表评论 取消回复