来自于“正正小课堂”
https://www.bilibili.com/video/av54194265
基础知识:
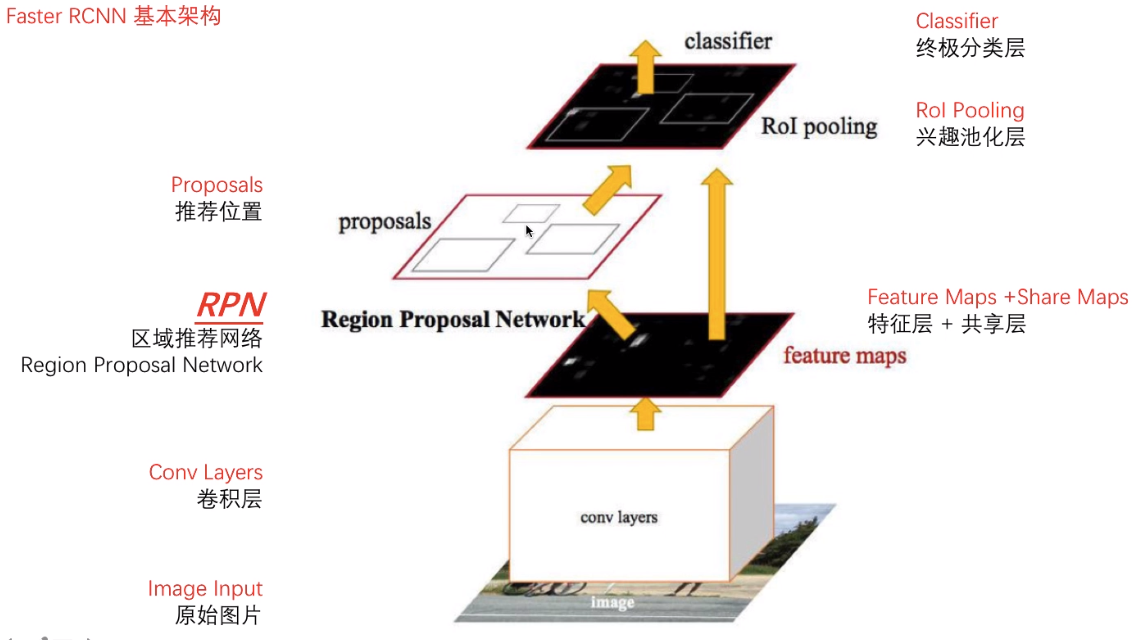
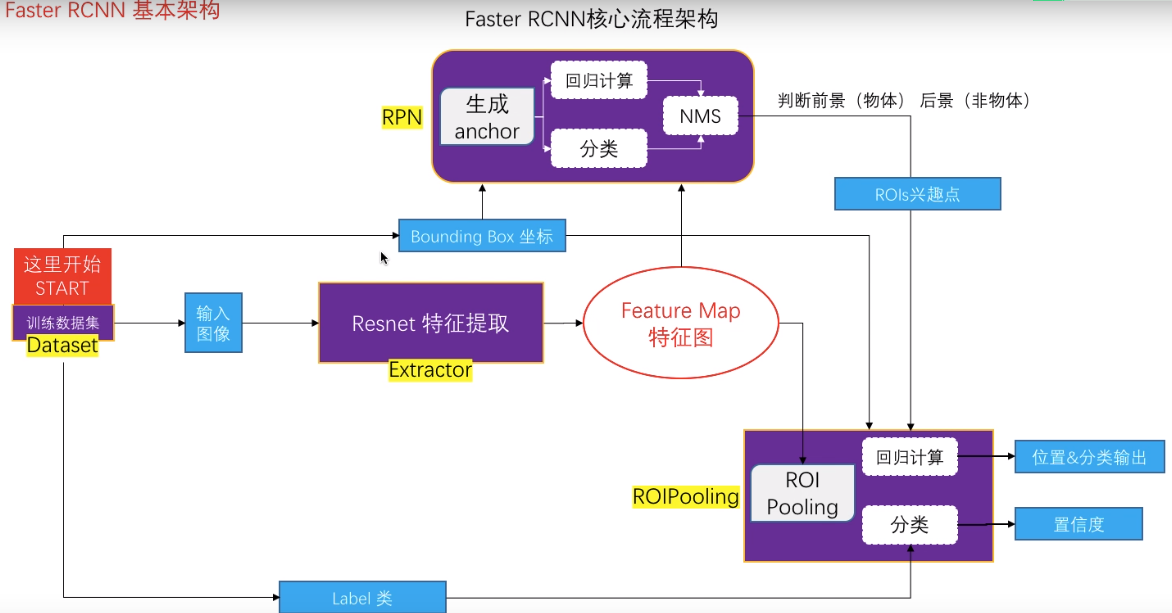
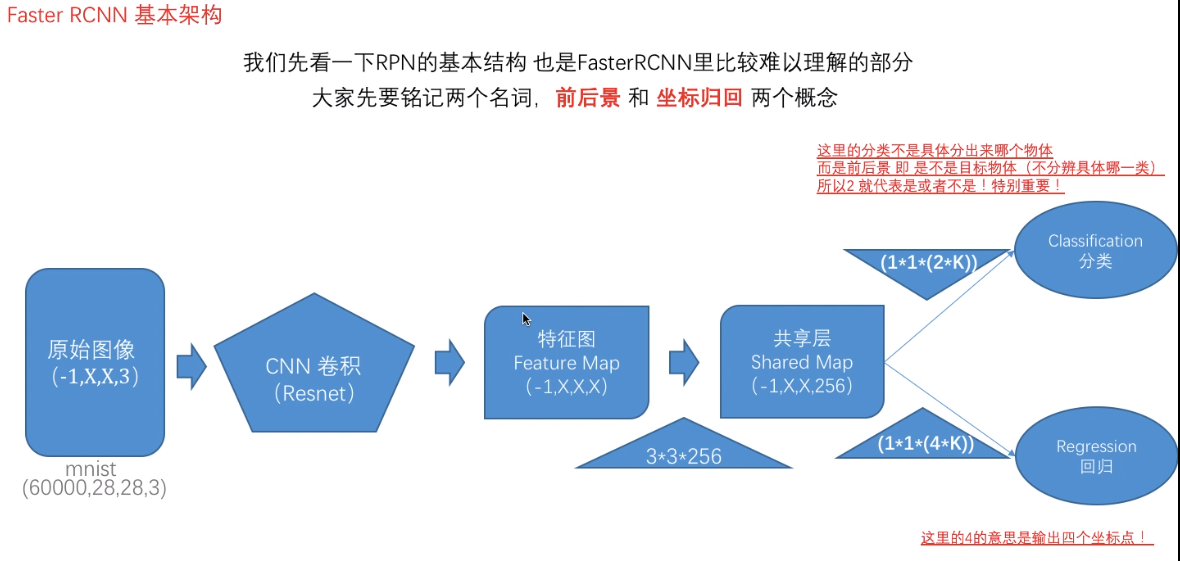
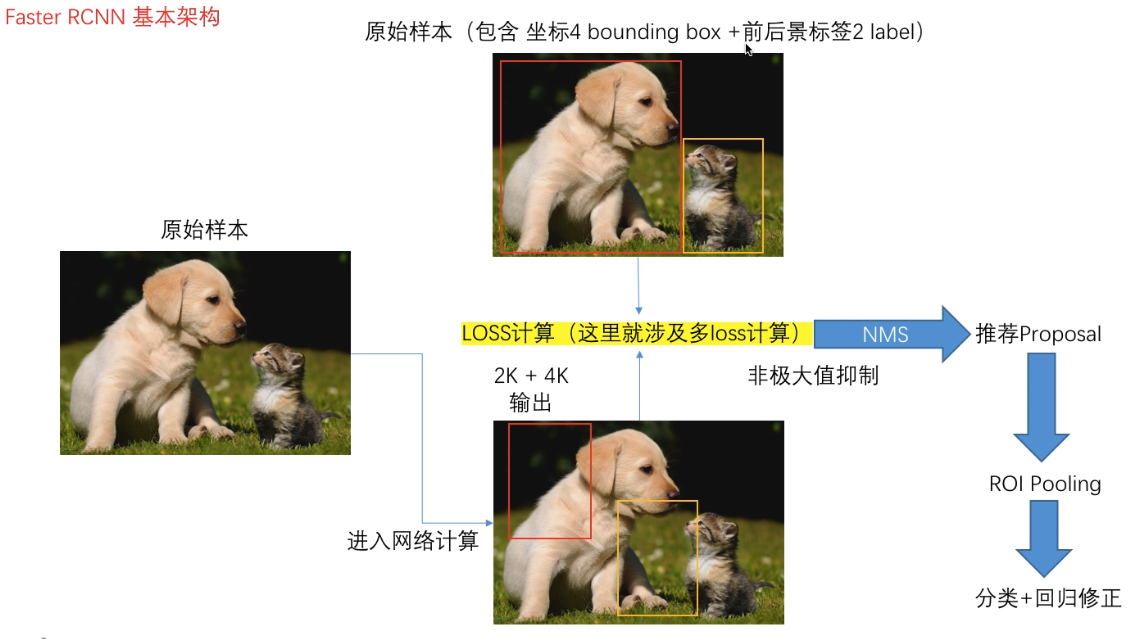
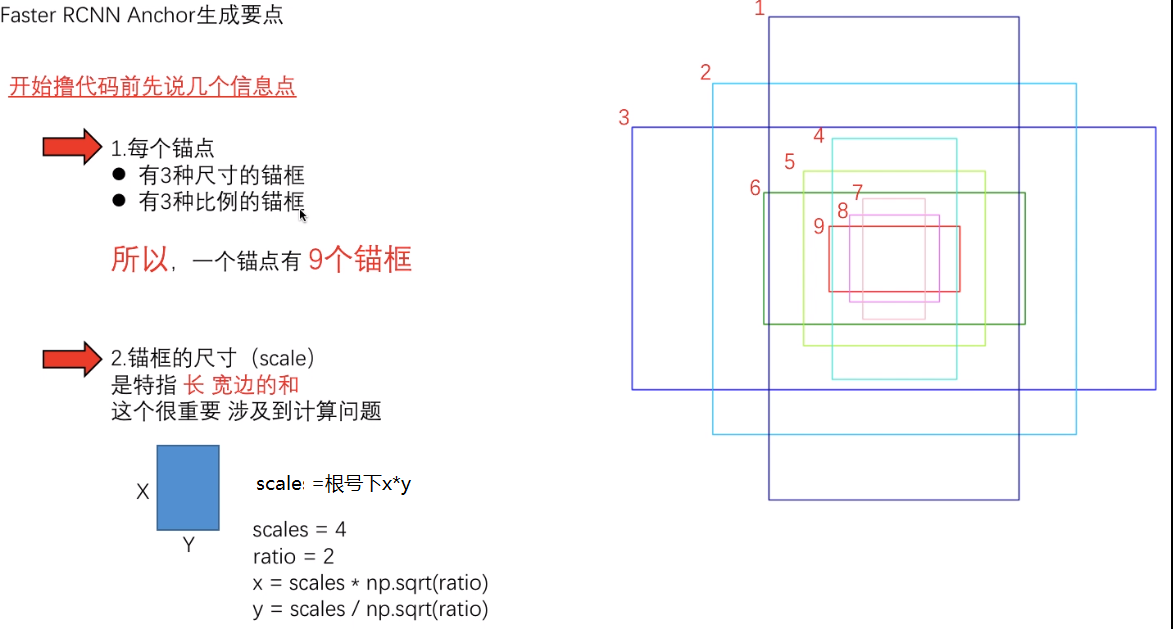
Faster RCNN Anchor生成要点
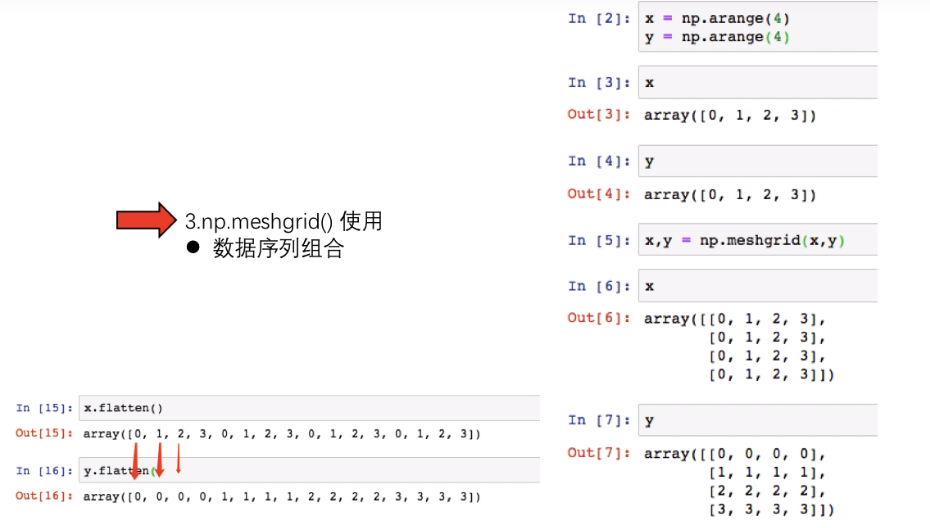
3.np.meshgrid()使用
作用:数据序列组合
4.np.stack()使用
作用:数组组合,堆积多维度
3 × 3与3 × 3 =>2 × 3 × 3
若想维度不变,需要reshape
0:横向顺次
1:行各自
2:列对应

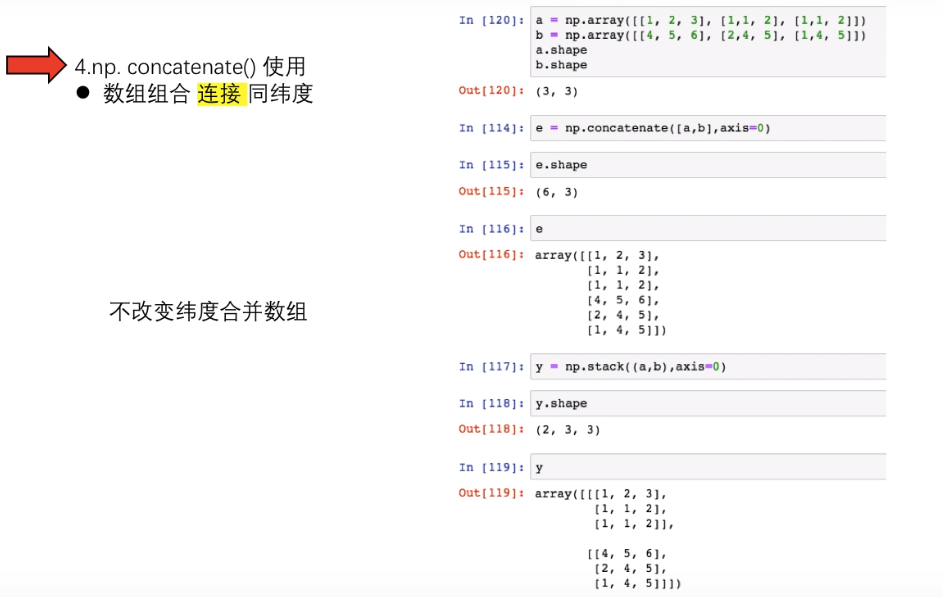
4.np.concatenate()使用
作用:数组 连接 同维度,不改变维度,合并数组
3 × 3与3 × 3 =>6 × 3
顺序同上
代码:
import numpy as np
import keras.utils
import sys
import importlib
import matplotlib.pyplot as plt
import matplotlib.patches as patches
from PIL import Image
#matlotlib inline
#Sample original input
Sample_raw_x = 128
Sample_raw_y = 128
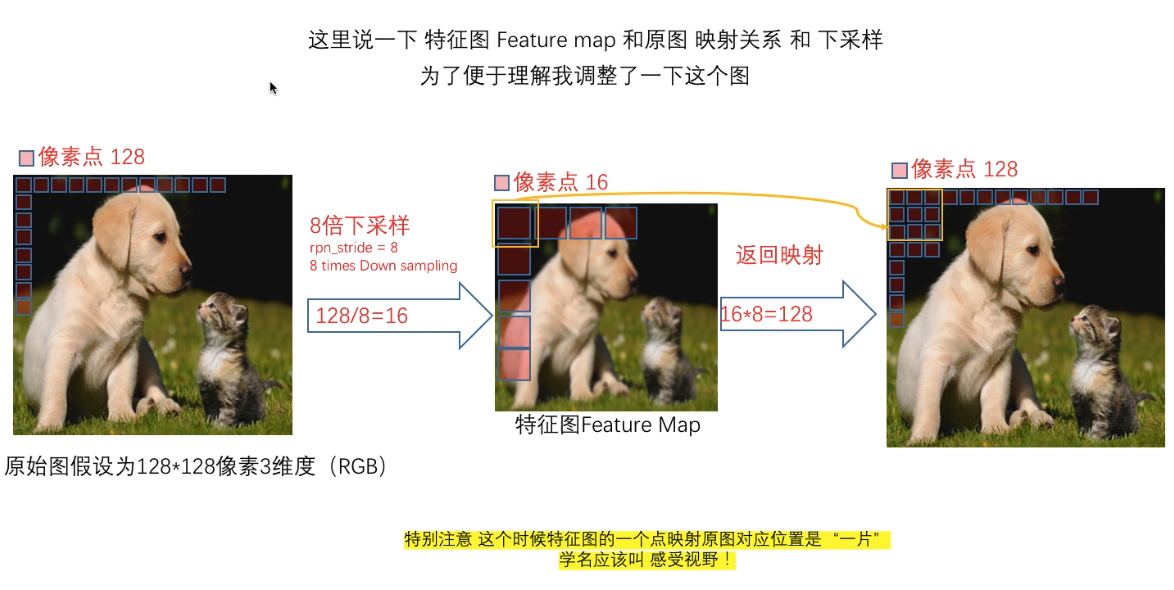
rpn_stride = 8 #8倍下采样
Feature_size_X = Sample_raw_x/rpn_stride
Feature_size_Y = Sample_raw_y/rpn_stride
scales = [1, 2, 4] #w,h的长
ratios = [0.5, 1, 2] #3的比例
""""
fx = np.arange(Feature_size_X)
fy = np.arange(Feature_size_Y)
FX, FY = np.meshgrid(fx, fy)
FX.flatten()
FY.flatten()
scales,ratios = np.meshgrid(scales,ratios) #做匹配
scales.flatten()
ratios.flatten()
print(scales.flatten())
print(ratios.flatten())
scale = 4
ratio = 2
x = scale * np.sqrt(ratio)
y = scale / np.sqrt(ratio)
print(x,y)
"""
def anchor(Feature_size_X, Feature_size_Y, rpn_stride, scales, ratios):
# 组合尺寸和比例 scales ratios
scales,ratios = np.meshgrid(scales,ratios)
scales, ratios = scales.flatten(),ratios.flatten()
#anchor尺寸计算
scalesX = scales * np.sqrt(ratios) #宽度
scalesY = scales / np.sqrt(ratios) #长度
#anchor point 映射关系
ShiftX = np.arange(0,Feature_size_X) * rpn_stride
ShiftY = np.arange(0,Feature_size_Y) * rpn_stride
#组合网格 anchor point在原图位置
ShiftX, ShiftY = np.meshgrid(ShiftX, ShiftY) #XY是Anchor的中心点
#每个anchor点需要有9个尺寸的anchor框
centerX, anchorX = np.meshgrid(ShiftX, scalesX)
centerY, anchorY = np.meshgrid(ShiftY, scalesY)
#Stack 各种尺寸,各种比例对应各种长度
anchor_center = np.stack([centerY, centerX], axis=2).reshape(-1, 2) #列对应
anchor_size = np.stack([anchorY, anchorX], axis=2).reshape(-1, 2)
#左上右下坐标点输出 #1维上x的内容
boxes = np.concatenate([anchor_center - 0.5 * anchor_size,anchor_center + 0.5 * anchor_size],axis=1)
return boxes
anchors = anchor(Feature_size_X, Feature_size_Y, rpn_stride, scales, ratios)
"""
print(anchors.shape)
print(anchors[1000])
"""
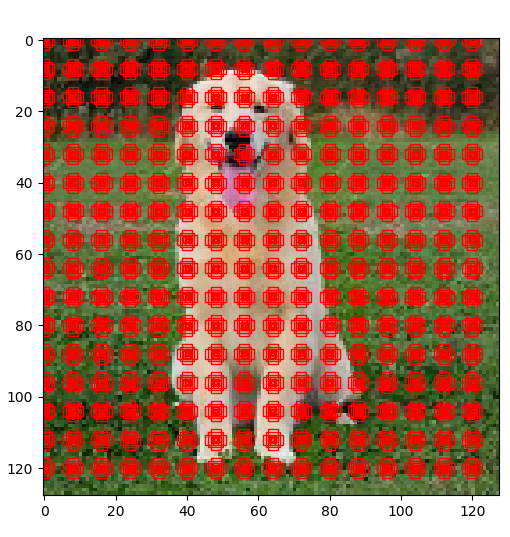
plt.figure(figsize=(10,10))
image = Image.open('test.jpg') #128 * 128
plt.imshow(image)
#plt.show()
asx = plt.gca() #get current axs
for i in range(anchors.shape[0]):
box = anchors[i]
# print(box)
rec = patches.Rectangle((box[0], box[1]), box[2]-box[0], box[3]-box[1], edgecolor='r', facecolor='none') #打印小片,红色不填充
asx.add_patch(rec)
plt.show()
结果图:
最后
以上就是体贴小鸽子最近收集整理的关于Faster-RCNN物体检测---(1)Anchor生成的全部内容,更多相关Faster-RCNN物体检测---(1)Anchor生成内容请搜索靠谱客的其他文章。
本图文内容来源于网友提供,作为学习参考使用,或来自网络收集整理,版权属于原作者所有。


发表评论 取消回复